Because of the holidays, TI E2E™ design support forum responses will be delayed from Dec. 25 through Jan. 2. Thank you for your patience.

This thread has been locked.

If you have a related question, please click the "Ask a related question" button in the top right corner. The newly created question will be automatically linked to this question.

How to use QT to develop Wi-Fi ping application for am37x-evm board?

Hi,

I have an am37x-evm board and Sitara SDK ("downloads.ti.com/.../"). 

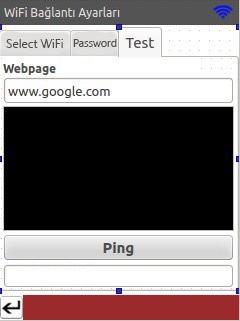
I use QT to create a small application and I am able to connect Wi-Fi hot-spot. I connect my am37x-evm board using putty. In terminal window I can use ping command to ping google. I also created a Ping DialogWindow in QT as shown below. At the moment when I click the ping button using below code the ping operation is works.

My problem is that I don't know how to use below code or similar to make a ping operation GUI window. Does anyone knows how to use QT to develop Wi-Fi ping application for am37x-evm board?

I contacted to QT form. And they advice me to come back here ("TI E2E™ Community") due to Sitara SDK. In this link ("e2e.ti.com/.../1731147 Mr. advice me to get help from "wireless_connectivity" form.

Kind Regards

Code:

// WIFI PING TEST BUTTON 
void DialogWIFI::on_PushButtonPing_clicked()
{
    system("ping -c 10 www.google.com > ping.txt");
}


Window:

  • Hi,

    Can you please clarify which SDK release are you using? WiFi GUI option is not available in any of the later SDKs.
    Also, I'm not very clear about your question - "make a ping operation GUI window" --> Isn't this purely QT related? How is this related to WLAN?

    Regards,
    Gigi Joseph.
  • Hi,

    I explaind in e2e.ti.com/.../1731147 link. When I use putty to connect my am37x-evm board I can use ping command as shown below.

    _____ _____ _ _
    | _ |___ ___ ___ ___ | _ |___ ___ |_|___ ___| |_
    | | _| .'| . | . | | __| _| . | | | -_| _| _|
    |__|__|_| |__,|_ |___| |__| |_| |___|_| |___|___|_|
    |___| |___|

    Arago Project http://arago-project.org am37x-evm ttyO2

    Arago 2013.02 am37x-evm ttyO2

    am37x-evm login: root
    Password:
    root@am37x-evm:~# gnome-terminal -x sh -c \" ping www.google.com \"
    -sh: gnome-terminal: not found
    root@am37x-evm:~# ping www.google.com
    PING www.google.com (74.125.136.147): 56 data bytes
    64 bytes from 74.125.136.147: seq=0 ttl=46 time=3068.082 ms
    64 bytes from 74.125.136.147: seq=1 ttl=46 time=2214.051 ms
    64 bytes from 74.125.136.147: seq=2 ttl=46 time=1481.413 ms
    64 bytes from 74.125.136.147: seq=3 ttl=46 time=2109.458 ms
    64 bytes from 74.125.136.147: seq=4 ttl=46 time=1377.098 ms
    ^C
    --- www.google.com ping statistics ---
    6 packets transmitted, 5 packets received, 16% packet loss
    round-trip min/avg/max = 1377.098/2050.020/3068.082 ms
    root@am37x-evm:~#


    I use code as;

    system("ping -c 10 www.google.com > ping.txt"); and seems its working.

    In my QT appas shown below for the am37x-evm I get an error that says ping: invalid number 10.


    void DialogWIFI::on_PushButtonPing_clicked()
    {
    //system("ping -c 10 www.google.com > ping.txt");

    QString m_sHostName;
    QString m_parameter;

    // Clear text
    ui->TextEditResult->clear();

    // Create string command and argument
    m_sHostName = ui->LineEditWebPage->text();
    m_parameter = "-c";

    ui->TextEditResult->append(m_sHostName);
    ui->TextEditResult->append(m_parameter);

    // Create QProcess object
    proc = new QProcess();
    proc->start("ping", QStringList() << m_parameter << QString(m_sHostName));

    // Show output
    connect(proc, SIGNAL(readyReadStandardOutput()), this, SLOT(rightMessage()));
    connect(proc, SIGNAL(readyReadStandardError()), this, SLOT(wrongMessage()));

    }


    // Show right message
    void DialogWIFI::rightMessage()
    {
    QByteArray strdata = proc->readAllStandardOutput();
    ui->TextEditResult->setTextColor(Qt::black);
    ui->TextEditResult->append(strdata);
    }


    // Show wrong message
    void DialogWIFI::wrongMessage()
    {
    QByteArray strdata = proc->readAllStandardError();
    ui->TextEditResult->setTextColor(Qt::red);
    ui->TextEditResult->append(strdata);
    }

    Kind Regards,

  • Hi,

    Here is the solution. My problem was TI SDK example didin't show how to use system command when using QT and C++.
    I was looking the line "proc->start("ping", QStringList() << "-c" << "3" << QString(m_sHostName));" that is the solution.

    Kind Regards.

    // WIFI PING TEST BUTTON
    void DialogWIFI::on_PushButtonPing_clicked()
    {
    QString m_sHostName;
    QString m_sHostNameMessage;

    // Clear text
    ui->TextEditResult->clear();

    // Create string command and argument
    m_sHostNameMessage = ui->LineEditHostName->text();
    m_sHostNameMessage = m_sHostNameMessage.append(" ping işlemi başlatıldı...");

    m_sHostName = ui->LineEditHostName->text();

    ui->TextEditResult->setTextColor(Qt::white);
    ui->TextEditResult->append(m_sHostName);
    ui->TextEditResult->append("<br>");

    // Create QProcess object
    proc = new QProcess();
    proc->start("ping", QStringList() << "-c" << "3" << QString(m_sHostName));

    // Show output
    connect(proc, SIGNAL(readyReadStandardOutput()), this, SLOT(rightMessage()));
    connect(proc, SIGNAL(readyReadStandardError()), this, SLOT(wrongMessage()));

    ui->TextEditResult->setTextColor(Qt::white);
    QCoreApplication::processEvents();
    }


    // Show right message
    void DialogWIFI::rightMessage()
    {
    QByteArray strdata = proc->readAllStandardOutput();
    strdata = strdata.simplified();
    strdata = strdata.trimmed();

    ui->TextEditResult->setTextColor(Qt::white);
    ui->TextEditResult->append(strdata);
    ui->TextEditResult->append("<br>");
    QCoreApplication::processEvents();
    }


    // Show wrong message
    void DialogWIFI::wrongMessage()
    {
    QByteArray strdata = proc->readAllStandardError();
    ui->TextEditResult->setTextColor(Qt::red);
    ui->TextEditResult->append(strdata);
    QCoreApplication::processEvents();
    }