This thread has been locked.

If you have a related question, please click the "Ask a related question" button in the top right corner. The newly created question will be automatically linked to this question.

SIMPLELINK-CC3220-SDK: Procedures to generate CC3220SF host application secure image?

Part Number: SIMPLELINK-CC3220-SDK

Hi,

I have CC3220SF software working in development mode and now I am trying to create production image.

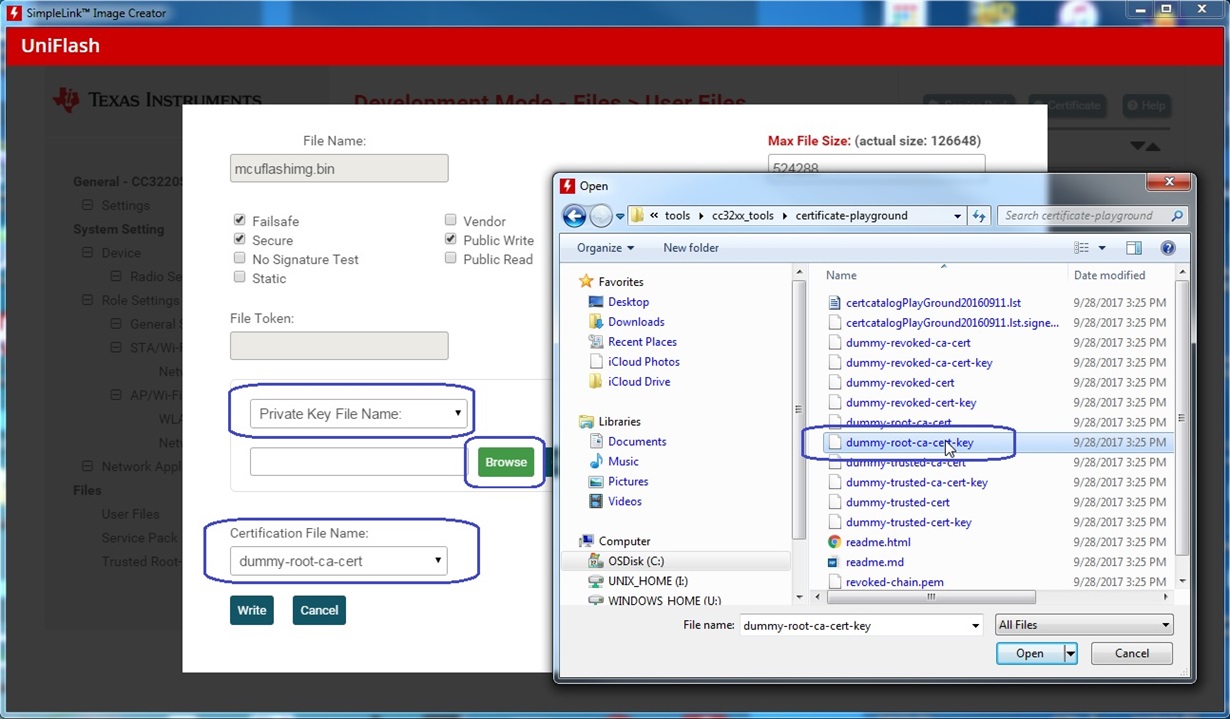
I am reading document "SWRU469A" (UniFlash CC3120, CC3220 SimpleLink™ Wi-Fi® and Internet-on-a chip™ Solution ImageCreator and Programming Tool). In section 5.7.1.1, the ImageCreator offers two methods of adding the host application. I prefer to using the second method (marked in the following picture). I have host_file without SHA. My question is how to generate private key in DER format?

Once private key file in DER format is generated, what are other steps to generate host_final file? Any document shows the detailed procedures?

Thanks in advance,

Al

  • Hello,

    You can look as a reference on the out_of_box UG, swru473, paragraph 9.3 Building the OOB Project Using CCS.

    See screenshot below, you need to pick the certificate file on your file system that matches the signature key and under Private Key File Name, browse and pick the matching key.

    I added the dummy-root-ca-cert as a certificate to the file system and picked it as a certificate. Then, I picked the matching dummy-root-ca-cert-key under the key

    Shlomi

  • Hi, Shlomi.

    Thanks for your reply.

    I followed your steps and changed from "Signature File Name" to "Private Key File Name", then selected "dummy-root-ca-cert-key" file, then click Write button. However, when I go back to check "mcuflashimg.bin" properties and found "Private Key File Name" was changed back to "Signature File Name" by itself.

    I did the above on OOB_SF_freertos project and had the same result.

    Any idea why it's changed back to "Signature File Name" by itself?

    Thanks,

    Al

  • By the way, when I did the above experiments, UniFlash was not connected to the board. Does it make any difference?

    Al
  • Hello,

    You do not have to be connected with Uniflash to change any configuration in the project.

    And yes, it is expected that it would change into "Signature File Name" since now the signature has been created.

    It should not be an issue.

    What is the issue now?

    Shlomi

  • Hi, Shlomi.

    Thanks for the reply. It was just a little confusing that it didn't stay as "Private Key File Name" when I went back to check it again. I tried yesterday, it was working.

    The example uses dummy certificate and key ("dummy-root-ca-cert" and "dummy-root-ca-cert-key") from TI. Now the question is:

    How can I generate my own certificate files? Any detailed procedures or documents?

    Thanks,

    Al

  • Well, you can use openSSL utility or any other tool you can find.

    You just need to create a CSR (Certificate Signing Request) and start the process of having it signed by a real CA (like VeriSign).

    When you get the certificate chain back, don't forget to remove the playground catalog and use the real one.

    Regards,

    Shlomi