This thread has been locked.

If you have a related question, please click the "Ask a related question" button in the top right corner. The newly created question will be automatically linked to this question.

How to upgrade software’s on DLP® LightCrafter™

Other Parts Discussed in Thread: DLPC300

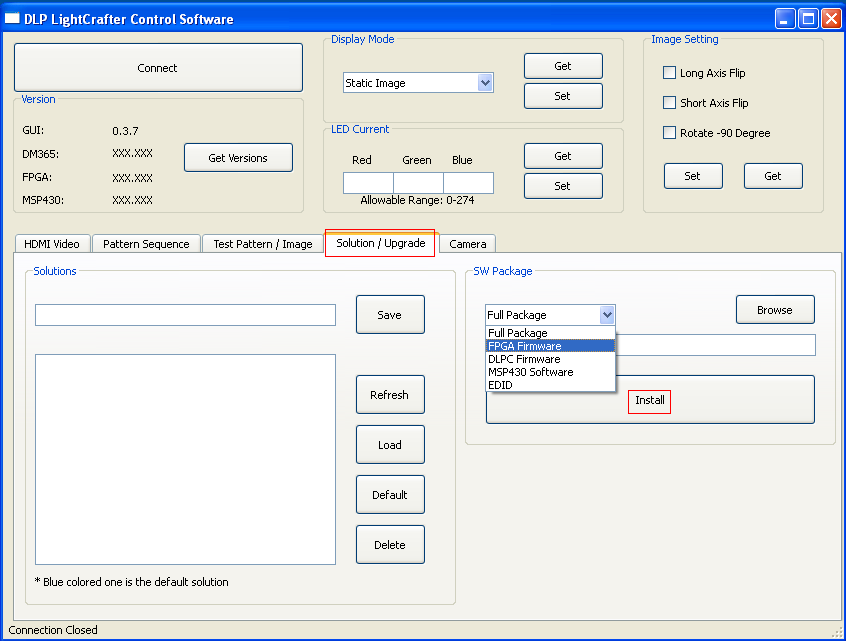
MSP430 and FPGA Firmware Upgrade:

Connect the LightCrafter to the PC via USB cable. After establishing the connection through GUI, open the ‘Solution/ Upgrade’ tab and select the SW package from the drop down menu to be FPGA Firmware/ MSP430 Software. Browse the location of the downloaded software and click ‘Install’. And, wait until “Command SUCCESS” appears on the bottom left of the GUI screen.

DM365 Software Upgrade:

Download the DM365 Software.

To copy the image, unzip with 7-zip. Free download of the 7-zip software is available here.

Select the file in the compressed folder, right click, and select extract under 7-zip menu. It will unzip to a 4GB file.

An SD card with 4GB size or greater can be used (Transcend 4GB class 10 micro SD card has been tested).

For loading the image to the SD card, Image writer utility is required.

For windows,

Download Win32DiskImager from: link

Insert the SD card and start Win32DiskImager

Select the image file and choose the letter drive for the SD card

Click on write.

If an error message appears stating that there is not enough memory on the disk, disregard and continue. The actual card sizes vary and not all the card is populated with data.

For Linux,

Use DD command:

Insert the sd card in your linux machine. Find out which device /dev/sda or /dev/sdb is detected by the OS. In our test case, it is typically detected as /dev/sdb

On the command prompt execute “dd if=/path/to/dm365sw_3_0sd4gb.dd of=/dev/sdb"

The card will be partitioned into two: a 44MB FAT32 formatted and a Linux partition of 40MB. The FAT32 partition contains the boot source for the DM365 boot loader. The Linux Partition includes the linux kernel and file system.

Now, keep the switch shown in figure below pointed to the micro SD card and keep the micro SD card in. Power cycle the LightCrafter.

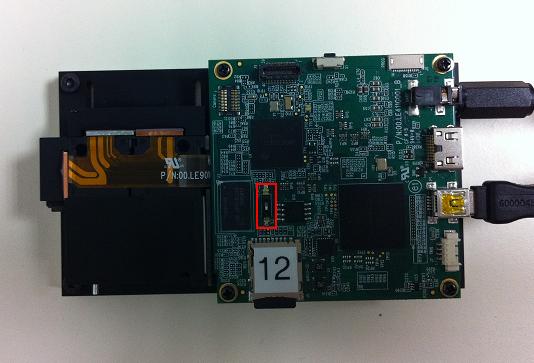
LightCrafter will boot and run from the card (a little slower than NAND). If you need to use the earlier version, just move the DIP switch away from the SD Card and it will boot from NAND on the next power-up. To switch back to booting from SD card, move the DIP switch to point to the SD card. However, solutions stored are not compatible with both versions.

 After a projected pattern with Red, Green and Blue vertical bars is seen on the screen, run the GUI and the updated version numbers will be visible on the GUI.

  • Divya,

    Thanks for the instructions, but it appears as though a 4GB card with a formatted capacity of less than the transcend uSD card you tested will not work with Win32 disk imager.  I'm going to buy an 8GB card that will certainly be large enough, but since you are only using 80MB (if even that) could you create a much smaller image?

    Also, the latest version I've found for the DM365 image is 2.5, I assume that 3.0 will be uploaded soon?

    Thanks

  • Peter,

    The real capacity of the transcend card we tested appeared to be 3.85GB on the Linux system. Can you try using the Physdiskwrite image writing tool (link) for writing the image to SD card. The image should certainly fit in 8GB card. The latest versions of the DM365 (v3.0), FPGA (v2.4.39), GUI (v0.40) and MSP430 (v2.4) will be soon uploaded.

    Thanks for your patience.

    Regards,

    Divya

  • what is the status of the newest firmwares listed in this post please?

  • Hi Phillip,

    Welcome to DLP section of TI E2E Community!

    Sorry for the delayed response. The new firmware might take at least 2 more weeks before it is available on ti.com. Our intention was to fix the USB issue before releasing the upgrades.

    We think we found the cause for USB connection issues on the Lightcrafter and would be releasing the problem statement and the fix soon. The firmware needs to be DVT'ed once more.

    Thanks for your patience.

    Regards,

    Divya

  • Hey Guys, 

    I am looking for DM365 firmware v4.0. Any help is appreciated.

    Regards,

    Houman

  • Hello Houman,

    You can visit this page http://www.ti.com/tool/dlplightcrafter look for "Available Versions" section and then download latest package from here. As on data v2.0.1 is the latest version. It has DM365 v4.0 firmware.

    Regards,

    Sanjeev

  • Sanjeev,

    Thank you. I found and downloaded the package.

    My next goal is to upgrade the DM365 software to version 4.0. I am following the "ReadMe.txt" file located at "DLPLightCrafterSoftwareBundle-2.0.1\DLPLightCrafterFWSW" step by step. 

    I chose the "a) Booting from NAND:" option. I successfully write the image file on a micro-SD card (at least I think I do) and I insert the SD card into the LightCrafter and set the DIP switch on System board to the side closest to the micro-SD card connector. Then I power up the LightCrafter and the LED next to DM365 lights up red (as it is supposed to according to "ReadMe.txt" file).

    In the "ReadMe.txt" file, the next step is explained as below:

    •While flashing NAND,
        - Wait until the LED next to DM365 lights up green. This should be a few seconds after the fourth splash screen
        - Power off the LightCrafter (short press of button on driver board)
        - Remove the micro-SD card and set the DIP switch to the side closes to DM365
        - Power up the LightCrafter using short press of button on driver board)
        - The LED next to the DM365 will start flashing red and green
        - A test screen with three colored bars will appear.

    Here is my issue: After I power up the LightCrafter, all the splash screens, up to the fourth one, appear but after that nothing happens and the progress bar does NOT go all the way to the end (it stops while there is only very little left to the end and it says Booting... below the progress bar) and the LED next to DM365 does NOT light up green but it stays red no matter how much I wait after the fourth splash screen. It is as if the device is halted and the screen is frozen.

    To make matters worse, now after I remove the micro-SD card and set the DIP switch on System board to the side closest to the DM365, trying to boot using the old NAND settings, I can't anymore as if I have ruined the old NAND settings as well. 

    Note: At the bottom right corner of the splash screen, while booting, it says "V1.0" and this is while there is a sticker on my device and on the box as well which says "2.0". Do you think it is possible that my device is actually Not a version 2.0?

    Anyway, any help is really appreciated.

    Regards,

    Houman

  • Hi Houman,

    When you were writing DM365 image to SD card, did you see the "Image copied to SD card SUCCESS" message as shown below?

    When you insert the SD card and set the Switch S2 towards the SD card slot, the LightCrafter boots until the fourth spash screen and the progress bar completes up to 90% (approximately). The only indication of the file system being copied to NAND from SD card is, the D1 LED should turn Green.

    Since you are unable to see the D1 turn Green, can you format your SD card and copy the DM365 image booting from SD - dm3xx_sd.dat file and boot the LightCrafter?

    Is it possible for you to check the UART log? You need to configure a terminal emulator like "Tera Term" with below serial port settings to see the log,

    • Baud: 115,200
    • Data Bits: 8
    • Stop Bits: 1
    • Parity: None
    • Flow Control: None

    While booting, the v1.0 seen on the splash screens is the DLPC300 controller boot loader version#. The 2.0 sticker indicates that you have the latest hardware.

    Regards,

    Divya

  • Divya,

    When writing DM365 image to SD card, I DID see  "Image copied to SD card SUCCESS" and my MSDOS command shell looked exactly like yours. Here is an image of it.

    But doing it this way, didn't cause the D1 LED turn green which, as you mentioned, is an indication that the file systems are not being copied to NAND from SD card.  

    As the next step, as you mentioned above, I tried to get LightCrafter to boot directly from SD card. So I formatted my SD card (as a FAT32 file system), and using MSDOS command shell, copied the DM365 image booting from SD (dm3xx_sd.dat file) onto my SD card. Here is a photo of how MSDOS command shell looked like after the coping operation:

    and a photo of the contents of the SD card:

    So, I insert the SD card into the slot, switch S2 towards the SD card slot and power up the LightCrafter. The exact same issue:   the LightCrafter boots until the fourth splash screen and the progress bar completes up to 90% (approximately). The D1 LED won't turn green and stays red steadily instead.


    About the UART log, I have no experience in that part. I would really appreciate it if you could give me detailed instructions on how to proceed. I downloaded a software called "Tera Term" version 4.78. But that is all I got. Do I need a special cable in order to be able to get the UART log? I attach a photo of how my "Tera Term" looks like:


    Note: At the very beginning, when I got the device, I simply powered it up and it booted correctly and I was able to connect to the device using GUI. But since all the software for all the parts were out of date, GUI wouldn't let me do much with the "pattern sequence" option, so I thought.  Therefore, I updated  all the software for FPGA, EDID and MSP430 using Solution/Upgrade tab on the GUI. The only software I wasn't able to upgrade was the one for DM365. That is when I read the "ReadMe.txt" file and realized I am supposed to use a SD card to upgrade that one. and that is when all this issues happened and I am not able to boot the device at all any more. Do you think the problem might be coming from the fact that the order in which I upgraded the software has been incorrect?

  • Hi Houman,

    Thanks for the details. The UART log will be really helpful to debug the issue further.

    You need to connect a serial cable to J1 connector on LightCrafter systems board. You can use a DB9 female connector to a 2.5 mm stereo plug similar to the one here- http://www.sfcable.com/D936-06.html

    If your PC has only a USB port, use will have to use a USB to RS232 adapter with FTDI chipset extension.

    When you have the UART cable connected, open Tera term and click on "Serial". Select the USB to Serial comm port.

    Click 'OK' and close the "Tera Term: New Connection" window. In the menu bar, goto Setup --> Serial Port.... and change the Baud rate to 115200.

    Now, power on the LightCrafter and you should see the boot log in the terminal.

    Please attach the log for us to debug. Thanks.

    Regards,

    Divya

  • Divya,

    I first format my SD card (right click on drive F: in "My Computer" and choose "Format" from the drop menu using the following options: "file system is FAT32" and "allocation unit size is 4096" and I use quick format). Then I write dm3xx_nand.dat onto the SD card. Here is an image of what MSDOS command shell looks like at this point:

    Then I remove the SD card from computer and plug it into the LightCrafter and switch S2 towards the SD card slot.  

    Then I plug the 2.5mm stereo end of the cable into the UART input on the device and using a " USB to RS232 adapter with FTDI chipset extension" connect the USB end to the computer. Here is an image ( the LightCrafter is not powered on at this point yet):

    As the next step, I run "tera term" and click on "Serial" and choose "COM3: USB Serial Port (COM3)" (which is my only option by the way) as the port and then close the "tera term: new connection" window by clicking "OK". Then using the menu bar on the terminal I choose "setup -> serial port" and change the Baud rate to 115200. Here is an image of "tera term: Serial port setup" before I press "OK".

    Next, I power on the LightCrafter. But nothing appears on the terminal. Here is an image of what the terminal looks like.

    I repeat the exact same instructions with dm3xx_sd.dat in another attempt and still nothing appears on the terminal.


    I'll also attach two images of the boards so that you can see what they look like while the screen is frozen on the fourth splash screen.

    Please let me know what you think. Thank you.

  • Hi Houman,

    As discussed, could you please try out the recommended power supply -

    http://www.digikey.com/scripts/dksearch/dksus.dll?vendor=0&keywords=t1212-p12p-nd

    Regards,

    Divya

  • Hello Divya,


    I finally got the lightcrafter working. I don't know why, but for some reason, the first time I plug in the lightcrafter it won't boot. But if I turn it off only using the on/off button on the driver board, and turn it back on only using the on/off button on the driver board again, it will boot successfully from then on.

    If I unplug it from power supply and plug it back again, it won't boot for the first time again. This is what I used to do before, turning the device off by unplugging and turning it back on by plugging it again never using the on/off button on the driver board. And that is why it never booted successfully (I also boot from SD card each time for the time being).

    As a side note, while using the on/off button on the driver board to turn the device off, the small LED next to DM365 (called D1 LED if I am not mistaken) should keep having a very weak red light (while in the off mode ofcourse)

    This guy seems to have had the same issue: http://e2e.ti.com/support/dlp__mems_micro-electro-mechanical_systems/f/850/t/242002.aspx

    Anyway, I wanted to thank you for your help and I thought someone else might benefit from this post in the future.


    Regards,

    Houman   

  • Hello Houman,

    Thanks for providing the helpful details. This is an interesting finding. Are you on the latest version of the software (DM365v4.0, FPGA v2.6.43 and MSP430 v2.7)?

    Regards,

    Divya

  • Actually, I am (note that I use the SD card to boot though).

    Regards,

    Houman

  • Hi, I have the same problem. I cannot update DM365 v4.0, the module screen stop at 90%. Any suggestion, thank you.

  • Hi everyone,

    I have found absolutely the same problem: I use SanDisk SDHC 8GB, it was formatted, the data transferred according to the manual (with SUCCESS! message; win7), the lightcrafter stuck at ~90% without changing the LED color from red to any other. By the way the old software was damaged, so it did not boot in proper way any more (without or with the card)...

    Luckily the educated guess (in Russian more sarcasm "Метод научного тыка") from Houman has helped and everything is OK (http://e2e.ti.com/support/dlp__mems_micro-electro-mechanical_systems/f/850/p/176873/1019042.aspx#1019042):

    I finally got the lightcrafter working. I don't know why, but for some reason, the first time I plug in the lightcrafter it won't boot. But if I turn it off only using the on/off button on the driver board, and turn it back on only using the on/off button on the driver board again, it will boot successfully from then on.

    So the tested method one more time:

    1. Prepare the microSD card according to the manual, insert to the lightcrafter, change the switch position to "SD", power on, wait 4 screens appear (all according to the manual), and get stuck at 90% (after ~40 sec)

    2. Switch the power off pressing the on/off button on the driver board

    3. Wait (e.g. 5 sec)

    4. Switch the power on pressing the on/off button on the driver board

    5. Wait 4 screens appear and the led color change during the last screen (according to the manual). Further steps according to the manual.

    Probably it should be tested more and added to the manual or at least to this solution from TI http://e2e.ti.com/support/dlp__mems_micro-electro-mechanical_systems/f/850/t/308753.aspx

    Message to TI: in my opinion it is not very_userfriendly to provide the software updating procedure of new hardware that requires some perfectly tested, but almost_impossible_to_buy (in a ordinary shop) old accessories.

    Andrei

  • Hello Andrei,

    Welcome to TI DLP E2E community!

    Thanks for bringing this our notice and sorry for having to go through this extra effort to get the LightCrafter up and running.

    I understand that the initial instructions to boot up the lightcrafter after upgrading the DM365 firmware are a little tricky, but we have been doing a thorough testing of our boards before they are rolled out and the step by step instructions are given in the Users guide Section 2.13.2 to upgrade the DM365 firmware.

    The tricky part here is to understand that there are 2 ways to upgrade the DM365 firmware and bootr up the LightCrafter:

    1. Directly from the SD card in which case you build an SD card with lcr_dm365_v5_sd.dat and the switch remains on the side closer to SD card all the time.
    2. Booting it from NAND in which case you build the SD card with lcr_dm365_v5_nand.dat and wait till it gets copied into NAND after which the switch needs to be flipped away from SD card and SD card can be removed.

    These are the detailed steps for the above mentioned methods:

    Steps to follow to boot it up from SD card:

    •             Format the SD Card (The SD card I used is Transcend 4GB micro SD HC).

    •             Run this command on the Command prompt (opened with administrator permissions)

    •        Navigate to the directory “SD Card Utility” inside the downloaded 3.0 Bundle that has .dat file

    o             lcr_boot_sd.exe dm3xx_sd.dat  F:  (or whatever SD card drive is mounted) 

    •             Make sure it comes back and says , Image successfully copied.

    •             Remove the SD card and put it inside the SD card slot on lightcrafter, flip the switch towards the SD card and power it up

    •             You should see a series of images/ splash screens like the one attached

    •             You should not need to flip the switch to the other side in this process.

    •             Note that now onwards, you will always need the SD card inserted in LighTcrafter and the switch always towards the SD card.

    •             Eventually the LightCrafter should boot up completely and you should see the RGB bars and the LED D1 should be blinking Red and green continuously.

    •        After this step, you should be able to connect to it from the GUI (download the latest form LightCrafter 3.0 Software and Firmware Bundle)


    Steps to follow to boot it up from NAND:

    •             Format the SD card

    •             Run the command  lcr_boot_sd.exe dm3xx_NAND.dat  F:  (or whatever SD card drive is mounted)

    •             Now insert the SD card into the SD card slot, make sure the switch is towards the SD card

    •             Power up the Lightcrafter, again watch series of the splash images and watch the LED D1.

    •             As soon as the LED D1 turns green, then flip the switch away from SD card and power the Lightcrafter down and power it back.

    •             Now what it means is, it has copied the firmware over to NAND flash part on the board. Now you can even remove the SD card and it should boot up from NAND.

    •             Note that, now onwards the switch always needs to be in a position away from SD card.

    If you follow these steps, it should be pretty straight forward to upgrade the firmware and boot up the LightCrafter.

    Hope this helps, let me know if you are still facing the booting issues.

    Regards

    Manasi

  • Hello Manasi,

    Thank you for the response and the detailed guidelines, as I wrote I could upgrade it and everything is OK.

    Probably it worth trying to boot from the SD card (to verify that the card is OK for the device) before copying the software to NAND (with further pressing different buttons).
    As the common problem in this topic I stuck somewhere in the middle:
        Steps to follow to boot it up from NAND:
        •             Format the SD card
        •             Run the command  lcr_boot_sd.exe dm3xx_NAND.dat  F:  (or whatever SD card drive is mounted)
        •             Now insert the SD card into the SD card slot, make sure the switch is towards the SD card
        •             Power up the Lightcrafter, again watch series of the splash images and watch the LED D1. ->HERE<-
        •             As soon as the LED D1 turns green, then flip the switch away from SD card and power the Lightcrafter down and power it     back.
    Hope to go further with the Lightcrafter.

    Andrei

  • Hi All,

    I have updated the DM365, but the FPGA and the MSP430 versions are both not updated and I can't figure out how to do so. I have tried updating them through the Upgrade/Splash tab, but it says "Command Success" in the bottom lefthand corner and then when I click "Get" in the firmware part, a message box appears with "Command Failed". Any ideas on how to get the firmware fixed? 

    Also, no light is being displayed from the LightCrafter and the LED light by the DM365 is blinking red and green.

    Thanks,

    Heather

  • I am having the exact same problem.  Is there any solution.  I attempt to upgrade FPGA, etc.  It says success, but does not show an updated version.

    Thanks in advance,

    Marco

  • Hello Marco,

    Welcome to TI DLP E2E community!

    I can definitely help you troubleshoot this since I know exactly what might be causing this.

    If you are at the latest DM365 firmware version 5.0 and you can connect to the GUI and see the LED D1 on the top board blinking red and green, but still don't see any light output then that means you have possibly corrupted the DLPC300 firmware and you need to revert that.

    Follow the following steps:

    • In this case, please download the DLPR300PROM bundle from here: http://www.ti.com/tool/dlpr300
    • Install this. 
    • In the GUI, go to Upgrade/Splash tab, select DLPC300 from the Upgrade drop down, select the firmware file you just installed from the previous step and click “Install”.
    • Make sure you hard reboot the system after this step (unplug the power and plug it back in)

    This should fix your problem, if not send me a message again with the UART ddebug log.

    Regards

    Manasi

  • Hi Minasi,

    That got it!

    Thanks,

    Marco