This thread has been locked.

If you have a related question, please click the "Ask a related question" button in the top right corner. The newly created question will be automatically linked to this question.

ADS1x15EVM + PAMB

Other Parts Discussed in Thread: ADS1015, ADS1115

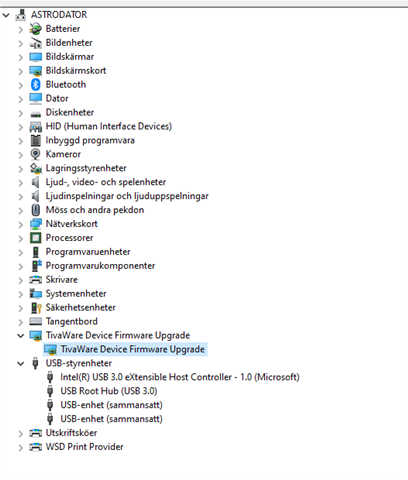
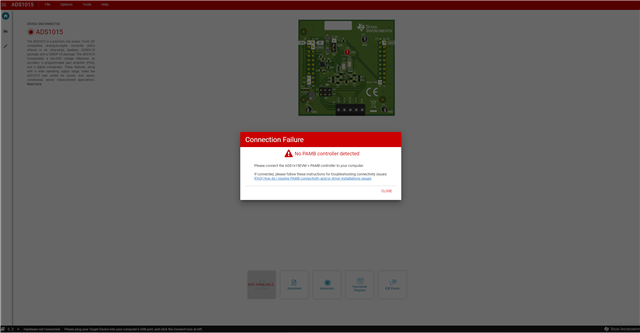
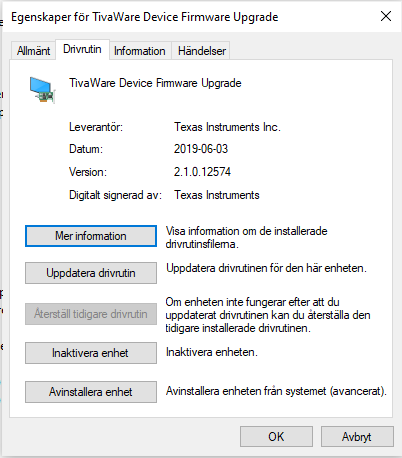
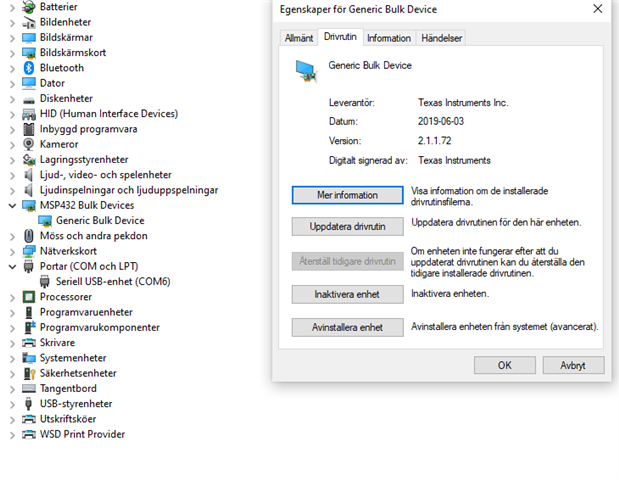
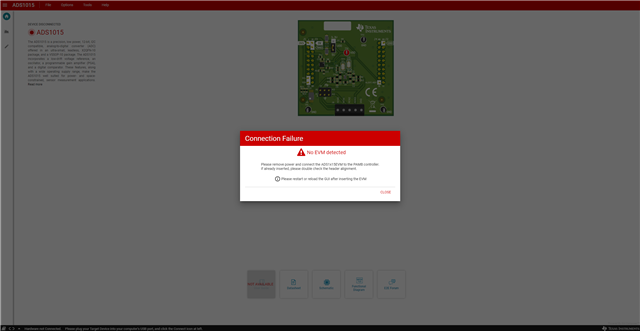
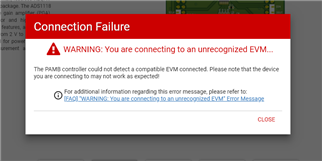
Hi i´m trying to install the ADS1x15EVM + PAMB, but it wont recognise the device, gone through the troubleshooting but cannot find the drivers anywhere on my computer

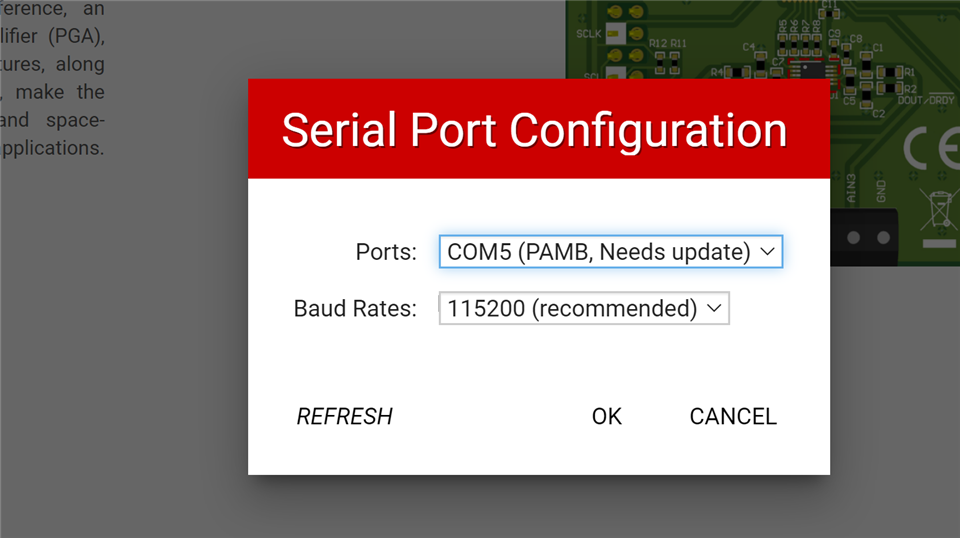
In the page for the ADS1x15EVM + PAMB it just says start evaluating, and first time it came up with a note about drivers for download, but now it just starts the GUI, where can we download the drivers? cannot find them anywhere

BR

/ Anders

  • Hi Anders,

    Welcome to the E2E forum!  The drivers are native drivers to the OS and should find and install automatically when the EVM is plugged in.  Sometimes this is not always recognized right away.  So the popup may have shown before the drivers were actually loaded.  Does the EVM show hardware connected?  If not have you tried pressing the connection icon link at the lower left of the GUI?

    You can find additional information in the following FAQ:

    https://e2e.ti.com/support/data-converters-group/data-converters/f/data-converters-forum/914940/faq-how-do-i-resolve-pamb-evm-connectivity-and-or-driver-installation-issues

    Best regards,

    Bob B

  • Hi Bob and thanks

    The additional info is the same as you can access via the GUI, it doesent see any hardware, and the drivers is not to be found on the computer.. Please advise

    BR

    /A

  • Hi Anders,

    So you clicked on the connect icon and you didn't see a popup?  If the drivers were missing or if there was a connection issue you should have seen the popup box.  Did you follow the information I gave in the link I provided in my last post?

    Can you attach a screen shot from the GUI?  Can you check the Device Manager and see if there are any unknown or '!' mark devices?  The EVM should enumerate as a composite device.  One device will be a virtual COM port and the second device shows up as a Bulk device.

    Thanks,

    Bob B

  • Hi again Bob

    Starting to think that its something wrong with the controller, found the drivers and tested them on one of our AMD machines, wouldent work whatever we tried - switched to a intel laptop, same issue - this time logicl tries 1) win10 as is, no response - 2) downloaded drivers tested all exept for the serial one - no response, just says - NO PAMB controller detected

    First time hooking it up to the computer windows seems fine by plug and play, but doesent work it identifies itself as "Tivaware device firmware upgrade" in devmgr.. and seems to be happy with the drivers

    Same cable as supplied - no hubs

    ???

    Is there any trick to see if it´s active? - tried to deattach the 1115 board just to se if there was any change - same message

    Best Regards

    / Anders

  • Tried to upload a . JPG for you but it´s not allowed?

    /A

  • Hi Anders,

    It appears that EVM motherboard was not programmed by the contract manufacturer that built the EVM boards.  So once the EVM is plugged in, click on the File menu in the GUI and select Program Device.  You should see a popup showing buttons for the ADS1015EVM and the ADS1115EVM.  Select the EVM appropriate to the hardware you are using.  The micro should then be flashed with the correct application.  Let me know if you still are seeing issues following the device programming.

    Best regards,

    Bob B

  • Hi bob, thanks now the PAMB woke up, however now it says No EVM detected :-)

    5V jumper is on 5V nothing else connected and the pin headers is right...

    BR

    / A

  • Hi Anders,

    Obviously the contract manufacturer did not follow the instructions they were given.  With a couple more steps you should be good to go.  The EVM has an EEPROM that is to be programmed to identify which EVM is connected to the GUI as the GUI is the same for both the ADS1015 and the ADS1115.  So without the EEPROM properly programmed, the GUI doesn't know which EVM is connected (or detected).  There is a utility to program the EEPROM, but first we need to have you use the Options menu selection to manually connect to the COM port that the EVM is set to use.  This appears to be COM6 according to the Device Manager screen shot.

    From the Options drop-down menu select Serial Port.  You should see an option box similar to what is shown.  Search for and select a COM port that displays the PAMB board in the “Ports” drop-down list and click OK.

    You will be issued a warning that the connection is to an unknown device, but that is ok.

    The EVM may appear to connect properly, but we still need to program the EEPROM so that the GUI will automatically connect when the GUI starts.  To fix this:

    • With the GUI open press CTRL+ ALT + D (this puts the GUI into developer mode)
    • Click Tools -> Write EEPROM

    Best regards,

    Bob B

  • Hi Bob and thanks, it however says connected ADS1015 in the left corner, not the 1115, should i still update the eprom?

  • Hi Anders,

    Yes you must update the EEPROM to match the EVM you are using.  The GUI will default to a specific device that may not be the EVM you are using.  So for the GUI to correctly identify the EVM you need to load the correct EEPROM data to be read by the GUI on startup.  The EEPROM will be updated based on the program loaded into the PAMB motherboard.  If you loaded the ADS1115 firmware when programming, the ADS1115 data will be loaded into the EEPROM automatically regardless of the GUI information.

    Once the EEPROM has been flashed successfully, you will need to disconnect and reconnect the EVM to the GUI.

    Best regards,

    Bob B

  • Hi again - took it on faith and updated :-), it worked, thanks - issue resolved

    Thank you for the exxcellent support, now we can go on with our evaluation of the 1115

    I wish you a wonderful day - stay safe

    Best regards

    / Anders

  • Hi Again Bob, getting a bit frustrated over this..

    We left the computer and eval board on during the day, and i got back thinking i should start testing it... took it out from the usb and plugged it back in again and NOW the screen only shows the below...

    It just wont start the TI-cloud agent, tried to reinstall, looked at chrome extensions - everything is as i can see it ok.... whats up now with this thing

    Please...

    BR

    / Anders

  • Hi Anders,

    TI recently did an update on dev.ti.com and now I too have the same issue.  I'm checking on it.

    Best regards,

    Bob B

  • Hi Anders,

    I have the team investigating what might be happening.  I did verify that the downloadable version is working.

    Best regards,

    Bob B

  • Hi Anders,

    Please try the GUI again.  The GC team thinks they have fixed the issue following their update.  At least it is working correctly for me now.

    Best regards,

    Bob B

  • Hi Bob, yes it´s working, however getting some strange results reading the 3v3 on board as in the quick start instructions, and the voltage indication on the left side dissapear as soon as you have a negative measurement, is this graph due to voltage variations on the USB? and if so, can you see in the graph every points voltage in some way, the x-axis is always the point measured - perhaps the downloadable version have more functionality? - Where can this be found to download?

    BR /A

  • Hi Anders,

    You found a bug in the GUI.  The display updates improperly for the axis when the code changes by 1.  The scaling is set to go between 3V and 4V and when it autoscales this disappears from the screen as the labels move outside of the visible region.  Unfortunately the downloadable GUI uses the same code.  For your information, the download version can be found in the dev.ti.com GUI Composer gallery and by searching for ads1x15.

    Using codes instead of volts will give the accurate representation.  The downside is you have to manually calculate the conversion  codes to volts.  I will have to give you an update on Monday when I think the GUI will be fixed.

    Best regards,

    Bob B

  • Hi Anders,

    I was able to quickly update the GUI.  Check it out and let me know if you are still seeing some issues.

    Best regards,

    Bob B

  • Bob - Very nice done, now the cursor also displays both the measured point and the voltage in that specific point

    Sweet :-) a Star for you

    Thanks again

    BR

    / Anders

  • Bob, final question, can you increase the resolution in the graph to be 2 more digits?

    /A

  • Hi Anders,

    The plot value chosen works well for all combinations in the chart with respect to resolution and is a general setting not specific to any level of precision.  If I expand the value, some of the charts become to look a bit messy.

    If you look at the statistics at the top of the window you can see that the variation may only be 1 or 2 codes depending on noise.  If you want to look at the data in more detail, you can choose File -> Analysis Data -> Save Data which will save the information in a CSV file.  The file can be opened in a spreadsheet program like Excel and converted to more precise detail there.

    Best regards,

    Bob B