This thread has been locked.

If you have a related question, please click the "Ask a related question" button in the top right corner. The newly created question will be automatically linked to this question.

TM4C129XNCZAD: uDMA internal use in kentec display

Part Number: TM4C129XNCZAD

i am using dk-tm4c129x msu with 8bit kentech display in that i want to use internal udma with this display.i am try with this display and grlib demo reference code but not success.

particular i want to use internal uDMA of display with dk tm4c129x msu.


so send me refreance uDMA code of that kentech dispaly

thank you.

  • Hi,

    particular i want to use internal uDMA of display with dk tm4c129x msu.

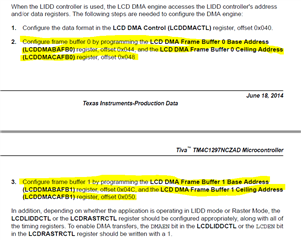
    I want first clarify about the usage of DMA. You refer to the uDMA. The uDMA is a generic centralized DMA module on the device. You can use the uDMA to move data between memories and peripherals. However, uDMA is not used for LCD. The LCD module has its own DMA engine that is built into the LCD module. See below excerpt from the datasheet. Perhaps you are talking about the same thing as for the built-in DMA but I just wanted to clarify.

    The Raster Controller provides a synchronous LCD interface. It provides timing and data for
    constant graphics refresh to a passive display. It supports a wide variety of monochrome and
    full-color display types and sizes by use of programmable timing controls, a built-in palette, and
    a gray-scale/serializer. Graphics data is processed and stored in frame buffers. A frame buffer
    is a contiguous memory block in the system. A built-in DMA engine supplies the graphics data
    to the Raster engine which, in turn, outputs to the external LCD device.

    so send me refreance uDMA code of that kentech dispaly

    Sorry, we don't have any examples that use the the built-in DMA. However, the TivaWare LCD peripheral drivers support DMA. Please refer to the lcd.c file in C:\ti\TivaWare_C_Series-2.2.0.295\driverlib for API such as LCDIDDDMAWrite() to write data to the display. 

    The grlib graphics library consists of three layers (with each subsequent layer building upon the previous layer to provide more functionality).
    • The display driver layer. This must be supplied by the application since it is specific to the display in use. For example, a driver that is specific to kentec320x240x16.
    • The graphics primitive layer. 
    • The widget layer. 

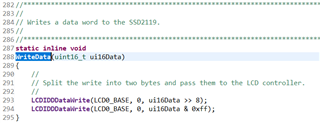
    The driver that is specific to kentec320x240x16 display on the DK board can be found in dk-tm4c129x\drivers\kentec320x240x16_ssd2119.c. If you look at this file you will see API such as WriteData() that calls the LCD driver function LCDIDDDataWrite(). See below snippet. The LCDIDDDataWrite() is a non-DMA version call to write data to the display. I think you can try to change the WriteData() to call LCDIDDDMAWrite() instead. Please note again that you must create your own display driver to interface to a different display you are using for your application. Since we don't have any examples that use DMA, this is all the tips I can provide. If you get it work on a different display, please share with the community that may benefit others. 

    //*****************************************************************************
    //
    // Writes a data word to the SSD2119.
    //
    //*****************************************************************************
    static inline void
    WriteData(uint16_t ui16Data)
    {
        //
        // Split the write into two bytes and pass them to the LCD controller.
        //
        LCDIDDDataWrite(LCD0_BASE, 0, ui16Data >> 8);
        LCDIDDDataWrite(LCD0_BASE, 0, ui16Data & 0xff);
    }

  • thank you for your response,

    when that change in my code is tell by you but its not working it only gives white screen output.

    my task is i want print image is attached in this code  by using display own DMA

    how can print image with lcd own dma?

    bellow is c file of images that file is wanted to print.

    //////////////////////////////////////////////////////////////////////////////////////////////////////////////////////////////////////////////////////////////////////////////////////////////////

    #include <stdint.h>
    #include <stdbool.h>
    #include "grlib/grlib.h"


     uint8_t g_pui8Blue50x50Press[] =
    {
        IMAGE_FMT_4BPP_COMP,
        50, 0,
        50, 0,
    
        15,
        0x00, 0x00, 0x00,
        0x23, 0x00, 0x00,
        0x52, 0x00, 0x00,
        0x63, 0x00, 0x00,
        0x6f, 0x00, 0x00,
        0x78, 0x00, 0x00,
        0x7c, 0x00, 0x00,
        0x7d, 0x00, 0x00,
        0x7f, 0x00, 0x00,
        0x81, 0x00, 0x00,
        0x85, 0x00, 0x00,
        0x89, 0x00, 0x00,
        0x8d, 0x00, 0x00,
        0x93, 0x00, 0x00,
        0x9b, 0x00, 0x00,
        0xa9, 0x00, 0x00,
    
        0x83, 0x03, 0x01, 0x12, 0x22, 0x22, 0x22, 0xe9, 0xd3, 0x20, 0x21, 0x10,
        0x07, 0x12, 0x22, 0x23, 0x33, 0x33, 0x64, 0x33, 0xe9, 0xd4, 0x32, 0x21,
        0x47, 0x33, 0x34, 0x19, 0x44, 0x44, 0x44, 0xe9, 0xd4, 0x43, 0x33, 0x34,
        0x00, 0x01, 0x22, 0x33, 0x44, 0x45, 0x56, 0x66, 0x66, 0x60, 0x66, 0xe9,
        0xd1, 0x65, 0x55, 0x44, 0x44, 0x32, 0x40, 0x10, 0x32, 0x12, 0x33, 0x44,
        0x55, 0x66, 0x88, 0x30, 0x88, 0x88, 0xe9, 0xd2, 0x87, 0x66, 0x55, 0x54,
        0x20, 0x44, 0x21, 0x39, 0x01, 0x23, 0x34, 0x45, 0x67, 0xc0, 0x47, 0x33,
        0x65, 0x54, 0x43, 0x10, 0x00, 0x00, 0x0c, 0x12, 0x33, 0x45, 0x66, 0x47,
        0x04, 0x66, 0x55, 0x00, 0x54, 0x31, 0x00, 0x00, 0x23, 0x34, 0x56, 0x78,
        0xc0, 0x3f, 0x04, 0x86, 0x66, 0x66, 0x44, 0x00, 0x01, 0x18, 0x23, 0x45,
        0x67, 0x47, 0x2f, 0x86, 0x64, 0x20, 0x0c, 0x02, 0x33, 0x45, 0x68, 0x3f,
        0x06, 0x89, 0x89, 0x06, 0x94, 0x40, 0x12, 0x34, 0x56, 0x47, 0x07, 0x88,
        0x03, 0x99, 0xa8, 0x91, 0x12, 0x34, 0x57, 0x3f, 0x07, 0x01, 0x88, 0x9a,
        0xaa, 0xa2, 0x23, 0x45, 0x68, 0x3f, 0x80, 0x07, 0x89, 0x99, 0xab, 0xa4,
        0x23, 0x45, 0x78, 0xc0, 0x3f, 0x07, 0x88, 0x9a, 0xbc, 0xb9, 0x23, 0x46,
        0xe7, 0x47, 0x3f, 0x39, 0xcc, 0xbc, 0x3f, 0x3f, 0x3b, 0x0f, 0xcd, 0xbc,
        0x23, 0x56, 0x3f, 0x3f, 0x3f, 0x3f, 0xff, 0x3f, 0x3f, 0x3f, 0x3f, 0x3f,
        0x3f, 0x3f, 0x3f, 0xff, 0x3f, 0x3f, 0x3f, 0x3f, 0x3f, 0x3f, 0x3f, 0x3f,
        0xff, 0x3f, 0x3f, 0x3f, 0x3f, 0x3f, 0x3f, 0x3f, 0x3f, 0xff, 0x3f, 0x3f,
        0x3f, 0x3f, 0x3f, 0x3f, 0x3f, 0x3f, 0xff, 0x3f, 0x3f, 0x3f, 0x3f, 0x3f,
        0x3f, 0x3f, 0x3f, 0xb0, 0x39, 0x57, 0x3f, 0x07, 0x88, 0x88, 0x9b, 0xcd,
        0x18, 0xbc, 0x24, 0x56, 0x3f, 0x07, 0x88, 0x89, 0xab, 0xe1, 0x3f, 0x3f,
        0x3c, 0xac, 0xdd, 0xcc, 0x34, 0x3f, 0xc3, 0x3f, 0x39, 0xbc, 0xde, 0xcc,
        0x24, 0x3f, 0x07, 0x03, 0x88, 0x88, 0x9a, 0xbd, 0xee, 0xdb, 0x3f, 0x07,
        0x80, 0x01, 0x9b, 0xcd, 0xee, 0xe5, 0x14, 0x56, 0x68, 0xc0, 0x37, 0x06,
        0x89, 0xab, 0xde, 0xef, 0xe3, 0x14, 0x60, 0x55, 0x3f, 0x07, 0x9a, 0xbc,
        0xde, 0xef, 0xe1, 0x0c, 0x03, 0x45, 0x88, 0x99, 0x37, 0x04, 0x89, 0xab,
        0x00, 0xcd, 0xee, 0xfe, 0xd0, 0x01, 0x46, 0x89, 0x99, 0x60, 0x98, 0x37,
        0x03, 0x9a, 0xbc, 0xde, 0xef, 0xff, 0x06, 0x20, 0x00, 0x35, 0x89, 0x99,
        0x37, 0x03, 0x99, 0x00, 0xab, 0xcd, 0xee, 0xff, 0xfe, 0x00, 0x00, 0x14,
        0x04, 0x89, 0x99, 0xaa, 0x99, 0x99, 0x37, 0x89, 0x99, 0x00, 0xab, 0xcc,
        0xde, 0xef, 0xff, 0xf1, 0x00, 0x00, 0x05, 0x02, 0x59, 0x9a, 0xba, 0xaa,
        0x29, 0x99, 0xe9, 0xa0, 0xd1, 0xaa, 0x41, 0xee, 0xff, 0xff, 0x30, 0x00,
        0x00, 0x00, 0x00, 0x25, 0xab, 0xbc, 0xcc, 0xbb, 0xbb, 0x1a, 0xcc, 0xcc,
        0xcc, 0xe9, 0xd1, 0xcd, 0x42, 0xf3, 0x80, 0x41, 0x00, 0x02, 0xaa, 0xcc,
        0xdc, 0xcd, 0xdd, 0x32, 0xdd, 0xdd, 0xe9, 0xd1, 0xde, 0xee, 0x41, 0xff,
        0x40, 0x30, 0x3a, 0x00, 0x19, 0xcc, 0xdd, 0xee, 0xee, 0x6a, 0xee, 0xe9,
        0xd3, 0xef, 0x41, 0xe1, 0x43, 0x00, 0x3a, 0x00, 0x2a, 0x47, 0x01, 0x41,
        0xe2, 0x45, 0x00, 0x0e, 0x00, 0x13, 0x7d, 0xef, 0x81, 0x69, 0x51, 0xef,
        0x20, 0xe9, 0x31, 0x43,
    };
    

  • Hi Mariya,

      Sorry, I don't really know why it is not working. I wonder if you have properly pass the starting address of the image and the size of the image when you call LCDIDDDMAWrite(). 

      I tend to think it is not as simple as changing the calling from LCDIDDDataWrite() to calling LCDIDDDMAWrite(). I think you will need to revamp the the kentec320x240x16_ssd2119.c quite a bit. in order to use DMA 

    Sorry, not really an expert and I'm also learning the module as we speak. 

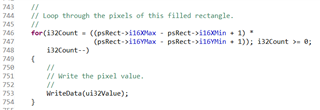
      As you see the description above, to use DMA, you will need to provide the starting address and the ending address of the image that stores the pixel data. If you know the start and end address of the image then you can call LCDIDDDMAWrite. But you need to understand how to use it. I don't think you can simply just replace LCDIDDDataWrite by LCDIDDDMAWrite. Since I'm also learning the module, I will just provide what I found in the code. Let's say you want to draw a rectangle. Ultimately, it will call the primitive function Kentec320x240x16_SSD2119RectFill to draw that rectangle. Now let's examine the snippet of code in the  function Kentec320x240x16_SSD2119RectFill. It will loop through each pixel in that rectangle and call the WriteData(). The WriteData() ultimately will call the LCDIDDDataWrite(). You will need to modify the Kentec320x240x16_SSD2119RectFill function such that instead of looping through each pixel to draw the rectangle, it will call something like WriteDataDma( this is a made-up new function name). The WriteDataDma will then call LCDIDDDMAWrite by passing the starting address and ending address of the pixel data stored in the buffer. 

      Again, I'm just as new to this as you. You will need to modify the driver on your own. Let's us know how it works and share with the community.