This thread has been locked.

If you have a related question, please click the "Ask a related question" button in the top right corner. The newly created question will be automatically linked to this question.

EK-TM4C123GXL: SPI Communication

Part Number: EK-TM4C123GXL

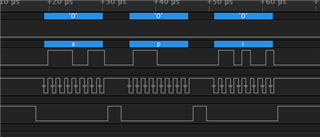
I am trying to configure SSI0 on GPIOA as master and SSI2 on GPIOB as slave on the same TI board. I have tested and found that SSI0 acting as master is working. I tested SSI0 uncommenting the loop found at line 424, and commenting out lines 408 - 422. Doing that , I was able to get the attached scope capture. However, while running unaltered version (loop at line 424 commented out, lines 408-422 running), the interrupt for SSI2 never triggers. I'm not sure if I have the interrupt configured correctly or not. I do have all the pins for SSI0 physically connected to SSI2 (following the guide at the top of the code except using GPIOB instead of GPIOH). Is there anything wrong with my code that would make the interrupt for SSI2 not fire?
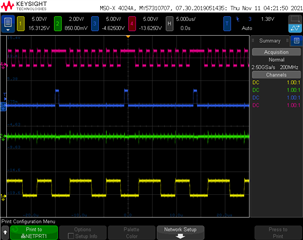
Waveforms from top to bottom:  GPIO_PB4_SSI2CLK, GPIO_PB5_SSI2FSS, GPIO_PB6_SSI2RX, GPIO_PB7_SSI2TX

//*****************************************************************************
//
// spi_slave.c - Example demonstrating how to configure RX timeout interrupt in
// SPI slave mode.
//
// Copyright (c) 2013 Texas Instruments Incorporated.  All rights reserved.
// TI Information - Selective Disclosure
//
//*****************************************************************************

#include <stdbool.h>
#include <stdint.h>
#include "inc/hw_ints.h"
#include "inc/hw_memmap.h"
#include "driverlib/debug.h"
#include "driverlib/gpio.h"
#include "driverlib/interrupt.h"
#include "driverlib/pin_map.h"
#include "driverlib/pwm.h"
#include "driverlib/rom.h"
#include "driverlib/rom_map.h"
#include "driverlib/hw_memmap.h"
#include "driverlib/qei.h"
#include "driverlib/sysctl.h"
#include "driverlib/uart.h"
#include "utils/uartstdio.h"
#include "driverlib/fpu.h"
#include "inc/hw_types.h"
#include "inc/hw_memmap.h"
// The error routine that is called if the driver library encounters an error.
#include "inc/hw_types.h"                   // Defines common types and macros
#include "inc/hw_gpio.h"                    // Defines Macros for GPIO hardware
#include "inc/hw_qei.h"
#include "driverlib/ssi.h"

#include "driverlib/uartstdio.h"

//*****************************************************************************
//
//! \addtogroup ssi_examples_list
//! <h1>SPI Slave (spi_slave)</h1>
//!
//! This example configures the SSI0 as SPI Master, SSI2 as SPI Slave on an
//! EK-LM4F232 evaluation board.  RX timeout interrupt is configured for SSI2.
//! Three characters are sent on the master TX, then SSI2 RX timeout interrupt
//! is enabled. The code then waits for the interrupt to fire.  Once the
//! interrupt is fired the data from slave RX FIFO is read and compared to the
//! transmitted packet and the appropriate status is displayed.  If everything
//! goes well you should see a "Test Passed." message on the terminal window.
//! The status messages are transmitted over UART0 at 115200 baud and 8-n-1
//! mode.
//!
//! This example uses the following peripherals and I/O signals on EK-LM4F232.
//! You must review these and change as needed for your own board:
//! - SSI0 peripheral
//! - GPIO Port A peripheral (for SSI0 pins) (available near the SD card slot)
//! - SSI0CLK - PA2
//! - SSI0Fss - PA3
//! - SSI0Rx  - PA4
//! - SSI0Tx  - PA5
//!
//! - SSI2 peripheral
//! - GPIO Port M peripheral (for SSI2 pins) (available right below the OLED)
//! - SSI2CLK - PH4
//! - SSI2Fss - PH5
//! - SSI2Rx  - PH6
//! - SSI2Tx  - PH7
//!
//! For this example to work, the following connections are needed on the
//! EK-LM4F232 evaluation board.
//! - SSI0CLK(PA2) - SSI2CLK(PH4)
//! - SSI0Fss(PA3) - SSI0Fss(PH5)
//! - SSI0Rx(PA4)  - SSI2Tx(PH7)
//! - SSI0Tx(PA5)  - SSI2Rx(PH6)
//!
//! The following UART signals are configured only for displaying console
//! messages for this example.  These are not required for operation of SSI0.
//! - UART0 peripheral
//! - GPIO Port A peripheral (for UART0 pins)
//! - UART0RX - PA0
//! - UART0TX - PA1
//!
//! This example uses the following interrupt handlers.  To use this example
//! in your own application you must add these interrupt handlers to your
//! vector table.
//! - SSI2IntHandler.
//!
//
//*****************************************************************************

//*****************************************************************************
//
// Number of bytes to send and receive.
//
//*****************************************************************************
#define NUM_SSI_DATA 3

//*****************************************************************************
//
// Global variables used in interrupt handler and the main loop.
//
//*****************************************************************************
//volatile unsigned long g_ulSSI2RXTO = 0;
//unsigned long g_ulDataRx2[NUM_SSI_DATA];

uint32_t g_ulSSI2RXTO = 0;
uint32_t g_ulDataRx2[NUM_SSI_DATA];
//*****************************************************************************
//
// Interrupt handler for SSI2 peripheral in slave mode.  It reads the interrupt
// status and if the interrupt is fired by a RX time out interrupt it reads the
// SSI2 RX FIFO and increments a counter to tell the main loop that RX timeout
// interrupt was fired.
//
//*****************************************************************************
void
SSI2IntHandler(void)
{
    unsigned long ulStatus, ulIndex;

    //
    // Read interrupt status.
    //
    ulStatus = SSIIntStatus(SSI2_BASE, 1);

    //
    // Check the reason for the interrupt.
    //
    if(ulStatus & SSI_RXTO)
    {
        //
        // Interrupt is because of RX time out.  So increment counter to tell
        // main loop that RX timeout interrupt occurred.
        //
        g_ulSSI2RXTO++;

        //
        // Read NUM_SSI_DATA bytes of data from SSI2 RX FIFO.
        //
        for(ulIndex = 0; ulIndex < NUM_SSI_DATA; ulIndex++)
        {
            SSIDataGet(SSI2_BASE, &g_ulDataRx2[ulIndex]);
        }
    }

    //
    // Clear interrupts.
    //
    SSIIntClear(SSI2_BASE, ulStatus);
}

//*****************************************************************************
//
// This function sets up UART0 to be used for a console to display information
// as the example is running.
//
//*****************************************************************************
void
InitConsole(void)
{
    //
    // Enable GPIO port A which is used for UART0 pins.
    //
    SysCtlPeripheralEnable(SYSCTL_PERIPH_GPIOA);

    //
    // Configure the pin muxing for UART0 functions on port A0 and A1.
    // This step is not necessary if your part does not support pin muxing.
    //
    GPIOPinConfigure(GPIO_PA0_U0RX);
    GPIOPinConfigure(GPIO_PA1_U0TX);

    //
    // Select the alternate (UART) function for these pins.
    //
    GPIOPinTypeUART(GPIO_PORTA_BASE, GPIO_PIN_0 | GPIO_PIN_1);

    //
    // Initialize the UART for console I/O.
    //
    //UARTStdioInit(0);
    UARTStdioConfig(0, 115200, 16000000);

}

//*****************************************************************************
//
// This function sets up SPI0 to be used as Master in freescale mode.
//
//*****************************************************************************
void
InitSPI0(void)
{
    //
    // The SSI0 peripheral must be enabled for use.
    //
    SysCtlPeripheralEnable(SYSCTL_PERIPH_SSI0);

    while (!SysCtlPeripheralReady(SYSCTL_PERIPH_SSI0))
    {
    }
    //
    // For this example SSI0 is used with PortA[5:2].  GPIO port A needs to be
    // enabled so these pins can be used.
    //
    SysCtlPeripheralEnable(SYSCTL_PERIPH_GPIOA);

    while (!SysCtlPeripheralReady(SYSCTL_PERIPH_GPIOA))
    {
    }
    //
    // Configure the pin muxing for SSI0 functions on port A2, A3, A4, and A5.
    // This step is not necessary if your part does not support pin muxing.
    //
    GPIOPinConfigure(GPIO_PA2_SSI0CLK);
    GPIOPinConfigure(GPIO_PA3_SSI0FSS);
    GPIOPinConfigure(GPIO_PA4_SSI0RX);
    GPIOPinConfigure(GPIO_PA5_SSI0TX);

    //
    // Configure the GPIO settings for the SSI pins.  This function also gives
    // control of these pins to the SSI hardware.  Consult the data sheet to
    // see which functions are allocated per pin.
    // The pins are assigned as follows:
    //      PA5 - SSI0Tx
    //      PA4 - SSI0Rx
    //      PA3 - SSI0Fss
    //      PA2 - SSI0CLK
    //
    GPIOPinTypeSSI(GPIO_PORTA_BASE, GPIO_PIN_5 | GPIO_PIN_4 | GPIO_PIN_3 |
                   GPIO_PIN_2);

    SSIDisable(SSI0_BASE);
    //
    // Configure and enable the SSI0 port for SPI master mode.
    //
    SSIConfigSetExpClk(SSI0_BASE, SysCtlClockGet(), SSI_FRF_MOTO_MODE_2,
                       SSI_MODE_MASTER, 660000, 8);

    //
    // Enable the SSI0 module.
    //
    SSIEnable(SSI0_BASE);
}

//*****************************************************************************
//
// This function sets up SPI2 to be used as slave in freescale mode.
//
//*****************************************************************************
void
InitSPI2(void)
{
    //
    // The SSI0 peripheral must be enabled for use.
    //
    SysCtlPeripheralEnable(SYSCTL_PERIPH_SSI2);

    while (!SysCtlPeripheralReady(SYSCTL_PERIPH_SSI2))
    {
    }
    //
    // For this example SSI2 is used with PortH[7:4].  GPIO port H needs to be
    // enabled so these pins can be used.
    //
    SysCtlPeripheralEnable(SYSCTL_PERIPH_GPIOB);

    while (!SysCtlPeripheralReady(SYSCTL_PERIPH_GPIOB))
    {
    }
    //
    // Configure the pin muxing for SSI2 functions on port H4, H5, H6 and H7.
    // This step is not necessary if your part does not support pin muxing.
    //
    GPIOPinConfigure(GPIO_PB4_SSI2CLK);
    GPIOPinConfigure(GPIO_PB5_SSI2FSS);
    GPIOPinConfigure(GPIO_PB6_SSI2RX);
    GPIOPinConfigure(GPIO_PB7_SSI2TX);

    //
    // Configure the GPIO settings for the SSI pins.  This function also gives
    // control of these pins to the SSI hardware.  Consult the data sheet to
    // see which functions are allocated per pin.
    // The pins are assigned as follows:
    //      PH7 - SSI2Tx
    //      PH6 - SSI2Rx
    //      PH5 - SSI2Fss
    //      PH4 - SSI2CLK
    //
    GPIOPinTypeSSI(GPIO_PORTB_BASE, GPIO_PIN_7 | GPIO_PIN_6 | GPIO_PIN_5 |
                   GPIO_PIN_4);

    SSIDisable(SSI2_BASE);
    //
    // Configure and enable the SSI2 port for SPI slave mode.
    //
    SSIConfigSetExpClk(SSI2_BASE, SysCtlClockGet(), SSI_FRF_MOTO_MODE_2,
                       SSI_MODE_SLAVE, 660000, 8);

    //
    // Enable the SSI2 module.
    //
    SSIEnable(SSI2_BASE);
   // SSIIntRegister(SSI2_BASE, SSI2IntHandler);
}

//*****************************************************************************
//
// This example will send out 3 bytes of data from master, then waits for slave
// RX timeout interrupt to fire (where these 3 bytes are read).  Then the sent
// and returned data are compared to give out appropriate status messages on
// UART0.
//
//*****************************************************************************
int
main(void)
{
    /*
    unsigned long ulDataTx0[NUM_SSI_DATA];
    unsigned long ulDataRx0[NUM_SSI_DATA];
    unsigned long ulindex;
    */
    uint32_t ulDataTx0[NUM_SSI_DATA];
    uint32_t ulDataRx0[NUM_SSI_DATA];
    uint32_t ulindex;

    //
    // Set the clocking to run directly from the external crystal/oscillator.
    //
    SysCtlClockSet(SYSCTL_SYSDIV_1 | SYSCTL_USE_OSC | SYSCTL_OSC_MAIN |
                   SYSCTL_XTAL_16MHZ);

    //
    // Set up the serial console to use for displaying messages.  This is
    // just for this example program and is not needed for SSI operation.
    //
    InitConsole();

    //
    // Display the setup on the console.
    //
    UARTprintf("SSI ->\n");
    UARTprintf("  Mode: SPI\n");
    UARTprintf("  Data: 16-bit\n\n");

    //
    // Init SPI0 as master.
    //
    InitSPI0();

    //
    // Read any residual data from the SSI port.  This makes sure the receive
    // FIFOs are empty, so we don't read any unwanted junk.  This is done here
    // because the SPI SSI mode is full-duplex, which allows you to send and
    // receive at the same time.  The SSIDataGetNonBlocking function returns
    // "true" when data was returned, and "false" when no data was returned.
    // The "non-blocking" function checks if there is any data in the receive
    // FIFO and does not "hang" if there isn't.  This might not be needed here.
    //
    while(SSIDataGetNonBlocking(SSI0_BASE, &ulDataRx0[0]))
    {
    }

    //
    // Init SPI2 as slave.
    //
    InitSPI2();

    //
    // Enable RX timeout interrupt.
    //
    SSIIntEnable(SSI2_BASE, SSI_RXTO);

    //
    // Read any residual data from the SSI port.  This makes sure the receive
    // FIFOs are empty, so we don't read any unwanted junk.  This is done here
    // because the SPI SSI mode is full-duplex, which allows you to send and
    // receive at the same time.  The SSIDataGetNonBlocking function returns
    // "true" when data was returned, and "false" when no data was returned.
    // The "non-blocking" function checks if there is any data in the receive
    // FIFO and does not "hang" if there isn't.
    //
    while(SSIDataGetNonBlocking(SSI2_BASE, &g_ulDataRx2[0]))
    {
    }

    //
    // Clear any pending interrupt
    //
    SSIIntClear(SSI2_BASE, SSI_RXTO);

    //
    // Initialize the data to send.
    //
    ulDataTx0[0] = 's';
    ulDataTx0[1] = 'p';
    ulDataTx0[2] = 'i';

    //
    // Display indication that the SSI is transmitting data.
    //
    UARTprintf("Sent:\n  ");

    //
    // Send 3 bytes of data.
    //

    for(ulindex = 0; ulindex < NUM_SSI_DATA; ulindex++)
    {
        //
        // Display the data that SSI is transferring.
        //
        UARTprintf("'%c' ", ulDataTx0[ulindex]);

        //
        // Send the data using the "blocking" put function.  This function
        // will wait until there is room in the send FIFO before returning.
        // This allows you to assure that all the data you send makes it into
        // the send FIFO.
        //
        SSIDataPut(SSI0_BASE, ulDataTx0[ulindex]);
    }
    /*
    while(1){
        SSIDataPut(SSI0_BASE, 's');
    }
    */
    //
    // Wait until SSI0 is done transferring all the data in the transmit FIFO.
    //
    while(SSIBusy(SSI0_BASE))
    {
    }

    //
    // Enable the SSI2 interrupts to ARM core.  This as to be done here,
    // otherwise the RX timeout interrupt will fire before all the data has
    // been transferred.  This is specific to this example as both the SSI
    // master and slave are on the same microcontroller.
    //
    IntEnable(INT_SSI2);

    //
    // Wait for the SSI2 RXTO interrupt to fire and data read from RXFIFO.
    //
    while(g_ulSSI2RXTO == 0)
    {
    }

    //
    // Display indication that salve has receiving data.
    //
    UARTprintf("\nReceived:\n  ");

    //
    // Display the 3 bytes of data that were read from RX FIFO.
    //
    for(ulindex = 0; ulindex < NUM_SSI_DATA; ulindex++)
    {
        UARTprintf("'%c' ", g_ulDataRx2[ulindex]);
    }

    //
    // Check that the data sent was the same as the data received.
    //
    for(ulindex = 0; ulindex < NUM_SSI_DATA; ulindex++)
    {
        if(ulDataTx0[ulindex] != g_ulDataRx2[ulindex])
        {
            //
            // Tell the user that the test failed.
            //
            UARTprintf("\n\nError: Data does not exactly match.\n");
            UARTprintf("Check that Tx & Rx are connected correctly.\n\n");

            //
            // Wait in infinite loop for debugging.
            //
            while(1)
            {
            }
        }
    }

    if(g_ulSSI2RXTO > 1)
    {
        //
        // Tell the user that the test failed and the reason.
        //
        UARTprintf("\n\nError: %d interrupt(s) fired when expecting only one."
                   "\n", g_ulSSI2RXTO);
    }
    else
    {
        //
        // Tell the user that the test passed.
        //
        UARTprintf("\n\nTest Passed.\n\n");
    }

    while(1)
    {
    }
}

  • Hello Ben,

    I see you have this commented out:

    SSIIntRegister(SSI2_BASE, SSI2IntHandler);

    Is that because you modified the startup_ccs.c file yourself to add that in? If not, this would also be a cause for the issue but the real issue is below.

    However, while running unaltered version (loop at line 424 commented out, lines 408-422 running), the interrupt for SSI2 never triggers.

    That is what I would expect because you are enabling the interrupt after sending the data. You have a misunderstanding here.

        //
        // Enable the SSI2 interrupts to ARM core.  This as to be done here,
        // otherwise the RX timeout interrupt will fire before all the data has
        // been transferred.  This is specific to this example as both the SSI
        // master and slave are on the same microcontroller.
        //
        IntEnable(INT_SSI2);

    I can see per your comment that you are mislead about the RX Timeout interrupt. This is from the device datasheet:

    The receive FIFO has a time-out period that is 32 periods at the rate of SSInClk (whether or not SSInClk is currently active) and is started when the RX FIFO goes from EMPTY to not-EMPTY. If the RX FIFO is emptied before 32 clocks have passed, the time-out period is reset.

    The bolded part is key here. The RX timeout interrupt will not fire before data has been transferred unless the transfer is lagged to the point that the period passes. Which in this scenario would not be the case as it is 32 periods, and you can clearly see that your data when you just spam send it, is not even taking 2 periods to send the next byte.

    So move this line up to where you have this one:

        //
        // Enable RX timeout interrupt.
        //
        SSIIntEnable(SSI2_BASE, SSI_RXTO);

    With that (and potentially re-adding the interrupt registration), I would anticipate you will get your interrupt now.

    Best Regards,

    Ralph Jacobi

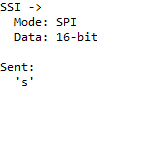
  • Moving the lines to where you said to place them didn't seem to fix anything, but when I moved them to the setup function for SSI2, I was able to transfer a single character. the value '115' appears in g_ulDataRx2, which is the decimal equivalent of the letter 's'. However, I have not been able to transfer the letters 'p' and 'i' yet.

    Based on output in the terminal, it doesn't look like these two character are sent at all. See below.

    It's almost as if something is breaking the for loop starting at line 413.

    my current code is below:

    //*****************************************************************************
    //
    // spi_slave.c - Example demonstrating how to configure RX timeout interrupt in
    // SPI slave mode.
    //
    // Copyright (c) 2013 Texas Instruments Incorporated.  All rights reserved.
    // TI Information - Selective Disclosure
    //
    //*****************************************************************************
    
    #include <stdbool.h>
    #include <stdint.h>
    #include "inc/hw_ints.h"
    #include "inc/hw_memmap.h"
    #include "driverlib/debug.h"
    #include "driverlib/gpio.h"
    #include "driverlib/interrupt.h"
    #include "driverlib/pin_map.h"
    #include "driverlib/pwm.h"
    #include "driverlib/rom.h"
    #include "driverlib/rom_map.h"
    #include "driverlib/hw_memmap.h"
    #include "driverlib/qei.h"
    #include "driverlib/sysctl.h"
    #include "driverlib/uart.h"
    #include "utils/uartstdio.h"
    #include "driverlib/fpu.h"
    #include "inc/hw_types.h"
    #include "inc/hw_memmap.h"
    // The error routine that is called if the driver library encounters an error.
    #include "inc/hw_types.h"                   // Defines common types and macros
    #include "inc/hw_gpio.h"                    // Defines Macros for GPIO hardware
    #include "inc/hw_qei.h"
    #include "driverlib/ssi.h"
    
    #include "driverlib/uartstdio.h"
    
    //*****************************************************************************
    //
    //! \addtogroup ssi_examples_list
    //! <h1>SPI Slave (spi_slave)</h1>
    //!
    //! This example configures the SSI0 as SPI Master, SSI2 as SPI Slave on an
    //! EK-LM4F232 evaluation board.  RX timeout interrupt is configured for SSI2.
    //! Three characters are sent on the master TX, then SSI2 RX timeout interrupt
    //! is enabled. The code then waits for the interrupt to fire.  Once the
    //! interrupt is fired the data from slave RX FIFO is read and compared to the
    //! transmitted packet and the appropriate status is displayed.  If everything
    //! goes well you should see a "Test Passed." message on the terminal window.
    //! The status messages are transmitted over UART0 at 115200 baud and 8-n-1
    //! mode.
    //!
    //! This example uses the following peripherals and I/O signals on EK-LM4F232.
    //! You must review these and change as needed for your own board:
    //! - SSI0 peripheral
    //! - GPIO Port A peripheral (for SSI0 pins) (available near the SD card slot)
    //! - SSI0CLK - PA2
    //! - SSI0Fss - PA3
    //! - SSI0Rx  - PA4
    //! - SSI0Tx  - PA5
    //!
    //! - SSI2 peripheral
    //! - GPIO Port M peripheral (for SSI2 pins) (available right below the OLED)
    //! - SSI2CLK - PH4
    //! - SSI2Fss - PH5
    //! - SSI2Rx  - PH6
    //! - SSI2Tx  - PH7
    //!
    //! For this example to work, the following connections are needed on the
    //! EK-LM4F232 evaluation board.
    //! - SSI0CLK(PA2) - SSI2CLK(PH4)
    //! - SSI0Fss(PA3) - SSI0Fss(PH5)
    //! - SSI0Rx(PA4)  - SSI2Tx(PH7)
    //! - SSI0Tx(PA5)  - SSI2Rx(PH6)
    //!
    //! The following UART signals are configured only for displaying console
    //! messages for this example.  These are not required for operation of SSI0.
    //! - UART0 peripheral
    //! - GPIO Port A peripheral (for UART0 pins)
    //! - UART0RX - PA0
    //! - UART0TX - PA1
    //!
    //! This example uses the following interrupt handlers.  To use this example
    //! in your own application you must add these interrupt handlers to your
    //! vector table.
    //! - SSI2IntHandler.
    //!
    //
    //*****************************************************************************
    
    //*****************************************************************************
    //
    // Number of bytes to send and receive.
    //
    //*****************************************************************************
    #define NUM_SSI_DATA 3
    
    //*****************************************************************************
    //
    // Global variables used in interrupt handler and the main loop.
    //
    //*****************************************************************************
    //volatile unsigned long g_ulSSI2RXTO = 0;
    //unsigned long g_ulDataRx2[NUM_SSI_DATA];
    
    uint32_t g_ulSSI2RXTO = 0;
    uint32_t g_ulDataRx2[NUM_SSI_DATA];
    //*****************************************************************************
    //
    // Interrupt handler for SSI2 peripheral in slave mode.  It reads the interrupt
    // status and if the interrupt is fired by a RX time out interrupt it reads the
    // SSI2 RX FIFO and increments a counter to tell the main loop that RX timeout
    // interrupt was fired.
    //
    //*****************************************************************************
    void
    SSI2IntHandler(void)
    {
        unsigned long ulStatus, ulIndex;
    
        //
        // Read interrupt status.
        //
        ulStatus = SSIIntStatus(SSI2_BASE, 1);
    
        //
        // Check the reason for the interrupt.
        //
        if(ulStatus & SSI_RXTO)
        {
            //
            // Interrupt is because of RX time out.  So increment counter to tell
            // main loop that RX timeout interrupt occurred.
            //
            g_ulSSI2RXTO++;
    
            //
            // Read NUM_SSI_DATA bytes of data from SSI2 RX FIFO.
            //
            for(ulIndex = 0; ulIndex < NUM_SSI_DATA; ulIndex++)
            {
                SSIDataGet(SSI2_BASE, &g_ulDataRx2[ulIndex]);
            }
        }
    
        //
        // Clear interrupts.
        //
        SSIIntClear(SSI2_BASE, ulStatus);
    }
    
    //*****************************************************************************
    //
    // This function sets up UART0 to be used for a console to display information
    // as the example is running.
    //
    //*****************************************************************************
    void
    InitConsole(void)
    {
        //
        // Enable GPIO port A which is used for UART0 pins.
        //
        SysCtlPeripheralEnable(SYSCTL_PERIPH_GPIOA);
    
        //
        // Configure the pin muxing for UART0 functions on port A0 and A1.
        // This step is not necessary if your part does not support pin muxing.
        //
        GPIOPinConfigure(GPIO_PA0_U0RX);
        GPIOPinConfigure(GPIO_PA1_U0TX);
    
        //
        // Select the alternate (UART) function for these pins.
        //
        GPIOPinTypeUART(GPIO_PORTA_BASE, GPIO_PIN_0 | GPIO_PIN_1);
    
        //
        // Initialize the UART for console I/O.
        //
        //UARTStdioInit(0);
        UARTStdioConfig(0, 115200, 16000000);
    
    }
    
    //*****************************************************************************
    //
    // This function sets up SPI0 to be used as Master in freescale mode.
    //
    //*****************************************************************************
    void
    InitSPI0(void)
    {
        //
        // The SSI0 peripheral must be enabled for use.
        //
        SysCtlPeripheralEnable(SYSCTL_PERIPH_SSI0);
    
        while (!SysCtlPeripheralReady(SYSCTL_PERIPH_SSI0))
        {
        }
        //
        // For this example SSI0 is used with PortA[5:2].  GPIO port A needs to be
        // enabled so these pins can be used.
        //
        SysCtlPeripheralEnable(SYSCTL_PERIPH_GPIOA);
    
        while (!SysCtlPeripheralReady(SYSCTL_PERIPH_GPIOA))
        {
        }
        //
        // Configure the pin muxing for SSI0 functions on port A2, A3, A4, and A5.
        // This step is not necessary if your part does not support pin muxing.
        //
        GPIOPinConfigure(GPIO_PA2_SSI0CLK);
        GPIOPinConfigure(GPIO_PA3_SSI0FSS);
        GPIOPinConfigure(GPIO_PA4_SSI0RX);
        GPIOPinConfigure(GPIO_PA5_SSI0TX);
    
        //
        // Configure the GPIO settings for the SSI pins.  This function also gives
        // control of these pins to the SSI hardware.  Consult the data sheet to
        // see which functions are allocated per pin.
        // The pins are assigned as follows:
        //      PA5 - SSI0Tx
        //      PA4 - SSI0Rx
        //      PA3 - SSI0Fss
        //      PA2 - SSI0CLK
        //
        GPIOPinTypeSSI(GPIO_PORTA_BASE, GPIO_PIN_5 | GPIO_PIN_4 | GPIO_PIN_3 |
                       GPIO_PIN_2);
    
        SSIDisable(SSI0_BASE);
        //
        // Configure and enable the SSI0 port for SPI master mode.
        //
        SSIConfigSetExpClk(SSI0_BASE, SysCtlClockGet(), SSI_FRF_MOTO_MODE_2,
                           SSI_MODE_MASTER, 660000, 8);
    
        //
        // Enable the SSI0 module.
        //
        SSIEnable(SSI0_BASE);
    }
    
    //*****************************************************************************
    //
    // This function sets up SPI2 to be used as slave in freescale mode.
    //
    //*****************************************************************************
    void
    InitSPI2(void)
    {
        //
        // The SSI0 peripheral must be enabled for use.
        //
        SysCtlPeripheralEnable(SYSCTL_PERIPH_SSI2);
    
        while (!SysCtlPeripheralReady(SYSCTL_PERIPH_SSI2))
        {
        }
        //
        // For this example SSI2 is used with PortH[7:4].  GPIO port H needs to be
        // enabled so these pins can be used.
        //
        SysCtlPeripheralEnable(SYSCTL_PERIPH_GPIOB);
    
        while (!SysCtlPeripheralReady(SYSCTL_PERIPH_GPIOB))
        {
        }
        //
        // Configure the pin muxing for SSI2 functions on port H4, H5, H6 and H7.
        // This step is not necessary if your part does not support pin muxing.
        //
        GPIOPinConfigure(GPIO_PB4_SSI2CLK);
        GPIOPinConfigure(GPIO_PB5_SSI2FSS);
        GPIOPinConfigure(GPIO_PB6_SSI2RX);
        GPIOPinConfigure(GPIO_PB7_SSI2TX);
    
        //
        // Configure the GPIO settings for the SSI pins.  This function also gives
        // control of these pins to the SSI hardware.  Consult the data sheet to
        // see which functions are allocated per pin.
        // The pins are assigned as follows:
        //      PH7 - SSI2Tx
        //      PH6 - SSI2Rx
        //      PH5 - SSI2Fss
        //      PH4 - SSI2CLK
        //
        GPIOPinTypeSSI(GPIO_PORTB_BASE, GPIO_PIN_7 | GPIO_PIN_6 | GPIO_PIN_5 |
                       GPIO_PIN_4);
    
        SSIDisable(SSI2_BASE);
        //
        // Configure and enable the SSI2 port for SPI slave mode.
        //
        SSIConfigSetExpClk(SSI2_BASE, SysCtlClockGet(), SSI_FRF_MOTO_MODE_2,
                           SSI_MODE_SLAVE, 660000, 8);
    
        //
        // Enable the SSI2 module.
        //
        SSIEnable(SSI2_BASE);
    
        IntEnable(INT_SSI2);
    
        SSIIntEnable(SSI2_BASE, SSI_RXTO);
    
       SSIIntRegister(SSI2_BASE, SSI2IntHandler);
    }
    
    //*****************************************************************************
    //
    // This example will send out 3 bytes of data from master, then waits for slave
    // RX timeout interrupt to fire (where these 3 bytes are read).  Then the sent
    // and returned data are compared to give out appropriate status messages on
    // UART0.
    //
    //*****************************************************************************
    int
    main(void)
    {
        /*
        unsigned long ulDataTx0[NUM_SSI_DATA];
        unsigned long ulDataRx0[NUM_SSI_DATA];
        unsigned long ulindex;
        */
        uint32_t ulDataTx0[NUM_SSI_DATA];
        uint32_t ulDataRx0[NUM_SSI_DATA];
        uint32_t ulindex;
    
        //
        // Set the clocking to run directly from the external crystal/oscillator.
        //
        SysCtlClockSet(SYSCTL_SYSDIV_1 | SYSCTL_USE_OSC | SYSCTL_OSC_MAIN |
                       SYSCTL_XTAL_16MHZ);
    
        //
        // Set up the serial console to use for displaying messages.  This is
        // just for this example program and is not needed for SSI operation.
        //
        InitConsole();
    
        //
        // Display the setup on the console.
        //
        UARTprintf("SSI ->\n");
        UARTprintf("  Mode: SPI\n");
        UARTprintf("  Data: 16-bit\n\n");
    
        //
        // Init SPI0 as master.
        //
        InitSPI0();
    
        //
        // Read any residual data from the SSI port.  This makes sure the receive
        // FIFOs are empty, so we don't read any unwanted junk.  This is done here
        // because the SPI SSI mode is full-duplex, which allows you to send and
        // receive at the same time.  The SSIDataGetNonBlocking function returns
        // "true" when data was returned, and "false" when no data was returned.
        // The "non-blocking" function checks if there is any data in the receive
        // FIFO and does not "hang" if there isn't.  This might not be needed here.
        //
        while(SSIDataGetNonBlocking(SSI0_BASE, &ulDataRx0[0]))
        {
        }
    
        //
        // Init SPI2 as slave.
        //
        InitSPI2();
    
        //
        // Enable RX timeout interrupt.
        //
        //SSIIntEnable(SSI2_BASE, SSI_RXTO);
        //IntEnable(INT_SSI2);
        //
        // Read any residual data from the SSI port.  This makes sure the receive
        // FIFOs are empty, so we don't read any unwanted junk.  This is done here
        // because the SPI SSI mode is full-duplex, which allows you to send and
        // receive at the same time.  The SSIDataGetNonBlocking function returns
        // "true" when data was returned, and "false" when no data was returned.
        // The "non-blocking" function checks if there is any data in the receive
        // FIFO and does not "hang" if there isn't.
        //
        while(SSIDataGetNonBlocking(SSI2_BASE, &g_ulDataRx2[0]))
        {
        }
    
        //
        // Clear any pending interrupt
        //
        SSIIntClear(SSI2_BASE, SSI_RXTO);
    
        //
        // Initialize the data to send.
        //
        ulDataTx0[0] = 's';
        ulDataTx0[1] = 'p';
        ulDataTx0[2] = 'i';
    
        //
        // Display indication that the SSI is transmitting data.
        //
        UARTprintf("Sent:\n  ");
    
        //
        // Send 3 bytes of data.
        //
    
        for(ulindex = 0; ulindex < NUM_SSI_DATA; ulindex++)
        {
            //
            // Display the data that SSI is transferring.
            //
            UARTprintf("'%c' ", ulDataTx0[ulindex]);
    
            //
            // Send the data using the "blocking" put function.  This function
            // will wait until there is room in the send FIFO before returning.
            // This allows you to assure that all the data you send makes it into
            // the send FIFO.
            //
            SSIDataPut(SSI0_BASE, ulDataTx0[ulindex]);
        }
        /*
        while(1){
            SSIDataPut(SSI0_BASE, 's');
        }
    */
        //
        // Wait until SSI0 is done transferring all the data in the transmit FIFO.
        //
        while(SSIBusy(SSI0_BASE))
        {
        }
    
        //
        // Enable the SSI2 interrupts to ARM core.  This as to be done here,
        // otherwise the RX timeout interrupt will fire before all the data has
        // been transferred.  This is specific to this example as both the SSI
        // master and slave are on the same microcontroller.
        //
    
    
        //
        // Wait for the SSI2 RXTO interrupt to fire and data read from RXFIFO.
        //
        while(g_ulSSI2RXTO == 0)
        {
        }
    
        //
        // Display indication that salve has receiving data.
        //
        UARTprintf("\nReceived:\n  ");
    
        //
        // Display the 3 bytes of data that were read from RX FIFO.
        //
        for(ulindex = 0; ulindex < NUM_SSI_DATA; ulindex++)
        {
            UARTprintf("'%c' ", g_ulDataRx2[ulindex]);
        }
    
        //
        // Check that the data sent was the same as the data received.
        //
        for(ulindex = 0; ulindex < NUM_SSI_DATA; ulindex++)
        {
            if(ulDataTx0[ulindex] != g_ulDataRx2[ulindex])
            {
                //
                // Tell the user that the test failed.
                //
                UARTprintf("\n\nError: Data does not exactly match.\n");
                UARTprintf("Check that Tx & Rx are connected correctly.\n\n");
    
                //
                // Wait in infinite loop for debugging.
                //
                while(1)
                {
                }
            }
        }
    
        if(g_ulSSI2RXTO > 1)
        {
            //
            // Tell the user that the test failed and the reason.
            //
            UARTprintf("\n\nError: %d interrupt(s) fired when expecting only one."
                       "\n", g_ulSSI2RXTO);
        }
        else
        {
            //
            // Tell the user that the test passed.
            //
            UARTprintf("\n\nTest Passed.\n\n");
        }
    
        while(1)
        {
        }
    }
    

  • Hi Ben,

    Try this:

        for(ulindex = 0; ulindex < NUM_SSI_DATA; ulindex++)
        {
            //
            // Send the data using the "blocking" put function.  This function
            // will wait until there is room in the send FIFO before returning.
            // This allows you to assure that all the data you send makes it into
            // the send FIFO.
            //
            SSIDataPut(SSI0_BASE, ulDataTx0[ulindex]);
            //
            // Wait until SSI0 is done transferring all the data in the transmit FIFO.
            //
            while(SSIBusy(SSI0_BASE))
            {
            }
        }
    

    You need to wait after each transmission and the UART print is liable to cause the RX Timeout to occur because that usually takes time to process.

    Best Regards,

    Ralph Jacobi

  • Hi Ralph,

    I'm still having the same result. Looking through the manual to see if there's anything else I may have overlooked

  • Introducing a slight delay between sending the letters allowed the 'p' print statement to execute, but it does not appear that this character was transferred.

  • Hello Ben,

    I was able to run your code on my LaunchPad today and there were two issues.

    One was the UART statement as I described before. It triggered the RXTO to occur before all three bytes were sent, so it was stuck spinning in the ISR because only one of three bytes made it out by the time the RXTO interrupt fired.

    Now, tried removing that and it didn't work still, and that is because of the second issue: you have a global variable used as a flag in your ISR that is not declared as a volatile. Without that declaration, the change to the variable is not being captured properly due to how code compilation/optimization works.

    volatile uint32_t g_ulSSI2RXTO = 0;
    

    With that change, I am able to get the right output: 

    SSI ->
      Mode: SPI
      Data: 16-bit
    
    Sent:
      
    Received:
      's' 'p' 'i' 
    
    Test Passed.
    

    Here is the full code I ran that works. Note that I had to change a couple of the links at the top to match TivaWare default directories.

    //*****************************************************************************
    //
    // spi_slave.c - Example demonstrating how to configure RX timeout interrupt in
    // SPI slave mode.
    //
    // Copyright (c) 2013 Texas Instruments Incorporated.  All rights reserved.
    // TI Information - Selective Disclosure
    //
    //*****************************************************************************
    
    #include <stdbool.h>
    #include <stdint.h>
    #include "inc/hw_ints.h"
    #include "inc/hw_memmap.h"
    #include "driverlib/debug.h"
    #include "driverlib/gpio.h"
    #include "driverlib/interrupt.h"
    #include "driverlib/pin_map.h"
    #include "driverlib/pwm.h"
    #include "driverlib/rom.h"
    #include "driverlib/rom_map.h"
    #include "inc/hw_memmap.h"
    #include "driverlib/qei.h"
    #include "driverlib/sysctl.h"
    #include "driverlib/uart.h"
    #include "utils/uartstdio.h"
    #include "driverlib/fpu.h"
    #include "inc/hw_types.h"
    #include "inc/hw_memmap.h"
    // The error routine that is called if the driver library encounters an error.
    #include "inc/hw_types.h"                   // Defines common types and macros
    #include "inc/hw_gpio.h"                    // Defines Macros for GPIO hardware
    #include "inc/hw_qei.h"
    #include "driverlib/ssi.h"
    
    #include "utils/uartstdio.h"
    
    //*****************************************************************************
    //
    //! \addtogroup ssi_examples_list
    //! <h1>SPI Slave (spi_slave)</h1>
    //!
    //! This example configures the SSI0 as SPI Master, SSI2 as SPI Slave on an
    //! EK-LM4F232 evaluation board.  RX timeout interrupt is configured for SSI2.
    //! Three characters are sent on the master TX, then SSI2 RX timeout interrupt
    //! is enabled. The code then waits for the interrupt to fire.  Once the
    //! interrupt is fired the data from slave RX FIFO is read and compared to the
    //! transmitted packet and the appropriate status is displayed.  If everything
    //! goes well you should see a "Test Passed." message on the terminal window.
    //! The status messages are transmitted over UART0 at 115200 baud and 8-n-1
    //! mode.
    //!
    //! This example uses the following peripherals and I/O signals on EK-LM4F232.
    //! You must review these and change as needed for your own board:
    //! - SSI0 peripheral
    //! - GPIO Port A peripheral (for SSI0 pins) (available near the SD card slot)
    //! - SSI0CLK - PA2
    //! - SSI0Fss - PA3
    //! - SSI0Rx  - PA4
    //! - SSI0Tx  - PA5
    //!
    //! - SSI2 peripheral
    //! - GPIO Port M peripheral (for SSI2 pins) (available right below the OLED)
    //! - SSI2CLK - PH4
    //! - SSI2Fss - PH5
    //! - SSI2Rx  - PH6
    //! - SSI2Tx  - PH7
    //!
    //! For this example to work, the following connections are needed on the
    //! EK-LM4F232 evaluation board.
    //! - SSI0CLK(PA2) - SSI2CLK(PH4)
    //! - SSI0Fss(PA3) - SSI0Fss(PH5)
    //! - SSI0Rx(PA4)  - SSI2Tx(PH7)
    //! - SSI0Tx(PA5)  - SSI2Rx(PH6)
    //!
    //! The following UART signals are configured only for displaying console
    //! messages for this example.  These are not required for operation of SSI0.
    //! - UART0 peripheral
    //! - GPIO Port A peripheral (for UART0 pins)
    //! - UART0RX - PA0
    //! - UART0TX - PA1
    //!
    //! This example uses the following interrupt handlers.  To use this example
    //! in your own application you must add these interrupt handlers to your
    //! vector table.
    //! - SSI2IntHandler.
    //!
    //
    //*****************************************************************************
    
    //*****************************************************************************
    //
    // Number of bytes to send and receive.
    //
    //*****************************************************************************
    #define NUM_SSI_DATA 3
    
    //*****************************************************************************
    //
    // Global variables used in interrupt handler and the main loop.
    //
    //*****************************************************************************
    //volatile unsigned long g_ulSSI2RXTO = 0;
    //unsigned long g_ulDataRx2[NUM_SSI_DATA];
    
    volatile uint32_t g_ulSSI2RXTO = 0;
    uint32_t g_ulDataRx2[NUM_SSI_DATA];
    //*****************************************************************************
    //
    // Interrupt handler for SSI2 peripheral in slave mode.  It reads the interrupt
    // status and if the interrupt is fired by a RX time out interrupt it reads the
    // SSI2 RX FIFO and increments a counter to tell the main loop that RX timeout
    // interrupt was fired.
    //
    //*****************************************************************************
    void
    SSI2IntHandler(void)
    {
        unsigned long ulStatus, ulIndex;
    
        //
        // Read interrupt status.
        //
        ulStatus = SSIIntStatus(SSI2_BASE, 1);
    
        //
        // Check the reason for the interrupt.
        //
        if(ulStatus & SSI_RXTO)
        {
            //
            // Interrupt is because of RX time out.  So increment counter to tell
            // main loop that RX timeout interrupt occurred.
            //
            g_ulSSI2RXTO++;
    
            //
            // Read NUM_SSI_DATA bytes of data from SSI2 RX FIFO.
            //
            for(ulIndex = 0; ulIndex < NUM_SSI_DATA; ulIndex++)
            {
                SSIDataGet(SSI2_BASE, &g_ulDataRx2[ulIndex]);
            }
        }
    
        //
        // Clear interrupts.
        //
        SSIIntClear(SSI2_BASE, ulStatus);
    }
    
    //*****************************************************************************
    //
    // This function sets up UART0 to be used for a console to display information
    // as the example is running.
    //
    //*****************************************************************************
    void
    InitConsole(void)
    {
        //
        // Enable GPIO port A which is used for UART0 pins.
        //
        SysCtlPeripheralEnable(SYSCTL_PERIPH_GPIOA);
    
        //
        // Configure the pin muxing for UART0 functions on port A0 and A1.
        // This step is not necessary if your part does not support pin muxing.
        //
        GPIOPinConfigure(GPIO_PA0_U0RX);
        GPIOPinConfigure(GPIO_PA1_U0TX);
    
        //
        // Select the alternate (UART) function for these pins.
        //
        GPIOPinTypeUART(GPIO_PORTA_BASE, GPIO_PIN_0 | GPIO_PIN_1);
    
        //
        // Initialize the UART for console I/O.
        //
        //UARTStdioInit(0);
        UARTStdioConfig(0, 115200, 16000000);
    
    }
    
    //*****************************************************************************
    //
    // This function sets up SPI0 to be used as Master in freescale mode.
    //
    //*****************************************************************************
    void
    InitSPI0(void)
    {
        //
        // The SSI0 peripheral must be enabled for use.
        //
        SysCtlPeripheralEnable(SYSCTL_PERIPH_SSI0);
    
        while (!SysCtlPeripheralReady(SYSCTL_PERIPH_SSI0))
        {
        }
        //
        // For this example SSI0 is used with PortA[5:2].  GPIO port A needs to be
        // enabled so these pins can be used.
        //
        SysCtlPeripheralEnable(SYSCTL_PERIPH_GPIOA);
    
        while (!SysCtlPeripheralReady(SYSCTL_PERIPH_GPIOA))
        {
        }
        //
        // Configure the pin muxing for SSI0 functions on port A2, A3, A4, and A5.
        // This step is not necessary if your part does not support pin muxing.
        //
        GPIOPinConfigure(GPIO_PA2_SSI0CLK);
        GPIOPinConfigure(GPIO_PA3_SSI0FSS);
        GPIOPinConfigure(GPIO_PA4_SSI0RX);
        GPIOPinConfigure(GPIO_PA5_SSI0TX);
    
        //
        // Configure the GPIO settings for the SSI pins.  This function also gives
        // control of these pins to the SSI hardware.  Consult the data sheet to
        // see which functions are allocated per pin.
        // The pins are assigned as follows:
        //      PA5 - SSI0Tx
        //      PA4 - SSI0Rx
        //      PA3 - SSI0Fss
        //      PA2 - SSI0CLK
        //
        GPIOPinTypeSSI(GPIO_PORTA_BASE, GPIO_PIN_5 | GPIO_PIN_4 | GPIO_PIN_3 |
                       GPIO_PIN_2);
    
        SSIDisable(SSI0_BASE);
        //
        // Configure and enable the SSI0 port for SPI master mode.
        //
        SSIConfigSetExpClk(SSI0_BASE, SysCtlClockGet(), SSI_FRF_MOTO_MODE_2,
                           SSI_MODE_MASTER, 660000, 8);
    
        //
        // Enable the SSI0 module.
        //
        SSIEnable(SSI0_BASE);
    }
    
    //*****************************************************************************
    //
    // This function sets up SPI2 to be used as slave in freescale mode.
    //
    //*****************************************************************************
    void
    InitSPI2(void)
    {
        //
        // The SSI0 peripheral must be enabled for use.
        //
        SysCtlPeripheralEnable(SYSCTL_PERIPH_SSI2);
    
        while (!SysCtlPeripheralReady(SYSCTL_PERIPH_SSI2))
        {
        }
        //
        // For this example SSI2 is used with PortH[7:4].  GPIO port H needs to be
        // enabled so these pins can be used.
        //
        SysCtlPeripheralEnable(SYSCTL_PERIPH_GPIOB);
    
        while (!SysCtlPeripheralReady(SYSCTL_PERIPH_GPIOB))
        {
        }
        //
        // Configure the pin muxing for SSI2 functions on port H4, H5, H6 and H7.
        // This step is not necessary if your part does not support pin muxing.
        //
        GPIOPinConfigure(GPIO_PB4_SSI2CLK);
        GPIOPinConfigure(GPIO_PB5_SSI2FSS);
        GPIOPinConfigure(GPIO_PB6_SSI2RX);
        GPIOPinConfigure(GPIO_PB7_SSI2TX);
    
        //
        // Configure the GPIO settings for the SSI pins.  This function also gives
        // control of these pins to the SSI hardware.  Consult the data sheet to
        // see which functions are allocated per pin.
        // The pins are assigned as follows:
        //      PH7 - SSI2Tx
        //      PH6 - SSI2Rx
        //      PH5 - SSI2Fss
        //      PH4 - SSI2CLK
        //
        GPIOPinTypeSSI(GPIO_PORTB_BASE, GPIO_PIN_7 | GPIO_PIN_6 | GPIO_PIN_5 |
                       GPIO_PIN_4);
    
        SSIDisable(SSI2_BASE);
        //
        // Configure and enable the SSI2 port for SPI slave mode.
        //
        SSIConfigSetExpClk(SSI2_BASE, SysCtlClockGet(), SSI_FRF_MOTO_MODE_2,
                           SSI_MODE_SLAVE, 660000, 8);
    
        //
        // Enable the SSI2 module.
        //
        SSIEnable(SSI2_BASE);
    
        IntEnable(INT_SSI2);
    
        SSIIntEnable(SSI2_BASE, SSI_RXTO);
    
        SSIIntRegister(SSI2_BASE, SSI2IntHandler);
    }
    
    //*****************************************************************************
    //
    // This example will send out 3 bytes of data from master, then waits for slave
    // RX timeout interrupt to fire (where these 3 bytes are read).  Then the sent
    // and returned data are compared to give out appropriate status messages on
    // UART0.
    //
    //*****************************************************************************
    int
    main(void)
    {
        /*
        unsigned long ulDataTx0[NUM_SSI_DATA];
        unsigned long ulDataRx0[NUM_SSI_DATA];
        unsigned long ulindex;
        */
        uint32_t ulDataTx0[NUM_SSI_DATA];
        uint32_t ulDataRx0[NUM_SSI_DATA];
        uint32_t ulindex;
    
        //
        // Set the clocking to run directly from the external crystal/oscillator.
        //
        SysCtlClockSet(SYSCTL_SYSDIV_1 | SYSCTL_USE_OSC | SYSCTL_OSC_MAIN |
                       SYSCTL_XTAL_16MHZ);
    
        //
        // Set up the serial console to use for displaying messages.  This is
        // just for this example program and is not needed for SSI operation.
        //
        InitConsole();
    
        //
        // Display the setup on the console.
        //
        UARTprintf("SSI ->\n");
        UARTprintf("  Mode: SPI\n");
        UARTprintf("  Data: 16-bit\n\n");
    
        //
        // Init SPI0 as master.
        //
        InitSPI0();
    
        //
        // Read any residual data from the SSI port.  This makes sure the receive
        // FIFOs are empty, so we don't read any unwanted junk.  This is done here
        // because the SPI SSI mode is full-duplex, which allows you to send and
        // receive at the same time.  The SSIDataGetNonBlocking function returns
        // "true" when data was returned, and "false" when no data was returned.
        // The "non-blocking" function checks if there is any data in the receive
        // FIFO and does not "hang" if there isn't.  This might not be needed here.
        //
        while(SSIDataGetNonBlocking(SSI0_BASE, &ulDataRx0[0]))
        {
        }
    
        //
        // Init SPI2 as slave.
        //
        InitSPI2();
    
        //
        // Enable RX timeout interrupt.
        //
        //SSIIntEnable(SSI2_BASE, SSI_RXTO);
        //IntEnable(INT_SSI2);
        //
        // Read any residual data from the SSI port.  This makes sure the receive
        // FIFOs are empty, so we don't read any unwanted junk.  This is done here
        // because the SPI SSI mode is full-duplex, which allows you to send and
        // receive at the same time.  The SSIDataGetNonBlocking function returns
        // "true" when data was returned, and "false" when no data was returned.
        // The "non-blocking" function checks if there is any data in the receive
        // FIFO and does not "hang" if there isn't.
        //
        while(SSIDataGetNonBlocking(SSI2_BASE, &g_ulDataRx2[0]))
        {
        }
    
        //
        // Clear any pending interrupt
        //
        SSIIntClear(SSI2_BASE, SSI_RXTO);
    
        //
        // Initialize the data to send.
        //
        ulDataTx0[0] = 's';
        ulDataTx0[1] = 'p';
        ulDataTx0[2] = 'i';
    
        //
        // Display indication that the SSI is transmitting data.
        //
        UARTprintf("Sent:\n  ");
    
        //
        // Send 3 bytes of data.
        //
    
        for(ulindex = 0; ulindex < NUM_SSI_DATA; ulindex++)
        {
            //
            // Display the data that SSI is transferring.
            //
    //        UARTprintf("'%c' ", ulDataTx0[ulindex]);
    
            //
            // Send the data using the "blocking" put function.  This function
            // will wait until there is room in the send FIFO before returning.
            // This allows you to assure that all the data you send makes it into
            // the send FIFO.
            //
            SSIDataPut(SSI0_BASE, ulDataTx0[ulindex]);
    
            //
            // Wait until SSI0 is done transferring all the data in the transmit FIFO.
            //
            while(SSIBusy(SSI0_BASE))
            {
            }
        }
        /*
        while(1){
            SSIDataPut(SSI0_BASE, 's');
        }
    */
    
        //
        // Enable the SSI2 interrupts to ARM core.  This as to be done here,
        // otherwise the RX timeout interrupt will fire before all the data has
        // been transferred.  This is specific to this example as both the SSI
        // master and slave are on the same microcontroller.
        //
    
    
        //
        // Wait for the SSI2 RXTO interrupt to fire and data read from RXFIFO.
        //
        while(g_ulSSI2RXTO == 0)
        {
        }
    
        //
        // Display indication that salve has receiving data.
        //
        UARTprintf("\nReceived:\n  ");
    
        //
        // Display the 3 bytes of data that were read from RX FIFO.
        //
        for(ulindex = 0; ulindex < NUM_SSI_DATA; ulindex++)
        {
            UARTprintf("'%c' ", g_ulDataRx2[ulindex]);
        }
    
        //
        // Check that the data sent was the same as the data received.
        //
        for(ulindex = 0; ulindex < NUM_SSI_DATA; ulindex++)
        {
            if(ulDataTx0[ulindex] != g_ulDataRx2[ulindex])
            {
                //
                // Tell the user that the test failed.
                //
                UARTprintf("\n\nError: Data does not exactly match.\n");
                UARTprintf("Check that Tx & Rx are connected correctly.\n\n");
    
                //
                // Wait in infinite loop for debugging.
                //
                while(1)
                {
                }
            }
        }
    
        if(g_ulSSI2RXTO > 1)
        {
            //
            // Tell the user that the test failed and the reason.
            //
            UARTprintf("\n\nError: %d interrupt(s) fired when expecting only one."
                       "\n", g_ulSSI2RXTO);
        }
        else
        {
            //
            // Tell the user that the test passed.
            //
            UARTprintf("\n\nTest Passed.\n\n");
        }
    
        while(1)
        {
        }
    }
    

    Best Regards,

    Ralph Jacobi

  • This works. Thanks for your help.