This thread has been locked.

If you have a related question, please click the "Ask a related question" button in the top right corner. The newly created question will be automatically linked to this question.

EK-TM4C1294XL: SPI Slave Mode

Part Number: EK-TM4C1294XL

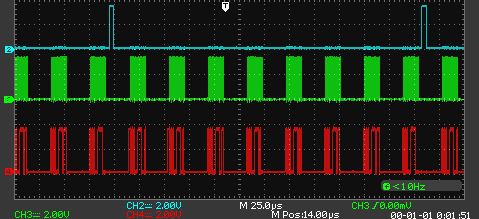
I need to use EK-TM4C1294XL as SPI slave (SSI2 port). Data from the master comes in a packet of 8 registers of 16 bytes (128 bits in total), at a frequency of 1 MHz. The time between new CS is minimal, the data goes continuously one after another.
How can I manage to get this data on the EK-TM4C1294XL and correctly parse it into registers?
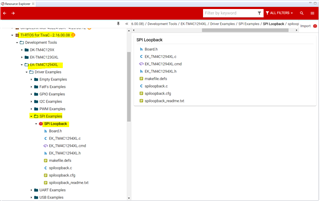
I would like to work in TI-RTOS.

  • Hi,

      If you are receiving the data quickly you can operate in interrupt mode where an interrupt is generated when the RXFIFO is half full or more. In the RX ISR you can service the incoming data in parallel while more data are coming from the master.

     We don't have a pure SSI slave example. I will suggest you reference the TI-RTOS SPI Loopback example as a starting point and make the necessary change  for your application. This example will use the TI-RTOS SPI driver. 

    If you want to use the TivaWare SPI driver then you can also look at the example such as C:\ti\TivaWare_C_Series-2.2.0.295\examples\boards\ek-tm4c1294xl\ssi_master_slave_xfer. 

  • I use example ssi_master_slave_xfer. I try 10 times to get the same sequence, but each time I get a new array of 8 elements...

    void
    SSI2IntHandler(void)
    {
        uint32_t ui32Status;
    
        //
        // Read SSIMIS (SSI Masked Interrupt Status).
        //
        ui32Status = MAP_SSIIntStatus(SSI2_BASE, true);
    
        //
        // Clear the SSI interrupt.
        //
        MAP_SSIIntClear(SSI2_BASE, ui32Status);
    
        //
        // Turn off the RX FIFO interrupt.
        //
        MAP_SSIIntDisable(SSI2_BASE, SSI_RXFF);
    
        g_breceiveFlag = 1;
    }

    int t=0;
    
        while (t<10)
        {
            //
            // Wait until SSI1 receives the half-full interrupt on the RX FIFO.
            //
            while (g_breceiveFlag == 0);
    
            //
            // Display indication that the SSI0 is receiving data.
            //
            //
            // Receive 4 bytes of data.
            //
            for(ui32Index = 0; ui32Index < NUM_SSI_DATA; ui32Index++)
            {
                //
                // Receive the data using the "blocking" Get function.  This function
                // will wait until there is data in the receive FIFO before returning.
                //
                MAP_SSIDataGet(SSI2_BASE, &pui32DataRx[ui32Index]);
    
                //
                // Since we are using 16-bit data, mask off the MSB.
                //
                //pui32DataRx[ui32Index] &= 0xFFFF;
    
                //
                // Display the data that SSI0 received.
                //
                //UARTprintf("'%d' ", pui32DataRx[ui32Index]);
            }
    
    
            UARTprintf("\nSSI2 Received: '%d' \n", t);
            for(ui32Index = 0; ui32Index < NUM_SSI_DATA; ui32Index++)
            {
                pui32DataRx[ui32Index] &= 0xFFFF;
                //
                // Display the data that SSI0 received.
                //
                UARTprintf("'%d' ", pui32DataRx[ui32Index]);
            }
            UARTprintf("\n\nMaster-Slave Transfer Complete.\n");
    
    
            //
            // Display indication that the SSI1 is receiving data.
            //
            t++;
        }

    SSI2 Received: '1'
    '43250' '43251' '43252' '43253' '43254' '43255' '43256' '43249'
    
    Master-Slave Transfer Complete.
    
    SSI2 Received: '2'
    '43253' '43254' '43255' '43256' '43249' '43250' '43251' '43252'
    
    Master-Slave Transfer Complete.
    
    SSI2 Received: '3'
    '43249' '43250' '43251' '43252' '43253' '43254' '43255' '43256'
    
    Master-Slave Transfer Complete.
    
    SSI2 Received: '4'
    '43252' '43253' '43254' '43255' '43256' '43249' '43250' '43251'
    
    Master-Slave Transfer Complete.
    
    SSI2 Received: '5'
    '43256' '43249' '43250' '43251' '43252' '43253' '43254' '43255'
    
    Master-Slave Transfer Complete.
    
    SSI2 Received: '6'
    '43252' '43253' '43254' '43255' '43256' '43249' '43250' '43251'
    
    Master-Slave Transfer Complete.
    
    SSI2 Received: '7'
    '43255' '43256' '43249' '43250' '43251' '43252' '43253' '43254'
    
    Master-Slave Transfer Complete.
    
    SSI2 Received: '8'
    '43251' '43252' '43253' '43254' '43255' '43256' '43249' '43250'
    
    Master-Slave Transfer Complete.
    
    SSI2 Received: '9'
    '43254' '43255' '43256' '43249' '43250' '43251' '43252' '43253'
    
    Master-Slave Transfer Complete.
    

    Array from master: '43249' '43250' '43251' '43252' '43253' '43254' '43255' '43256'

    Waveform:

  • Hi,

      I think after the below line you need to reset the g_breceiveFlag to 0 again. 

            while (g_breceiveFlag == 0);

            g_breceiveFlag = 0; // Add this line


  • It seems to work with TivaWare, how now to repeat the same thing in RTOS. How to handle SSI_RXFF interrupt in RTOS and transfer it to hwi.

  • Hi,

      Please go to section 5 Using Hwi on this TI-RTOS Workshop training for details about setting up Hwi. Page 166 has examples to setup Hwi for Tiva MCU. 

    https://training.ti.com/sites/default/files/docs/TI_RTOS_Kernel_Workshop_Student_Guide_rev4.00.pdf

    Below is an example to setup the Hwi for Timer2A. 

    //----------------------------------------
    // BIOS header files
    //----------------------------------------
    #include <xdc/std.h>  						//mandatory - have to include first, for BIOS types
    #include <ti/sysbios/BIOS.h> 				//mandatory - if you call APIs like BIOS_start()
    #include <xdc/runtime/Log.h>				//needed for any Log_info() call
    #include <xdc/cfg/global.h> 				//header file for statically defined objects/handles
    #include <xdc/runtime/System.h>
    #include <xdc/runtime/Error.h>
    #include <ti/sysbios/hal/Hwi.h>
    
    
    //------------------------------------------
    // TivaWare Header Files
    //------------------------------------------
    #include <stdint.h>
    #include <stdbool.h>
    
    #include "inc/hw_types.h"
    #include "inc/hw_memmap.h"
    #include "driverlib/sysctl.h"
    #include "driverlib/gpio.h"
    #include "inc/hw_ints.h"
    #include "driverlib/interrupt.h"
    #include "driverlib/timer.h"
    
    
    //----------------------------------------
    // Prototypes
    //----------------------------------------
    void hardware_init(void);
    void ledToggle(void);
    
    
    //---------------------------------------
    // Globals
    //---------------------------------------
    volatile int16_t i16ToggleCount = 0;
    
    
    //---------------------------------------------------------------------------
    // main()
    //---------------------------------------------------------------------------
    void main(void)
    {
    
        hardware_init();                         // init hardware via Xware
    
        Hwi_Params hwiParams;
        Hwi_Handle myHwi;
        Error_Block eb;
        /* Initialize error block and hwiParams to default values */
        Error_init(&eb);
        Hwi_Params_init(&hwiParams);
        hwiParams.enableInt = FALSE;
        myHwi = Hwi_create(39, (Hwi_FuncPtr)ledToggle, &hwiParams, &eb);
        if (myHwi == NULL) {
        System_abort("Hwi create failed");
        }
        Hwi_enableInterrupt(39);
    
    
       BIOS_start();
    
    }
    
    
    //---------------------------------------------------------------------------
    // hardware_init()
    //
    // inits GPIO pins for toggling the LED
    //---------------------------------------------------------------------------
    void hardware_init(void)
    {
    	uint32_t ui32Period;
    
    	//Set CPU Clock to 40MHz. 400MHz PLL/2 = 200 DIV 5 = 40MHz
    	SysCtlClockSet(SYSCTL_SYSDIV_5|SYSCTL_USE_PLL|SYSCTL_XTAL_16MHZ|SYSCTL_OSC_MAIN);
    
    	// ADD Tiva-C GPIO setup - enables port, sets pins 1-3 (RGB) pins for output
    	SysCtlPeripheralEnable(SYSCTL_PERIPH_GPIOF);
    	GPIOPinTypeGPIOOutput(GPIO_PORTF_BASE, GPIO_PIN_1|GPIO_PIN_2|GPIO_PIN_3);
    
    	// Turn on the LED
    	GPIOPinWrite(GPIO_PORTF_BASE, GPIO_PIN_1|GPIO_PIN_2|GPIO_PIN_3, 4);
    
    	// Timer 2 setup code
    	SysCtlPeripheralEnable(SYSCTL_PERIPH_TIMER2);			// enable Timer 2 periph clks
    	TimerConfigure(TIMER2_BASE, TIMER_CFG_PERIODIC);		// cfg Timer 2 mode - periodic
    
    	ui32Period = (SysCtlClockGet() /2);						// period = CPU clk div 2 (500ms)
    	TimerLoadSet(TIMER2_BASE, TIMER_A, ui32Period);			// set Timer 2 period
    
    	TimerIntEnable(TIMER2_BASE, TIMER_TIMA_TIMEOUT);		// enables Timer 2 to interrupt CPU
    
    	TimerEnable(TIMER2_BASE, TIMER_A);						// enable Timer 2
    
    }
    
    
    //---------------------------------------------------------------------------
    // ledToggle()
    //
    // toggles LED on Tiva-C LaunchPad
    //---------------------------------------------------------------------------
    void ledToggle(void)
    {
        TimerIntClear(TIMER2_BASE, TIMER_TIMA_TIMEOUT);			// must clear timer flag FROM timer
    
    	// LED values - 2=RED, 4=BLUE, 8=GREEN
    	if(GPIOPinRead(GPIO_PORTF_BASE, GPIO_PIN_2))
    	{
    		GPIOPinWrite(GPIO_PORTF_BASE, GPIO_PIN_1|GPIO_PIN_2|GPIO_PIN_3, 0);
    	}
    	else
    	{
    		GPIOPinWrite(GPIO_PORTF_BASE, GPIO_PIN_2, 4);
    	}
    
    	i16ToggleCount += 1;									// keep track of #toggles
    
    	Log_info1("LED TOGGLED [%u] TIMES",i16ToggleCount);		// send toggle count to UIA
    
    }