This thread has been locked.

If you have a related question, please click the "Ask a related question" button in the top right corner. The newly created question will be automatically linked to this question.

MCU-PLUS-SDK-AM243X: Flash-driver sometimes reads garbage when using OSPI-PHY-mode with Gigadevice-Flash

Part Number: MCU-PLUS-SDK-AM243X


Hello,

we are using MCU Plus SDK 08.04 without the new flash-driver since there is still an issue with ISSI-Flashes we are working on with TI. We are also using different flashes on our pcbas. The correct flash is identified by its id on startup and the matching configurations are then loaded. So currently there can be an ISSI or an Gigadevice (GD25LX256E)-Flash.

The ISSI-Flashes work with PHY-mode but the Gigadevice-Flashes do not properly. At least that's our first assumption. It may also occur now because we got some new charges of AM2434-Sitara SoCs which are used with the combination of the GigaDevice-Flash.

We noticed that at Boot-time, when booting from Flash the Flash_read-commands in our SBL return with Success but the read data is not correct. This happens randomly sometimes. Like in 20% of the power-ups.

This does not happen with the ISSI-Flash. We set the configuration of the Gigadevice-flash according to its data sheet. Also the RBL does work, and the read-id-command in 1s-1s-1s-mode also works. Also setting it to OCTAL SPI works but then using the PHY-Mode seems to break the operation.

The speed is set to 200 MHz or to 133 Mhz, in both cases the problem occurs, when the PHY is enabled. When PHY is disabled the problem does not occur.

We have 1k Pull-Down connected to DQS, which should be suitable.

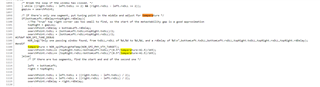
To catch the issue I inserted a while-loop in our SBL-code when the read data is not correct. Interestingly when I connect via CCS the memory browser shows the correct data inside the flash and if I trigger a read-operation (so jumping to the read-operation in CCS and execute it) it suddenly reads the correct data.

I thought as a temporary workaround that maybe a sleep would then provoke the correct behaviour but even a 200 ms-sleep after Flash_open still does not help.

I saw there is a big file for PHY-tuning. Does this take care of the mentioned bug of the PHY-mode in the errata (i2189)?

Since our SBL uses sensitive data which is important for booting which is located inside the flash, a wrong read would lead to a fallback and the correct fw which should be booted is not booted anymore. This will mean that from now on produced devices will end in a non-useable state for our customers. This is a blocking point for us.

As a workaround we can disable the PHY-mode, but that would mean we would only run with 50 MHz. And we also noticed that the read-operations will take much longer. This would slow the application since we also use a webserver which needs flash-access and a file-system and so on.

Best regards

Felix

  • Hi ,

    The best guess is that their curve is slightly shifted here and there, and the algorithm doesn’t start at the correct ends. We have some stuff we can try, will discuss the same in the call scheduled.

    The one external factor which can fail the tuning is temperature (maybe ?).

    Best regards,
    Aakash

  • Hi Aakash,

    I will follow up with a phyGraph-Curve in a bad case and send it to you and Anand as we agreed in the meeting. The temperature thing could probably be a reason since it does not happen at first power-up but at like the 2nd or 3rd off-on-action when the device already has some temperature.

    Best regards

    Felix

  • Hi ,

    As discussed, if you are able to generate a graph with OSPI_phyTuneGrapher which needs to be called independently. Then we might get some data. This data can be used to plot the graph. After the graph is plotted, we can find what are optimum parameters for the PHY. Do let us know if you have any update on this.

    Best Regards,
    Aakash

  • Hey Aakash, so I implemented the function and wanted to catch that case again.

    Well. I think we need to consider multiple cases.

    The first products that showed the problem were newly finished products with a housing and a potting compound and with latest Sitara hs-fs-derivates. Since we a re still in the development phase we have multiple stages out there. I now have a pcba without potting compound with GigaDevice flash and Sitara gp which was produced some months earlier. And here I can't recreate the issue. I also tried to heaten it up to see if this affects it but it does not.

    Also it did not happen with all of the latest produced devices. Just with some few of them. I am also checking if something in the layout changed maybe. But it seems that this only occurs with the latest Sitara batch we received. I will come back with closer information and I also try to find a faulty device again, my last one got damaged somehow in the process (we needed to scratch it and possibly some components were damaged).

    I think I will receive a new device next week and then I try to recreate the issue and create the graph.

    Best regards,

    Felix

  • Hi Felix,

    I have requested help from the expert in this. He can help you find the problem much more in detail.

    Best Regards,
    Aakash

  • Hi Felix, 

    Do you have an estimate of how many new boards and in how many of them the issue presents? Also, once you find a failing board, is the issue reproducible on constantly or does it only happen intermittently? is the product also showing issues at boot time with the GD flash or is this exclusive to runtime? 

    Please let us know if you find any differences between the revisions of the schematics, while in the meantime I'll try to find out if there is anything between GP and HS-FS parts that could cause this behavior. I'll update the thread if we figure out something that could be cause for concern. 

    Best,

    Daniel

  • Hey Daniel,

    I coordinated with our colleagues. We will provide the information as soon as possible.

    Currently the issue seems to happen in 75% of the devices. This was definetely fixed with the workaround by disabling the OSPI-PHY. Our service department checked it. The issue was reproducible with the one board I had. But "constantly" in a sense that every third to fourth boot had this behaviour.

    The issues are happening in the bootloader and also in the application, but therefore notice: The Bootloader is a separate "application" in this case: the bootloader used the OSPI-PHY. So it can happen that the boot succeeds but then the following application initializes the OSPI again also with the OSPI-PHY enabled. here we also noticed at startup that our fileSystem could not read the data correctly and ran into a custom assert of us, which happens when the data is corrupt. So either the one (Bootloader did not succeed to read correct data from flash) or the other case (application-flash-read did not succeed) happened.

    Sadly the mentioned device was damaged when opening it and thus I currently have no device here with which I can reproduce it now. We are opening another device currently. So I will keep you also updated and provide a PHY-Graph like mentioned in the beginning as soon as I can.

    Best regards

    Felix

  • Hi Felix, 

    Thanks for the update, I am still trying to find information on my side regarding the type of device, so far it seems that there shouldn't be anything that could cause this issue between GD and HS-FS parts.

    Best,

    Daniel

  • ISSI_25WX256_working_02_out.txtGigaDevice_25LX256E_working_02_out.txt
    The issue using the phy with OSPI could not yet be reproduced, but the phyTuneGraph could be recorded for the ISSI device (working without issues) and the GigaDevice device (which sometimes has issues). Both graphs are captured of working flash devices at room temperature, with a clock of 200Mhz. Could you see any issues why the GigaDevice flash may start with a bad DDR tuning?

  • Hi Robert,

    From the plots, it looks like RD delay is already being set to 2. From some research, switching the device to HSFS most likely has no impact in the behavior observed before. A few things:

    • So you have no access anymore to the board that was originally failing? an interest experiment would have been placing a HSFS device on it and check for functionality
    • What is currently your setup? did you get a new board with an HSFS device and GigaDevice flash and are testing on this currently? 
    • Could you try lowering the speed to 166MHz and see if the issue is reproduced in the new setup or not? 

    Best,

    Daniel

  • Hi Felix,

    This thread has been unlocked. Please answer Daniel's question.

    Best regards,

    Ming

  • Hi Daniel,
    sorry for replying so late.

    Our Setup is running the second Stage Bootloader, OSPI is configured with:

    /* OSPI attributes */
    static OSPI_Attrs gOspiAttrs[CONFIG_OSPI_NUM_INSTANCES] =
    {
        {
            .baseAddr             = CSL_FSS0_OSPI0_CTRL_BASE,
            .dataBaseAddr         = CSL_FSS0_DAT_REG1_BASE,
            .inputClkFreq         = 166666666U,
            .intrNum              = 171U,
            .intrEnable           = FALSE,
            .intrPriority         = 4U,
            .dtrEnable            = TRUE,
            .dmaEnable            = TRUE,
            .phyEnable            = TRUE,
            .dacEnable            = FALSE,
            .xferLines            = OSPI_XFER_LINES_OCTAL,
            .chipSelect           = OSPI_CS0,
            .frmFmt               = OSPI_FF_POL0_PHA0,
            .decChipSelect        = OSPI_DECODER_SELECT4,
            .baudRateDiv          = 4,
            .dmaRestrictedRegions = gOspiDmaRestrictRegions,
        },
    };

    We found a device with the issue, in case of the error a bad txDll, rxDll had been chosen. Tracing the DDR tune algorithm showed, that a singularity has been found outside in the lowtxDll, rxDll corner, with a successful read of the attack vector. The traces logged to RAM for each phy tune setting. Each setting is represented by a uint32 where first byte indicates a AttackVector hit with 0x01 and miss with 0x00. The second byte is the rxDll value, the third the txDll value und the fourth the rdDelay value.

    selectedPhyConfig	struct OSPI_PhyConfig	{txDLL=8,rxDLL=6,rdDelay=2}	0x700123F4	
    otp1bottomLeft	struct OSPI_PhyConfig	{txDLL=8,rxDLL=6,rdDelay=2}	0x70012368	
    otp1topRight	struct OSPI_PhyConfig	{txDLL=9,rxDLL=6,rdDelay=2}	0x700123C8	
    otp1gapLow	struct OSPI_PhyConfig	{txDLL=9,rxDLL=6,rdDelay=2}	0x70012388	
    otp1gapHigh	struct OSPI_PhyConfig	{txDLL=0,rxDLL=0,rdDelay=0}	0x70012378	
    otp1rxLow	struct OSPI_PhyConfig	{txDLL=18,rxDLL=6,rdDelay=2}	0x700123A8	
    otp1rxHigh	struct OSPI_PhyConfig	{txDLL=18,rxDLL=42,rdDelay=2}	0x70012398	
    otp1txLow	struct OSPI_PhyConfig	{txDLL=8,rxDLL=36,rdDelay=2}	0x700123E8	
    otp1txHigh	struct OSPI_PhyConfig	{txDLL=63,rxDLL=12,rdDelay=2}	0x700123D8	
    otp1temp	struct OSPI_PhyConfig	{txDLL=59,rxDLL=38,rdDelay=2}	0x700123B8	
    otp1slope	float	0.654545426	0x7007637C	
    otp1intercept	float	0.763637543	0x70076378	


    @70010768 --> phyTrace
    
    stat rx tx rd
    
    01 00 00 00 : --> Inital check if attack vector exists
    
    
    : scan until first attack vector hit (OSPI_phyFindRxLow) 
    00 00 12 00  00 01 12 00  00 02 12 00  00 03 12 00  00 04 12 00  00 05 12 00  00 06 12 00  00 07 12 00 
    00 08 12 00  00 09 12 00  00 0A 12 00  00 0B 12 00  00 0C 12 00  00 0D 12 00  00 0E 12 00  00 0F 12 00 
    00 01 12 01  00 01 12 01  00 02 12 01  00 03 12 01  00 04 12 01  00 05 12 01  00 06 12 01  00 07 12 01 
    00 08 12 01  00 09 12 01  00 0A 12 01  00 0B 12 01  00 0C 12 01  00 0D 12 01  00 0E 12 01  00 0F 12 01 
    00 00 12 02  00 01 12 02  00 02 12 02  00 03 12 02  00 04 12 02  00 05 12 02  01 06 12 02  
    --> Lead to otp1rxLow	struct OSPI_PhyConfig	{txDLL=18,rxDLL=6,rdDelay=2}	0x700123A8
    
    : scan from rxDLL max to min to get first occurrence
    00 3F 12 00  00 3E 12 00  00 3D 12 00  00 3C 12 00  00 3B 12 00  00 3A 12 00  00 39 12 00  00 38 12 00 
    00 37 12 00  00 36 12 00  00 35 12 00  00 34 12 00  00 33 12 00  00 32 12 00  00 31 12 00  00 30 12 00 
    00 2F 12 00  00 2E 12 00  00 2D 12 00  00 2C 12 00  00 2B 12 00  00 2A 12 00  00 29 12 00  00 28 12 00 
    00 27 12 00  00 26 12 00  00 25 12 00  00 24 12 00  00 23 12 00  00 22 12 00  00 21 12 00  00 20 12 00 
    00 1F 12 00  00 1E 12 00  00 1D 12 00  00 1C 12 00  00 1B 12 00  00 1A 12 00  00 19 12 00  00 3F 12 01 
    00 3E 12 01  00 3D 12 01  00 3C 12 01  00 3B 12 01  00 3A 12 01  00 39 12 01  00 38 12 01  00 37 12 01 
    00 36 12 01  00 35 12 01  00 34 12 01  00 33 12 01  00 32 12 01  00 31 12 01  00 30 12 01  00 2F 12 01 
    00 2E 12 01  00 2D 12 01  00 2C 12 01  00 2B 12 01  00 2A 12 01  00 29 12 01  00 28 12 01  00 27 12 01 
    00 26 12 01  00 25 12 01  00 24 12 01  00 23 12 01  00 22 12 01  00 21 12 01  00 20 12 01  00 1F 12 01 
    00 1E 12 01  00 1D 12 01  00 1C 12 01  00 1B 12 01  00 1A 12 01  00 19 12 01  00 3F 12 02  00 3E 12 02 
    00 3D 12 02  00 3C 12 02  00 3B 12 02  00 3A 12 02  00 39 12 02  00 38 12 02  00 37 12 02  00 36 12 02 
    00 35 12 02  00 34 12 02  00 33 12 02  00 32 12 02  00 31 12 02  00 30 12 02  00 2F 12 02  00 2E 12 02 
    00 2D 12 02  00 2C 12 02  00 2B 12 02  01 2A 12 02
    --> Lead to otp1rxHigh	struct OSPI_PhyConfig	{txDLL=18,rxDLL=42,rdDelay=2}	0x70012398	
    
    : (Part 1 of) Check a different point if the otp1rxLow and otp1rxHigh are on the same rdDelay. Scan at high tx=48(0x30) to low tx = 38(0x26)
    00 00 30 00  00 01 30 00  00 02 30 00  00 03 30 00  00 04 30 00 v00 05 30 00  00 06 30 00  00 07 30 00 
    00 08 30 00  00 09 30 00  00 0A 30 00  00 0B 30 00  00 0C 30 00  00 0D 30 00  00 0E 30 00  00 0F 30 00 
    00 00 30 01  00 01 30 01  00 02 30 01  00 03 30 01  00 04 30 01  00 05 30 01  00 06 30 01  00 07 30 01 
    00 08 30 01  00 09 30 01  00 0A 30 01  00 0B 30 01  00 0C 30 01  00 0D 30 01  00 0E 30 01  00 0F 30 01 
    00 00 30 02  00 01 30 02  00 02 30 02  00 03 30 02  00 04 30 02  00 05 30 02  01 06 30 02
    --> Lead to otp1temp struct OSPI_PhyConfig	{txDLL=48,rxDLL=6,rdDelay=2} 	0x700123B8	 (temp is overriden multiple times during search algorithm)
    --> Lead to NO CHANGE of otp1rxLow because of same rxLow result
    
    : (Part 2 of) Check a different point if the otp1rxLow and otp1rxHigh are on the same rdDelay. Scan for rxMax=63 at the same tx=48
    00 3F 30 00  00 3E 30 00  00 3D 30 00  00 3C 30 00  00 3B 30 00  00 3A 30 00  00 39 30 00  00 38 30 00 
    00 37 30 00  00 36 30 00  00 35 30 00  00 34 30 00  00 33 30 00  00 32 30 00  00 31 30 00  00 30 30 00 
    00 2F 30 00  00 2E 30 00  00 2D 30 00  00 2C 30 00  00 2B 30 00  00 2A 30 00  00 29 30 00  00 28 30 00 
    00 27 30 00  00 26 30 00  00 25 30 00  00 24 30 00  00 23 30 00  00 22 30 00  00 21 30 00  00 20 30 00 
    00 1F 30 00  00 1E 30 00  00 1D 30 00  00 1C 30 00  00 1B 30 00  00 1A 30 00  00 19 30 00  00 3F 30 01 
    00 3E 30 01  00 3D 30 01  00 3C 30 01  00 3B 30 01  00 3A 30 01  00 39 30 01  00 38 30 01  00 37 30 01 
    00 36 30 01  00 35 30 01  00 34 30 01  00 33 30 01  00 32 30 01  00 31 30 01  00 30 30 01  00 2F 30 01 
    00 2E 30 01  00 2D 30 01  00 2C 30 01  00 2B 30 01  00 2A 30 01  00 29 30 01  00 28 30 01  00 27 30 01 
    00 26 30 01  00 25 30 01  00 24 30 01  00 23 30 01  00 22 30 01  00 21 30 01  00 20 30 01  00 1F 30 01 
    00 1E 30 01  00 1D 30 01  00 1C 30 01  00 1B 30 01  00 1A 30 01  00 19 30 01  00 3F 30 02  00 3E 30 02 
    00 3D 30 02  00 3C 30 02  00 3B 30 02  00 3A 30 02  00 39 30 02  00 38 30 02  00 37 30 02  00 36 30 02 
    00 35 30 02  00 34 30 02  00 33 30 02  00 32 30 02  00 31 30 02  00 30 30 02  00 2F 30 02  00 2E 30 02 
    00 2D 30 02  00 2C 30 02  01 2B 30 02  
    --> Lead to otp1temp struct OSPI_PhyConfig	{txDLL=48,rxDLL=43,rdDelay=2} 	0x700123B8	 (temp is overriden multiple times during search algorithm)
    --> Lead to NO CHANGE of otp1rxHigh because of same rxDLL is now slightly higher
    
    : Scan for tx Bounderies at 1/4 of rxDll window rxHigh=42 rxLow=6 --> rxDLL=12(0x0C) 
    00 0C 00 00  00 0C 01 00  00 0C 02 00  00 0C 03 00  00 0C 04 00  00 0C 05 00  00 0C 06 00  00 0C 07 00 
    00 0C 08 00  00 0C 09 00  00 0C 0A 00  00 0C 0B 00  00 0C 0C 00  00 0C 0D 00  00 0C 0E 00  00 0C 0F 00 
    00 0C 10 00  00 0C 11 00  00 0C 12 00  00 0C 13 00  00 0C 14 00  00 0C 15 00  00 0C 16 00  00 0C 17 00 
    00 0C 18 00  00 0C 19 00  00 0C 1A 00  00 0C 1B 00  00 0C 1C 00  00 0C 1D 00  00 0C 1E 00  00 0C 1F 00 
    00 0C 20 00  00 0C 00 01  00 0C 01 01  00 0C 02 01  00 0C 03 01  00 0C 04 01  00 0C 05 01  00 0C 06 01 
    00 0C 07 01  00 0C 08 01  00 0C 09 01  00 0C 0A 01  00 0C 0B 01  00 0C 0C 01  00 0C 0D 01  00 0C 0E 01 
    00 0C 0F 01  00 0C 10 01  00 0C 11 01  00 0C 12 01  00 0C 13 01  00 0C 14 01  00 0C 15 01  00 0C 16 01 
    00 0C 17 01  00 0C 18 01  00 0C 19 01  00 0C 1A 01  00 0C 1B 01  00 0C 1C 01  00 0C 1D 01  00 0C 1E 01 
    00 0C 1F 01  00 0C 20 01  00 0C 00 02  00 0C 01 02  00 0C 02 02  00 0C 03 02  00 0C 04 02  00 0C 05 02 
    00 0C 06 02  00 0C 07 02  00 0C 08 02  00 0C 09 02  01 0C 0A 02
    --> Lead to otp1txLow	struct OSPI_PhyConfig	{txDLL=10,rxDLL=12,rdDelay=2}	0x700123E8	
    
    
    : scan for txMax at same rxDll=12 (0x0C) from 63(0x3F) down
    00 0C 3F 00  00 0C 3E 00  00 0C 3D 00  00 0C 3C 00  00 0C 3B 00  00 0C 3A 00  00 0C 39 00  00 0C 38 00 
    00 0C 37 00  00 0C 36 00  00 0C 35 00  00 0C 34 00  00 0C 33 00  00 0C 32 00  00 0C 31 00  00 0C 30 00 
    00 0C 3F 01  00 0C 3E 01  00 0C 3D 01  00 0C 3C 01  00 0C 3B 01  00 0C 3A 01  00 0C 39 01  00 0C 38 01 
    00 0C 37 01  00 0C 36 01  00 0C 35 01  00 0C 34 01  00 0C 33 01  00 0C 32 01  00 0C 31 01  00 0C 30 01 
    01 0C 3F 02
    --> Lead to otp1txHigh	struct OSPI_PhyConfig	{txDLL=63,rxDLL=12,rdDelay=2}	0x700123D8
    
    
    : (Part 1 of) Check a different point if the otp1txLow and otp1txHigh are on the same rdDelay. Find txLow at 3/4 of rxDLL = (42 + 6) *(3/4) = 36
    00 24 00 00  00 24 01 00  00 24 02 00  00 24 03 00 
    00 24 04 00  00 24 05 00  00 24 06 00  00 24 07 00 
    00 24 08 00  00 24 09 00  00 24 0A 00  00 24 0B 00 
    00 24 0C 00  00 24 0D 00  00 24 0E 00  00 24 0F 00 
    00 24 10 00  00 24 11 00  00 24 12 00  00 24 13 00 
    00 24 14 00  00 24 15 00  00 24 16 00  00 24 17 00 
    00 24 18 00  00 24 19 00  00 24 1A 00  00 24 1B 00 
    00 24 1C 00  00 24 1D 00  00 24 1E 00  00 24 1F 00 
    00 24 20 00  00 24 00 01  00 24 01 01  00 24 02 01 
    00 24 03 01  00 24 04 01  00 24 05 01  00 24 06 01 
    00 24 07 01  00 24 08 01  00 24 09 01  00 24 0A 01 
    00 24 0B 01  00 24 0C 01  00 24 0D 01  00 24 0E 01 
    00 24 0F 01  00 24 10 01  00 24 11 01  00 24 12 01 
    00 24 13 01  00 24 14 01  00 24 15 01  00 24 16 01 
    00 24 17 01  00 24 18 01  00 24 19 01  00 24 1A 01 
    00 24 1B 01  00 24 1C 01  00 24 1D 01  00 24 1E 01 
    00 24 1F 01  00 24 20 01  00 24 00 02  00 24 01 02 
    00 24 02 02  00 24 03 02  00 24 04 02  00 24 05 02 
    00 24 06 02  00 24 07 02  01 24 08 02
    --> Lead to otp1temp struct OSPI_PhyConfig	{txDLL=8,rxDLL=36,rdDelay=2} 	0x700123B8	 (temp is overriden multiple times during search algorithm)
    
    --> !!!! Lead to CHANGE of otp1txLow from   struct OSPI_PhyConfig	{txDLL=10,rxDLL=12,rdDelay=2}	0x700123E8
    -->                                    to   struct OSPI_PhyConfig	{txDLL=8,rxDLL=36,rdDelay=2}	0x700123E8	
    -->      TxLow is now completely overriden, also for rxDll ..
    
    
    : (Part 2 of) Check a different point if the otp1txLow and otp1txHigh are on the same rdDelay. Scan for txMax at 3/4 of rxDll = 36
    00 24 3F 00 
    00 24 3E 00  00 24 3D 00  00 24 3C 00  00 24 3B 00 
    00 24 3A 00  00 24 39 00  00 24 38 00  00 24 37 00 
    00 24 36 00  00 24 35 00  00 24 34 00  00 24 33 00 
    00 24 32 00  00 24 31 00  00 24 30 00  00 24 3F 01 
    00 24 3E 01  00 24 3D 01  00 24 3C 01  00 24 3B 01 
    00 24 3A 01  00 24 39 01  00 24 38 01  00 24 37 01 
    00 24 36 01  00 24 35 01  00 24 34 01  00 24 33 01 
    00 24 32 01  00 24 31 01  00 24 30 01  01 24 3F 02 
    --> Lead to otp1temp struct OSPI_PhyConfig	{txDLL=63,rxDLL=36,rdDelay=2} 	0x700123B8	 (temp is overriden multiple times during search algorithm)
    --> Lead to NO CHANGE of otp1txHigh
    
    
    : Calculation of theoretical corners
        !!! ATTENTION: Different points for txDll and rxDll
        otp1bootomLeft = {otpt1txLow.txDll, otp1rxLow.rxDll} 
    --> Lead to otp1bottomLeft	struct OSPI_PhyConfig	{txDLL=8,rxDLL=6,rdDelay=2}	0x70012368	
    
    : Test at otp1bottomLeft (+4 rxDll, +4 txDll) = {txDLL=12,rxDLL=10,rdDelay=2}
    01 0A 0C 02  
    --> Hit, no additional check with different rdDelay required
    
    : Calculation of otp1topRight
        !!! ATTENTION: Different points for rxDll and txDll
        otp1topRight = {otp1txHigh.txDLL, otp1rxHigh.rxDLL} = {63-4, 42-4} = {59 (0x3B), 38(0x26)}
    --> Lead to otp1topRight	struct OSPI_PhyConfig	{txDLL=63,rxDLL=42,rdDelay=2}	0x700123C8  !!!! Difference to final value !!!!
    
    : Test at otp1topRight {63, 42}
    01 26 3B 02  
    --> Hit, no additional check with different rdDelay required
    
    
    : Calculation of slope and intercept
        otp1slope = ((float)otp1topRight.rxDLL-(float)otp1bottomLeft.rxDLL)/((float)otp1topRight.txDLL-(float)otp1bottomLeft.txDLL);
                  = (42 - 6) / (63 - 8) = 0,6545
    --> Lead to otp1slope	float	0.654545426	0x7007637C	
    
        otp1intercept = (float)otp1topRight.rxDLL - otp1slope*((float)otp1topRight.txDLL);
                      = 42 - 0.654545426 * 63 = 0,7636363
    --> lead to otp1intercept	float	0.763637543	0x70076378	
        
    : search along the corners until no system failure starting with  otp1bottomLeft  {txDLL=8,rxDLL=6,rdDelay=2}
    01 06 08 02  
    --> Immediate hit, increment txDll and calculate next rxDll
    
    : search along the linear equation, as long as search succeedes
    00 06 09 02 
    --> Immediate fail!!! May be due temperature drift?             <-- Seams to be the first hard fail of the algorithm
    
    : calculate the spot of the first fail
    --> Lead to initial starting point otp1bottomLeft  {txDLL=9,rxDLL=6,rdDelay=2}
    --> Lead to otp1gapLow	struct OSPI_PhyConfig	{txDLL=9,rxDLL=6,rdDelay=2}	0x70012388	
    
    
    : (Part 1 of) If there's only one segment, put tuning point in the middle and adjust for temperature
    :             This is chosen, because all hits occured only with rdDelay 2
    --> In this case otp1topRight is overriden with otp1gapLow
    --> Search point is half of new bottomLeft and bottomRight --> 
    
    : Check choosen point 
    01 06 08 02
    --> Hit, seams algorithm finaly succeeded, but one txDll further it fails! (Metastable?)


    With this log at line 167 we see that the singularity was chosen as the start of the diagonal. Line 172 shows, that the next value on the diagonal fails. In line 185 the setting is finally tested again with a attack vector hit and is used by the driver. Further operation of the bootloader failed - maybe due to temperature - because all settings around fail.


  • Our idea is now to change the DDR tune algorithm at all to following solution with fast and fix runtime:

    /*
     *
      The algorithm here is used to find the must stabble settings for OSPI DRR operation.
      
      Normally Map of working settings (X=hit, 0=miss):
      _________________________________________ RX_Dll
      |0000000000000000000000000000000000000000
      |0000000000000000000000000000000000000000
      |00000XXXXXXXXXXXX00000000000000000000000
      |0000XXXXXXXXXXXXX00000000000000000000000
      |000XXXXXXXXXXXXXX00000000000000000000000
      |00XXXXXXXXXXXXXXX00000000000000000000000
      |00XXXXXXXXXXXXXXX00000000000000000000000
      |00XXXXXXXXXXXXXXX00000000000000000000000
      |00XXXXXXXXXXXXXXX00000000000000000000000
      |00XXXXXXXXXXXXXXX00000000000000000000000
      |00XXXXXXXXXXXXXXX00000000000000000000000
      |0000000000000000000000000000000000000000
      |0000000000000000000000000000000000000000
      |0000000000000000000000000000000000000000
      |0000000000000000000000000000000000000000
      |0000000000000000000000000000000000000000
      |0000000000000000000000000000000000000000
      TX_Dll
    
      The algorithm has the target to find the middle of the hit region, 
      with as least hit/miss tests than possible. The idea is to test 
      different txDll and rxDll values in a wide mesh.
       _________________________________________ RX_Dll
      |
      |      0   0   0   0   0
      |
      |      X   X   X   0   0
      |
      |      X   X   X   0   0
      |
      |      X   X   X   0   0
      |
      |      X   X   X   0   0
      |
      |      0   0   0   0   0
      |
      |      0   0   0   0   0
      |
      |
      |
      TX_Dll
    */
    int32_t OSPI_phyFindOTP_Balluff(OSPI_Handle handle, uint32_t flashOffset, OSPI_PhyConfig *otp)
    {
        int32_t status = SystemP_SUCCESS;
        OSPI_PhyConfig searchPoints[] = {{.rdDelay = 2, .rxDLL=0, .txDLL=0},
                                       {.rdDelay = 2, .rxDLL=0, .txDLL=0},
                                       {.rdDelay = 2, .rxDLL=0, .txDLL=0}};
    
        uint32_t rxWeight = 0;
        uint32_t txWeight = 0;
        uint32_t hitCounter = 0;
    
        for(int rx = gPhyTuneBalluffParams.rxStart; 
                rx < gPhyTuneBalluffParams.rxEnd; 
                rx += gPhyTuneBalluffParams.rxStep)
        {
            for(int tx = gPhyTuneBalluffParams.txStart; 
                        tx < gPhyTuneBalluffParams.txEnd; 
                        tx += gPhyTuneBalluffParams.txStep)
            {
                searchPoints[0].rxDLL = rx;
                searchPoints[0].txDLL = tx;
                OSPI_phySetRdDelayTxRxDLL(handle, &(searchPoints[0]));
                status = OSPI_phyReadAttackVector(handle, flashOffset);
                if(status == SystemP_SUCCESS)
                {
                    rxWeight += rx;
                    txWeight += tx;
                    hitCounter++;
                }
            }
        }
    
        status = SystemP_FAILURE;
        if(rxWeight != 0 && rxWeight != 0)
        {
            otp->rdDelay = searchPoints[0].rdDelay;
            otp->rxDLL = rxWeight / hitCounter;
            otp->txDLL = txWeight / hitCounter;
            status = SystemP_SUCCESS;
    
            // test target spot 
            searchPoints[0].rxDLL = otp->rxDLL;   
            searchPoints[0].txDLL = otp->txDLL;
            // test target spot with lower safety distance
            searchPoints[1].rxDLL = otp->rxDLL - gPhyTuneBalluffParams.rxSafetyDistance;   
            searchPoints[1].txDLL = otp->txDLL - gPhyTuneBalluffParams.txSafetyDistance;
            // test target spot with higher safety distance
            searchPoints[2].rxDLL = otp->rxDLL + gPhyTuneBalluffParams.rxSafetyDistance;   
            searchPoints[2].txDLL = otp->txDLL + gPhyTuneBalluffParams.txSafetyDistance;
    
            for(uint32_t i = 0; 
                status == SystemP_SUCCESS && i < sizeof(searchPoints)/sizeof(searchPoints[0]); 
                i++)
            {
                OSPI_phySetRdDelayTxRxDLL(handle, &(searchPoints[i]));
                status = OSPI_phyReadAttackVector(handle, flashOffset);
            }
        }
        
        if(status != SystemP_SUCCESS)
        {
            otp->rxDLL = 0;
            otp->txDLL = 0;
            otp->rdDelay = 0;
        }
    
        return status;
    }
    

    The idea is to limit the search for the settings to only use rdDelay 2, additionally we reduce the rxDll and txDll to a small window where we expect the hits (this was already done by the existing algorithms). The algorithm than just test points within this window (large grid). By weighting the values of the successful txdll and rxdll settings, a txDll/rxDll couple the middle of the successful region will be chosen.

    Con:
    - scan uses only the rdDelay 2

    Pro:
    + weighting the values avoid choosing singular values (as with our GigaDevice)
    + deterministic runtime
    + faster runtime due to very few test settings

    What do you think about this algorithm? Do you see any issues?

  • Hi ,

    What do you think about this algorithm? Do you see any issues?

    How often do you intend to call this function ?

    • On every Boot ?
    • In a low priority task periodically ?

    Best Regards,
    Aakash

  • Hi Aakash,

    The idea is to call this algorithm on each boot up.

    What is your experience for temperature changes, will it be sufficient to determine the ideal settings once? For example in a worst case szenario, lets say we clock the OSPI with 200 Mhz and the device starts booting at -10°C and in the application the device later heats itself up to about 90°C, how many rxDll/txDll steps will the setting fade away? If it will be still in the valid region, it will not be necessary to readjust the settings. Otherwise we will need a task which measures the temperature and retries the algorithm in case we left the temperature range we expect we have still valid settings.

    Best Regards,
    Robert

  • Hi Robert,

    The current algorithm in the SDK does not contain the temperature optimization to choose the best point possible. Due to this, the scenario you are describing will most likely result in a fail as temperature rises. It is hard to say how much the variation would be without testing or having a working temperature optimization in the search for the point. I will discuss this some of the software experts and get back to you with possible solutions, I'm mostly looking to evaluate how much time it would take to optimize this code to take in account temperature to see if we can come up with a fast fix. I'll update you on Monday with more details after our discussion.

    Best,

    Daniel 

  • Hi Robert,

    I apologize for the delay on this topic, we have ran into issues trying to contact the right experts to help with temperature optimization integration in the code. I will bring this up in discussions again next week an update you by Wednesday. 

    Thanks,

    Daniel

  • Hi Robert, 

    I will file a ticket to include temperature optimization in future releases of the AM243x SDK. I have found this implementation from the processor SDK that takes in account the temperature range when choosing a tuning point: nor_spi_phy_tune.c « ospi « nor « flash « src « board « ti « packages - processor-sdk/pdk - Unnamed repository; edit this file 'description' to name the repository.

    The code provided in the CGIT repo is applicable to AM64x so you can use it as a reference for AM243x. You'll be able to see how it is implemented in lines 1108-1110:

    Please let me know if this helps you move forward with your issue.

    Best,

    Daniel