This thread has been locked.

If you have a related question, please click the "Ask a related question" button in the top right corner. The newly created question will be automatically linked to this question.

MCU-PLUS-SDK-AM263PX: debugger initialization error on initial setup

Part Number: MCU-PLUS-SDK-AM263PX
Other Parts Discussed in Thread: AM263P4, TMDSCNCD263P

Tool/software:

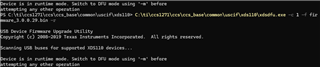
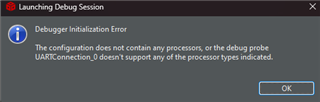
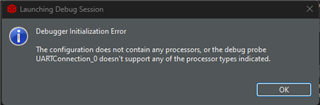
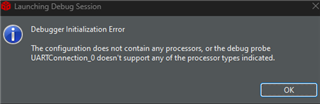
I am trying to connect to the AM263P4 demo board and getting this message when trying to connect. So it seems to connect to the XDS programmer, but not the USB. So, I thought it was ok, but when running the hello world sample clang app I get this error when trying to flash. Any ideas? Maybe a quick call to get me up an running would be easier with a screenshare, im available most of the day today if you have 15 minutes.


I followed this how-to.

https://software-dl.ti.com/mcu-plus-sdk/esd/AM263PX/09_02_00_56/exports/docs/api_guide_am263px/GETTING_STARTED.html


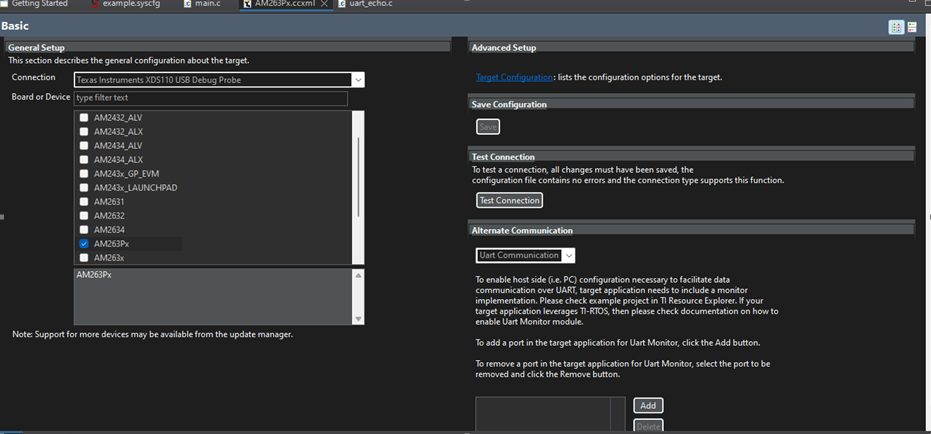
The board screenshots didn’t look the same  (I must have a newer version than the one here), but I think I deduced that I shouldn’t change any dip switches from the schematic
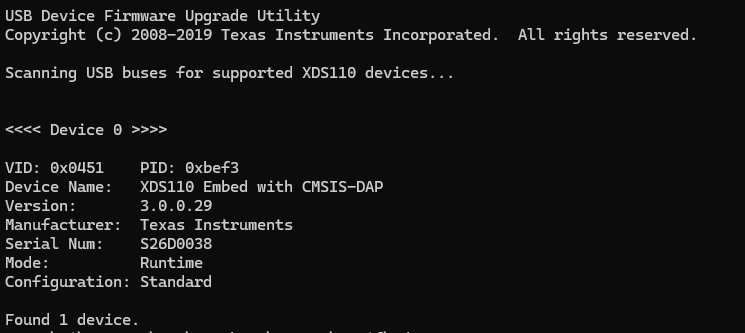
https://software-dl.ti.com/mcu-plus-sdk/esd/AM263PX/09_02_00_56/exports/docs/api_guide_am263px/EVM_SETUP_PAGE.html

Flashing results:

Setup results.

[Start: Texas Instruments XDS110 USB Debug Probe_0]


Execute the command:


%ccs_base%/common/uscif/dbgjtag -f %boarddatafile% -rv -o -S integrity


[Result]


-----[Print the board config pathname(s)]------------------------------------


C:\Users\benh\AppData\Local\TEXASI~1\CCS\

    ccs1271\0\0\BrdDat\testBoard.dat


-----[Print the reset-command software log-file]-----------------------------


This utility has selected a 100/110/510 class product.

This utility will load the adapter 'jioxds110.dll'.

The library build date was 'Apr 19 2024'.

The library build time was '14:04:01'.

The library package version is '12.7.0.00130'.

The library component version is '35.35.0.0'.

The controller does not use a programmable FPGA.

The controller has a version number of '5' (0x00000005).

The controller has an insertion length of '0' (0x00000000).

This utility will attempt to reset the controller.

This utility has successfully reset the controller.


-----[Print the reset-command hardware log-file]-----------------------------


The scan-path will be reset by toggling the JTAG TRST signal.

The controller is the XDS110 with USB interface.

The link from controller to target is direct (without cable).

The software is configured for XDS110 features.

The controller cannot monitor the value on the EMU[0] pin.

The controller cannot monitor the value on the EMU[1] pin.

The controller cannot control the timing on output pins.

The controller cannot control the timing on input pins.

The scan-path link-delay has been set to exactly '0' (0x0000).


-----[Perform the Integrity scan-test on the JTAG IR]------------------------


This test will use blocks of 64 32-bit words.

This test will be applied just once.


Do a test using 0xFFFFFFFF.

Scan tests: 1, skipped: 0, failed: 0

Do a test using 0x00000000.

Scan tests: 2, skipped: 0, failed: 0

Do a test using 0xFE03E0E2.

Scan tests: 3, skipped: 0, failed: 0

Do a test using 0x01FC1F1D.

Scan tests: 4, skipped: 0, failed: 0

Do a test using 0x5533CCAA.

Scan tests: 5, skipped: 0, failed: 0

Do a test using 0xAACC3355.

Scan tests: 6, skipped: 0, failed: 0

All of the values were scanned correctly.


The JTAG IR Integrity scan-test has succeeded.


-----[Perform the Integrity scan-test on the JTAG DR]------------------------


This test will use blocks of 64 32-bit words.

This test will be applied just once.


Do a test using 0xFFFFFFFF.

Scan tests: 1, skipped: 0, failed: 0

Do a test using 0x00000000.

Scan tests: 2, skipped: 0, failed: 0

Do a test using 0xFE03E0E2.

Scan tests: 3, skipped: 0, failed: 0

Do a test using 0x01FC1F1D.

Scan tests: 4, skipped: 0, failed: 0

Do a test using 0x5533CCAA.

Scan tests: 5, skipped: 0, failed: 0

Do a test using 0xAACC3355.

Scan tests: 6, skipped: 0, failed: 0

All of the values were scanned correctly.


The JTAG DR Integrity scan-test has succeeded.


[End: Texas Instruments XDS110 USB Debug Probe_0]


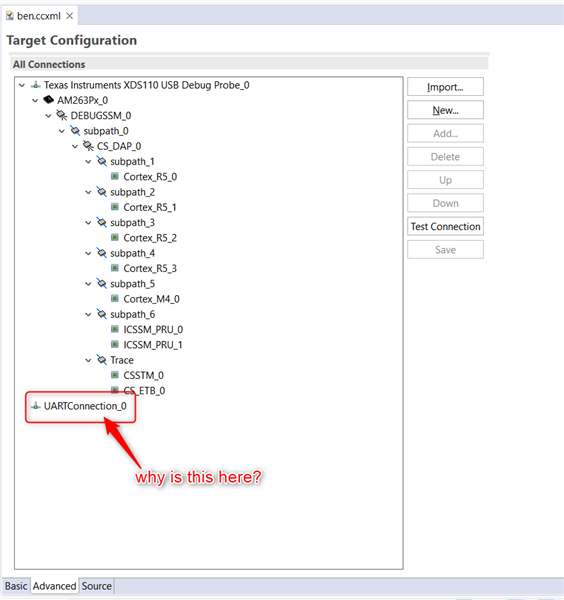
[Start: UARTConnection_0]


Execute the command:


The Diagnostic Command is not defined in the connection properties.

  • Hi Ben, 

    Can you specify which AM263Px evaluation board you are using, and when you received the kit?

  • TMDSCNCD263P, received last week.

  • Ben,

    Please see this E2E thread to resolve your issue. I suspect you are running into the same problem.

    This is a known issue due to potentially corrupted firmware being programmed on the XDS110 during EVM production. Let me know if the steps detailed in the attached thread do not resolve your issue.

    Note that the EVM in this thread is different than the one you are using, but we have seen the same issue on the TMDSCNCD263P. When grounding the TDO pin of the XDS110 device, ensure that you are using a GND on the XDS110 section of the PCB, and not a GND point on the isolated non-XDS110 section of the PCB. I would suggest using TP74 as the GND.

    https://e2e.ti.com/support/microcontrollers/arm-based-microcontrollers-group/arm-based-microcontrollers/f/arm-based-microcontrollers-forum/1374638/lp-am263p-xds-110-firmware-update-failure/5282507#5282507

    Regards,

    Brennan

  • Hello, i used TP74 to ground and worked through (i had to put into dfm mode with another command i showed below. however, i started with the correct version and it doesnt look like the download changed anything

    here was my process:

    input:

     C:\ti\ccs1271\ccs\ccs_base\common\uscif\xds110\xdsdfu.exe -e

    result:

    USB Device Firmware Upgrade Utility
    Copyright (c) 2008-2019 Texas Instruments Incorporated. All rights reserved.

    Scanning USB buses for supported XDS110 devices...


    <<<< Device 0 >>>>

    VID: 0x0451 PID: 0xbef3
    Device Name: XDS110 Embed with CMSIS-DAP
    Version: 3.0.0.29
    Manufacturer: Texas Instruments
    Serial Num: S26D0038
    Mode: Runtime
    Configuration: Standard

    input:

     C:\ti\ccs1271\ccs\ccs_base\common\uscif\xds110\xdsdfu.exe -c 1 -f firmware_3.0.0.29.bin -r

    result:

    so then i ran that command

    input:

    C:\ti\ccs1271\ccs\ccs_base\common\uscif\xds110> C:\ti\ccs1271\ccs\ccs_base\common\uscif\xds110\xdsdfu.exe -m

    result:

    USB Device Firmware Upgrade Utility
    Copyright (c) 2008-2019 Texas Instruments Incorporated. All rights reserved.

    Scanning USB buses for supported XDS110 devices...


    <<<< Device 0 >>>>

    VID: 0x0451 PID: 0xbef3
    Device Name: XDS110 Embed with CMSIS-DAP
    Version: 3.0.0.29
    Manufacturer: Texas Instruments
    Serial Num: S26D0038
    Mode: Runtime
    Configuration: Standard

    Switching device into DFU mode.

    then i ran the command input:

    C:\ti\ccs1271\ccs\ccs_base\common\uscif\xds110\xdsdfu.exe -c 1 -f firmware_3.0.0.29.bin -r

    result:

    then i ran again to verify:

    the above didnt work... i think i had the proper software, but needed to change the serial number

    so then i went further on and there were some edits i needed to do:

    input:

    C:\ti\ccs1271\ccs\ccs_base\common\uscif\xds110\xdsdfu.exe -m

     C:\ti\ccs1271\ccs\ccs_base\common\uscif\xds110\xdsdfu.exe -s S26E0001 -r

    C:\ti\ccs1271\ccs\ccs_base\common\uscif\xds110\xdsdfu.exe -e

    output:

    Scanning USB buses for supported XDS110 devices...


    <<<< Device 0 >>>>

    VID: 0x0451 PID: 0xbef3
    Device Name: XDS110 Embed with CMSIS-DAP
    Version: 3.0.0.29
    Manufacturer: Texas Instruments
    Serial Num: S26E0001
    Mode: Runtime
    Configuration: Standard

    Found 1 device.

    CCS

    then i went into CCS and i still get the same issue, so i dont think its the same issue?

  • Ben,

    Thank you for going through those steps to verify the proper firmware on the XDS110 device.

    Can you follow the steps in section 5.1.2 of this Quick Start Guide and let me know if you are able to see the 'C's printing on the UART console?

  • hello, 

    yes i get the CC's, but on first startup of CCS in the middle i get a bunch of jibberish.

    Output:

    CCCCCCCCCCCCCCCCCCCCCCCCCCCCCCCCCCCCCCCCCCCCCCCCCCCCCCCCCC000002010100000000000100414d323633505800000000000400cdab010001000100000000000000000000000000000000000000af5eff8df8eb89a9648c5ef91c54185dec3446dbc611834d740003b552fedc867008d43c5bb11b4a7e7031cf960e81f266b9a75f53a0ed4602d0f3580bd334ce000000000000000000000000000000000000000000000000000000000000000000000000000000000000000000000000000000000000000000000000000000002bc5ef0656e401ba3b2eb7ead9b19c0b7aeac945189a3d0ae9a3d297bd541e92e88880a1460ad7938150bd893495ac4eb4226d763ab1bf4617c9283089400951CCCCCCCCCCCCCCCCCCCCCCCCCCCCCCCCCCCCCCCCCCCCCCCCCCCCCCCCCCCCCC000002010100000000000100414d323633505800000000000400cdab010001000100000000000000000000000000000000000000af5eff8df8eb89a9648c5ef91c54185dec3446dbc611834d740003b552fedc867008d43c5bb11b4a7e7031cf960e81f266b9a75f53a0ed4602d0f3580bd334ce000000000000000000000000000000000000000000000000000000000000000000000000000000000000000000000000000000000000000000000000000000002bc5ef0656e401ba3b2eb7ead9b19c0b7aeac945189a3d0ae9a3d2CCCCCCCCCCCCCC

    if i reopen the terminal, once CCS is already open, then i just get the CC's

    Output:

    CCCCCCCCCCCCCCCC

  • Ben,

    That all looks fine, the characters before the C's are expected.

    Can you confirm that your boot mode switches are set correctly?

  • interesting.... 

    i followed this getting started which seems to conflict and seems to be an older rev board... - https://software-dl.ti.com/mcu-plus-sdk/esd/AM263PX/09_02_00_56/exports/docs/api_guide_am263px/EVM_SETUP_PAGE.html

    i didnt run across the control card quick start you shared.

    however, i still get the debugger initi error with the bootmode dip switches as you state when trying to launch debugger with hello world

    now when i open the terminal i do not get any C's either

  • Ben - can you attach your ccxml file?

    Also, how are you trying to launch a debug session?

  • Hello, yes im trying to launch the debug session continuing on in the getting stated guide. 

    <?xml version="1.0" encoding="UTF-8" standalone="no"?>
    <configurations XML_version="1.2" id="configurations_0">


    <configuration XML_version="1.2" id="Texas Instruments XDS110 USB Debug Probe_0">

    <instance XML_version="1.2" desc="Texas Instruments XDS110 USB Debug Probe_0" href="connections/TIXDS110_Connection.xml" id="Texas Instruments XDS110 USB Debug Probe_0" xml="TIXDS110_Connection.xml" xmlpath="connections"/>

    <connection XML_version="1.2" id="Texas Instruments XDS110 USB Debug Probe_0">

    <instance XML_version="1.2" href="drivers/tixds510debugssm.xml" id="drivers" xml="tixds510debugssm.xml" xmlpath="drivers"/>

    <instance XML_version="1.2" href="drivers/tixds510cs_dap.xml" id="drivers" xml="tixds510cs_dap.xml" xmlpath="drivers"/>

    <instance XML_version="1.2" href="drivers/tixds510cortexR.xml" id="drivers" xml="tixds510cortexR.xml" xmlpath="drivers"/>

    <instance XML_version="1.2" href="drivers/tixds510cortexM.xml" id="drivers" xml="tixds510cortexM.xml" xmlpath="drivers"/>

    <instance XML_version="1.2" href="drivers/tixds510pru.xml" id="drivers" xml="tixds510pru.xml" xmlpath="drivers"/>

    <instance XML_version="1.2" href="drivers/tixds510csstm.xml" id="drivers" xml="tixds510csstm.xml" xmlpath="drivers"/>

    <instance XML_version="1.2" href="drivers/tixds510etbcs.xml" id="drivers" xml="tixds510etbcs.xml" xmlpath="drivers"/>

    <platform XML_version="1.2" id="platform_0">

    <instance XML_version="1.2" desc="AM263Px_0" href="devices/AM263Px.xml" id="AM263Px_0" xml="AM263Px.xml" xmlpath="devices"/>

    <device HW_revision="1" XML_version="1.2" description="AM263Px" id="AM263Px_0" partnum="AM263Px" simulation="no">

    <router HW_revision="1.0" XML_version="1.2" description="OneMCU DebugSS top level" id="DEBUGSSM_0" isa="DEBUGSSM">

    <subpath id="subpath_0">

    <router HW_revision="1.0" XML_version="1.2" description="CS_DAP Router" id="CS_DAP_0" isa="CS_DAP">

    <subpath id="subpath_2">

    <property Type="choicelist" Value="0" desc="Type_0" id="Type"/>

    </subpath>

    <subpath id="subpath_3">

    <property Type="choicelist" Value="0" desc="Type_1" id="Type"/>

    <property Type="numericfield" Value="0x4" desc="Port Number_0" id="Port Number"/>

    </subpath>

    <subpath id="subpath_4">

    <property Type="numericfield" Value="0x5" desc="Port Number_1" id="Port Number"/>

    </subpath>

    <subpath id="subpath_5">

    <property Type="choicelist" Value="0" desc="Type_2" id="Type"/>

    <property Type="numericfield" Value="0x2" desc="Port Number_2" id="Port Number"/>

    </subpath>

    <subpath id="subpath_6">

    <property Type="numericfield" Value="0x8" desc="Port Number_3" id="Port Number"/>

    </subpath>

    <subpath id="subpath_7">

    <property Type="choicelist" Value="1" desc="Type_3" id="Type"/>

    <property Type="numericfield" Value="0x9" desc="Port Number_4" id="Port Number"/>

    </subpath>

    </router>

    <property Type="numericfield" Value="0x1" desc="Port Number_5" id="Port Number"/>

    </subpath>

    </router>

    </device>

    </platform>

    </connection>

    </configuration>

    <configuration XML_version="1.2" id="UARTConnection_0">
    <instance XML_version="1.2" desc="UARTConnection_0" href="connections/uart_connection.xml" id="UARTConnection_0" xml="uart_connection.xml" xmlpath="connections"/>
    <connection XML_version="1.2" id="UARTConnection_0"/>
    </configuration>
    </configurations>

  • There is an extra UART Connection type in your ccxml that is not there by default. Did you manually add this?

  • I dont beleive i did, but i did click the add button in the uart connection after i received the error early on but it didnt seem to do anything. When i deleted this it worked. Thanks!

  • ah, ok that explains it. Pressing the add button there would try to add a UART connection type to the existing ccxml. You would only do this in very specific use cases that doesn't apply here.