This thread has been locked.
If you have a related question, please click the "Ask a related question" button in the top right corner. The newly created question will be automatically linked to this question.
Tool/software:
Hi TI-Team,
I have the exact same problem as described in the linked issue (https://e2e.ti.com/support/microcontrollers/arm-based-microcontrollers-group/arm-based-microcontrollers/f/arm-based-microcontrollers-forum/1349306/mcu-plus-sdk-am243x-cannot-sbl_ospi-boot-the-hs_fs-application-image-on-my-custom-board-am2431alv/5148133?tisearch=e2e-sitesearch&keymatch=%25252520user%2525253A572738#5148133)
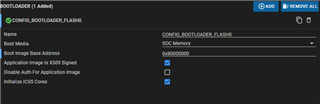
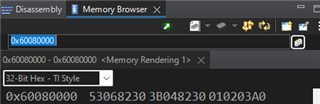
I use SBL_OSPI, which is adjusted to my custom board (custom flash, custom DDR etc.) this works fine if the option "Disable Auth For Application Image" is unchecked. I can then load firmware files successfully. As soon as this Authentication option is checked the SBL_OSPI cannot start the flashed .appimage.hs_fs at 0x80000. If I debug I see that it fails at the same position as mentioned in the linked thread. The content of 0x60080000 is also equal
Yes, I also integrated the suggested workaround shown in various other threads, the following code fraction is inserted just before the Bootloader_parseMultiCoreAppImage(...).
/* WORKAROUND: Enable the DAC mode */
OSPI_Handle ospi_handle = OSPI_getHandle(CONFIG_OSPI0);
OSPI_enableDacMode(ospi_handle);
I am currently using the MCU+ SDK delivered with the latest www.ti.com/.../09.02.00.08
I also tried to replicate on AM64x-EVM but there everything worked fine, I could start/authenticate any image given. Even my custom images using all R5-cores and now beeing bigger than 1,6 MB
Help would be highly appreciated. What is the problem? Is there a bigger bug in somewhere in MCU+ SDK and I currently need to disable authentication at all?
Kind regards,
Dominik
Hello,
Could you please go through the following thread & provide relevant inputs like SYSFW logs
Regards,
Prashant
Sorry for the late response. The mentioned thread actually is a bit difficult to follow as multiple users respondended, but I got through and instructions for Sysfw logs were clear.
One thing: I was not able to add dump_sysfw_logs() directly after Bootloader_socAuthImage() as this is not called from SBL_OSPI but in functions from bootloader.c. The dump function is now directly called after the Bootloader_parseMultiCoreAppImage().
Here the printed SYSFWLOGS from Debug UART, I used the function as described. If you need other format let me know.
<<SYSFW_LOGS 180010C 0x61C0009C 0x61276CB7 0x61276CB7 0xC20101 0xC20024 0x61800101 0x61C0008A 0xC20104 0xC20024 0x61800104 0x61C0008A 0xC20100 0xC20024 0x61800100 0x61C0008A 0x62000000 0xC2010D 0xC20024 0x6180010D 0x61C0008A 0x61257C83 0xC2010C 0xC20024 0x6180010C 0x61C0008A 0x61257C83 0x61257C83 0xC20101 0xC20024 0x61800101 0x61C0008A 0xC20104 0xC20024 0x61800104 0x61C0008A 0xC20100 0xC20024 0x61800100 0x61C0008A 0x62000000 0xC2010D 0xC20024 0x6180010D 0x61C0008A 0x612D7C83 0xC2010C 0xC20024 0x6180010C 0x61C0008A 0x612D7C83 0x612D7C83 0xC20101 0xC20024 0x61800101 0x61C0008A 0xC20104 0xC20024 0x61800104 0x61C0008A 0xC20100 0xC20024 0x61800100 0x61C0008A 0x62000000 0xC2010D 0xC20024 0x6180010D 0x61C0008A 0x61257C83 0xC2010C 0xC20024 0x6180010C 0x61C0008A 0x61257C83 0x61257C83 0xC20101 0xC20024 0x61800101 0x61C0008A 0xC20104 0xC20024 0x61800104 0x61C0008A 0xC20100 0xC20024 0x61800100 0x61C0008A 0x62000000 0xC2010D 0xC20024 0x6180010D 0x61C0008A 0x612D7C83 0xC2010C 0xC20024 0x6180010C 0x61C0008A 0x612D7C83 0x612D7C83 0xC21500 0xC20024 0x4F4E00FF 0x4F4A001A 0x4F4B0020 0x4F4606A0 0x4F4C000C 0x4F4D0006 0x4F4F0000 0x4F500000 0xC21500 0xC20024 0x4F4E00FF 0x4F4A001A 0x4F4B0022 0x4F4606A2 0x4F4C0006 0x4F4D0006 0x4F4F0000 0x4F500000 0xC21500 0xC20024 0x4F4E00FF 0x4F4A001A 0x4F4B0021 0x4F4606A1 0x4F4C0006 0x4F4D0006 0x4F4F0000 0x4F500000 0xC21500 0xC20024 0x4F4E00FF 0x4F4A001C 0x4F4B000D 0x4F46070D 0x4F4C0210 0x4F4D0100 0x4F4F0000 0x4F500000 0xC21500 0xC20024 0x4F4E00FF 0x4F4A001C 0x4F4B000A 0x4F46070A 0x4F4C002C 0x4F4D000E 0x4F4F0000 0x4F500000 0xC21110 0xC20024 0x41070000 0x410800BF 0x4F8A00FF 0x4F8B0001 0x4F80001A 0x4100001A 0x4F01000C 0x4F06068D 0x4F0A0024 0x4101000C 0x410C0001 0x410D7007 0x410E5980 0x410F0000 0x41100001 0x41110000 0x4F8A00FF 0x4F8B0001 0x4F80001A 0x4100001A 0x4F8A00FF 0x4F8B0001 0x4F80001A 0x4100001A 0x41070000 0x410800BF 0x4F8A00FF 0x4F8B0001 0x4F80001A 0x4100001A 0xC21205 0xC20024 0x43870001 0x43887FFF 0x4F8A00FF 0x4F8B0001 0x4F80001A 0x4380001A 0x4F01000C 0x4F0606A0 0x4F0A0024 0x4381000C 0x438A0000 0x43A00000 0x43A10000 0x438B0000 0x438C000C 0x43A20000 0x438D0000 0x43A30000 0x43A40000 0x438F0004 0x43900000 0x43910000 0x43920001 0x439F0001 0x43A50000 0x43A60001 0x4F8A00FF 0x4F8B0001 0x4F80001A 0x4380001A 0xC20002 0xC20024 0x4003007 0x4400927 0xC20201 0xC20024 0x61800201 0x61C00051 0xC20200 0xC20024 0x61800200 0x61C00051 0x62000002 0x62C0C000 0x6403C000 0x64006004 0x62C0C001 0x6080009D 0x6080009F 0x60000051 0x6383C000 0x63806004 0xC20202 0xC20024 0x61800202 0x61C00051 0x62000000 0xC20101 0xC20024 0x61800101 0x61C00051 0xC20104 0xC20024 0x61800104 0x61C00051 0xC20103 0xC20024 0x61800103 0x61C00051 0xC20100 0xC20024 0x61800100 0x61C00051 0x62000000 0x60C0009D 0xC20102 0xC20024 0x61800102 0x61C00051 0x62000001 0xC2010D 0xC20024 0x6180010D 0x61C00051 0x612B7C91 0xC2010C 0xC20024 0x6180010C 0x61C00051 0x612B7C91 0x612B7C91 0xC20201 0xC20024 0x61800201 0x61C00052 0xC20200 0xC20024 0x61800200 0x61C00052 0x62000002 0x62C0E000 0x6403E000 0x64006005 0x62C0E001 0x6080009E 0x608000A0 0x60000052 0x6383E000 0x63806005 0xC20202 0xC20024 0x61800202 0x61C00052 0x62000000 0xC20101 0xC20024 0x61800101 0x61C00052 0xC20104 0xC20024 0x61800104 0x61C00052 0xC20103 0xC20024 0x61800103 0x61C00052 0xC20100 0xC20024 0x61800100 0x61C00052 0x62000000 0x60C0009E 0xC20102 0xC20024 0x61800102 0x61C00052 0x62000001 0xC2010D 0xC20024 0x6180010D 0x61C00052 0x612B7C91 0xC2010C 0xC20024 0x6180010C 0x61C00052 0x612B7C91 0x612B7C91 0xC2C120 0xC20024 0x20C00003 0x20C00002 0024 0x61800103 0x61C0184B 0xC20100 0xC20024 0x61800100 0x61C0184B 0x62000000 0x60C000A3 0xC20102 0xC20024 0x61800102 0x61C0184B 0x62000007 0xC2010D 0xC20024 0x6180010D 0x61C0184B 0x612B7C88 0xC2010C 0xC20024 0x6180010C 0x61C0184B 0x612B7C88 0x612B7C88 0xC20101 0xC20024 0x61800101 0x61C0009C 0xC20104 0xC20024 0x61800104 0x61C0009C 0xC20103 0xC20024 0x61800103 0x61C0009C 0xC20100 0xC20024 0x61800100 0x61C0009C 0x62000000 0x60C000BE 0x60C000B7 0xC20102 0xC20024 0x61800102 0x61C0009C 0x62000001 0xC2010D 0xC20024 0x6180010D 0x61C0009C 0x61276CB7 0xC2010C 0xC20024 0x6 SYSFW_LOGS
Hi Prashnat,
I found a workaround, which currently helps me to load at least big hello world projects with signature checking activated. I modified the bootloader to take the appimage from a specified address in DDR RAM.
1) switched the bootloader settings in Sysconfig
2) Activated DDR (sysconfig, ddr-config header) on my custom board
3) Added the following code in the SBL OSPI
uint8_t* p_data_buffer = loadFromFlash(&bootParams.bufIoTempBufSize); bootParams.bufIoTempBuf = p_data_buffer; bootParams.bufIoDeviceIndex = ~0; bootParams.memArgsAppImageBaseAddr = (uintptr_t)p_data_buffer;
Note: My loadFromFlash() function reads in blocks from the flash as soon as I tried to load the complete appimage at once I did not get the complete appimage in DDR, it was cut somewhere in the middle. Maybe a problem with Flash_read(…) and big read-sizes?
This whole process seems to work fine for hello_world projects build in CCS. I even added a big array and bloated the hs_fs image to > 3 MB. Authentication and starting of the application/firmware still worked. Nevertheless, I am still not able to load my custom application, but I am now facing different errors, the Signature check does not fail anymore.
ERROR: Bootloader_socCpuSetEntryPoint:908: CPU set config failed for r5f0-1Some tests have failed!!
Hi Dominik,
Thank you for following up. Let me go through the results & get back to you!!
I think we can close this issue for now. I switched to BOOTLOADER_MEDIA_MEM and with the correct configuration and some explicitely reserved space on DDR for bootloader the issue is solved. Prashant showed how to implement with 2 Bootloader instances in this issue: