This thread has been locked.

If you have a related question, please click the "Ask a related question" button in the top right corner. The newly created question will be automatically linked to this question.

LP-AM243: LP-AM243 Error -1170 when connecting debugger

Part Number: LP-AM243

Tool/software:

Hi,

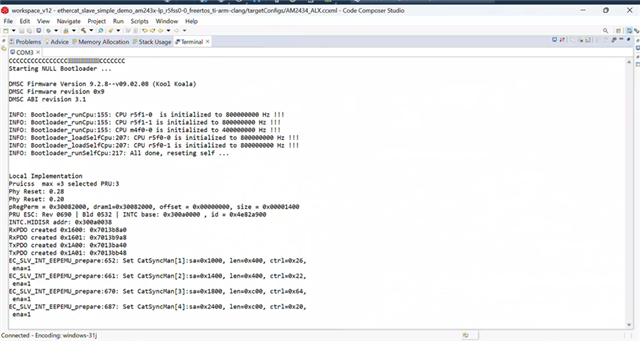
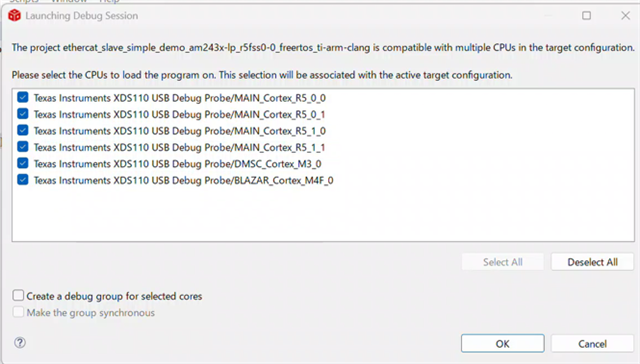
I'm trying to work "ethercat_slave_simple_demo_am243x-lp_r5fss0-0_freertos_ti-arm-clang".
I could build this project under CCS12.7. So, I will try to deploy this on LP-243x via XDS110 onboard debugger.

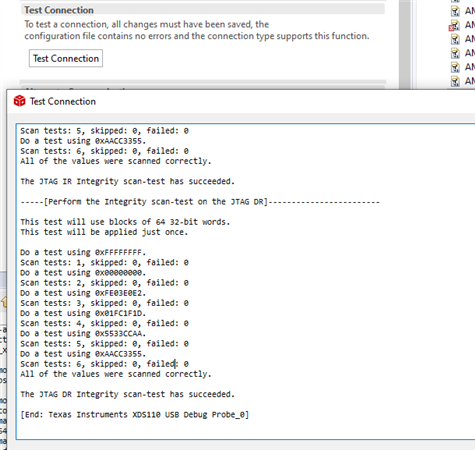
However, as I launch target configuration file, I got following error.

"Error connecting to the target: (Error -1170 @0x0)

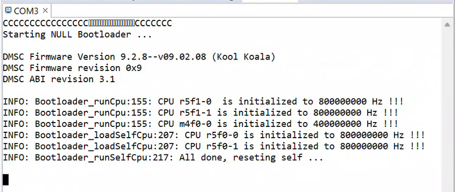
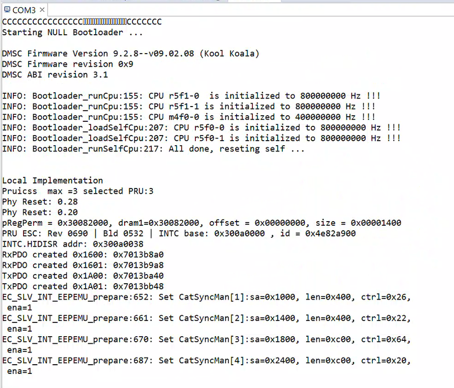
Here is capture image.


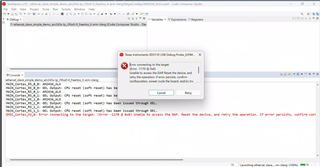
Here is revision/version information for each components.

* Board Rev: PROC109A
* MCU+SDK Rev :09_02_01_05
* Industrial commnication SDK Rev : 09.02.00.24

I followed following procedure for initialization.
https://software-dl.ti.com/mcu-plus-sdk/esd/AM243X/09_02_01_05/exports/docs/api_guide_am243x/EVM_SETUP_PAGE.html

And, I did not observe any error during EVM setup.
Could you please comment which one may be cause of this issue ?

Best Regards,

  • Hi Ryuuichi,

    Can you please tell which boot mode are you using?

    Are you able to see the SBL logs on UART console once the EVM setup is done?

    Regards,

    Tushar

  • Hello,

    Thank you for your reply.
    >Can you please tell which boot mode are you using?
    I followed below, and since this used OSPI boot, so I used same boot mode.
    https://software-dl.ti.com/mcu-plus-sdk/esd/AM243X/09_02_01_05/exports/docs/api_guide_am243x/EVM_SETUP_PAGE.html

    >Are you able to see the SBL logs on UART console once the EVM setup is done?
    Yes. Here is console log on CCS.


    Best Regards,

  • Hi,

    Looks like the EVM is initialized correctly. Can you please disconnect and reconnect the JTAG cable and try again?

    Regards,

    Tushar

  • Hello,

    Thank you for your reply.

    >Can you please disconnect and reconnect the JTAG cable and try again?
    I did it, but still observe issue.

    Best Regards,

  • Hi, 

    Please share your target configuration(*.ccxml) file with us?

    Also have you tried this with out LP board also?

    Regards,

    Tushar

  • Hello

    >Please share your target configuration(*.ccxml) file with us?
    Attached is my target configuration file. Please check it.

    >Also have you tried this with out LP board also?
    No.

    Best Regards,

    AM2434_ALX.zip

  • Hi Ryuuichi,

    Thanks for providing the ccxml file, I will review this.

    Sorry for the above typo, I just checked I have written without LP board.

    What I meant is, have you tried on other LP board also?

    Regards,

    Tushar

  • Hi Ryuuichi,

    I have checked the ccxml file and it looks okay. Can you please try changing the cables or may be try with different LP board?

    Regards,

    Tushar

  • Hello,

    Thank you for your reply.
    >Can you please try changing the cables or may be try with different LP board?
    I did not check by using other cable, so I will try it later.
    However, I did not have another LP board.(I have only one board.) So I can not perform your second request at this time.

    Best Regards,

  • Hello,

    I tried to change both cable micro-B and Type-C, however issue still observe.

    Best Regards,

  • Hi Ryuuichi,

    When you click test connection from the target configuration file are you seeing success logs or getting any error?

    Please refer below image.

    Regards,

    Tushar

  • Hello,

    Here is my result when I performed "test connection".

    ----

    [Start: Texas Instruments XDS110 USB Debug Probe_0]

    Execute the command:

    %ccs_base%/common/uscif/dbgjtag -f %boarddatafile% -rv -o -S integrity

    [Result]


    -----[Print the board config pathname(s)]------------------------------------

    C:\Users\TEDECE\AppData\Local\TEXASI~1\CCS\
    ccs1270\0\0\BrdDat\testBoard.dat

    -----[Print the reset-command software log-file]-----------------------------

    This utility has selected a 100/110/510 class product.
    This utility will load the adapter 'jioxds110.dll'.
    The library build date was 'Mar 13 2024'.
    The library build time was '13:03:34'.
    The library package version is '12.7.0.00105'.
    The library component version is '35.35.0.0'.
    The controller does not use a programmable FPGA.
    The controller has a version number of '5' (0x00000005).
    The controller has an insertion length of '0' (0x00000000).
    This utility will attempt to reset the controller.
    This utility has successfully reset the controller.

    -----[Print the reset-command hardware log-file]-----------------------------

    The scan-path will be reset by toggling the JTAG TRST signal.
    The controller is the XDS110 with USB interface.
    The link from controller to target is direct (without cable).
    The software is configured for XDS110 features.
    The controller cannot monitor the value on the EMU[0] pin.
    The controller cannot monitor the value on the EMU[1] pin.
    The controller cannot control the timing on output pins.
    The controller cannot control the timing on input pins.
    The scan-path link-delay has been set to exactly '0' (0x0000).

    -----[Perform the Integrity scan-test on the JTAG IR]------------------------

    This test will use blocks of 64 32-bit words.
    This test will be applied just once.

    Do a test using 0xFFFFFFFF.
    Scan tests: 1, skipped: 0, failed: 0
    Do a test using 0x00000000.
    Scan tests: 2, skipped: 0, failed: 0
    Do a test using 0xFE03E0E2.
    Scan tests: 3, skipped: 0, failed: 0
    Do a test using 0x01FC1F1D.
    Scan tests: 4, skipped: 0, failed: 0
    Do a test using 0x5533CCAA.
    Scan tests: 5, skipped: 0, failed: 0
    Do a test using 0xAACC3355.
    Scan tests: 6, skipped: 0, failed: 0
    All of the values were scanned correctly.

    The JTAG IR Integrity scan-test has succeeded.

    -----[Perform the Integrity scan-test on the JTAG DR]------------------------

    This test will use blocks of 64 32-bit words.
    This test will be applied just once.

    Do a test using 0xFFFFFFFF.
    Scan tests: 1, skipped: 0, failed: 0
    Do a test using 0x00000000.
    Scan tests: 2, skipped: 0, failed: 0
    Do a test using 0xFE03E0E2.
    Scan tests: 3, skipped: 0, failed: 0
    Do a test using 0x01FC1F1D.
    Scan tests: 4, skipped: 0, failed: 0
    Do a test using 0x5533CCAA.
    Scan tests: 5, skipped: 0, failed: 0
    Do a test using 0xAACC3355.
    Scan tests: 6, skipped: 0, failed: 0
    All of the values were scanned correctly.

    The JTAG DR Integrity scan-test has succeeded.

    [End: Texas Instruments XDS110 USB Debug Probe_0]
    ----

    Best Regards,

  • Hi Ryuuichi,

    Thanks for the confirmation. I was going through the earlier replies and found that you have flashed SBL NULL binary to the EVM.

    But I can also see some other logs also coming on the console.

    Can you please tell if you are not able to connect how are you getting application logs?

    Regards,

    Tushar

  • Hello 
    >Can you please tell if you are not able to connect how are you getting application logs?
    Here is procedure how I got application log.

       - POWER-OFF the AM243X-LP
       - Switch the LP boot mode to OSPI mode.
       - Connect the UART terminal
       - POWER-ON the AM243X-LP
       - Close the UART terminal 
       - I saw output below on the UART terminal


      - I peformed debug by clicking following icon (build project and launch debugger.)


      - During launching debugger, I saw "cortex M3" connection error as I posted on previos thread.
      - After confirming above error, I checked console. Then, I saw following application log.


    Best Regards,

  • Hi Ryuuichi,

    Which device type are you using? Is it GP or HSFS?

    Are you trying to connect with M3 core?

    Please note for HSFS device the M3 JTAG is locked and can't be connected. Please refer HSFS_MIGRATION_GUIDE for more info.

    Regards,

    Tushar

  • Hi,

    >Which device type are you using? Is it GP or HSFS?
    As I described, I use Board Rev PROC109A.
    I believe that this implements HS-FS device.

    >Are you trying to connect with M3 core?
    Do you know whether I tried to connect M3 core manually ?
    If so, the answer is NO. The first time when I connect device by using onboard XDS110, CCS might ask me which core I will try to connect. In this case, I may set to connect all core including M3.

    >Please note for HSFS device the M3 JTAG is locked and can't be connected. Please refer HSFS_MIGRATION_GUIDE for more info.
    I checked above URL.
    I have following question.

    * According to above URL, you show following two cases.

    - SBL base
    - CCS + GEL base

    In my case(following case), I believe that I used SBL base.
    https://software-dl.ti.com/mcu-plus-sdk/esd/AM243X/09_02_01_05/exports/docs/api_guide_am243x/EVM_SETUP_PAGE.html

    However, in this case, it seems that application is NOT compiled on CCS.
    (Because, I did not see kind of " *.appimage.hs_fs ". Can I use application image which I built on CCS under SBL base ?

    Best Regards,

  • Hi Ryuuichi,

    I believe that this implements HS-FS device.

    You can check the same by following the steps mentioned here.

    I will try to connect. In this case, I may set to connect all core including M3.

    No, the above is incorrect. You should only select one specific core for which the application is built not all the cores at once.

    However, in this case, it seems that application is NOT compiled on CCS.

    The above methods are for the EVM/SOC initialization. The binary can be build using either CCS or Makefiles.

    Regards,

    Tushar 

  • Hello,

    - 1 -
    For below.
    >You can check the same by following the steps mentioned here.
    Here is result when I tried to identify device on AM243x-LP.

    ---
    SoC ID Header Info:
    -----------------------
    NumBlocks : [2]
    -----------------------
    SoC ID Public ROM Info:
    -----------------------
    SubBlockId :
    SubBlockSize :
    DeviceName : am64x
    DeviceType : HSFS
    DMSC ROM Version : [0, 2, 0, 0]
    R5 ROM Version : [0, 2, 0, 0]
    -----------------------
    SoC ID Secure ROM Info:
    -----------------------
    Sec SubBlockId : 2
    Sec SubBlockSize : 166
    Sec Prime : 0
    Sec Key Revision : 0
    Sec Key Count : 0
    Sec TI MPK Hash : b018658ad99dc903c8c9bfb27b12751099920a042ad1dfea7b7ba57369f15546de285edde6a7b39a8bdc40a27b237f8fb1e57f245e80b929c1e28b024aa2ecc6
    Sec Cust MPK Hash : ad0bc40b000000000000000000000000000000000000000000000000000000000000000000000000000000000000000000000000000000000000000000000000
    Sec Unique ID : 67916e9ae256227f4e5069db4ae8ea052fe149a0c1c63967233fa3d4d0bdd399
    ---
    This shows HSFS device, but device type was AM64.

    - 2 -
    For below.
    >The above methods are for the EVM/SOC initialization. The binary can be build using either CCS or Makefiles.
    I built under CCS. However, it seems that generated binary is NOT for security device because there is no "hs_fs" extension with generated file.
    What I would like you to confirm how I can build for hsfs device under CCS ?

    Best Regards,


  • Hi Ryuuichi,

    This shows HSFS device, but device type was AM64

    Thanks for the confirmation.

    What I would like you to confirm how I can build for hsfs device under CCS ?

    Please share the makefile_ccs_bootimage_gen file of the project with us?

    Regards,

    Tushar

  • Hi,

    Yesterday, I worked my generated app on EVM.
    It seems that root cause of my issue was below.

    * When I performed launch target, I used following icon.

    However, it seems this icon performed not only launch core but also connect and load application.
    As I said previous thread, when I connected EVM to PC first time, I choosed all cores as shown below.

    Because of this setting, I faced this issue.

    Instead of using this icon, I performed "View" -> "target configurations" -> select proper ccml file and performed "launch selected configuration".
    As a result, I could launch cores and connect R5_0. Finally, I worked application on EVM.

    So, I will close this thread. Thank you for your support.

    Best Regards,