This thread has been locked.

If you have a related question, please click the "Ask a related question" button in the top right corner. The newly created question will be automatically linked to this question.

CCS/EK-TM4C123GXL: Simple_tx Simple_rx CAN bus difficulties

Part Number: EK-TM4C123GXL
Other Parts Discussed in Thread: SN65HVD232

Tool/software: Code Composer Studio

I've been working on getting the example code for simple_tx and simple_rx included in the peripheral library up and running and have hit a roadblock. No doubt I am doing something wrong, but I cannot for the life of me figure out what it is.

Hardware:

- 2x TM4C123GXL launchpads

- 2x SN65HVD232 CAN Transceivers with 120ohm terminating resistors.

Code:

Simple_tx and simple_rx as provided in the peripheral library.

IDE is Code composer studio V7.4, using TI v16.9.8.LTS Compiler

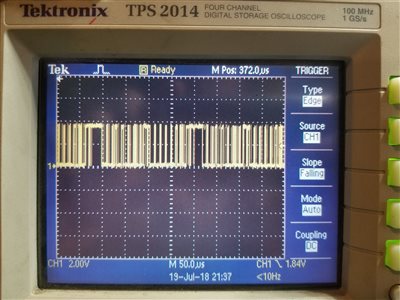
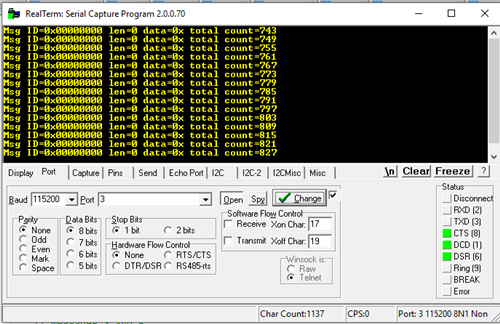
Initially I ran the code bone stock with no modifications save updating tx/rx to PE4 and PE5, and dynamically allocating the interrupt. This resulted in a constant transmission of the same message. The interrupt would continuously trigger and "message data" and "total count" would increment out of sync unlike the indicated behavior at the top of the program.

*Message transmission begins immediately after the first ends.

I have found a workaround for this. By inserting a CANMessageClear(CAN0_BASE,1); command at the end of the interrupt. This prevents re-sending of the message until CANMessageSet is called again in my main while loop. It seems odd that I would have to modify vendor example code to get it working beyond configuring ports for my hardware. Am I missing something here?

Probelm 2, I have not found a workaround for.

Simple_Rx, this code triggers message object interrupts, so it acknowledges a message has been received. However the message ID it prints out are always exactly what was loaded into the message object for the MsgID.

ie: if I set the MsgID to 0 so it receives any message, it will always print out ID 0 when it receives a message. If I load 0x0002 (but leave the mask as 0) then it always prints ID 0x00000002, regardless of the message ID it should be receiving.

No matter how I configure the IDs and message data it always returns 0 for message length and data.

  • I've left the code out of the first post to keep things as tidy as possible, I'll include it here.  Note that it is essentially bone stock code from the peripheral library.

    //*****************************************************************************
    //
    // simple_tx.c - Example demonstrating simple CAN message transmission.
    //
    // Copyright (c) 2010-2016 Texas Instruments Incorporated.  All rights reserved.
    // Software License Agreement
    //
    //   Redistribution and use in source and binary forms, with or without
    //   modification, are permitted provided that the following conditions
    //   are met:
    //
    //   Redistributions of source code must retain the above copyright
    //   notice, this list of conditions and the following disclaimer.
    //
    //   Redistributions in binary form must reproduce the above copyright
    //   notice, this list of conditions and the following disclaimer in the
    //   documentation and/or other materials provided with the
    //   distribution.
    //
    //   Neither the name of Texas Instruments Incorporated nor the names of
    //   its contributors may be used to endorse or promote products derived
    //   from this software without specific prior written permission.
    //
    // THIS SOFTWARE IS PROVIDED BY THE COPYRIGHT HOLDERS AND CONTRIBUTORS
    // "AS IS" AND ANY EXPRESS OR IMPLIED WARRANTIES, INCLUDING, BUT NOT
    // LIMITED TO, THE IMPLIED WARRANTIES OF MERCHANTABILITY AND FITNESS FOR
    // A PARTICULAR PURPOSE ARE DISCLAIMED. IN NO EVENT SHALL THE COPYRIGHT
    // OWNER OR CONTRIBUTORS BE LIABLE FOR ANY DIRECT, INDIRECT, INCIDENTAL,
    // SPECIAL, EXEMPLARY, OR CONSEQUENTIAL DAMAGES (INCLUDING, BUT NOT
    // LIMITED TO, PROCUREMENT OF SUBSTITUTE GOODS OR SERVICES; LOSS OF USE,
    // DATA, OR PROFITS; OR BUSINESS INTERRUPTION) HOWEVER CAUSED AND ON ANY
    // THEORY OF LIABILITY, WHETHER IN CONTRACT, STRICT LIABILITY, OR TORT
    // (INCLUDING NEGLIGENCE OR OTHERWISE) ARISING IN ANY WAY OUT OF THE USE
    // OF THIS SOFTWARE, EVEN IF ADVISED OF THE POSSIBILITY OF SUCH DAMAGE.
    //
    // This is part of revision 2.1.3.156 of the Tiva Firmware Development Package.
    //
    //*****************************************************************************
    
    #include <stdbool.h>
    #include <stdint.h>
    #include "inc/hw_can.h"
    #include "inc/hw_ints.h"
    #include "inc/hw_memmap.h"
    #include "driverlib/can.h"
    #include "driverlib/gpio.h"
    #include "driverlib/interrupt.h"
    #include "driverlib/pin_map.h"
    #include "driverlib/sysctl.h"
    #include "driverlib/uart.h"
    #include "utils/uartstdio.h"
    
    //*****************************************************************************
    //
    //! \addtogroup can_examples_list
    //! <h1>Simple CAN TX (simple_tx)</h1>
    //!
    //! This example shows the basic setup of CAN in order to transmit messages
    //! on the CAN bus.  The CAN peripheral is configured to transmit messages
    //! with a specific CAN ID.  A message is then transmitted once per second,
    //! using a simple delay loop for timing.  The message that is sent is a 4
    //! byte message that contains an incrementing pattern.  A CAN interrupt
    //! handler is used to confirm message transmission and count the number of
    //! messages that have been sent.
    //!
    //! This example uses the following peripherals and I/O signals.  You must
    //! review these and change as needed for your own board:
    //! - CAN0 peripheral
    //! - GPIO Port E peripheral (for CAN0 pins)
    //! - CAN0RX - PE4
    //! - CAN0TX - PE5
    //!
    //! The following UART signals are configured only for displaying console
    //! messages for this example.  These are not required for operation of CAN.
    //! - GPIO port A peripheral (for UART0 pins)
    //! - UART0RX - PA0
    //! - UART0TX - PA1
    //!
    //! This example uses the following interrupt handlers.  To use this example
    //! in your own application you must add these interrupt handlers to your
    //! vector table.
    //! - INT_CAN0 - CANIntHandler
    //
    //*****************************************************************************
    
    //*****************************************************************************
    //
    // A counter that keeps track of the number of times the TX interrupt has
    // occurred, which should match the number of TX messages that were sent.
    //
    //*****************************************************************************
    volatile uint32_t g_ui32MsgCount = 0;
    
    //*****************************************************************************
    //
    // A flag to indicate that some transmission error occurred.
    //
    //*****************************************************************************
    volatile bool g_bErrFlag = 0;
    
    //*****************************************************************************
    //
    // This function sets up UART0 to be used for a console to display information
    // as the example is running.
    //
    //*****************************************************************************
    void
    InitConsole(void)
    {
        //
        // Enable GPIO port A which is used for UART0 pins.
        // TODO: change this to whichever GPIO port you are using.
        //
        SysCtlPeripheralEnable(SYSCTL_PERIPH_GPIOA);
    
        //
        // Configure the pin muxing for UART0 functions on port A0 and A1.
        // This step is not necessary if your part does not support pin muxing.
        // TODO: change this to select the port/pin you are using.
        //
        GPIOPinConfigure(GPIO_PA0_U0RX);
        GPIOPinConfigure(GPIO_PA1_U0TX);
    
        //
        // Enable UART0 so that we can configure the clock.
        //
        SysCtlPeripheralEnable(SYSCTL_PERIPH_UART0);
    
        //
        // Use the internal 16MHz oscillator as the UART clock source.
        //
        UARTClockSourceSet(UART0_BASE, UART_CLOCK_PIOSC);
    
        //
        // Select the alternate (UART) function for these pins.
        // TODO: change this to select the port/pin you are using.
        //
        GPIOPinTypeUART(GPIO_PORTA_BASE, GPIO_PIN_0 | GPIO_PIN_1);
    
        //
        // Initialize the UART for console I/O.
        //
        UARTStdioConfig(0, 115200, 16000000);
    }
    
    //*****************************************************************************
    //
    // This function provides a 1 second delay using a simple polling method.
    //
    //*****************************************************************************
    void
    SimpleDelay(void)
    {
        //
        // Delay cycles for 1 second
        //
        SysCtlDelay(16000000 / 3);
    }
    
    //*****************************************************************************
    //
    // This function is the interrupt handler for the CAN peripheral.  It checks
    // for the cause of the interrupt, and maintains a count of all messages that
    // have been transmitted.
    //
    //*****************************************************************************
    void
    CANIntHandler(void)
    {
        uint32_t ui32Status;
    
        //
        // Read the CAN interrupt status to find the cause of the interrupt
        //
        ui32Status = CANIntStatus(CAN0_BASE, CAN_INT_STS_CAUSE);
    
        //
        // If the cause is a controller status interrupt, then get the status
        //
        if(ui32Status == CAN_INT_INTID_STATUS)
        {
            //
            // Read the controller status.  This will return a field of status
            // error bits that can indicate various errors.  Error processing
            // is not done in this example for simplicity.  Refer to the
            // API documentation for details about the error status bits.
            // The act of reading this status will clear the interrupt.  If the
            // CAN peripheral is not connected to a CAN bus with other CAN devices
            // present, then errors will occur and will be indicated in the
            // controller status.
            //
            ui32Status = CANStatusGet(CAN0_BASE, CAN_STS_CONTROL);
    
            //
            // Set a flag to indicate some errors may have occurred.
            //
            g_bErrFlag = 1;
        }
    
        //
        // Check if the cause is message object 1, which what we are using for
        // sending messages.
        //
        else if(ui32Status == 1)
        {
            //
            // Getting to this point means that the TX interrupt occurred on
            // message object 1, and the message TX is complete.  Clear the
            // message object interrupt.
            //
            CANIntClear(CAN0_BASE, 1);
    
            //
            // Increment a counter to keep track of how many messages have been
            // sent.  In a real application this could be used to set flags to
            // indicate when a message is sent.
            //
            g_ui32MsgCount++;
    
            //
            // Since the message was sent, clear any error flags.
            //
            g_bErrFlag = 0;
    
            //CANMessageClear(CAN0_BASE,1);  //*******************ADDED LINE: un-comment to prevent repeated transmission*****************
        }
    
        //
        // Otherwise, something unexpected caused the interrupt.  This should
        // never happen.
        //
        else
        {
            //
            // Spurious interrupt handling can go here.
            //
        }
    }
    
    
    //*****************************************************************************
    //
    // Configure the CAN and enter a loop to transmit periodic CAN messages.
    //
    //*****************************************************************************
    int
    main(void)
    {
    #if defined(TARGET_IS_TM4C129_RA0) ||                                         \
        defined(TARGET_IS_TM4C129_RA1) ||                                         \
        defined(TARGET_IS_TM4C129_RA2)
        uint32_t ui32SysClock;
    #endif
    
        tCANMsgObject sCANMessage;
        uint32_t ui32MsgData;
        uint8_t *pui8MsgData;
    
        pui8MsgData = (uint8_t *)&ui32MsgData;
    
        //
        // Set the clocking to run directly from the external crystal/oscillator.
        // TODO: The SYSCTL_XTAL_ value must be changed to match the value of the
        // crystal on your board.
        //
    #if defined(TARGET_IS_TM4C129_RA0) ||                                         \
        defined(TARGET_IS_TM4C129_RA1) ||                                         \
        defined(TARGET_IS_TM4C129_RA2)
        ui32SysClock = SysCtlClockFreqSet((SYSCTL_XTAL_25MHZ |
                                           SYSCTL_OSC_MAIN |
                                           SYSCTL_USE_OSC)
                                           25000000);
    #else
        SysCtlClockSet(SYSCTL_SYSDIV_1 | SYSCTL_USE_OSC | SYSCTL_OSC_MAIN |
                       SYSCTL_XTAL_16MHZ);
    #endif
    
        //
        // Set up the serial console to use for displaying messages.  This is
        // just for this example program and is not needed for CAN operation.
        //
        InitConsole();
    
        //
        // For this example CAN0 is used with RX and TX pins on port B4 and B5.
        // The actual port and pins used may be different on your part, consult
        // the data sheet for more information.
        // GPIO port E needs to be enabled so these pins can be used.
        // TODO: change this to whichever GPIO port you are using
        //
        SysCtlPeripheralEnable(SYSCTL_PERIPH_GPIOE);
    
        //
        // Configure the GPIO pin muxing to select CAN0 functions for these pins.
        // This step selects which alternate function is available for these pins.
        // This is necessary if your part supports GPIO pin function muxing.
        // Consult the data sheet to see which functions are allocated per pin.
        // TODO: change this to select the port/pin you are using
        //
        GPIOPinConfigure(GPIO_PE4_CAN0RX);
        GPIOPinConfigure(GPIO_PE5_CAN0TX);
    
        //
        // Enable the alternate function on the GPIO pins.  The above step selects
        // which alternate function is available.  This step actually enables the
        // alternate function instead of GPIO for these pins.
        // TODO: change this to match the port/pin you are using
        //
        GPIOPinTypeCAN(GPIO_PORTE_BASE, GPIO_PIN_4 | GPIO_PIN_5);
    
        //
        // The GPIO port and pins have been set up for CAN.  The CAN peripheral
        // must be enabled.
        //
        SysCtlPeripheralEnable(SYSCTL_PERIPH_CAN0);
    
        //
        // Initialize the CAN controller
        //
        CANInit(CAN0_BASE);
    
        //
        // Set up the bit rate for the CAN bus.  This function sets up the CAN
        // bus timing for a nominal configuration.  You can achieve more control
        // over the CAN bus timing by using the function CANBitTimingSet() instead
        // of this one, if needed.
        // In this example, the CAN bus is set to 500 kHz.  In the function below,
        // the call to SysCtlClockGet() or ui32SysClock is used to determine the
        // clock rate that is used for clocking the CAN peripheral.  This can be
        // replaced with a  fixed value if you know the value of the system clock,
        // saving the extra function call.  For some parts, the CAN peripheral is
        // clocked by a fixed 8 MHz regardless of the system clock in which case
        // the call to SysCtlClockGet() or ui32SysClock should be replaced with
        // 8000000.  Consult the data sheet for more information about CAN
        // peripheral clocking.
        //
    #if defined(TARGET_IS_TM4C129_RA0) ||                                         \
        defined(TARGET_IS_TM4C129_RA1) ||                                         \
        defined(TARGET_IS_TM4C129_RA2)
        CANBitRateSet(CAN0_BASE, ui32SysClock, 500000);
    #else
        CANBitRateSet(CAN0_BASE, SysCtlClockGet(), 500000);
    #endif
    
        //
        // Enable interrupts on the CAN peripheral.  This example uses static
        // allocation of interrupt handlers which means the name of the handler
        // is in the vector table of startup code.  If you want to use dynamic
        // allocation of the vector table, then you must also call CANIntRegister()
        // here.
        //
         CANIntRegister(CAN0_BASE, CANIntHandler); // if using dynamic vectors
        //
        CANIntEnable(CAN0_BASE, CAN_INT_MASTER | CAN_INT_ERROR | CAN_INT_STATUS);
    
        //
        // Enable the CAN interrupt on the processor (NVIC).
        //
        IntEnable(INT_CAN0);
    
        //
        // Enable the CAN for operation.
        //
        CANEnable(CAN0_BASE);
    
        //
        // Initialize the message object that will be used for sending CAN
        // messages.  The message will be 4 bytes that will contain an incrementing
        // value.  Initially it will be set to 0.
        //
        ui32MsgData = 0;
        sCANMessage.ui32MsgID = 0x1001;
        sCANMessage.ui32MsgIDMask = 0;
        sCANMessage.ui32Flags = MSG_OBJ_TX_INT_ENABLE;
        sCANMessage.ui32MsgLen = sizeof(pui8MsgData);
        sCANMessage.pui8MsgData = pui8MsgData;
    
        //
        // Enter loop to send messages.  A new message will be sent once per
        // second.  The 4 bytes of message content will be treated as an uint32_t
        // and incremented by one each time.
        //
        while(1)
        {
            //
            // Print a message to the console showing the message count and the
            // contents of the message being sent.
            //
            UARTprintf("Sending msg: 0x%02X %02X %02X %02X",
                       pui8MsgData[0], pui8MsgData[1], pui8MsgData[2],
                       pui8MsgData[3]);
    
            //
            // Send the CAN message using object number 1 (not the same thing as
            // CAN ID, which is also 1 in this example).  This function will cause
            // the message to be transmitted right away.
            //
            CANMessageSet(CAN0_BASE, 1, &sCANMessage, MSG_OBJ_TYPE_TX);
    
            CANIntDisable(CAN0_BASE, CAN_INT_MASTER | CAN_INT_ERROR | CAN_INT_STATUS);
    
            //
            // Now wait 1 second before continuing
            //
            SimpleDelay();
    
            CANIntEnable(CAN0_BASE, CAN_INT_MASTER | CAN_INT_ERROR | CAN_INT_STATUS);
    
            //
            // Check the error flag to see if errors occurred
            //
            if(g_bErrFlag)
            {
                UARTprintf(" error - cable connected?\n");
            }
            else
            {
                //
                // If no errors then print the count of message sent
                //
                UARTprintf(" total count = %X\n", g_ui32MsgCount);
            }
    
            //
            // Increment the value in the message data.
            //
            ui32MsgData++;
        }
    
        //
        // Return no errors
        //
        return(0);
    }
    

    Receive Code


    //*****************************************************************************
    //
    // simple_rx.c - Example demonstrating simple CAN message reception.
    //
    // Copyright (c) 2010-2016 Texas Instruments Incorporated.  All rights reserved.
    // Software License Agreement
    // 
    //   Redistribution and use in source and binary forms, with or without
    //   modification, are permitted provided that the following conditions
    //   are met:
    // 
    //   Redistributions of source code must retain the above copyright
    //   notice, this list of conditions and the following disclaimer.
    // 
    //   Redistributions in binary form must reproduce the above copyright
    //   notice, this list of conditions and the following disclaimer in the
    //   documentation and/or other materials provided with the  
    //   distribution.
    // 
    //   Neither the name of Texas Instruments Incorporated nor the names of
    //   its contributors may be used to endorse or promote products derived
    //   from this software without specific prior written permission.
    // 
    // THIS SOFTWARE IS PROVIDED BY THE COPYRIGHT HOLDERS AND CONTRIBUTORS
    // "AS IS" AND ANY EXPRESS OR IMPLIED WARRANTIES, INCLUDING, BUT NOT
    // LIMITED TO, THE IMPLIED WARRANTIES OF MERCHANTABILITY AND FITNESS FOR
    // A PARTICULAR PURPOSE ARE DISCLAIMED. IN NO EVENT SHALL THE COPYRIGHT
    // OWNER OR CONTRIBUTORS BE LIABLE FOR ANY DIRECT, INDIRECT, INCIDENTAL,
    // SPECIAL, EXEMPLARY, OR CONSEQUENTIAL DAMAGES (INCLUDING, BUT NOT
    // LIMITED TO, PROCUREMENT OF SUBSTITUTE GOODS OR SERVICES; LOSS OF USE,
    // DATA, OR PROFITS; OR BUSINESS INTERRUPTION) HOWEVER CAUSED AND ON ANY
    // THEORY OF LIABILITY, WHETHER IN CONTRACT, STRICT LIABILITY, OR TORT
    // (INCLUDING NEGLIGENCE OR OTHERWISE) ARISING IN ANY WAY OUT OF THE USE
    // OF THIS SOFTWARE, EVEN IF ADVISED OF THE POSSIBILITY OF SUCH DAMAGE.
    // 
    // This is part of revision 2.1.3.156 of the Tiva Firmware Development Package.
    //
    //*****************************************************************************
    
    #include <stdbool.h>
    #include <stdint.h>
    #include "inc/hw_can.h"
    #include "inc/hw_ints.h"
    #include "inc/hw_memmap.h"
    #include "inc/hw_types.h"
    #include "driverlib/can.h"
    #include "driverlib/gpio.h"
    #include "driverlib/interrupt.h"
    #include "driverlib/pin_map.h"
    #include "driverlib/sysctl.h"
    #include "driverlib/uart.h"
    #include "utils/uartstdio.h"
    
    //*****************************************************************************
    //
    //! \addtogroup can_examples_list
    //! <h1>Simple CAN RX (simple_rx)</h1>
    //!
    //! This example shows the basic setup of CAN in order to receive messages
    //! from the CAN bus.  The CAN peripheral is configured to receive messages
    //! with any CAN ID and then print the message contents to the console.
    //!
    //! This example uses the following peripherals and I/O signals.  You must
    //! review these and change as needed for your own board:
    //! - CAN0 peripheral
    //! - GPIO port B peripheral (for CAN0 pins)
    //! - CAN0RX - PB4
    //! - CAN0TX - PB5
    //!
    //! The following UART signals are configured only for displaying console
    //! messages for this example.  These are not required for operation of CAN.
    //! - GPIO port A peripheral (for UART0 pins)
    //! - UART0RX - PE4
    //! - UART0TX - PE5
    //!
    //! This example uses the following interrupt handlers.  To use this example
    //! in your own application you must add these interrupt handlers to your
    //! vector table.
    //! - INT_CAN0 - CANIntHandler
    //
    //*****************************************************************************
    
    //*****************************************************************************
    //
    // A counter that keeps track of the number of times the RX interrupt has
    // occurred, which should match the number of messages that were received.
    //
    //*****************************************************************************
    volatile uint32_t g_ui32MsgCount = 0;
    
    //*****************************************************************************
    //
    // A flag for the interrupt handler to indicate that a message was received.
    //
    //*****************************************************************************
    volatile bool g_bRXFlag = 0;
    
    //*****************************************************************************
    //
    // A flag to indicate that some reception error occurred.
    //
    //*****************************************************************************
    volatile bool g_bErrFlag = 0;
    
    //*****************************************************************************
    //
    // This function sets up UART0 to be used for a console to display information
    // as the example is running.
    //
    //*****************************************************************************
    void
    InitConsole(void)
    {
        //
        // Enable GPIO port A which is used for UART0 pins.
        // TODO: change this to whichever GPIO port you are using.
        //
        SysCtlPeripheralEnable(SYSCTL_PERIPH_GPIOA);
    
        //
        // Configure the pin muxing for UART0 functions on port A0 and A1.
        // This step is not necessary if your part does not support pin muxing.
        // TODO: change this to select the port/pin you are using.
        //
        GPIOPinConfigure(GPIO_PA0_U0RX);
        GPIOPinConfigure(GPIO_PA1_U0TX);
    
        //
        // Enable UART0 so that we can configure the clock.
        //
        SysCtlPeripheralEnable(SYSCTL_PERIPH_UART0);
    
        //
        // Use the internal 16MHz oscillator as the UART clock source.
        //
        UARTClockSourceSet(UART0_BASE, UART_CLOCK_PIOSC);
    
        //
        // Select the alternate (UART) function for these pins.
        // TODO: change this to select the port/pin you are using.
        //
        GPIOPinTypeUART(GPIO_PORTA_BASE, GPIO_PIN_0 | GPIO_PIN_1);
    
        //
        // Initialize the UART for console I/O.
        //
        UARTStdioConfig(0, 115200, 16000000);
    }
    
    //*****************************************************************************
    //
    // This function is the interrupt handler for the CAN peripheral.  It checks
    // for the cause of the interrupt, and maintains a count of all messages that
    // have been received.
    //
    //*****************************************************************************
    void
    CANIntHandler(void)
    {
        uint32_t ui32Status;
    
        //
        // Read the CAN interrupt status to find the cause of the interrupt
        //
        ui32Status = CANIntStatus(CAN0_BASE, CAN_INT_STS_CAUSE);
    
        //
        // If the cause is a controller status interrupt, then get the status
        //
        if(ui32Status == CAN_INT_INTID_STATUS)
        {
            //
            // Read the controller status.  This will return a field of status
            // error bits that can indicate various errors.  Error processing
            // is not done in this example for simplicity.  Refer to the
            // API documentation for details about the error status bits.
            // The act of reading this status will clear the interrupt.
            //
            ui32Status = CANStatusGet(CAN0_BASE, CAN_STS_CONTROL);
    
            //
            // Set a flag to indicate some errors may have occurred.
            //
            g_bErrFlag = 1;
        }
    
        //
        // Check if the cause is message object 1, which what we are using for
        // receiving messages.
        //
        else if(ui32Status == 1)
        {
            //
            // Getting to this point means that the RX interrupt occurred on
            // message object 1, and the message reception is complete.  Clear the
            // message object interrupt.
            //
            CANIntClear(CAN0_BASE, 1);
    
            //
            // Increment a counter to keep track of how many messages have been
            // received.  In a real application this could be used to set flags to
            // indicate when a message is received.
            //
            g_ui32MsgCount++;
    
            //
            // Set flag to indicate received message is pending.
            //
            g_bRXFlag = 1;
    
            //
            // Since a message was received, clear any error flags.
            //
            g_bErrFlag = 0;
        }
    
        //
        // Otherwise, something unexpected caused the interrupt.  This should
        // never happen.
        //
        else
        {
            //
            // Spurious interrupt handling can go here.
            //
        }
        //CANIntClear(CAN0_BASE, 1);
    }
    
    //*****************************************************************************
    //
    // Configure the CAN and enter a loop to receive CAN messages.
    //
    //*****************************************************************************
    int
    main(void)
    {
    #if defined(TARGET_IS_TM4C129_RA0) ||                                         \
        defined(TARGET_IS_TM4C129_RA1) ||                                         \
        defined(TARGET_IS_TM4C129_RA2)
        uint32_t ui32SysClock;
    #endif
    
        tCANMsgObject sCANMessage;
        uint8_t pui8MsgData[8];
    
        //
        // Set the clocking to run directly from the external crystal/oscillator.
        // TODO: The SYSCTL_XTAL_ value must be changed to match the value of the
        // crystal used on your board.
        //
    #if defined(TARGET_IS_TM4C129_RA0) ||                                         \
        defined(TARGET_IS_TM4C129_RA1) ||                                         \
        defined(TARGET_IS_TM4C129_RA2)
        ui32SysClock = SysCtlClockFreqSet((SYSCTL_XTAL_25MHZ |
                                           SYSCTL_OSC_MAIN |
                                           SYSCTL_USE_OSC)
                                           25000000);
    #else
        SysCtlClockSet(SYSCTL_SYSDIV_1 | SYSCTL_USE_OSC | SYSCTL_OSC_MAIN |
                       SYSCTL_XTAL_16MHZ);
    #endif
    
        //
        // Set up the serial console to use for displaying messages.  This is
        // just for this example program and is not needed for CAN operation.
        //
        InitConsole();
    
        //
        // For this example CAN0 is used with RX and TX pins on port B4 and B5.
        // The actual port and pins used may be different on your part, consult
        // the data sheet for more information.
        // GPIO port E needs to be enabled so these pins can be used.
        // TODO: change this to whichever GPIO port you are using
        //
        SysCtlPeripheralEnable(SYSCTL_PERIPH_GPIOE);
    
        //
        // Configure the GPIO pin muxing to select CAN0 functions for these pins.
        // This step selects which alternate function is available for these pins.
        // This is necessary if your part supports GPIO pin function muxing.
        // Consult the data sheet to see which functions are allocated per pin.
        // TODO: change this to select the port/pin you are using
        //
        GPIOPinConfigure(GPIO_PE4_CAN0RX);
        GPIOPinConfigure(GPIO_PE5_CAN0TX);
    
        //
        // Enable the alternate function on the GPIO pins.  The above step selects
        // which alternate function is available.  This step actually enables the
        // alternate function instead of GPIO for these pins.
        // TODO: change this to match the port/pin you are using
        //
        GPIOPinTypeCAN(GPIO_PORTE_BASE, GPIO_PIN_4 | GPIO_PIN_5);
    
        //
        // The GPIO port and pins have been set up for CAN.  The CAN peripheral
        // must be enabled.
        //
        SysCtlPeripheralEnable(SYSCTL_PERIPH_CAN0);
    
        //
        // Initialize the CAN controller
        //
        CANInit(CAN0_BASE);
    
        //
        // Set up the bit rate for the CAN bus.  This function sets up the CAN
        // bus timing for a nominal configuration.  You can achieve more control
        // over the CAN bus timing by using the function CANBitTimingSet() instead
        // of this one, if needed.
        // In this example, the CAN bus is set to 500 kHz.  In the function below,
        // the call to SysCtlClockGet() or ui32SysClock is used to determine the 
        // clock rate that is used for clocking the CAN peripheral.  This can be 
        // replaced with a  fixed value if you know the value of the system clock, 
        // saving the extra function call.  For some parts, the CAN peripheral is 
        // clocked by a fixed 8 MHz regardless of the system clock in which case 
        // the call to SysCtlClockGet() or ui32SysClock should be replaced with 
        // 8000000.  Consult the data sheet for more information about CAN 
        // peripheral clocking.
        //
    #if defined(TARGET_IS_TM4C129_RA0) ||                                         \
        defined(TARGET_IS_TM4C129_RA1) ||                                         \
        defined(TARGET_IS_TM4C129_RA2)
        CANBitRateSet(CAN0_BASE, ui32SysClock, 500000);
    #else
        CANBitRateSet(CAN0_BASE, SysCtlClockGet(), 500000);
    #endif
    
        //
        // Enable interrupts on the CAN peripheral.  This example uses static
        // allocation of interrupt handlers which means the name of the handler
        // is in the vector table of startup code.  If you want to use dynamic
        // allocation of the vector table, then you must also call CANIntRegister()
        // here.
        //
        CANIntRegister(CAN0_BASE, CANIntHandler); // if using dynamic vectors
        //
        CANIntEnable(CAN0_BASE, CAN_INT_MASTER | CAN_INT_ERROR | CAN_INT_STATUS);
    
        //
        // Enable the CAN interrupt on the processor (NVIC).
        //
        IntEnable(INT_CAN0);
    
        //
        // Enable the CAN for operation.
        //
        CANEnable(CAN0_BASE);
    
        //
        // Initialize a message object to be used for receiving CAN messages with
        // any CAN ID.  In order to receive any CAN ID, the ID and mask must both
        // be set to 0, and the ID filter enabled.
        //
        sCANMessage.ui32MsgID = 0;
        sCANMessage.ui32MsgIDMask = 0;
        sCANMessage.ui32Flags = MSG_OBJ_RX_INT_ENABLE | MSG_OBJ_USE_ID_FILTER;
        sCANMessage.ui32MsgLen = 8;
    
        //
        // Now load the message object into the CAN peripheral.  Once loaded the
        // CAN will receive any message on the bus, and an interrupt will occur.
        // Use message object 1 for receiving messages (this is not the same as
        // the CAN ID which can be any value in this example).
        //
        CANMessageSet(CAN0_BASE, 1, &sCANMessage, MSG_OBJ_TYPE_RX);
    
        //
        // Enter loop to process received messages.  This loop just checks a flag
        // that is set by the interrupt handler, and if set it reads out the
        // message and displays the contents.  This is not a robust method for
        // processing incoming CAN data and can only handle one messages at a time.
        // If many messages are being received close together, then some messages
        // may be dropped.  In a real application, some other method should be used
        // for queuing received messages in a way to ensure they are not lost.  You
        // can also make use of CAN FIFO mode which will allow messages to be
        // buffered before they are processed.
        //
        for(;;)
        {
            unsigned int uIdx;
    
            //
            // If the flag is set, that means that the RX interrupt occurred and
            // there is a message ready to be read from the CAN
            //
            if(g_bRXFlag)
            {
                //
                // Reuse the same message object that was used earlier to configure
                // the CAN for receiving messages.  A buffer for storing the
                // received data must also be provided, so set the buffer pointer
                // within the message object.
                //
                sCANMessage.pui8MsgData = pui8MsgData;
    
                //
                // Read the message from the CAN.  Message object number 1 is used
                // (which is not the same thing as CAN ID).  The interrupt clearing
                // flag is not set because this interrupt was already cleared in
                // the interrupt handler.
                //
                CANMessageGet(CAN0_BASE, 1, &sCANMessage, 0);
    
                //
                // Clear the pending message flag so that the interrupt handler can
                // set it again when the next message arrives.
                //
                g_bRXFlag = 0;
    
                //
                // Check to see if there is an indication that some messages were
                // lost.
                //
                if(sCANMessage.ui32Flags & MSG_OBJ_DATA_LOST)
                {
                    UARTprintf("CAN message loss detected\n");
                }
    
                //
                // Print out the contents of the message that was received.
                //
                UARTprintf("Msg ID=0x%08X len=%u data=0x",
                           sCANMessage.ui32MsgID, sCANMessage.ui32MsgLen);
                for(uIdx = 0; uIdx < sCANMessage.ui32MsgLen; uIdx++)
                {
                    UARTprintf("%02X ", pui8MsgData[uIdx]);
                }
                UARTprintf(" total count=%u\n", g_ui32MsgCount);
            }
        }
    
        //
        // Return no errors
        //
        return(0);
    }


  • Are you using the latest version of TivaWare? I notice the example code is from the previous version. The current version is 2.1.4.178.

    // This is part of revision 2.1.3.156 of the Tiva Firmware Development Package.
    

  • May I note that (any/all deviation) from, 'almost bone stock' - proves (extremely)  difficult to detect!     Especially so - when the code dump is massive - and the 'mods' few!
    Your  - color coding of such, 'deviations' - along w/an organized 'Mod listing' - would greatly aid your helper's 'FIND' - of your 'modifications!'    

    Such 'Added Clarity' surely, 'Speeds, Eases & Enhances'  (your) code's review - all to your advantage - don't you agree?

  • I downloaded CCS and the tivaware package directly from the TI website about 3 months ago Bob, I will verify that I've got the most up to date version once I get home tonight.

    I just attempted to colour code things CB1, however within code tags it doesn't highlight properly as far as I can tell. Just adds further code infront of that line. Apologies, I'm new to the forum.

    Line 225 of Simple_tx is the only line of code I've added here. And it is commented out to produce the output in my first post (continuous interrupt generation). Uncommenting it produces one interrupt per message. Otherwise I've simply updated the CAN Tx/Rx to PE4 and PE5 as specified by the "todo" messages in the file.

  • Thank you - few respond w/the quickness & keenness - as you've just illustrated.

    For unexplained reasons - those 'Code Tags' cause an unwanted 'line offset' - when my firm's PCs examine the tags.    (recently vendor's 'Bob' and I - responded to a poster - and that 'line offset' was well noted - and most disturbing!

    More than six years past - my firm employed 'Simple_TX & Simple_RX'  (a much earlier version) and we were 'BEYOND Simply IMPRESSED!'     We're strong (very strong) KISS Advocates - and starting from a SOLID BASE and/or FOUNDATION - has proven, 'SAFEST - SUREST - FASTEST' - to build a successful (even later expanded) Solution!

    If your difficulty persists - and if you're willing to employ a (long past) code version (that 'simple' duo) - I can provide that.    (Clients demand that we maintain our source - LONG into the future!)

    Pity that 'code tags' destroy the MANY BENEFITS of  'color coding!'     Our firm employs such color-coding DAILY - and it proves IDEAL:  

    • in tracking code sources
    • and versions
    • and 'candidate (often competing) methods'  ...  for  contrasted, 'test & evaluation.'
  • Thanks CB1, I would definitely appreciate some more code to try out.

    I've spent a surprisingly great deal of time getting to this point even, so any time you guys can spend assisting is much appreciated!

    My biggest concern right now is the Rx portion, so if you had some old known working for that. I suspect it probably does things much the same way, as the core concept is pretty straightforward -

    • Initialize CAN module, ports, interrupts.
    • Initialize CAN message object.
      • ensure filters/masks are wide open
    • Load message object into CAN peripheral to configure it.
    • CAN peripheral interrupts upon message reception.
    • Retrieve message from CAN peripheral.

    Seems pretty simple. Yet somehow the only messages I can retrieve from the can peripheral are ones I've loaded in to initialize is.

    I've tested it filtering for particular message ID's and it interrupts only on the filtered ID's. So the CAN peripheral and ISR are all reading the correct things I am quite certain. I just can't retrieve it properly. Will be interesting to see if your older code uses the same process.

  • As promised - here's a (much) earlier version of 'simple_RX.c' - issued under StellarisWare.     (ver. 9107 -  that version issued before (some) here - were born!      (almost))

    4162.simple_rx.c
    //*****************************************************************************
    //
    // simple_rx.c - Example demonstrating simple CAN message reception.
    //
    // Copyright (c) 2010-2012 Texas Instruments Incorporated.  All rights reserved.
    // Software License Agreement
    // 
    // Texas Instruments (TI) is supplying this software for use solely and
    // exclusively on TI's microcontroller products. The software is owned by
    // TI and/or its suppliers, and is protected under applicable copyright
    // laws. You may not combine this software with "viral" open-source
    // software in order to form a larger program.
    // 
    // THIS SOFTWARE IS PROVIDED "AS IS" AND WITH ALL FAULTS.
    // NO WARRANTIES, WHETHER EXPRESS, IMPLIED OR STATUTORY, INCLUDING, BUT
    // NOT LIMITED TO, IMPLIED WARRANTIES OF MERCHANTABILITY AND FITNESS FOR
    // A PARTICULAR PURPOSE APPLY TO THIS SOFTWARE. TI SHALL NOT, UNDER ANY
    // CIRCUMSTANCES, BE LIABLE FOR SPECIAL, INCIDENTAL, OR CONSEQUENTIAL
    // DAMAGES, FOR ANY REASON WHATSOEVER.
    // 
    // This is part of revision 9107 of the Stellaris Firmware Development Package.
    //
    //*****************************************************************************
    
    #include "inc/hw_memmap.h"
    #include "inc/hw_types.h"
    #include "inc/hw_can.h"
    #include "inc/hw_ints.h"
    #include "driverlib/can.h"
    #include "driverlib/interrupt.h"
    #include "driverlib/sysctl.h"
    #include "driverlib/gpio.h"
    #include "utils/uartstdio.h"
    
    //*****************************************************************************
    //
    //! \addtogroup can_examples_list
    //! <h1>Simple CAN RX (simple_rx)</h1>
    //!
    //! This example shows the basic setup of CAN in order to receive messages
    //! from the CAN bus.  The CAN peripheral is configured to receive messages
    //! with any CAN ID and then print the message contents to the console.
    //!
    //! This example uses the following peripherals and I/O signals.  You must
    //! review these and change as needed for your own board:
    //! - CAN0 peripheral
    //! - GPIO port D peripheral (for CAN0 pins)
    //! - CAN0RX - PD0
    //! - CAN0TX - PD1
    //!
    //! The following UART signals are configured only for displaying console
    //! messages for this example.  These are not required for operation of CAN.
    //! - GPIO port A peripheral (for UART0 pins)
    //! - UART0RX - PA0
    //! - UART0TX - PA1
    //!
    //! This example uses the following interrupt handlers.  To use this example
    //! in your own application you must add these interrupt handlers to your
    //! vector table.
    //! - INT_CAN0 - CANIntHandler
    //
    //*****************************************************************************
    
    //*****************************************************************************
    //
    // A counter that keeps track of the number of times the RX interrupt has
    // occurred, which should match the number of messages that were received.
    //
    //*****************************************************************************
    volatile unsigned long g_ulMsgCount = 0;
    
    //*****************************************************************************
    //
    // A flag for the interrupt handler to indicate that a message was received.
    //
    //*****************************************************************************
    volatile unsigned long g_bRXFlag = 0;
    
    //*****************************************************************************
    //
    // A flag to indicate that some reception error occurred.
    //
    //*****************************************************************************
    volatile unsigned long g_bErrFlag = 0;
    
    //*****************************************************************************
    //
    // This function sets up UART0 to be used for a console to display information
    // as the example is running.
    //
    //*****************************************************************************
    void
    InitConsole(void)
    {
        //
        // Enable GPIO port A which is used for UART0 pins
        //
        SysCtlPeripheralEnable(SYSCTL_PERIPH_GPIOA);
    
        //
        // Configure the pin muxing for UART0 functions on port A0 and A1.
        // This step is not necessary if your part does not support pin muxing.
        //
        GPIOPinConfigure(GPIO_PA0_U0RX);
        GPIOPinConfigure(GPIO_PA1_U0TX);
    
        //
        // Select the alternate (UART) function for these pins.
        //
        GPIOPinTypeUART(GPIO_PORTA_BASE, GPIO_PIN_0 | GPIO_PIN_1);
    
        //
        // Initialize the UART for console I/O.
        //
        UARTStdioInit(0);
    }
    
    //*****************************************************************************
    //
    // This function is the interrupt handler for the CAN peripheral.  It checks
    // for the cause of the interrupt, and maintains a count of all messages that
    // have been received.
    //
    //*****************************************************************************
    void
    CANIntHandler(void)
    {
        unsigned long ulStatus;
    
        //
        // Read the CAN interrupt status to find the cause of the interrupt
        //
        ulStatus = CANIntStatus(CAN0_BASE, CAN_INT_STS_CAUSE);
    
        //
        // If the cause is a controller status interrupt, then get the status
        //
        if(ulStatus == CAN_INT_INTID_STATUS)
        {
            //
            // Read the controller status.  This will return a field of status
            // error bits that can indicate various errors.  Error processing
            // is not done in this example for simplicity.  Refer to the
            // API documentation for details about the error status bits.
            // The act of reading this status will clear the interrupt.
            //
            ulStatus = CANStatusGet(CAN0_BASE, CAN_STS_CONTROL);
    
            //
            // Set a flag to indicate some errors may have occurred.
            //
            g_bErrFlag = 1;
        }
    
        //
        // Check if the cause is message object 1, which what we are using for
        // receiving messages.
        //
        else if(ulStatus == 1)
        {
            //
            // Getting to this point means that the RX interrupt occurred on
            // message object 1, and the message reception is complete.  Clear the
            // message object interrupt.
            //
            CANIntClear(CAN0_BASE, 1);
    
            //
            // Increment a counter to keep track of how many messages have been
            // received.  In a real application this could be used to set flags to
            // indicate when a message is received.
            //
            g_ulMsgCount++;
    
            //
            // Set flag to indicate received message is pending.
            //
            g_bRXFlag = 1;
    
            //
            // Since a message was received, clear any error flags.
            //
            g_bErrFlag = 0;
        }
    
        //
        // Otherwise, something unexpected caused the interrupt.  This should
        // never happen.
        //
        else
        {
            //
            // Spurious interrupt handling can go here.
            //
        }
    }
    
    //*****************************************************************************
    //
    // Configure the CAN and enter a loop to receive CAN messages.
    //
    //*****************************************************************************
    int
    main(void)
    {
        tCANMsgObject sCANMessage;
        unsigned char ucMsgData[8];
    
        //
        // Set the clocking to run directly from the external crystal/oscillator.
        // TODO: The SYSCTL_XTAL_ value must be changed to match the value of the
        // crystal used on your board.
        //
        SysCtlClockSet(SYSCTL_SYSDIV_1 | SYSCTL_USE_OSC | SYSCTL_OSC_MAIN |
                       SYSCTL_XTAL_16MHZ);
    
        //
        // Set up the serial console to use for displaying messages.  This is
        // just for this example program and is not needed for CAN operation.
        //
        InitConsole();
    
        //
        // For this example CAN0 is used with RX and TX pins on port D0 and D1.
        // The actual port and pins used may be different on your part, consult
        // the data sheet for more information.
        // GPIO port D needs to be enabled so these pins can be used.
        // TODO: change this to whichever GPIO port you are using
        //
        SysCtlPeripheralEnable(SYSCTL_PERIPH_GPIOD);
    
        //
        // Configure the GPIO pin muxing to select CAN0 functions for these pins.
        // This step selects which alternate function is available for these pins.
        // This is necessary if your part supports GPIO pin function muxing.
        // Consult the data sheet to see which functions are allocated per pin.
        // TODO: change this to select the port/pin you are using
        //
        GPIOPinConfigure(GPIO_PD0_CAN0RX);
        GPIOPinConfigure(GPIO_PD1_CAN0TX);
    
        //
        // Enable the alternate function on the GPIO pins.  The above step selects
        // which alternate function is available.  This step actually enables the
        // alternate function instead of GPIO for these pins.
        // TODO: change this to match the port/pin you are using
        //
        GPIOPinTypeCAN(GPIO_PORTD_BASE, GPIO_PIN_0 | GPIO_PIN_1);
    
        //
        // The GPIO port and pins have been set up for CAN.  The CAN peripheral
        // must be enabled.
        //
        SysCtlPeripheralEnable(SYSCTL_PERIPH_CAN0);
    
        //
        // Initialize the CAN controller
        //
        CANInit(CAN0_BASE);
    
        //
        // Set up the bit rate for the CAN bus.  This function sets up the CAN
        // bus timing for a nominal configuration.  You can achieve more control
        // over the CAN bus timing by using the function CANBitTimingSet() instead
        // of this one, if needed.
        // In this example, the CAN bus is set to 500 kHz.  In the function below,
        // the call to SysCtlClockGet() is used to determine the clock rate that
        // is used for clocking the CAN peripheral.  This can be replaced with a
        // fixed value if you know the value of the system clock, saving the extra
        // function call.  For some parts, the CAN peripheral is clocked by a fixed
        // 8 MHz regardless of the system clock in which case the call to
        // SysCtlClockGet() should be replaced with 8000000.  Consult the data
        // sheet for more information about CAN peripheral clocking.
        //
        CANBitRateSet(CAN0_BASE, SysCtlClockGet(), 500000);
    
        //
        // Enable interrupts on the CAN peripheral.  This example uses static
        // allocation of interrupt handlers which means the name of the handler
        // is in the vector table of startup code.  If you want to use dynamic
        // allocation of the vector table, then you must also call CANIntRegister()
        // here.
        //
        // CANIntRegister(CAN0_BASE, CANIntHandler); // if using dynamic vectors
        //
        CANIntEnable(CAN0_BASE, CAN_INT_MASTER | CAN_INT_ERROR | CAN_INT_STATUS);
    
        //
        // Enable the CAN interrupt on the processor (NVIC).
        //
        IntEnable(INT_CAN0);
    
        //
        // Enable the CAN for operation.
        //
        CANEnable(CAN0_BASE);
    
        //
        // Initialize a message object to be used for receiving CAN messages with
        // any CAN ID.  In order to receive any CAN ID, the ID and mask must both
        // be set to 0, and the ID filter enabled.
        //
        sCANMessage.ulMsgID = 0;                        // CAN msg ID - 0 for any
        sCANMessage.ulMsgIDMask = 0;                    // mask is 0 for any ID
        sCANMessage.ulFlags = MSG_OBJ_RX_INT_ENABLE | MSG_OBJ_USE_ID_FILTER;
        sCANMessage.ulMsgLen = 8;                       // allow up to 8 bytes
    
        //
        // Now load the message object into the CAN peripheral.  Once loaded the
        // CAN will receive any message on the bus, and an interrupt will occur.
        // Use message object 1 for receiving messages (this is not the same as
        // the CAN ID which can be any value in this example).
        //
        CANMessageSet(CAN0_BASE, 1, &sCANMessage, MSG_OBJ_TYPE_RX);
    
        //
        // Enter loop to process received messages.  This loop just checks a flag
        // that is set by the interrupt handler, and if set it reads out the
        // message and displays the contents.  This is not a robust method for
        // processing incoming CAN data and can only handle one messages at a time.
        // If many messages are being received close together, then some messages
        // may be dropped.  In a real application, some other method should be used
        // for queuing received messages in a way to ensure they are not lost.  You
        // can also make use of CAN FIFO mode which will allow messages to be
        // buffered before they are processed.
        //
        for(;;)
        {
            unsigned int uIdx;
    
            //
            // If the flag is set, that means that the RX interrupt occurred and
            // there is a message ready to be read from the CAN
            //
            if(g_bRXFlag)
            {
                //
                // Reuse the same message object that was used earlier to configure
                // the CAN for receiving messages.  A buffer for storing the
                // received data must also be provided, so set the buffer pointer
                // within the message object.
                //
                sCANMessage.pucMsgData = ucMsgData;
    
                //
                // Read the message from the CAN.  Message object number 1 is used
                // (which is not the same thing as CAN ID).  The interrupt clearing
                // flag is not set because this interrupt was already cleared in
                // the interrupt handler.
                //
                CANMessageGet(CAN0_BASE, 1, &sCANMessage, 0);
    
                //
                // Clear the pending message flag so that the interrupt handler can
                // set it again when the next message arrives.
                //
                g_bRXFlag = 0;
    
                //
                // Check to see if there is an indication that some messages were
                // lost.
                //
                if(sCANMessage.ulFlags & MSG_OBJ_DATA_LOST)
                {
                    UARTprintf("CAN message loss detected\n");
                }
    
                //
                // Print out the contents of the message that was received.
                //
                UARTprintf("Msg ID=0x%08X len=%u data=0x",
                           sCANMessage.ulMsgID, sCANMessage.ulMsgLen);
                for(uIdx = 0; uIdx < sCANMessage.ulMsgLen; uIdx++)
                {
                    UARTprintf("%02X ", ucMsgData[uIdx]);
                }
                UARTprintf("total count=%u\n", g_ulMsgCount);
            }
        }
    
        //
        // Return no errors
        //
        return(0);
    }


    There will likely be some 'clash' of defines - this vendor has a published Guide on, 'Transitioning from StellarisWare to TWare.'       I've long requested (of this vendor) that such documents be rendered FAR MORE 'Findable!'      That 'reasonable' request - neither acknowledged - nor fulfilled - instead vendor chooses to PARK (mostly unwanted) 'Blogs, Groups & Training' - but NEVER the NECESSARY 'Guiding/Amplifying' Tech documents - upon this page's 'prime (beach-front)' real estate.    (that - the 'notable area' (up top) emblazoned w/Red Stripe (voici) - some arcane 'Style Guide' - vendor 'high-up' once told me.)       Promoting 'Style' over User 'Ease/Convenience'  ...  proves NOT great concern for client-users.

    I'm including (equally old simple_TX.c - so that you have both files - which we (past) used - w/considerable success.

    I cannot recall if our 'Test & Verification' over-lapped your requirement (it has been 6+ years) - yet these files appear a 'reasonable alternative' - which if we are fortunate - may provide desired insight.   (one hopes!)     Bon chance,  mon ami...

    3513.simple_tx.c
    //*****************************************************************************
    //
    // simple_tx.c - Example demonstrating simple CAN message transmission.
    //
    // Copyright (c) 2010-2012 Texas Instruments Incorporated.  All rights reserved.
    // Software License Agreement
    // 
    // Texas Instruments (TI) is supplying this software for use solely and
    // exclusively on TI's microcontroller products. The software is owned by
    // TI and/or its suppliers, and is protected under applicable copyright
    // laws. You may not combine this software with "viral" open-source
    // software in order to form a larger program.
    // 
    // THIS SOFTWARE IS PROVIDED "AS IS" AND WITH ALL FAULTS.
    // NO WARRANTIES, WHETHER EXPRESS, IMPLIED OR STATUTORY, INCLUDING, BUT
    // NOT LIMITED TO, IMPLIED WARRANTIES OF MERCHANTABILITY AND FITNESS FOR
    // A PARTICULAR PURPOSE APPLY TO THIS SOFTWARE. TI SHALL NOT, UNDER ANY
    // CIRCUMSTANCES, BE LIABLE FOR SPECIAL, INCIDENTAL, OR CONSEQUENTIAL
    // DAMAGES, FOR ANY REASON WHATSOEVER.
    // 
    // This is part of revision 9107 of the Stellaris Firmware Development Package.
    //
    //*****************************************************************************
    
    #include "inc/hw_memmap.h"
    #include "inc/hw_types.h"
    #include "inc/hw_can.h"
    #include "inc/hw_ints.h"
    #include "driverlib/can.h"
    #include "driverlib/interrupt.h"
    #include "driverlib/sysctl.h"
    #include "driverlib/gpio.h"
    #include "utils/uartstdio.h"
    
    //*****************************************************************************
    //
    //! \addtogroup can_examples_list
    //! <h1>Simple CAN TX (simple_tx)</h1>
    //!
    //! This example shows the basic setup of CAN in order to transmit messages
    //! on the CAN bus.  The CAN peripheral is configured to transmit messages
    //! with a specific CAN ID.  A message is then transmitted once per second,
    //! using a simple delay loop for timing.  The message that is sent is a 4
    //! byte message that contains an incrementing pattern.  A CAN interrupt
    //! handler is used to confirm message transmission and count the number of
    //! messages that have been sent.
    //!
    //! This example uses the following peripherals and I/O signals.  You must
    //! review these and change as needed for your own board:
    //! - CAN0 peripheral
    //! - GPIO Port D peripheral (for CAN0 pins)
    //! - CAN0RX - PD0
    //! - CAN0TX - PD1
    //!
    //! The following UART signals are configured only for displaying console
    //! messages for this example.  These are not required for operation of CAN.
    //! - GPIO port A peripheral (for UART0 pins)
    //! - UART0RX - PA0
    //! - UART0TX - PA1
    //!
    //! This example uses the following interrupt handlers.  To use this example
    //! in your own application you must add these interrupt handlers to your
    //! vector table.
    //! - INT_CAN0 - CANIntHandler
    //!
    //
    //*****************************************************************************
    
    //*****************************************************************************
    //
    // A counter that keeps track of the number of times the TX interrupt has
    // occurred, which should match the number of TX messages that were sent.
    //
    //*****************************************************************************
    volatile unsigned long g_ulMsgCount = 0;
    
    //*****************************************************************************
    //
    // A flag to indicate that some transmission error occurred.
    //
    //*****************************************************************************
    volatile unsigned long g_bErrFlag = 0;
    
    //*****************************************************************************
    //
    // This function sets up UART0 to be used for a console to display information
    // as the example is running.
    //
    //*****************************************************************************
    void
    InitConsole(void)
    {
        //
        // Enable GPIO port A which is used for UART0 pins
        //
        SysCtlPeripheralEnable(SYSCTL_PERIPH_GPIOA);
    
        //
        // Configure the pin muxing for UART0 functions on port A0 and A1.
        // This step is not necessary if your part does not support pin muxing.
        //
        GPIOPinConfigure(GPIO_PA0_U0RX);
        GPIOPinConfigure(GPIO_PA1_U0TX);
    
        //
        // Select the alternate (UART) function for these pins.
        //
        GPIOPinTypeUART(GPIO_PORTA_BASE, GPIO_PIN_0 | GPIO_PIN_1);
    
        //
        // Initialize the UART for console I/O.
        //
        UARTStdioInit(0);
    }
    
    //*****************************************************************************
    //
    // This function provides a 1 second delay using a simple polling method.
    //
    //*****************************************************************************
    void
    SimpleDelay(void)
    {
        //
        // Delay cycles for 1 second
        //
        SysCtlDelay(16000000 / 3);
    }
    
    //*****************************************************************************
    //
    // This function is the interrupt handler for the CAN peripheral.  It checks
    // for the cause of the interrupt, and maintains a count of all messages that
    // have been transmitted.
    //
    //*****************************************************************************
    void
    CANIntHandler(void)
    {
        unsigned long ulStatus;
    
        //
        // Read the CAN interrupt status to find the cause of the interrupt
        //
        ulStatus = CANIntStatus(CAN0_BASE, CAN_INT_STS_CAUSE);
    
        //
        // If the cause is a controller status interrupt, then get the status
        //
        if(ulStatus == CAN_INT_INTID_STATUS)
        {
            //
            // Read the controller status.  This will return a field of status
            // error bits that can indicate various errors.  Error processing
            // is not done in this example for simplicity.  Refer to the
            // API documentation for details about the error status bits.
            // The act of reading this status will clear the interrupt.  If the
            // CAN peripheral is not connected to a CAN bus with other CAN devices
            // present, then errors will occur and will be indicated in the
            // controller status.
            //
            ulStatus = CANStatusGet(CAN0_BASE, CAN_STS_CONTROL);
    
            //
            // Set a flag to indicate some errors may have occurred.
            //
            g_bErrFlag = 1;
        }
    
        //
        // Check if the cause is message object 1, which what we are using for
        // sending messages.
        //
        else if(ulStatus == 1)
        {
            //
            // Getting to this point means that the TX interrupt occurred on
            // message object 1, and the message TX is complete.  Clear the
            // message object interrupt.
            //
            CANIntClear(CAN0_BASE, 1);
    
            //
            // Increment a counter to keep track of how many messages have been
            // sent.  In a real application this could be used to set flags to
            // indicate when a message is sent.
            //
            g_ulMsgCount++;
    
            //
            // Since the message was sent, clear any error flags.
            //
            g_bErrFlag = 0;
        }
    
        //
        // Otherwise, something unexpected caused the interrupt.  This should
        // never happen.
        //
        else
        {
            //
            // Spurious interrupt handling can go here.
            //
        }
    }
    
    //*****************************************************************************
    //
    // Configure the CAN and enter a loop to transmit periodic CAN messages.
    //
    //*****************************************************************************
    int
    main(void)
    {
        tCANMsgObject sCANMessage;
        unsigned char ucMsgData[4];
    
        //
        // Set the clocking to run directly from the external crystal/oscillator.
        // TODO: The SYSCTL_XTAL_ value must be changed to match the value of the
        // crystal on your board.
        //
        SysCtlClockSet(SYSCTL_SYSDIV_1 | SYSCTL_USE_OSC | SYSCTL_OSC_MAIN |
                       SYSCTL_XTAL_16MHZ);
    
        //
        // Set up the serial console to use for displaying messages.  This is
        // just for this example program and is not needed for CAN operation.
        //
        InitConsole();
    
        //
        // For this example CAN0 is used with RX and TX pins on port D0 and D1.
        // The actual port and pins used may be different on your part, consult
        // the data sheet for more information.
        // GPIO port D needs to be enabled so these pins can be used.
        // TODO: change this to whichever GPIO port you are using
        //
        SysCtlPeripheralEnable(SYSCTL_PERIPH_GPIOD);
    
        //
        // Configure the GPIO pin muxing to select CAN0 functions for these pins.
        // This step selects which alternate function is available for these pins.
        // This is necessary if your part supports GPIO pin function muxing.
        // Consult the data sheet to see which functions are allocated per pin.
        // TODO: change this to select the port/pin you are using
        //
        GPIOPinConfigure(GPIO_PD0_CAN0RX);
        GPIOPinConfigure(GPIO_PD1_CAN0TX);
    
        //
        // Enable the alternate function on the GPIO pins.  The above step selects
        // which alternate function is available.  This step actually enables the
        // alternate function instead of GPIO for these pins.
        // TODO: change this to match the port/pin you are using
        //
        GPIOPinTypeCAN(GPIO_PORTD_BASE, GPIO_PIN_0 | GPIO_PIN_1);
    
        //
        // The GPIO port and pins have been set up for CAN.  The CAN peripheral
        // must be enabled.
        //
        SysCtlPeripheralEnable(SYSCTL_PERIPH_CAN0);
    
        //
        // Initialize the CAN controller
        //
        CANInit(CAN0_BASE);
    
        //
        // Set up the bit rate for the CAN bus.  This function sets up the CAN
        // bus timing for a nominal configuration.  You can achieve more control
        // over the CAN bus timing by using the function CANBitTimingSet() instead
        // of this one, if needed.
        // In this example, the CAN bus is set to 500 kHz.  In the function below,
        // the call to SysCtlClockGet() is used to determine the clock rate that
        // is used for clocking the CAN peripheral.  This can be replaced with a
        // fixed value if you know the value of the system clock, saving the extra
        // function call.  For some parts, the CAN peripheral is clocked by a fixed
        // 8 MHz regardless of the system clock in which case the call to
        // SysCtlClockGet() should be replaced with 8000000.  Consult the data
        // sheet for more information about CAN peripheral clocking.
        //
        CANBitRateSet(CAN0_BASE, SysCtlClockGet(), 500000);
    
        //
        // Enable interrupts on the CAN peripheral.  This example uses static
        // allocation of interrupt handlers which means the name of the handler
        // is in the vector table of startup code.  If you want to use dynamic
        // allocation of the vector table, then you must also call CANIntRegister()
        // here.
        //
        // CANIntRegister(CAN0_BASE, CANIntHandler); // if using dynamic vectors
        //
        CANIntEnable(CAN0_BASE, CAN_INT_MASTER | CAN_INT_ERROR | CAN_INT_STATUS);
    
        //
        // Enable the CAN interrupt on the processor (NVIC).
        //
        IntEnable(INT_CAN0);
    
        //
        // Enable the CAN for operation.
        //
        CANEnable(CAN0_BASE);
    
        //
        // Initialize the message object that will be used for sending CAN
        // messages.  The message will be 4 bytes that will contain an incrementing
        // value.  Initially it will be set to 0.
        //
        *(unsigned long *)ucMsgData = 0;
        sCANMessage.ulMsgID = 1;                        // CAN message ID - use 1
        sCANMessage.ulMsgIDMask = 0;                    // no mask needed for TX
        sCANMessage.ulFlags = MSG_OBJ_TX_INT_ENABLE;    // enable interrupt on TX
        sCANMessage.ulMsgLen = sizeof(ucMsgData);       // size of message is 4
        sCANMessage.pucMsgData = ucMsgData;             // ptr to message content
    
        //
        // Enter loop to send messages.  A new message will be sent once per
        // second.  The 4 bytes of message content will be treated as an unsigned
        // long and incremented by one each time.
        //
        for(;;)
        {
            //
            // Print a message to the console showing the message count and the
            // contents of the message being sent.
            //
            UARTprintf("Sending msg: 0x%02X %02X %02X %02X",
                       ucMsgData[0], ucMsgData[1], ucMsgData[2], ucMsgData[3]);
    
            //
            // Send the CAN message using object number 1 (not the same thing as
            // CAN ID, which is also 1 in this example).  This function will cause
            // the message to be transmitted right away.
            //
            CANMessageSet(CAN0_BASE, 1, &sCANMessage, MSG_OBJ_TYPE_TX);
    
            //
            // Now wait 1 second before continuing
            //
            SimpleDelay();
    
            //
            // Check the error flag to see if errors occurred
            //
            if(g_bErrFlag)
            {
                UARTprintf(" error - cable connected?\n");
            }
            else
            {
                //
                // If no errors then print the count of message sent
                //
                UARTprintf(" total count = %u\n", g_ulMsgCount);
            }
    
            //
            // Increment the value in the message data.
            //
            (*(unsigned long *)ucMsgData)++;
        }
    
        //
        // Return no errors
        //
        return(0);
    }


  • Dawns that the (mated) past  'pin_map.h'  will aid your review of (likely) 'Define Clashes' - between TM4C and (retired)  'LM3S & LX4F.'    Staff here has  'added'  TM4C123 to the original StellarisWare 9107 - so that the TM4C could be serviced by this past (Bug-Free) API.    (explains the far newer 'date-code' - w/the attached 'pin_map.h.')

    It is equally possible to 'import' the past (specific)  'LM3S and/or LX4F'  component of  'pin_map.h'  - into the more readily available (i.e. current)  'pin_map.h'

    It remains unclear if our group had exercised our (successful) CAN Bus implementation in a manner which (fully) duplicated your method.    Yet - w/out vendor's 'insider insight' - this file 'compare/contrast' may prove a safe (though temporary) harbor - through your current storm...   (we hope!)

    7851.pin_map.h

  • Thanks CB1, from a quick review of the code it doesn't seem like the API has changed much at all since back in the day. I'll have more time to dig into it tonight though.

    I've since borrowed a CAN bus analyzer and confirmed that my tx is working as intended and the ID's and data bytes are transmitting correctly at least.

    Bob, I recently got a new laptop here, so I'm in the process of doing a fresh install of CCS (V8 now!) and the latest greatest tivaware. So I'll see if it produces any different results.

    Cheers
  • Well I'll be damned. I put a fresh install of CCS with 2.1.4.178 on a new computer, and it works perfectly.

    I am very confused as to how this would happen, somehow one of can drivers/routines for message rx was corrupted in the particular release I had? Oh well, not that it matters. It's working now, and my understanding of the API and bus topology is much deeper for my having spent a couple of weeks pulling my hair out haha.

    Thanks for the help guys!