Part Number: TM4C123GH6PM
Hello Community,
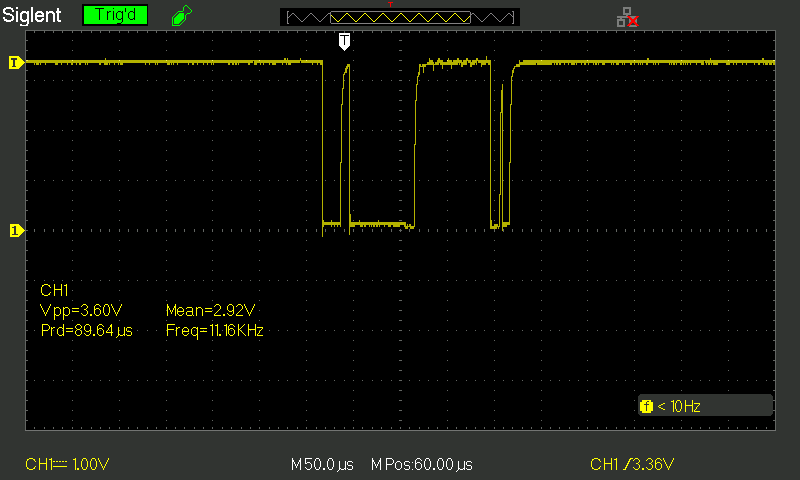
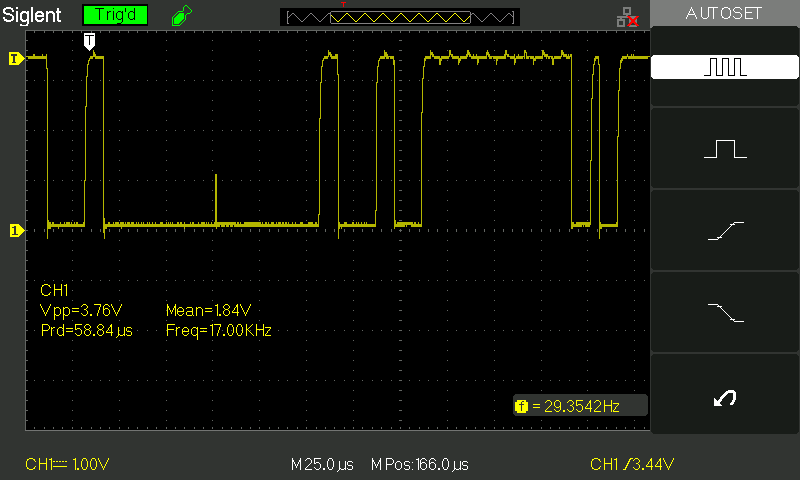
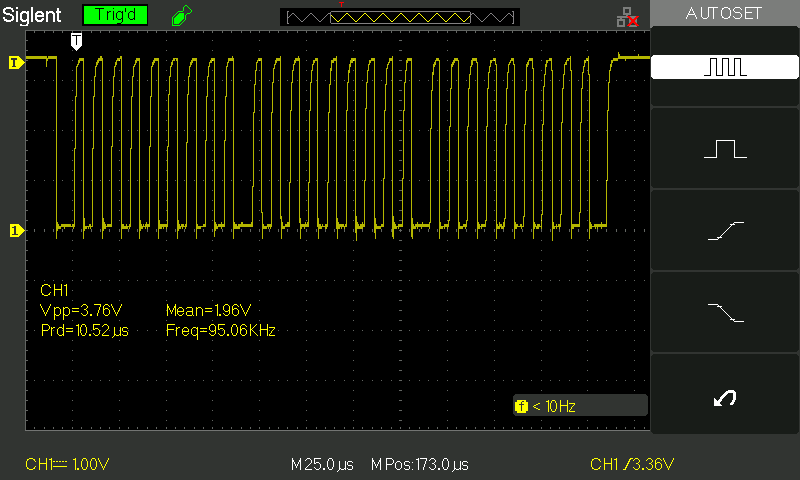
i tried to run the MCP23008 I2C I/O Expander using TM4C123. I simply only copied the code from the video:
TM4C123 Tutorial: I2C Communication (https://www.youtube.com/watch?v=A7PUM9wPUAw
/**
 * @author Carlos Alvarez (2/26/2015)
 *
 * @details Use the I2C peripheral in your Tiva-C or Stellaris Launchpad board
 *			to drive an input output expander to control the state of 8 LEDs connected to
 *			its GPIO port.
 *
 *        See detail tutorial at: www.youtube.com/watch
 */
#include <TM4C123GH6PM.h>
//#include <lm4f120h5qr.h>
#include <stdbool.h>
#include <stdint.h>
#include "driverlib/timer.h"
#include "driverlib/sysctl.h"
#include "driverlib/interrupt.h"
#include "driverlib/gpio.h"
//#include "inc/hw_memmap.h"
#include "inc/hw_ints.h"
//I2C COMMUNICATION

uint8_t leds = 0x00;
uint32_t uiPeriod;
void setSlaveAddress(uint8_t slaveAddress)
{
  //MSA register consists of eight bits: 7 address bits and 1 Receive/Send bit, which determines if the next operation is Receive(1) or Transmit(0)
  //slaveAddress = 0b _001.0000
  I2C1->MSA = (slaveAddress<<1); //Specify the slave address of the master
}

void setRW(uint8_t mode)
{
  //NEXT operation is to Transmit
  if(mode == 0)
  {
    I2C1->MSA &= ~(1<<0); //Clear bit, transmitting data
  }
  else
  {
    I2C1->MSA |= (1<<0); //set bit, receiving data
  }
}

void writeByte(uint8_t dataByte, uint8_t conditions)
{
  //This byte contains the data transferred during a transaction
  I2C1->MDR = dataByte;
  I2C1->MCS = conditions;

  while( (I2C1->MCS & (1<<0)) != 0);

  if( (I2C1->MCS & (1<<1) ) != 0)
  {
    if( (I2C1->MCS & (1<<4)) == 1){}
    else
    {
      I2C1->MCS = (1<<2);
      while( (I2C1->MCS & (1<<0)) != 0);
    }
  }
}

int main()
{

  //Step 1
  //Enalbe and provide a clock to I2C module 1 in Run mode.
  SYSCTL->RCGCI2C = (1<<1); //using I2C Module 1
  //Step 2
  SYSCTL->RCGCGPIO = (1<<0); //Module 1 uses port A => we must enable the clock on Port A

  //Step 3
  GPIOA->AFSEL = (1<<6)|(1<<7); //Enabling the alternate functions for pin 6 and 7
  GPIOA->DEN = (1<<6)|(1<<7); //They are digital signals

  //Step 4
  //Setting a bit in this register enables the open-drain configuration of the corresponding GPIO pad
  //When this bit is enabled, it should also be set in the GPIODEN register.
  //PA7 corresponds to SDA.
  GPIOA->ODR = (1<<7);

  //Step 5
  //GPIOA->PCTL &= ~0xFF000000; //This line is not required
  //Specify which alternate function you want to use, see Table 21-5
  GPIOA->PCTL = (3<<28)|(3<<24); //put a 3 in PMC7 and PMC6 (pins PA7 and PA6 respectively)

  //Step 6
  //Initialize I2C as a Master
  I2C1->MCR = (1<<4); //Master mode is enabled
  //Step 7
  //Set the desired SCL clock speed of 100 Kbps
  //The TPR (for us is 7) is found using the formula on pg. 972
  I2C1->MTPR = 0x7;


  //1 byte must be sent
  setSlaveAddress(0x20); //last 7 bits (7-1)
  setRW(0); //first bit (0)

  //writeByte(BYTE ONE, BYTE TWO)

  //send IODIR register address
  writeByte(0x00, (1<<0)|(1<<1)); //BYTE TWO: conditions = RUN and START
  //send IODIR value to make GPIO pins outputs
  writeByte(0x00, (1<<0)|(1<<2)); //BTYE TWO: conditions = RUN, STOP

  while(1)
  {
    writeByte(0x09, (1<<0)|(1<<1));
    writeByte(0xFF, (1<<0)|(1<<2));

    for(int i = 0; i < 1000000; i++){};
    uiPeriod=SysCtlClockGet();
  }


  return 0;
}