This thread has been locked.

If you have a related question, please click the "Ask a related question" button in the top right corner. The newly created question will be automatically linked to this question.

EK-TM4C1294XL: Connecting to ICDI after dfuprog

Part Number: EK-TM4C1294XL

I have been trying to understand steps involved in using the bootloader.

I ran the uart bootloader successfully from LM flash programmer.

Then I re-compiled boot_serial with #define USB_ENABLE_UPDATE, uncommented every USB define.

and all UART defines commented out.

I was able to flash this bin file from CCS.

Then I started dfuprog.exe and programmed boot_demo_usb using what I thought was USB bootloader.

I had not read this thread when I did this:

Since then, I can't go back to CCS and use the Stellaris ICDI interface.

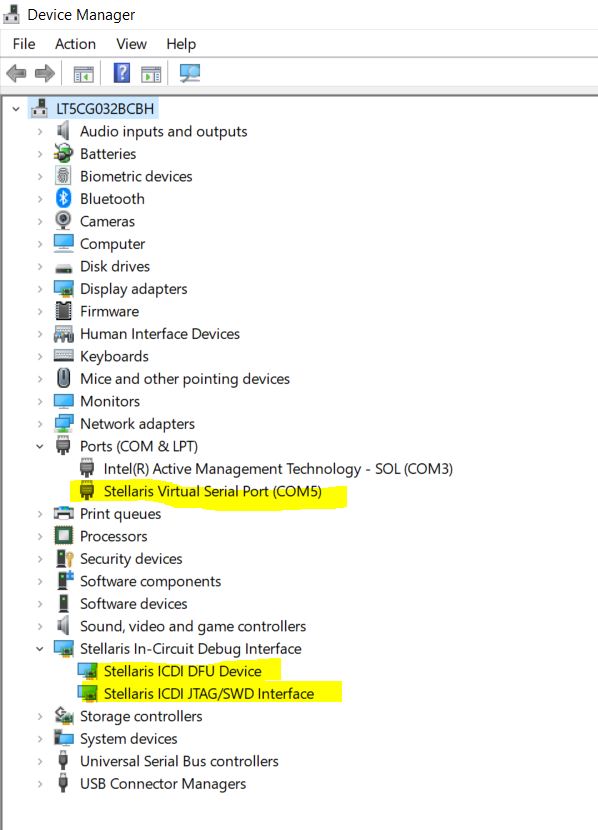
I changed EKs. In the device manager I can see the Stellaris VSP.

I tried flashing blinky from CCS to this EK. It appears to start using the Stellaris ICDI and 

then stops saying it can't connect to the target.

Is there a way to exit dfuprog.exe? device 0 is still in run time mode and I don't

know how to exit this.

I appreciate any information that fills in missing gaps in my understanding here.

Thanks,

Priya

  • Hi Priya,

      The post that you reference explains exactly what happened. As mentioned in that post, once you flash and run the boot_serial in USB mode, the MCU enumerates as a DFU device. However, the ICDI debug probe is also another DFU device. Therefore, if you use dfuprog you will see two DFU capable devices. You must have chosen the incorrect DFU device and update the ICDI controller with the boot_demo_usb and hence the ICDI controller is no longer acting as a debug probe. 

      You can verify this again by going to the device manager. You should see the Stellaris IDCI JTAG/SWD Interface and Stellaris ICDI DFU Device in a normal LaunchPad. If you do not see this, the ICDI controller is destroyed in the sense that you can recover it. There is a bootloader inside the ICDI controller too. That bootloader is overwritten with the boot_demo_usb program. It will not enumerate as a DFU device anymore and it will not take another update either. 


    In the boot_demo_usb.c file, there is an IMPORTANT note written about doing DFU update. There is really nothing you can do at this moment. I would suggest you move on to another LaunchPad to continue your development if you want to use the ICDI debug probe. If you have an external debug probe like XDS100 or XDS200 you can use them to connect to the target. If you do use a new LaunchPad, please be very careful to choose the correct DFU device before you update the application. The safest way will be to provide external power to the LaunchPad and have the ICDI Debug port disconnected. This way there is only one DFU device shown up. 

    //! With the device connected to your PC and the device driver installed, enter
    //! the following command to enumerate DFU devices:
    //!
    //! <tt>dfuprog -e</tt>
    //!
    //! This will list all DFU-capable devices found and you should see that you
    //! have one or two devices available which are in ``Runtime'' mode.
    //!
    //! *** IMPORTANT - PLEASE READ ***
    //! If you see two devices, it is strongly recommended that you disconnect
    //! ICDI debug port from the PC, and change the POWER_SELECT jumper (JP1) 
    //! from 'ICDI' to 'OTG' in order to power the LaunchPad from the USB
    //! OTG port. The reason for this is that the ICDI chip on the board is
    //! a DFU-capable TM4C129x device, and if not careful, the firmware on the
    //! ICDI chip could be accidently erased which can not restored easily.
    //! As a result, debug capabilities would be lost!
    //! *** IMPORTANT - PLEASE READ ***
    //!
    //! If IDCI debug port is disconnected from your PC, you should see only one
    //! device from above command, and its index should be 0, and should be named
    //! as ``Mouse with Device Firmware Upgrade''. 
    //! If for any reason you need to keep the ICDI port connected, the above
    //! command should show two devices. The second device is probably named as
    //! ``In-Circuit Debug interface'', and we need to be careful not to update
    //! the firmware on that device. So please take careful note of the index for
    //! the device ``Mouse with Device Firmware Upgrade'', it could be 0 or 1, we
    //! will need this index number for the following command. 
    //! Entering the following command will switch this device into DFU mode and
    //! leave it ready to receive a new firmware image:
    //!
    //! <tt>dfuprog -i index -m</tt>
    //!
    //! After entering this command, you should notice that the device disconnects
    //! from the USB bus and reconnects again.  Running ``<tt>dfuprog -e</tt>'' a
    //! second time will show that the device is now in DFU mode and ready to
    //! receive downloads.  At this point, either LM Flash Programmer or dfuprog
    //! may be used to send a new application binary to the device.
  • Thank you for the detailed explanation. A how to use the bootloader app note will be very helpful;

    possibly one for each bootloader. There is current documentation which has lot more information,

    a smaller doc with the USB bootloader steps outlined will be very helpful. A pre-requisite to this

    are the steps to the UART bootloader

    In boot_serial, if there is a define that can change bootloaders, it is much better than editing 

    the bl_config.h file.

    Priya

  • Hi Priya,

      Thank you and I will take your feedback for internal discussion.