This thread has been locked.

If you have a related question, please click the "Ask a related question" button in the top right corner. The newly created question will be automatically linked to this question.

LAUNCHXL-F2800157: Unable to run blinky

Part Number: LAUNCHXL-F2800157
Other Parts Discussed in Thread: C2000WARE, SYSCONFIG

Hello all, I am again unable to use the documentation to run a basic blinky application on a freshly unboxed launchpad. This time it's on the F2800157. Here's what's happened so far:

  1. I import the project, build and try to flash
  2. It tells me I needed to update the firmware so accept and it completes
  3. Now CCS will not recognize the device until I eventually decide to reboot and power cycle a number of times
  4. I successfully run the debugger with the application but see no blinky LED
  5. I pause the debugger to see what's running and the sources for the function it's executing (sysctl_delay) are for some reason not available

What am I doing wrong? If this is my experience trying to blink an LED on now the 3rd EVK, I fear for when I'm trying to configure complex peripherals.

  • Hi Dan,

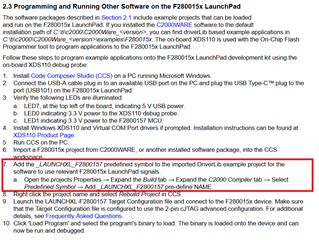
    Thanks for your question. Have you made sure to include the _LAUNCHXL_F280015X pre-define? Please follow the steps from the LaunchPad user guide.

    Regards,

    Vince

  • The last time I tried to follow the guide, adding the #define for the board broke the project and it wouldn't compile. Incidentally, I was told that this was out of date info and not necessary to do. See: https://e2e.ti.com/support/microcontrollers/c2000-microcontrollers-group/c2000/f/c2000-microcontrollers-forum/1233873/tms320f280039c-cannot-connect-to-dev-board

    That said, I just checked and that symbol is in fact defined by the project already when I import it from the C2000 Ware.

  • Hi Dan,

    Can you provide a picture of the boot selection switch? I'm wondering if a different boot mode is being selected.

    Also, is there a ".sycfg" file in your project? I'm wondering if the project is writing the output to a "non-LED" GPIO (meant for the controlCARD).

    Regards,

    Vince

  • The boot selection switch is in the correct orientation. The application is running, and I am able to debug it. The GPIO instructions just have no impact on the LED. I added a line to toggle the other LED (LED5 on the silkscreen) and that does toggle. LED4 which is what the example uses, does not. My project does have a .syscfg- it came with the example from the SDK.

    Are you not able to reproduce this behavior?

        //
        // Loop Forever
        //
        for(;;)
        {
            //
            // Turn on LED
            //
            GPIO_writePin(DEVICE_GPIO_PIN_LED1, 0);
            GPIO_writePin(DEVICE_GPIO_PIN_LED2, 0);
    
            //
            // Delay for a bit.
            //
            DEVICE_DELAY_US(500000);
    
            //
            // Turn off LED
            //
            GPIO_writePin(DEVICE_GPIO_PIN_LED1, 1);
            GPIO_writePin(DEVICE_GPIO_PIN_LED2, 1);
    
            //
            // Delay for a bit.
            //
            DEVICE_DELAY_US(500000);
        }

    // LEDs
    //
    #define DEVICE_GPIO_PIN_LED1        35U             // GPIO number for LED4
    #define DEVICE_GPIO_PIN_LED2        49U             // GPIO number for LED5
    #define DEVICE_GPIO_CFG_LED1        GPIO_35_GPIO35  // "pinConfig" for LED4
    #define DEVICE_GPIO_CFG_LED2        GPIO_49_GPIO49  // "pinConfig" for LED5

  • Hi Dan,

    I've reached out to the board design expert. It is possible that the GPIO chosen as "LED4" in the software may not actually be the correct one that is connected on the LaunchPad.

    Another possibility is the LED itself may not be working correctly.

    Board designer will be able to assist with this.

    Regards,

    Vince

  • According to the schematic, those are the correct IOs and the LED tests fine with a diode tester

  • Hi Dan,

    I am the lead designer for this LaunchPad, thank you for reaching out for assistance. The LEDs are included in the test plan that our manufacturers perform on every board, so all LEDs should be functional. I ran this default example on one of my LAUNCHXL-F2800157 devices and see the same issue, that the LED is not toggling. 

    It seems the example code is missing the line of code which configures the pin as a GPIO. To fix this issue, please paste the following line of code after the Device_initGPIO() call

        GPIO_setPinConfig(DEVICE_GPIO_CFG_LED1);

    After this, you should be able to see the LED blinking correctly. If this is not the case and the LED is still not working, please let me know and I can send over the project that I am using for you to validate your board. If this resolves your issue, please let me know and I will file this bug so that it gets fixed in the next release of C2000Ware

    Regards,

    Peter

  • Thank you for the help. This does fix my issue. Are these samples tested before the C2000 Ware release? I'm concerned that I'm going to keep facing other similar issues or at least delays if I rely on the example code to guide my development. Is there a better alternative?

  • Hi Dan,

    Thank you for confirming the solution. I've already filed a bug report on this so it should get resolved. We do have regression testing for these example software so I will work with the software team to see how this bug popped up. I actually use these examples in my board testing to validate my prototype designs and I did not see this issue in the previous version of C2000Ware I was using. 

    These examples should still remain a good source for your embedded software development. If you are interested in trying out a different software development tool, I employ you to check out our SysConfig tool, which generates the MCU configuration code for you and goes through its own set of validation and regression testing. It generates code that is automatically used in your project, but you can also use it as a reference i.e. configure the peripheral in the SysConfig tool and copy and paste the generated code into your own project. You can find more information at: www.ti.com/.../spracx3 

    Regards,

    Peter

  • Great. Thanks again for the fix and for the additional details. This has been very helpful.