Because of the holidays, TI E2E™ design support forum responses will be delayed from Dec. 25 through Jan. 2. Thank you for your patience.

This thread has been locked.

If you have a related question, please click the "Ask a related question" button in the top right corner. The newly created question will be automatically linked to this question.

MSP430FR2512: water stream activates touch on Liquid-tolerant capacitive keypad

Part Number: MSP430FR2512
Other Parts Discussed in Thread: TIDM-1021

Hello there!


We have an application requiring liquid toletant buttons, and after doing some research we came across your TIDM-1021.

Following you design guidelines for TIDM-1021, we started developing a one button prototype using the mutual mode (with a hatched TX sensor on the TOP layer with an RX electrode, hatched GND on 2on and 3rd layer, and solid GND on BOT layer).

Also, this button will be on vertical position, and have a LED on the BOT layer.

That’s what we got:
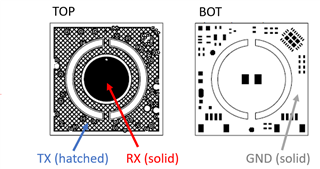


Right now, we achieve good sensitivity with the button, but we cannot obtain the same results shown on the video (https://www.youtube.com/watch?v=_hWXgGZijec). At first, water stream decreases delta and activates the negative touch flag, but after that, the water increases increase delta count, and activates our TOUCH. 

Doing some more research I came across to this other post (https://e2e.ti.com/support/microcontrollers/msp-low-power-microcontrollers-group/msp430/f/msp-low-power-microcontroller-forum/935359/boostxl-capkeypad-waterproof-capacitive-touch-sensor-does-not-work-as-expected)


Should we evade GND on 2nd an 3rd layer to avoid GND coupling? or there is something else that we are missing out?

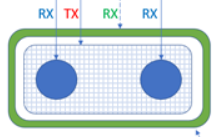
Also, its better approach to create a guard button (as you explained on the previous post) to protect the button from water (see image)?
 

Thank you for any help about this issue

Best regards

Albert

  • Hi Albert,

    Your design actually looks quite good.

    The goal is to always try to minimize the potential opportunity for water to couple to any ground.  Ideally, you don't want any grounds for water to couple to, but most designs makes this almost impossible because ground pours are essential to many applications.  Assuming your 4-layer PCB stack up with sensors on L1 and a ground pour on L2, the distance between the layers is considerably closer as compared to a 2-layer PCB, so coupling will be strong.  A ground pour on L3 will be a little better because the distance is greater, but coupling is still  relatively strong.  And obviously a ground pour on L4 is furthest so this would be the weakest coupling.  But looking at your design when you add up hatched grounds on L2, L3 plus a solid ground pour on L4,  this adds up to a lot of ground unfortunately.

    If you are fortunate to have no components mounted on L4 under neath the sensors, (MCU sits somewhere else on the board or separate PCB), then a simple hatched ground on L4 is all that is needed.  If, however, as in your case, you do have components on L4 and possibly traces that route from one layer to a second or third layer through a VIA.  Unless these are blind VIAs, they will extend from L4 up to L1 and if any of these are at a fixed potential (ground, VCC, etc), they are exposed on L1 and subject to coupling as well.  Fortunately their surface area is so small, water doesn't have much area to couple to.

    So the answer is, if you can, do not have any ground pour on L2.  You didn't indicate the %hatch you are using, but I would suggest a 15-20% hatch on L3. You want some grounding effects for minimizing potential electrical noise from components on L4 interfering with sensors on L1.  And based on the size of your PCB, it doesn't make sense to make L4 hatched, so keep it solid.

    Now for the guard ring.  The guard ring can help with minimizing coupling to grounds outside of the sensor area, but considering how small your PCB is, and I don't know what you have around the outside of the PCB (other conductive surfaces?), its hard to tell if it will help much.  So the question for you is, is the button supposed to continue to work in the presence of water (as demonstrated in TIDM-1021), or merely detect when moisture is present and "lock out" the button until the water is removed?

    If you want to provide some more information about the application, you can send me a friend request and share privately.

  • Hi Dennis. 

    Thanks for your rapid response. I will mark this issue as resolved and send you more details privately

    Best regards

**Attention** This is a public forum