Other Parts Discussed in Thread: ENERGIA
Hi, i recently started a project that requires an accelerometer to gather data. We picked up an MMA 8452Q arduino accelerometer planning to use Energia bridge the gap between TI and the arduino component. Using the configuration from the tutorial with the simple setup found here. and using the energia reference pages to relate the pins between arduino and the msp432.

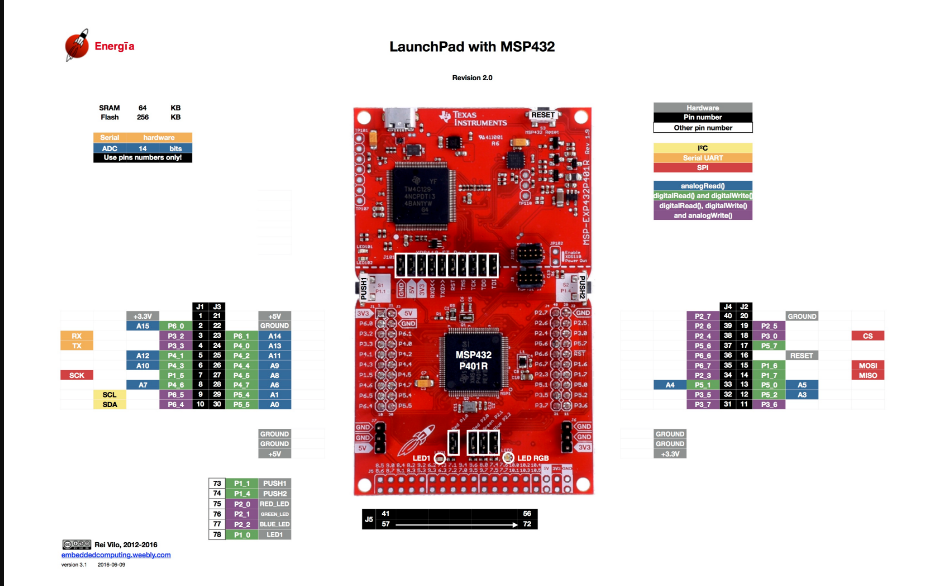
So instead of SCL we have 6.5 and instead of SDA we have 6.4. then ground and 3.3V. with this setup and the code below the serial monitor does not show anything. I was wondering if there are any other differences between the TI devices and the arduino devices that are causing this setup to not work. We have soldered the connections with headers to the breakout board for the accelerometer so i dont believe its a connection quality problem.
#include <Wire.h> // Must include Wire library for I2C
#include <SFE_MMA8452Q.h> // Includes the SFE_MMA8452Q library

// Begin using the library by creating an instance of the MMA8452Q
//  class. We'll call it "accel". That's what we'll reference from
//  here on out.
MMA8452Q accel;

// The setup function simply starts serial and initializes the
//  accelerometer.
void setup()
{
  Serial.begin(9600);
  Serial.println("MMA8452Q Test Code!");

  // Choose your adventure! There are a few options when it comes
  // to initializing the MMA8452Q:
  //  1. Default init. This will set the accelerometer up
  //     with a full-scale range of +/-2g, and an output data rate
  //     of 800 Hz (fastest).
  accel.init();
  //  2. Initialize with FULL-SCALE setting. You can set the scale
  //     using either SCALE_2G, SCALE_4G, or SCALE_8G as the value.
  //     That'll set the scale to +/-2g, 4g, or 8g respectively.
  //accel.init(SCALE_4G); // Uncomment this out if you'd like
  //  3. Initialize with FULL-SCALE and DATA RATE setting. If you
  //     want control over how fast your accelerometer produces
  //     data use one of the following options in the second param:
  //     ODR_800, ODR_400, ODR_200, ODR_100, ODR_50, ODR_12,
  //     ODR_6, or ODR_1.
  //     Sets to 800, 400, 200, 100, 50, 12.5, 6.25, or 1.56 Hz.
  //accel.init(SCALE_8G, ODR_6);
}

// The loop function will simply check for new data from the
//  accelerometer and print it out if it's available.
void loop()
{
  // Use the accel.available() function to wait for new data
  //  from the accelerometer.
  if (accel.available())
  {
    // First, use accel.read() to read the new variables:
    accel.read();

    // accel.read() will update two sets of variables.
    // * int's x, y, and z will store the signed 12-bit values
    //   read out of the accelerometer.
    // * floats cx, cy, and cz will store the calculated
    //   acceleration from those 12-bit values. These variables
    //   are in units of g's.
    // Check the two function declarations below for an example
    // of how to use these variables.
    printCalculatedAccels();
    //printAccels(); // Uncomment to print digital readings

    // The library also supports the portrait/landscape detection
    //  of the MMA8452Q. Check out this function declaration for
    //  an example of how to use that.
    printOrientation();

    Serial.println(); // Print new line every time.
  }
}

// The function demonstrates how to use the accel.x, accel.y and
//  accel.z variables.
// Before using these variables you must call the accel.read()
//  function!
void printAccels()
{
  Serial.print(accel.x, 3);
  Serial.print("\t");
  Serial.print(accel.y, 3);
  Serial.print("\t");
  Serial.print(accel.z, 3);
  Serial.print("\t");
}

// This function demonstrates how to use the accel.cx, accel.cy,
//  and accel.cz variables.
// Before using these variables you must call the accel.read()
//  function!
void printCalculatedAccels()
{
  Serial.print(accel.cx, 3);
  Serial.print("\t");
  Serial.print(accel.cy, 3);
  Serial.print("\t");
  Serial.print(accel.cz, 3);
  Serial.print("\t");
}

// This function demonstrates how to use the accel.readPL()
// function, which reads the portrait/landscape status of the
// sensor.
void printOrientation()
{
  // accel.readPL() will return a byte containing information
  // about the orientation of the sensor. It will be either
  // PORTRAIT_U, PORTRAIT_D, LANDSCAPE_R, LANDSCAPE_L, or
  // LOCKOUT.
  byte pl = accel.readPL();
  switch (pl)
  {
  case PORTRAIT_U:
    Serial.print("Portrait Up");
    break;
  case PORTRAIT_D:
    Serial.print("Portrait Down");
    break;
  case LANDSCAPE_R:
    Serial.print("Landscape Right");
    break;
  case LANDSCAPE_L:
    Serial.print("Landscape Left");
    break;
  case LOCKOUT:
    Serial.print("Flat");
    break;
  }
}