Because of the holidays, TI E2E™ design support forum responses will be delayed from Dec. 25 through Jan. 2. Thank you for your patience.

This thread has been locked.

If you have a related question, please click the "Ask a related question" button in the top right corner. The newly created question will be automatically linked to this question.

[FAQ] PROCESSOR-SDK-AM57X: How to boot from QSPI flash on AM57x.

Part Number: PROCESSOR-SDK-AM57X
Other Parts Discussed in Thread: UNIFLASH

Hi Team,

We need to boot from QSPI flash on AM571x, can you mention the steps required to do so.

  • Hi,

    On AM57x, MMCSD and QSPI boot are validated using SDK (see here for AM57x Boot Mode supported).

    Tools/Packages required for flashing to QSPI:

    You can find the files required to boot from QSPI at below location:

    • CCS_targetConfiguration: C:\Users\<username>\ti\CCSTargetConfigurations
    • MLO: pdk_am57xx_X_X_XX\packages\ti\boot\sbl\binary\idkAM571x\qspi\bin\MLO
    • Appimage: processor_sdk_rtos_am57xx_X_XX_XX_XXX\prebuilt-sdcards\idkAM571x\sd_card_files\led_TEST

    For flashing/erasing the required files to/from QSPI, you can follow the sequence mentioned in this post.

    WRITING Sequence:

    • Open CLI from uniflash root folder and give following commands in sequence mention below.
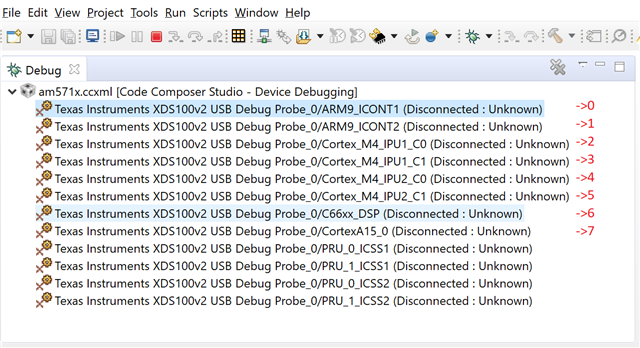
    • dslite.bat --mode load --config=<path\to\ccs\target\configuration\am571x.ccxml> -f <path\to\uniflash\root_folder>\processors\FlashWriter\idkAM571x\uart_idkAM571x_flash_programmer.out -n 7

      note - “n” represents core id. On AM571x, “7” corresponds to a15 core. You can easily get the core id by launching the respective target configuration in CCS and manually counting starting from zero.
    • You can see CCC in the console.
    • Note down the port number(such as COM4) and close the console, you will need it in next command.
    • dslite.bat --mode processors -c COM4 -f C:\ti\pdk_am57xx_1_0_17\packages\ti\boot\sbl\binary\idkAM571x\qspi\bin\MLO -d 2 -i 1 -o 0
    • dslite.bat --mode processors -c COM4 -f C:\ti\processor_sdk_rtos_am57xx_6_03_00_106\prebuilt-sdcards\idkAM571x\sd_card_files\led_TEST -d 2 -o 80000
    • Now power cycle the board, you can see the led blinking.

    Erasing Sequence:

    • Power cycle the board and let it boot from QSPI.
    • Open CCS.
    • Launch the Target Configuration but don’t connect any core.
    • Right click on the core (a15) -> open gel files view -> right click in the gel/script section -> remove all. Basically, you have to connect the core without gel initialization.
    • Then, connect the core(a15) and load and run the following binary: <path\to\uniflash\root\folder>\processors\FlashWriter\idkAM571x\uart_idkAM571x_flash_programmer.out
    • You can see CCC in the console.
    • Note down the port number(such as COM4) and close the console, you will need it in next command.
    • Open CLI from uniflash root folder and give the command: 
      dslite.bat --mode processors -c COM4 -e 10000 -d 2 -o 0
    • It will erase the QSPI memory space.

    NOTE:

    • All paths used above will be same, if required packages are installed at default locations.
    • Above examples are validated for idkAM571x board using led blink example, which can be easily modified for other AM57x platforms and other example – binary should be in appimage format, not .out.

    Useful links: