This thread has been locked.

If you have a related question, please click the "Ask a related question" button in the top right corner. The newly created question will be automatically linked to this question.

J7200XSOMXEVM: SD card boot for CAN-Ethernet Gateway demo

Part Number: J7200XSOMXEVM
Other Parts Discussed in Thread: DRA821

Hi TI

For J7200 EVM board,

We tried to use the SD card to boot the can_traffic_generator demo code (mcu1_0) of the CAN-Ethernet Gateway demo, but the program seemed to not start,

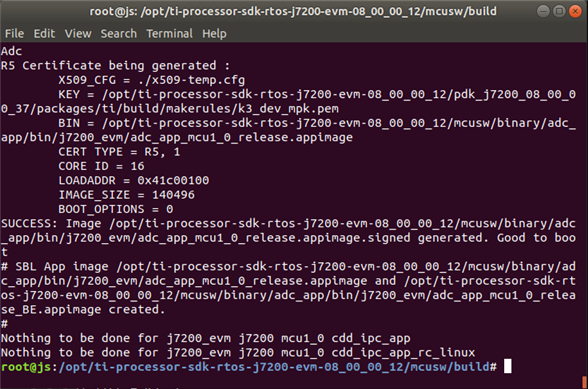
and when we updated the can_traffic_generator demo code (mcu1_0) using OSPI, The program started successfully.

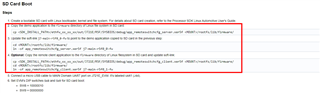
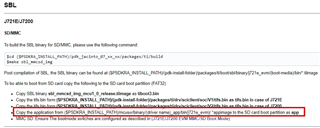
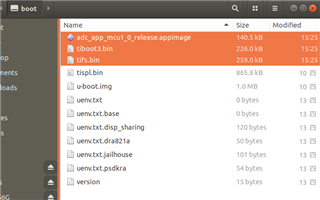
About the SD card booting, We have copied the files to the SD card and have executed the software link command.

Also, changed the boot switch to SD card boot mode.

Could you please help ?

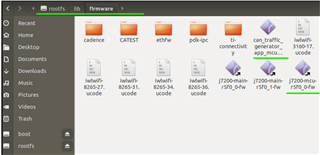
Please refer to the picture below in SD card.

Can-Eth-User_Guide.md (ti.com)

  • Hi Jay,

    SD card boot mode is not supported for Gateway. Only CCS and OSPI boot modes are supported.

    If you see the gateway user guide, there is no section for SD card boot.

    Regards

    Vineet

  • Hi Vineet

    If we  use the SD card to boot the can_traffic_generator demo code (mcu1_0) of the CAN-Ethernet Gateway demo, how to achieved this. 

    Could you provide some hint to do?

    How to development CAN traffic function with SD CARD mode? have any demo example?

    BR

    JAY

  • Hi Jay,

    How to development CAN traffic function with SD CARD mode? have any demo example?

    As mentioned above, unfortunately we do not support this feature in Gateway-Demos right now. The reason behind this was that we wanted to highlight early boot use-case with Gateway and SD card boot doesn't allow that.

    We will evaluate this request for future SDK releases.

    Regards

    Vineet

  • Hi Vineet 

    Many Thanks.

    BTW, We can develop MCU2_0 and MCU2_1 application functions with SD CARD mode as following

    Ethernet Firmware: Ethernet Firmware differentiating features demos

    how to development MCU1_0 application functions with SD CARD mode? have any demo example?

    BR

    JAY

  • Hi Jay,

    how to development MCU1_0 application functions with SD CARD mode? have any demo example?

    You can look at the examples inside sdk/mcusw, please consult the MCUSW user guide

    Regards

    Vineet

  • Hi Vinnet

    We need  MCU1_0 (include application) image  into SD CARD , such as  MCU2_0 and MCU2_1 into SD CARD

    So DRA821 can run A72/MAIN R5F/MCU R5F from SD CARD boot mode same time, 

    or have other way can do this sceniao?

    BR

    JAY

  • Hi Jay,

    There are two bootflows in the SDK

    1. SBL bootflow : RTOS applications

    2. SBL/SPL bootflow : Linux boot

    A72 cannot run RTOS applications (we do not support in SDK), it can only load Linux and that is already supported both through the Linux SDK and Vision Apps (in RTOS SDK)

    MAIN R5F/MCU R5F can run RTOS applications using SBL boot. Please refer to this documentation

    Did you check the MCUSW User Guide link I posted above ?

    Regards

    Vineet

  • Hi Vineet

    Thanks your information,

    We check the MCUSW User Guide , it only runs on CCS/OSPI boot mode, it's correct?

    We know that A72 can't run RTOS only load Linux , and MAIN R5F/MCU R5F can run RTOS applications

    While we development applications with A72/MAIN R5F/MCU R5F,  we need  put the MAIN R5F/MCU R5F with RTOS image and A72 with

    linux  into same storage (ex: SDCARD or EMMC or QSPI)

    How  can we boot A72/MAIN R5F/MCU R5F at the same time?

    BR

    JAY

  • Hi Vineet

    We check again the MCUSW User Guide for SD Boot as following, it seams need put MCU1_0 image into SD card boot partition not rootfs partition 

    we will try it , thanks

    BR

    JAY

  • Hi Jay,

    MCUSW applications are SBL bootflow only, so, no rootfs.

    Regards

    Vineet

  • Hi Vineet

    We run the step to SBL bootflow as following

    (1)To build the SBL binary for SD/MMC, please use the following command:

    make sbl_mmcsd_img BOARD=j7200_evm SOC=j7200

    (2) copy the following to the SD card boot partition (FAT32)

    -Copy SBL binary sbl_mmcsd_img_mcu1_0_release.tiimage as tiboot3.bin

    cp /opt/ti-processor-sdk-rtos-j7200-evm-08_00_00_12/pdk_j7200_08_00_00_37/packages/ti/boot/sbl/binary/j7200_evm/mmcsd/bin/sbl_mmcsd_img_mcu1_0_release.tiimage /media/js/boot/
    mv /media/js/boot/sbl_mmcsd_img_mcu1_0_release.tiimage /media/js/boot/tiboot3.bin

    -Copy the tifs.bin form ($PSDKRA_INSTALL_PATH)/(pdk-install-folder)/packages/ti/drv/sciclient/soc/V2/tifs.bin as tifs.bin in case of J7200

    cp /opt/ti-processor-sdk-rtos-j7200-evm-08_00_00_12/pdk_j7200_08_00_00_37/packages/ti/drv/sciclient/soc/V2/tifs.bin /media/js/boot/

    -we build MCUSW image as following,

    then copy the application from ($PSDKRA_INSTALL_PATH)/mcusw/binary/(driver name)_app/bin/j721e_evm)/.*appimage to the SD card boot partition as app

    make -s all BOARD=j7200_evm SOC=j7200


    cp /opt/ti-processor-sdk-rtos-j7200-evm-08_00_00_12/mcusw/binary/adc_app/bin/j7200_evm/adc_app_mcu1_0_release.appimage  /media/js/boot/

    (3) SD CARD boot partition as following:

    (4)First  we load adc_app_mcu1_0_release.xer5f image for CCS boot,   MCU UART message shows as following, it seems normal.

    DC_APP: Sample Application - STARTS !!!
    ADC_APP: Variant - Post Build being used !!!
    ADC_APP: GROUPs 1: HWUNIT 1: LOOP COUNT 5: NUM STREAMS 1:!!!
    
    ADC_APP:  ADC MCAL Version Info
    ADC_APP: ---------------------
    ADC_APP:  Vendor ID           : 44
    ADC_APP:  Module ID           : 123
    ADC_APP:  SW Major Version    : 1
    ADC_APP:  SW Minor Version    : 3
    ADC_APP:  SW Patch Version    : 2
    
    
     Result Buffer Content
     ---------------------
     ADC Group 0 Log:
     ----------------
     Channel    Stream    HW_CH       ADC Value    Volt
     ----------------------------------------------------
     0          0         ADC_IN0     0x00000e6f  1624 mV
    
     Read Buffer Content
     -------------------
     ADC Group 0 Log:
     ----------------
     Channel    Set Idx   HW_CH       ADC Value    Volt
     ----------------------------------------------------
     0          0         ADC_IN0     0x00000d1f  1476 mV
     0          1         ADC_IN0     0x00000e5e  1616 mV
     0          2         ADC_IN0     0x00000e66  1620 mV
     0          3         ADC_IN0     0x00000e71  1625 mV
     0          4         ADC_IN0     0x00000e6f  1624 mV
     Warning: ADC Group 0 values are out of range!!
    ADC_APP: ADC Stack Usage: 1164 bytes
    ADC_APP: ADC Test Passed!!!
    ADC_APP: Sample Application - DONE !!!
    

    (5) Then , we use SD CARD boot , MCU UART message shows: SD Boot - File open fails

     SD Boot - File open fails
    SBL Revision: 01.00.10.01 (Aug 23 2021 - 12:32:23)
    TIFS  ver: 21.5.0--v2021.05 (Terrific Llam
    
     SD Boot - File open fails

    please help to fix SD CARD boot flow.

    BR

    JAY

  • Hi Jay,

    You need to rename the application to "app" on SD card

    Regards

    Vineet

  • Hi Vinnet

    Thanks your information.

    We finally can boot MCU1_0 from SD CARD boot, but linux(a72/main r5f) still not boot at the same time

    SBL Revision: 01.00.10.01 (Aug 23 2021 - 12:32:23)
    TIFS  ver: 21.5.0--v2021.05 (Terrific Llam
    ADC_APP: Sample Application - STARTS !!!
    ADC_APP: Variant - Post Build being used !!!
    ADC_APP: GROUPs 1: HWUNIT 1: LOOP COUNT 5: NUM STREAMS 1:!!!
    
    ADC_APP:  ADC MCAL Version Info
    ADC_APP: ---------------------
    ADC_APP:  Vendor ID           : 44
    ADC_APP:  Module ID           : 123
    ADC_APP:  SW Major Version    : 1
    ADC_APP:  SW Minor Version    : 3
    ADC_APP:  SW Patch Version    : 2
    
    
     Result Buffer Content
     ---------------------
     ADC Group 0 Log:
     ----------------
     Channel    Stream    HW_CH       ADC Value    Volt
     ----------------------------------------------------
     0          0         ADC_IN0     0x00000e94  1640 mV
    
     Read Buffer Content
     -------------------
     ADC Group 0 Log:
     ----------------
     Channel    Set Idx   HW_CH       ADC Value    Volt
     ----------------------------------------------------
     0          0         ADC_IN0     0x00000cd1  1442 mV
     0          1         ADC_IN0     0x00000e4f  1610 mV
     0          2         ADC_IN0     0x00000e97  1641 mV
     0          3         ADC_IN0     0x00000e6a  1621 mV
     0          4         ADC_IN0     0x00000e94  1640 mV
     Warning: ADC Group 0 values are out of range!!
    ADC_APP: ADC Stack Usage: 1164 bytes
    ADC_APP: ADC Test Passed!!!
    ADC_APP: Sample Application - DONE !!!

    how we boot linux(a72/main r5f) with MCU1_0 at the same time? 

    BR

    JAY

  • Hi Jay,

    To boot linux with MCU1_0, you need to follow linux bootflow. So linux will load MCU1_0 with the application you want via remoteproc. The application needs to be compatible with Linux in terms of pinmux etc.

    Regards

    Vineet

  • Hi Vineet

    Do you have any suggestion for this development flow to achieve  the goal of booting linux with MCU1_0

    BR

    Jay

  • Hi Jay,

    To load Linux on A72 along with your custom MCU1_0 firmware you need to make sure that the memory being accessed by MCU1_0 application is reserved from Linux and the two cores are not racing for any resource.

    Please also take a look at https://e2e.ti.com/support/processors-group/processors/f/processors-forum/931992/faq-tda4vm-application-in-the-psdkra-runs-standalone-from-sbl-but-doesn-t-run-alongside-linux .

    If there are more question, please create a separate thread where we can discuss how to load linux alongside your custom application on MCU1_0.

    Regards

    Karan