This thread has been locked.

If you have a related question, please click the "Ask a related question" button in the top right corner. The newly created question will be automatically linked to this question.

[FAQ] AM64X: How can I flash SOC initialization binaries on HS - FS HW versions .

Part Number: AM6442
Other Parts Discussed in Thread: UNIFLASH

Note: This Procedure is used only for MCU+SDK RTOS/No-RTOS OS , Not for Linux OS 

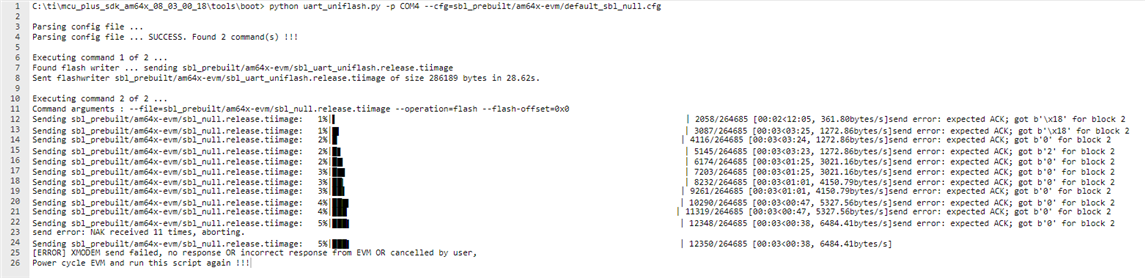
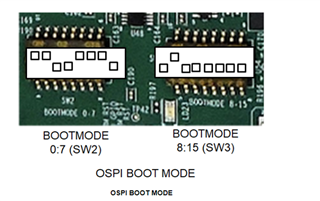
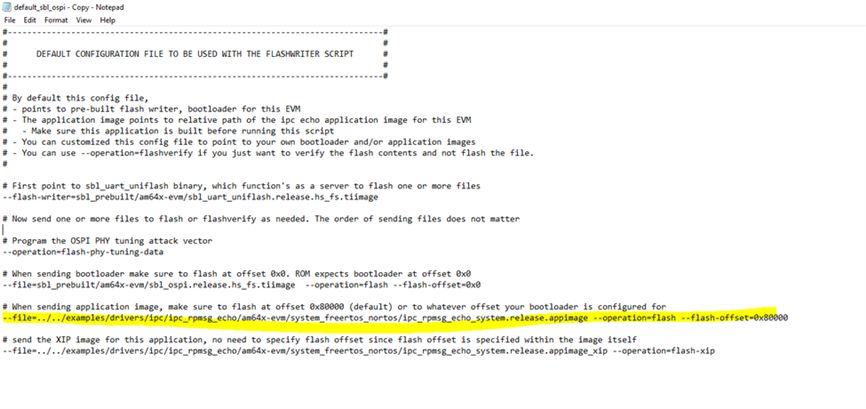
If you are trying to send prebuilt sbl_uart_uniflash.release.tiimage and sbl_null.release.tiimage images to HS_FS HW version for SOC initializations, you may get some errors like  "[ERROR] XMODEM send failed,   no response OR incorrect response from EVM OR cancelled by user" on command prompt window. See screenshot below

  • How Can I solve this problem ? This FAQ aims to explain how to flash AM64X SOC initialization  binaries on HS_FS HW versions .

    MCU+SDK now supports HS-FS (High Security - Field Secured) in the SDK as the default device type with limited-Time  support for GP Devices


    If you want information about the difference between GP vs HS_FS HW versions? Please use the link below for more details.

    https://software-dl.ti.com/mcu-plus-sdk/esd/AM64X/08_05_00_24/exports/docs/api_guide_am64x/HSFS_MIGRATION_GUIDE.html

    Please use the link for more details on Migration guide.

    https://software-dl.ti.com/processor-sdk-linux/esd/AM64X/08_04_01_04/exports/docs/linux/Foundational_Components_Migration_Guide.html

    Please follow below steps for SOC initializations on HS_FS HW versions.

    Step 1:

    Please check path below and update default_sbl_ospi and default_sbl_null cfg files.

    Path: C:\ti\mcu_plus_sdk_am64x_08_05_00_24\tools\boot\sbl_prebuilt\am64x-evm

    default_sbl_null cfg file:  

    1. Update image file to release.hs_fs.tiimage from sbl_uart_uniflash.release.tiimage 
    2. Update image file to release.hs_fs.tiimage from sbl_null.release.tiimage

    See the  Modified Screenshot below


    default_sbl_ospi cfg file: 

    1. Update image file to release.hs_fs.tiimage from sbl_uart_uniflash.release.tiimage
    2. Update image file to release.hs_fs.tiimage from sbl_ospi.release.tiimage

    See the  Modified Screenshot below


    Step 2 :

    Power OFF the EVM and Set boot mode to UART BOOT MODE.


    Step 3:

    Power ON the EVM and Open a command prompt and run the below command to flash the SOC initialization binary to the EVM.

    python uart_uniflash.py -p COM8 --cfg=sbl_prebuilt/am64x-evm/default_sbl_null.cfg

    Here COM<x> is the port name of the identified UART port in Windows.

    Step 4:

    POWER-OFF the EVM and Switch the EVM boot mode to OSPI mode as shown below.


    • Congratulations now the EVM is ready for loading and running from CCS.
    • You don’t need to do these steps again unless you have flashed some other binary to the flash.

    Note:  

    1. When you want to load application in external memory follow same above steps but use default_sbl_ospi cfg file instead of default_sbl_null cfg file and update the application image path in the yellow path marked below. 
    2. Same steps should be followed for AM64X-SK board setup and BOOT SW positions are different compared to GP or HS_FS HW versions.

    Regards,

    S.Anil.