Other Parts Discussed in Thread: SYSCONFIG, UNIFLASH
Hi,
SK-AM62 Sitara Board How to enable gpio pins
This thread has been locked.
If you have a related question, please click the "Ask a related question" button in the top right corner. The newly created question will be automatically linked to this question.
Hi Veerapandiyan,
Could you elaborate more on the query, what OS are you using? Is the query related to HW or enabling GPIO pins in software?
This will help route your query to the right expert for support.
Best Regards,
Suren
Hi Suren,
i facing the issue attached the screen shot below:
Device 'Cortex M.AM64x.AM62x_SK_EVM' is not currently recognized:
- Re-run CCS installer on your existing CCS location, ensure the Product Family for your device is selected, and proceed with installation if it wasn't.
- See 'Help > Check for Updates' to check if support for this device is available through a CCS update.
- Migrate the project to closest matching supported device by adjusting project properties.
- Or contact TI for support if using experimental silicon.
i used ccs version is 12.4.00
sdk version is 08.03.00.07
which one i use tell mee.
Thanks Regards,
V Veerapandiyan
Hi Veerapandiyan,
Thanks for the screenshot.
I think it could be problem with XDS, as in the error message in console, it states XDS110 failed to connect.
Can you try installing drivers ?
Go to CCS Install Path > ccs > install_scripts
and run the following command "sudo ./install_drivers.sh"
Once done, can you confirm if the above problem is resolved or not ?
Best Regards,
Vaibhav
Hi Vaibhav,
I have two doubts
1. I install Drivers. But i upload the example programme sk-am62 sitara board coming some problem how to solve it. tell me i attached the screenshot below:
How to upload programme send example video link.
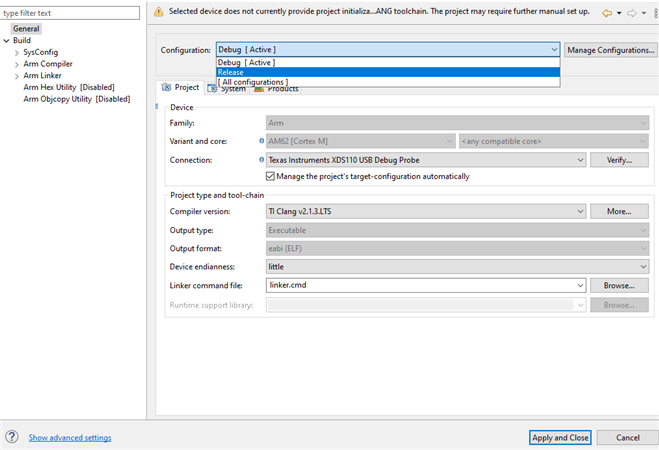
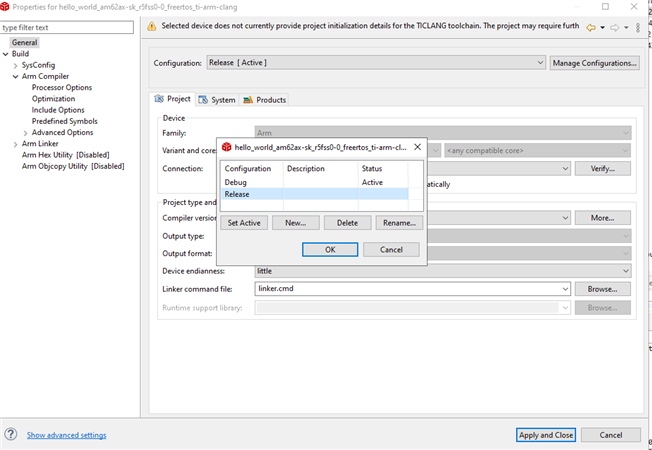
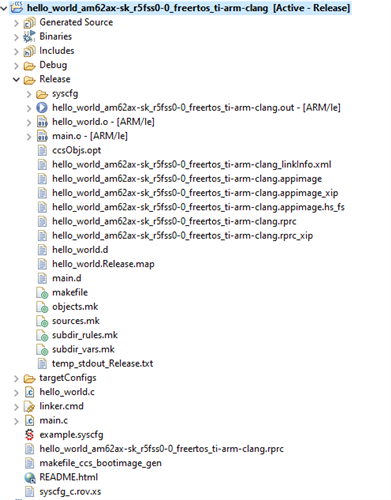
2. I have create new project file and sysconfig code generation time is build error for gmake i attached the screen shot.
1. configuration the sitara board screenshot
2. code generation and build
Errors
1.Description Resource Path Location Type
gmake: *** [build-1494553375] Error 1 Ti_Led_Blink_1 C/C++ Problem
2.Description Resource Path Location Type
gmake: Target 'all' not remade because of errors. Ti_Led_Blink_1 C/C++ Problem
3.Description Resource Path Location Type
recipe for target 'build-1494553375' failed subdir_rules.mk /Ti_Led_Blink_1/Debug line 7 C/C++ Problem
how to solve the problem.
Thanks Regards,
V Veerapandiyan.
Hi Veerapandhiyan,
Thanks for the brief explanation of the problem you are facing.
I am going to try the same thing on my setup and see if I face the same problem.
Please give me a day time.
Regards,
Vaibhav
Hi Veerapandiyan,
. I have create new project file and sysconfig code generation time is build error for gmake i attached the screen shot.
1. configuration the sitara board screenshot
2. code generation and build
Errors
1.Description Resource Path Location Type
gmake: *** [build-1494553375] Error 1 Ti_Led_Blink_1 C/C++ Problem
To make your custom example I would suggest you to start with an empty project.
Regards,
Vaibhav
Hi Vaibav,
I am not understanding your replay. The screenshots are same yesterday i upload screenshot, upload your current screenshot.
Please send briefly. issue not solved. Continue same thread.
same error i upload screenshot
Thanks Regards,
Veerapandiyan V.
Hi Veerapandiyan,
When I said import empty example, I meant importing the empty example from MCU PLUS SDK examples directory.
To clarify more on the above please have a look at the screengrab below.
Hope this helps. You can consider this as a starting point for your custom application.
Also as you said you wanted to enable the GPIO pins, well you can do it in SysConfig itself, where you just simply need to add the GPIO module and configure the pins as output/input as desired.
Regards,
Vaibhav
Hi Vaibav,
I have upload the progrmme SK-AM62 sitara board 3 methods are not uploading the progrmme. I attached image and video link below:
1. Debug Mode:
Video Link : https://drive.google.com/file/d/1WzgCCL83iDu4FBpV9ExhSzEmY0555vVW/view?usp=drive_link
2.Run-->Load
Video_Link : https://drive.google.com/file/d/1VTeFv2LhYLS1LqJG3oc8AnnOMhtxK7rA/view?usp=drive_link
3.uniflash
Video Link : https://drive.google.com/file/d/1bkblnv020drzP8RfEMO8tdWqizM7FVXi/view?usp=drive_link
how to solve this issue tell me vaibav.
Thanks Regards,
Veerapandiyan V
Hi Veerapandiyan,
I appreciate your response.
I will look into this. Please allow me sometime to get back to you.
Regards,
Vaibhav
Hi Veerapandiyan,
Can you please follow along the steps mentioned here ?
Once done, tell me about the results.
Regards,
Vaibhav
Hi Vaibhav,
I have tried but same problem is coming. how to solve the problem any ideas tell me sir
Thanks Regards,
Veerapandiyan V
Hi Veerapandiyan,
I went through your videos.
The ones you have attached, are all mainly because you are selecting the wrong core to debug your application.
Can you please follow this procedure instead?
Please tell me once you have followed the above process.
Regards,
Vaibhav
Hi Veerapandiyan,
Please let me know if the steps mentioned above helped you solve your issue.
Best Regards,
Vaibhav
Hi Vaibhav,
This six steps are solved my issue.
Another one doubt, how to enable I/O expansion header and PRU header any reference documents is there.
Thanks Regards,
Veerapandiyan v
Hello Veerapandiyan,
Please go through few of the references which I am sure you will find helpful.
3. You can read about PRU here: https://www.ti.com/lit/ug/spruiv7a/spruiv7a.pdf#page=4221
The above(first two) points will be mostly talking about changes in dts/dtsi files.
But, if you were to use SysConfig and do it on MCU PLUS SDK, then you just have to configure the pin you want to use from SysConfig and the generated files will take care for the rest of the procedure.
I hope this helps.
Regards,
Vaibhav
Hi Vaibhav,
I have enabled PRU and I/O Expansion pins all working in input and output mode.I use example uart code is not working and i will check one led connected Tx pin is not blink data not transmit. how to write uart code.
Thanks Regards,
Veerapandiyan V.
Hello Veerapandiyan,
I would encourage you to raise a seperate e2e question for this.
Since you are talking about UART SDK Example not working at your end.
Looking forward to your e2e.
Regards,
Vaibhav
Hi Vaibhav,
I created new e2e forum for UART communication in link below:
Thanks for your support.
Thanks Regards,
Veerapandiyan V.
Hi Vaibhav,
Led Blink Code working in Debug Mode but power cable remove to insert the power cable the progrmme is not running the led blink code. how to permanent upload programme. how to fix this problem.
Thanks Regards,
Veerapandiyan V
Hi Veerapandiyan,
but power cable remove to insert the power cable the progrmme is not running the led blink code
Can you simplify this statement a little more.
Regards,
Vaibhav
Hi Vaibhav,
1. Programme working in debug mode only.
2. power cable remove to insert code not working again i upload the programme is working.
how to solve this problem.
Thanks Regards,
Veerapandiyan V.
Hi Veerapandiyan,
Do you mean to say that you want to build the application and load the .out file onto the respective core, but all of this in release mode?
Also can you confirm if you are changing the selection in the following window ?
I reached the window by right clicking on the project in CCS and selecting Show Build Settings..
Please confirm on the above.
Best Regards,
Vaibhav
Hi Vaibhav,
1. I check only show debug mode
2. I change Release then compile code after uploading the progrmae in same issue
any solution update.
Thanks Regards,
Veerapandiyan V.
Hi Veerapandiyan,
In CCS, when you open build settings for a particular project, by default you see that Debug [ Active ] is written.
To change it properly, you need to select Manage Configurations..
In the new window pop up, simply select Release and select the option as Set Active.
Please check the below attachment for the same.
This should work, as it worked in my case.
Best Regards,
Vaibhav
Hi Vaibhav
I changed Release mode(set active). same issue how to solve.
Thanks Regards,
Veerapandiyan V.
Hi Veerapandiyan,
After you hit Apply and close, that should be enough.
At this point your application configuration should be set to Release.
Can you please check and confirm again.
Essentially after building, you can load the .out file mentioned in the Release Directory.
Please see the attachment below.
Regards,
Vaibhav
Hi Vaibhav,
I seeing Release folder show .out,.appimage file is there i attach the screen shot
Thanks Regards,
Veerapandiyan V.
Hi Veerapandiyan,
After building the project in Release Mode. Load the out file onto the respective core.
I just ran a simple hello world application.
Works like a charm for me.
Regards,
Vaibhav
Hi Vaibhav,
I Understood code is working for debug mode,
Remove the power cable. the power cable insert again programme again reload then working.
Thanks Regards,
Veerapandiyan V.