This thread has been locked.

If you have a related question, please click the "Ask a related question" button in the top right corner. The newly created question will be automatically linked to this question.

TMDS64EVM: Aditional SDK Tools, dfu-util and Zadig tool doesn't show the AM64x DFU device

Part Number: TMDS64EVM
Other Parts Discussed in Thread: UNIFLASH

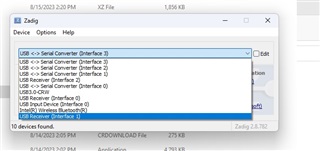
Hi, my company just got the TMDS64EVM evaluation module, and we have been trying to configure it, but haven't been successful at it. Specifically, the step where you install the dfu-util, neither the dfu-util nor the Zadig tool are able to show a device named AM64x DFU. 

My computer is a Dell Intel(R) Core(TM) i9-10900X CPU @ 3.70GHz   3.70 GHz and as operating system Windows 11 Pro. Another collegue of mine try it, he is using an intel-I7 Windows 10 and got stuck at the same step that me. 

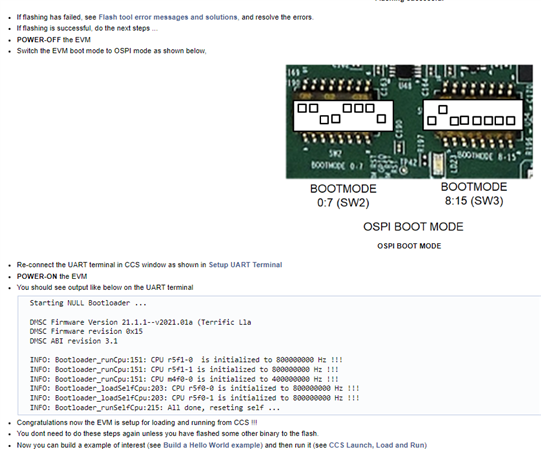
At this step the boot mode is DFU SW2 is 11001010 and SW3 is 00000000.

Of all the steps this is the one that is missing, that is why I think that is the problem. 

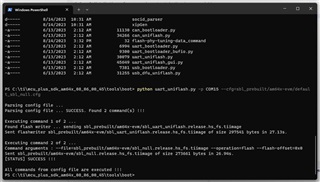
Regarding the code composer, I was able to communicate with the board using the code composer terminal, I got the "C" characters every 3 seconds. But when I try to upload a sample code to the board I've been having errors like:

Error connecting to the target: (Error -1170 @ 0x0) Unable to access the DAP. Reset the device, and retry the operation. If error persists, confirm configuration, power-cycle the board, and/or try more reliable JTAG settings (e.g. lower TCLK).

Device functional clock appears to be off. Power-cycle the board. If error persists, confirm configuration and/or try more reliable JTAG settings (e.g. lower TCLK).

Error connecting to the target: (Error -2081 - (0:0:0)) Device functional clock appears to be off.

  • Hi Juan,

    Many thanks for the query.

    Looks like after you got the characters "C" printed on the console, you have not done SoC Initialization.

    Basically the SoC can be initialized via some of the ways mentioned below:

    • Through SBL
      • Through USB DFU flash (This the one where you are facing the problem)
      • Through UART Uniflash
    • Through SPL
    • Through CCS Gel Scripts

    Out of all the above steps can initialize the SoC through UART Uniflash?

    After you see the logs on the COM Port, follow from here onwards: https://software-dl.ti.com/mcu-plus-sdk/esd/AM64X/08_06_00_45/exports/docs/api_guide_am64x/EVM_SETUP_PAGE.html#autotoc_md32

    Meanwhile I will try installing the tools required for DFU flashing on another system and check if the error persists at my end.

    Regards,

    Vaibhav

  • Hi Vaibhav, thank you for your response. I tried the 3 solutions, but they didn't work. Here are the responses I got:

    1) By FLASH SOC Initialization Binary

    2) By SOC Initialization using SD boot

    3) Run the SOC initialization script

  • Hi Juan,

    I believe so you are using HSFS device.

    I would highly recommend you to update the config file as you are using HSFS device.

    The appimages/release/debug images to be flashed should be pertaining to HSFS.

    So the default_sbl_null.cfg file is provided with the following information (Please check attached code)

    #-----------------------------------------------------------------------------#
    #                                                                             #
    #      DEFAULT CONFIGURATION FILE TO BE USED WITH THE FLASHWRITER SCRIPT      # 
    #                                                                             #
    #-----------------------------------------------------------------------------#
    #
    # By default this config file, 
    # - points to pre-built flash writer, and SOC init bootloader or SBL NULL bootloader for this EVM
    # - The SBL NULL bootloader does below 
    #   - Load sysfw and init sysfw by passing a "boardcfg"
    #   - power-ON and clock setup for the R5F and M4F CPUs.
    #   - reset and run all the CPUs in a "WFI" loop.
    #   - It does NOT boot any applicaiton binary
    # - SBL NULL is useful to init the SOC when the EVM is powered ON, 
    #   so that one can do connect CCS and load application from CCS without needing
    #   to run any DMSC load scripts
    # - This make the CCS development flow lot simpler as long as this one time flashing step is done.
    #
    
    # First point to sbl_uart_uniflash binary, which function's as a server to flash one or more files
    --flash-writer=sbl_prebuilt/am64x-evm/sbl_uart_uniflash.release.tiimage
    
    # When sending bootloader make sure to flash at offset 0x0. ROM expects bootloader at offset 0x0
    --file=sbl_prebuilt/am64x-evm/sbl_null.release.tiimage --operation=flash --flash-offset=0x0

    You need to modify it as follows and use it. (Please check attached code)


    #-----------------------------------------------------------------------------#
    #                                                                             #
    #      DEFAULT CONFIGURATION FILE TO BE USED WITH THE FLASHWRITER SCRIPT      # 
    #                                                                             #
    #-----------------------------------------------------------------------------#
    #
    # By default this config file, 
    # - points to pre-built flash writer, and SOC init bootloader or SBL NULL bootloader for this EVM
    # - The SBL NULL bootloader does below 
    #   - Load sysfw and init sysfw by passing a "boardcfg"
    #   - power-ON and clock setup for the R5F and M4F CPUs.
    #   - reset and run all the CPUs in a "WFI" loop.
    #   - It does NOT boot any applicaiton binary
    # - SBL NULL is useful to init the SOC when the EVM is powered ON, 
    #   so that one can do connect CCS and load application from CCS without needing
    #   to run any DMSC load scripts
    # - This make the CCS development flow lot simpler as long as this one time flashing step is done.
    #
    
    # First point to sbl_uart_uniflash binary, which function's as a server to flash one or more files
    --flash-writer=sbl_prebuilt/am64x-evm/sbl_uart_uniflash.release.hs_fs.tiimage
    
    # When sending bootloader make sure to flash at offset 0x0. ROM expects bootloader at offset 0x0
    --file=sbl_prebuilt/am64x-evm/sbl_null.release.hs_fs.tiimage --operation=flash --flash-offset=0x0

    Please try doing SoC Initialization again and update me with your results.

    Best Regards,

    Vaibhav

  • Thanks you Vaibhav, that resolved the issue, I just have 2 questions:

    1) What is a HSFS device?

    2) According to the install guide this is the last configuration step, is it? or are there other steps before I can upload any program to the device?

  • Hi Juan,

    Many thanks for your response. I am glad my explanation helped you out.

    Well to answer your two questions I would suggest you a couple of links which you can easily follow along.

    1) What is a HSFS device?

    Check the following link to understand what HSFS and HSSE device type is: https://software-dl.ti.com/tisci/esd/latest/6_topic_user_guides/key_writer.html#high-security-hs-device-sub-types

    Check the following link to understand the differences between GP and HSFS device: https://software-dl.ti.com/mcu-plus-sdk/esd/AM64X/08_06_00_43/exports/docs/api_guide_am64x/HSFS_MIGRATION_GUIDE.html#autotoc_md516

    2) According to the install guide this is the last configuration step, is it? or are there other steps before I can upload any program to the device?

    Post the uart uniflash, you need to power off the board and change the UART boot mode to OPSI Boot Mode. Reconnect the COM PORT in CCS to see the logs. Power on the board.

    Please follow the steps here : https://software-dl.ti.com/mcu-plus-sdk/esd/AM64X/08_06_00_43/exports/docs/api_guide_am64x/EVM_SETUP_PAGE.html#autotoc_md32

    OR

    Alternatively follow along the steps mentioned in the attachment below:

    Let me know if this resonates with you. 

    Best Regards,

    Vaibhav