This thread has been locked.

If you have a related question, please click the "Ask a related question" button in the top right corner. The newly created question will be automatically linked to this question.

SK-AM62-LP: SK-AM62-LP

Part Number: SK-AM62-LP
Other Parts Discussed in Thread: UNIFLASH, SYSCONFIG

Tool/software:

Hi Team,
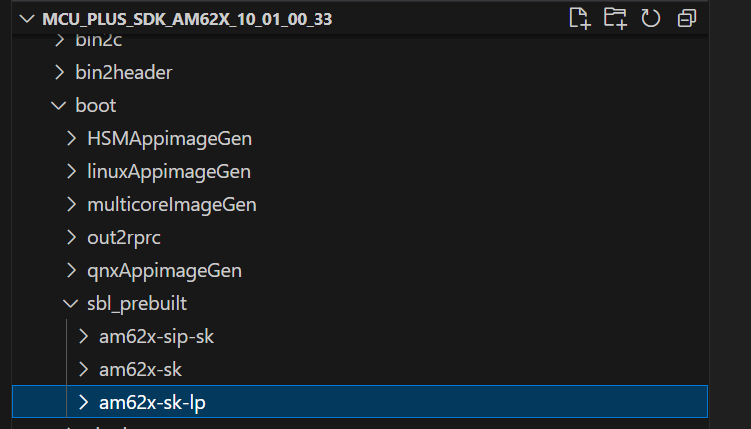
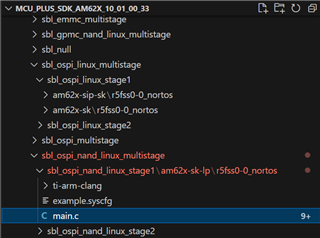
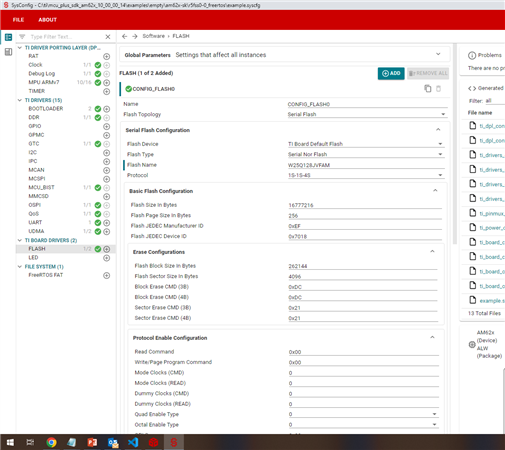
Am using MCU_SDK 10 version, for am62-lp-sk custom device, I have changed the example.syscfg in the path C:\ti\mcu_plus_sdk_am62x_10_00_00_14\examples\drivers\boot\sbl_ospi_linux_multistage\sbl_ospi_linux_stage1\am62x-sk\r5fss0-0_nortos and board_IpaddrReginit.h file in C:\ti\mcu_plus_sdk_am62x_10_00_00_14\source\drivers\ddr\v0\soc\am62x.

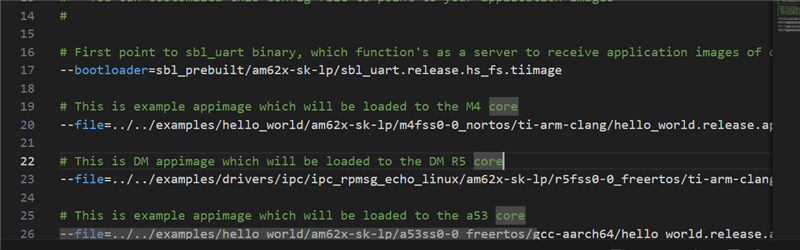
And I build the mcu_sdk with cmd make -s BOARD=am62x-sk all, and am using the ~/ti/mcu_plus_sdk_am62x_10_00_00_14/tools/boot/sbl_prebuilt/am62x-sk/default_sbl_ospi_linux_hs_fs.cfg for my Nor chip(winbond). also build the all appimages mentioned in default_sbl_ospi_linux_hs_fs.cfg.

  1. sbl_ospi_linux_stage1.release.hs_fs.tiimage
  2. sbl_ospi_linux_stage2.release.appimage.hs_fs
  3. ipc_rpmsg_echo_linux.release.appimage.hs_fs
  4. hsm.appimage.hs_fs
  5. ipc_rpmsg_echo_linux.release.appimage.hs_fs
  6. linux.appimage.hs_fs
  7. u-boot.img

But am not using Uart_uniflash.py method, but using dfu method to flash all above images. but facing below issue.

CASE1: After going through the code, I have found out that in the function Bootloader_parseMultiCoreAppImage called  Bootloader_verifyMulticoreImage(handle) check is failed and getting status = SystemP_FAILURE due to certzise = 0(zero).

CASE2:
One of the suggestions mention in the Ti-forum as we can comment this check condition since it's a known issue. so, I commented and tried but later it's failing to pass the condition 
status = config->fxns->imgReadFxn(&mHdrStr, sizeof(Bootloader_MetaHeaderStart), config->args);
if(mHdrStr.magicStr != (uint32_t)BOOTLOADER_META_HDR_MAGIC_STR)
{
    status = SystemP_FAILURE
}
Because of mHdrStr is filling with zero's
Could you please help me on this.
Debugging further it might be reading from QSPI_readMemMapMode.
  • Hi,

    Allow me sometime to state you the debug steps you can follow for this.

    Regards,

    Vaibhav

  • Hi Vaibhav,

    Any update?

  • Hi Manu,

    Thanks for waiting.

    My first pointer would go to check the device type you are using. You can do so by referring this guide: https://e2e.ti.com/support/processors-group/processors/f/processors-forum/1228618/faq-am6xx-how-to-check-if-device-type-is-hs-se-hs-fs-or-gp

    My second pointer would be to use the correct images, I see that the thread has been created with AM62x-SK-LP as the Part Number, so I am assuming you would need to go for the files in the third directory:

    Please let me know your thoughts on this one.

    Respectfully,

    Vaibhav

  • I also believe so if the TI EVM would have been the following: https://www.ti.com/tool/SK-AM62B-P1

    Then it would have been okay to refer the configuration files from the second directory which is am62x-sk.

    Let me know your thoughts on this as well.

  • Hi Vaibhav,

    For your 1st point, I have checked its HS-FS deivce.

    For the 2nd point, am using customized am62x-sk-lp device, it has NOR Chip (winbond) instead of NAND, so in am62x-sk-lp don't have examples for sbl_ospi_linux_multistage.cfg for Nor-chip, So that's why am using am62x-sk .cfg.

  • Hi Manu,

    Thanks for clarifying.

    Since you have just changed the flash from NAND to NOR, it would be great if you can go ahead and modify the example.sysconfig file of all the applications which has OSPI/FLASH added by default and change it to make it work for NOR flash instead of NAND flash under the am62x-sk-lp examples.

    Hope you get my point, let me know know if you need further help with anything else.

    Regards,

    Vaibhav

  • Hi Vaibhav,
    I have modified example.syscfg in the path C:\ti\mcu_plus_sdk_am62x_10_00_00_14\examples\drivers\boot\sbl_ospi_linux_multistage\sbl_ospi_linux_stage1\am62x-sk\r5fss0-0_nortos and board_IpaddrReginit.h file in C:\ti\mcu_plus_sdk_am62x_10_00_00_14\source\drivers\ddr\v0\soc\am62x.

    And I build the mcu_sdk with cmd make -s BOARD=am62x-sk all

    1. sbl_ospi_linux_stage1.release.hs_fs.tiimage
    2. sbl_ospi_linux_stage2.release.appimage.hs_fs
    3. ipc_rpmsg_echo_linux.release.appimage.hs_fs
    4. hsm.appimage.hs_fs
    5. ipc_rpmsg_echo_linux.release.appimage.hs_fs
    6. linux.appimage.hs_fs
    7. u-boot.img

    But am not using Uart_uniflash.py method, but using dfu method to flash all above images. so, getting above mentioned errors.

  • Hi Manu,

    I have gone through your response.

    Looks like you did modify the file, but my suggestion is to go ahead and use the following file:

    And modify the example.syscfg here.

    Regards,

    Vaibhav

  • Hi,

    I would like you to modify this parameter: 

    Regards,

    Vaibhav

  • thanks Vaibhav, will try and let you know

  • Hi Manu,

    Thanks for the heads up.

    Looking forward to your response.

    Regards,

    Vaibhav

  • Still the same issue facing as mentioned in 1st question,

    CASE1: After going through the code, I have found out that in the function Bootloader_parseMultiCoreAppImage called  Bootloader_verifyMulticoreImage(handle) check is failed and getting status = SystemP_FAILURE due to certzise = 0(zero).

    CASE2:
    One of the suggestions mention in the Ti-forum as we can comment this check condition since it's a known issue. so, I commented and tried but later it's failing to pass the condition 
    status = config->fxns->imgReadFxn(&mHdrStr, sizeof(Bootloader_MetaHeaderStart), config->args);
    if(mHdrStr.magicStr != (uint32_t)BOOTLOADER_META_HDR_MAGIC_STR)
    {
        status = SystemP_FAILURE
    }
    Because of mHdrStr is filling with zero's
  • Hi Manu,

    Can you share your sysconfig file here which has the OSPI changes for the am62-sk-lp examples?

    Regards,

    Vaibhav

  • Hi Vaibhav, 
    Am using Winbond Nor chip, Also I think all the flash and other functions are calling 

      .fxns = &gFlashNorOspiFxns,

     instead need to call gFlashNorQspiFxns. also please the read/write command ID's related to SPI nor

  • /**
    * These arguments were used when this file was generated. They will be automatically applied on subsequent loads
    * via the GUI or CLI. Run CLI with '--help' for additional information on how to override these arguments.
    * @cliArgs --device "AM62x" --package "ALW" --part "Default" --context "r5fss0-0" --product "MCU_PLUS_SDK_AM62x@10.00.00"
    * @versions {"tool":"1.20.0+3587"}
    */

    /**
    * Import the modules used in this configuration.
    */
    const flash = scripting.addModule("/board/flash/flash", {}, false);
    const flash1 = flash.addInstance();
    const bootloader = scripting.addModule("/drivers/bootloader/bootloader", {}, false);
    const bootloader1 = bootloader.addInstance();
    const bootloader2 = bootloader.addInstance();
    const ddr = scripting.addModule("/drivers/ddr/ddr", {}, false);
    const ddr1 = ddr.addInstance();
    const gtc = scripting.addModule("/drivers/gtc/gtc");
    const mcu_bist = scripting.addModule("/drivers/mcu_bist/mcu_bist", {}, false);
    const mcu_bist1 = mcu_bist.addInstance();
    const qos = scripting.addModule("/drivers/qos/qos", {}, false);
    const qos1 = qos.addInstance();
    const clock = scripting.addModule("/kernel/dpl/clock");
    const debug_log = scripting.addModule("/kernel/dpl/debug_log");
    const mpu_armv7 = scripting.addModule("/kernel/dpl/mpu_armv7", {}, false);
    const mpu_armv71 = mpu_armv7.addInstance();
    const mpu_armv72 = mpu_armv7.addInstance();
    const mpu_armv73 = mpu_armv7.addInstance();
    const mpu_armv74 = mpu_armv7.addInstance();
    const mpu_armv75 = mpu_armv7.addInstance();
    const mpu_armv76 = mpu_armv7.addInstance();
    const mpu_armv77 = mpu_armv7.addInstance();
    const mpu_armv78 = mpu_armv7.addInstance();
    const mpu_armv79 = mpu_armv7.addInstance();
    const mpu_armv710 = mpu_armv7.addInstance();

    /**
    * Write custom configuration values to the imported modules.
    */
    bootloader1.EMMCAppImageOffset = "0x800000";
    bootloader1.$name = "CONFIG_BOOTLOADER_FLASH_MCU";
    bootloader1.appImageOffset = "0x100000";
    bootloader1.bootloaderDma = true;

    bootloader2.EMMCAppImageOffset = "0xC00000";
    bootloader2.$name = "CONFIG_BOOTLOADER_FLASH_SBL";
    bootloader2.appImageOffset = "0x80000";

    flash1.$name = "CONFIG_FLASH0";
    bootloader1.flashDriver = flash1;
    bootloader2.flashDriver = flash1;
    flash1.serialFlashDriver.$name = "board_flash_serialFlash_serialflash0";
    flash1.serialFlashDriver.flashSize = 16777216;
    flash1.serialFlashDriver.flashManfId = "0xEF";
    flash1.serialFlashDriver.dummy_isAddrReg = false;
    flash1.serialFlashDriver.dummy_cfgReg = "0x00";
    flash1.serialFlashDriver.dummy_cmdRegRd = "0x00";
    flash1.serialFlashDriver.dummy_cmdRegWr = "0x00";
    flash1.serialFlashDriver.dummy_mask = "0x00";
    flash1.serialFlashDriver.dummy_bitP = 0;
    flash1.serialFlashDriver.proto_isAddrReg = false;
    flash1.serialFlashDriver.proto_cfgReg = "0x00";
    flash1.serialFlashDriver.proto_cmdRegRd = "0x00";
    flash1.serialFlashDriver.proto_cmdRegWr = "0x00";
    flash1.serialFlashDriver.proto_mask = "0x00";
    flash1.serialFlashDriver.proto_bitP = 0;
    flash1.serialFlashDriver.fname = "W25Q128JVFAM";
    flash1.serialFlashDriver.protocol = "1s_1s_4s";
    flash1.serialFlashDriver.flashDeviceId = "0x7018";
    flash1.serialFlashDriver.peripheralDriver.$name = "CONFIG_OSPI0";
    flash1.serialFlashDriver.peripheralDriver.dmaEnable = true;
    flash1.serialFlashDriver.peripheralDriver.OSPI.DQS.$used = false;
    flash1.serialFlashDriver.peripheralDriver.OSPI.D7.$used = false;
    flash1.serialFlashDriver.peripheralDriver.OSPI.D6.$used = false;
    flash1.serialFlashDriver.peripheralDriver.OSPI.D5.$used = false;
    flash1.serialFlashDriver.peripheralDriver.OSPI.D4.$used = false;

    ddr1.$name = "CONFIG_DDR0";
    ddr1.ddrConfigIncludeFileName = "drivers/ddr/v0/soc/am62x/board_lpddrReginit.h";

    mcu_bist1.$name = "CONFIG_MCU_BIST0";

    qos1.$name = "CONFIG_QOS0";

    const udma = scripting.addModule("/drivers/udma/udma", {}, false);
    const udma1 = udma.addInstance({}, false);
    udma1.$name = "CONFIG_UDMA0";
    bootloader1.udmaDriver = udma1;
    flash1.serialFlashDriver.peripheralDriver.udmaDriver = udma1;

    const udma_blkcopy_channel = scripting.addModule("/drivers/udma/udma_blkcopy_channel", {}, false);
    const udma_blkcopy_channel1 = udma_blkcopy_channel.addInstance({}, false);
    udma_blkcopy_channel1.$name = "CONFIG_UDMA_BLKCOPY_CH0";
    bootloader1.udmaBlkCopyChannel = udma_blkcopy_channel1;
    flash1.serialFlashDriver.peripheralDriver.udmaBlkCopyChannel = udma_blkcopy_channel1;

    clock.instance = "TIMER1";

    debug_log.enableUartLog = true;
    debug_log.enableCssLog = false;
    debug_log.sysfwUartTrace = true;
    debug_log.uartLog.$name = "CONFIG_UART0";
    debug_log.uartLog.intrEnable = "DISABLE";
    debug_log.uartLog.useWakeupDomainPeripherals = false;
    debug_log.sysfwUartLog.$name = "CONFIG_UART_TRACE0";
    debug_log.sysfwUartLog.useWakeupDomainPeripherals = false;
    debug_log.sysfwUartLog.UART.$assign = "USART1";
    debug_log.sysfwUartLog.UART.RXD.$assign = "MCASP0_AFSR";
    debug_log.sysfwUartLog.UART.TXD.$assign = "MCASP0_ACLKR";
    debug_log.sysfwUartLog.UART.RTSn.$assign = "MCASP0_AXR2";
    debug_log.sysfwUartLog.UART.CTSn.$assign = "MCASP0_AXR3";

    mpu_armv71.$name = "CONFIG_MPU_REGION0";
    mpu_armv71.accessPermissions = "Supervisor RD+WR, User RD";
    mpu_armv71.allowExecute = false;
    mpu_armv71.attributes = "NonCached";

    mpu_armv72.$name = "CONFIG_MPU_REGION1";
    mpu_armv72.accessPermissions = "Supervisor RD+WR, User RD";
    mpu_armv72.size = 7;

    mpu_armv73.$name = "CONFIG_MPU_REGION2";
    mpu_armv73.accessPermissions = "Supervisor RD+WR, User RD";
    mpu_armv73.baseAddr = 0x41C00000;
    mpu_armv73.size = 19;

    mpu_armv74.$name = "CONFIG_MPU_REGION3";
    mpu_armv74.accessPermissions = "Supervisor RD+WR, User RD";
    mpu_armv74.baseAddr = 0x70000000;
    mpu_armv74.size = 16;

    mpu_armv75.$name = "CONFIG_MPU_REGION4";
    mpu_armv75.baseAddr = 0x80000000;
    mpu_armv75.size = 31;

    mpu_armv76.$name = "CONFIG_MPU_REGION5";
    mpu_armv76.baseAddr = 0x41010000;
    mpu_armv76.size = 15;
    mpu_armv76.attributes = "NonCached";

    mpu_armv77.$name = "CONFIG_MPU_REGION6";
    mpu_armv77.size = 15;
    mpu_armv77.attributes = "NonCached";

    mpu_armv78.$name = "CONFIG_MPU_REGION8";
    mpu_armv78.baseAddr = 0x43C00000;
    mpu_armv78.size = 18;

    mpu_armv79.$name = "CONFIG_MPU_REGION7";
    mpu_armv79.baseAddr = 0xFC40000;
    mpu_armv79.size = 8;
    mpu_armv79.attributes = "Device";
    mpu_armv79.allowExecute = false;

    mpu_armv710.$name = "CONFIG_MPU_REGION9";
    mpu_armv710.allowExecute = false;
    mpu_armv710.size = 9;
    mpu_armv710.attributes = "Device";
    mpu_armv710.baseAddr = 0x2800000;

    /**
    * Pinmux solution for unlocked pins/peripherals. This ensures that minor changes to the automatic solver in a future
    * version of the tool will not impact the pinmux you originally saw. These lines can be completely deleted in order to
    * re-solve from scratch.
    */
    flash1.serialFlashDriver.peripheralDriver.OSPI.$suggestSolution = "OSPI0";
    flash1.serialFlashDriver.peripheralDriver.OSPI.CLK.$suggestSolution = "OSPI0_CLK";
    flash1.serialFlashDriver.peripheralDriver.OSPI.CSn0.$suggestSolution = "OSPI0_CSn0";
    flash1.serialFlashDriver.peripheralDriver.OSPI.D3.$suggestSolution = "OSPI0_D3";
    flash1.serialFlashDriver.peripheralDriver.OSPI.D2.$suggestSolution = "OSPI0_D2";
    flash1.serialFlashDriver.peripheralDriver.OSPI.D1.$suggestSolution = "OSPI0_D1";
    flash1.serialFlashDriver.peripheralDriver.OSPI.D0.$suggestSolution = "OSPI0_D0";
    debug_log.uartLog.UART.$suggestSolution = "USART0";
    debug_log.uartLog.UART.RXD.$suggestSolution = "UART0_RXD";
    debug_log.uartLog.UART.TXD.$suggestSolution = "UART0_TXD";

  • Above is my example.sycfg file 

  • gFlashNorQspiFxns

    Hi,

    The following need not be called, as the Flash NOR OSPI Apis itself takes care of the QSPI operations if any.

    The main part is the protocol set function.

    Please see the following snippet from the file flash_nor_ospi.c file.

    Regards,

    Vaibhav

  • Thank you for providing the sysconfig file.

    I am reviewing the same and then I can comment further in sometime.

    Regards,

    Vaibhav

  • Hi Manu,

    I have reviewed the sysconfig file that you shared.

    What seemed strange to me was that the read and write commands were not written.

    Please refer this guide to setup the QSPI flash: https://e2e.ti.com/support/processors-group/processors/f/processors-forum/1500011/faq-mcu-plus-sdk-am62x-how-to-interface-qspi-flash-part

    Let me know if you need further help in understanding the FAQ.

    Regards,

    Vaibhav

  • Hi Vaibhav,

    First thing am not able to see the ospi_flash_diag example in mentioned path.

    2nd thing is after building ospi_flash_diag example how to flash, do we have any default.cfg file are there to flash using python?

    I have referred the link you have mentoned. 

  • Hi Manu,

    I see that OSPI Flash Diag example in the latest SDK for AM62x.

    But it is not available for AM62x-sk-lp.

    So for this, I would like you to pick an empty example and convert it/make it function like ospi flash diag.

    Let me know if you run into any problems.

    Regards,

    Vaibhav

  • Hi Vaibhav,

    I have NCU+SD version with 10.14, I can't able to install MCU+SDK with 11 version, could you please zip and send it me the diag. it will greatfull.

    Thank you

  • Hi Manu,

    I am able to download the version 11.

    What exact problem is coming your way, please let me know, then I can go ahead and send you the OSPI flash diagnostics application.

    Regards,

    Vaibhav

  • HI Vaibhav,
    Is it possible to flash the OSPI flash diagnostics application using lauterbach? will that supports? because lauterbach supports to our customized board.

  • And also we are using Trace32 for flashing

  • Hi Manu,

    Thanks for waiting.

    Does the lauterbach has its own application/UI to flash the QSPI?

    I think, instead of this, you can try to flash via UART, and use the file for sbl uart that is: default_sbl_uart_hs_fs.cfg file

    For this your command would look like: python uart_bootloader.py -p COM<X> --cfg=PATH_TO_default_sbl_uart_hs_fs.cfg

    Inside the cfg file, you would need to give the path to the ospi flash diagnostics(which you must have ported to empty application for am62x-sk-lp example).

    Here you just replace the line 22:

    Regards,

    Vaibhav