Part Number: TDA4AL-Q1
Tool/software:
Example application on SDK 10.0 to show large byte transfer between CDD IPC(MCU1_0) and Linux (A72) using cdd_ipc_rc_linux ,rpsmg_char_simple applications on J721S2 ?

This thread has been locked.
If you have a related question, please click the "Ask a related question" button in the top right corner. The newly created question will be automatically linked to this question.
Part Number: TDA4AL-Q1
Tool/software:
Example application on SDK 10.0 to show large byte transfer between CDD IPC(MCU1_0) and Linux (A72) using cdd_ipc_rc_linux ,rpsmg_char_simple applications on J721S2 ?
git clone git://git.ti.com/rpmsg/ti-rpmsg-char.gitwe will need to prepare the SD card that will contain the Linux image. Once you have the Linux SDK downloaded, you can use the included script to prepare the SD card. The detailed steps are given here. On success, you should have the SD card prepared, which will have the root/ and the boot/ directory
we have to copy the downloaded rpmsg_char library & example to the sd card. To copy use cp ti-rpmsg-char /media/$USER/root/ command
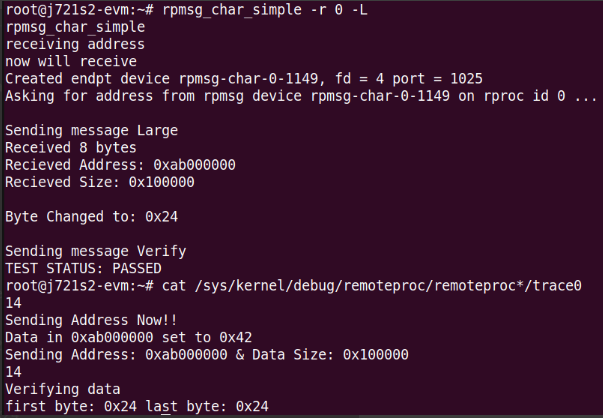
Let us start with rpmsg_char_simple and look and what modifications we made to the existing example application to do large byte transfer:
largeflag to true.
|
|
|
|
ret = send_msg(rcdev->fd, (char *)packet_buf, packet_len); |
|
|
phys_read_write() function does this. This function implements the devmem2 logic for translating physical address to virtual address using mmap() and /dev/mem.
|
|
The /dev/mem is a character device that can be used to access the main memory of the system. In the function we use the mmap() call to map /dev/mem's file descriptor to the virtual address space of the process. We map a page (4096 bytes) at a time.
So, we loop through each page mapping and unmapping every time, and in each iteration we change the contents of the memory to reflect on the remote side that we were able to access the memory.
|
|
After that we do the same for the remaining bytes if the size was not a multiple of the PAGESIZE. Note that, we can potentially map the whole size at once, instead of mapping and unmapping a page at once, but I haven't tried it yet.
phys_read_write() to rpmsg_char_get_addr(), we send another message to the remote core saying "Verify". This lets the remote core know that we have altered the data sent by the remote core and asks it to check that|
|
|
|
In the AUTOSAR side we have to modify the MPU (memory protection unit) file and in the Linux side we have to change the device tree file.
The AUTOSAR side is simple. We just add a new region at the end in the file ti-processor-sdk-rtos-j721s2-evm-10_01_00_04/mcusw/mcal_drv/mcal/examples/CddIpcRProcLinux/soc/j721s2/mcu1_0/CddIpcR5Mpu.c. We use the same address 0xAB000000, and reserve 32 MB of memory. Following snippet shows the new region:
|
|
Now let us look at what changes have we made in cdd_ipc_app_rc_linux applications. This file is at ti-processor-sdk-rtos-j721s2-evm-10_01_00_04/mcusw/mcal_drv/mcal/examples/CddIpcRProcLinux/CddIpcAppRProcLinux.c. Inside the cdd_ipc_Linux() function, we make the following changes:
|
|
|
|
https://e2e.ti.com/cfs-file/__key/communityserver-discussions-components-files/791/MCAL_5F00_CDDIPC_5F00_patch.patch
After doing the above changes mentioned in cdd_ipc_app_rc_linux
make cdd_ipc_app_rc_linux CORE=mcu1_0 BOARD=j721s2_evm SOC=j721s2 CDD_IPC_LINUX_BUILD=yes -sj
cp -r ti-processor-sdk-rtos-j721s2-evm-10_01_00_04/mcusw/binary/cdd_ipc_app_rc_linux/bin/j721s2_evm/cdd_ipc_app_rc_linux_mcu1_0_release.xer5f ti-processor-sdk-linux-adas-j721s2-evm-10_01_00_04/board-support/prebuilt-images/ti-dm/j721s2/ipc_echo_testb_mcu1_0_release_strip.xer5f
make u-boot -j
cp ti-processor-sdk-linux-adas-j721s2-evm-10_01_00_04/board-support/ti-u-boot-2025.01+git/build/a72/tispl.bin /media/$USER/bootIn the Linux side, the device tree file we have to change is in ti-processor-sdk-linux-adas-j721s2-evm-10_01_00_04/board-support/ti-linux-kernel-6.12.17+git-ti/arch/arm64/boot/dts/ti/k3-j721e-som-p0.dtsi. We have added the following new region in the reserved memory node:
|
|
https://e2e.ti.com/cfs-file/__key/communityserver-discussions-components-files/791/dts_2D00_for_2D00_large_2D00_byte_2D00_transfer.patch
To apply the changes we made to the device tree file, we will need to rebuild them again. To do so we can just build the Linux kernel using the make linux -j command in the root directory of Linux SDK.
This will generate all the required .dtb and .dtbo files necessary. We need to replace the already existing dts files with the newly built one. To do so, insert your SD card in you PC and run the following command:
|
|