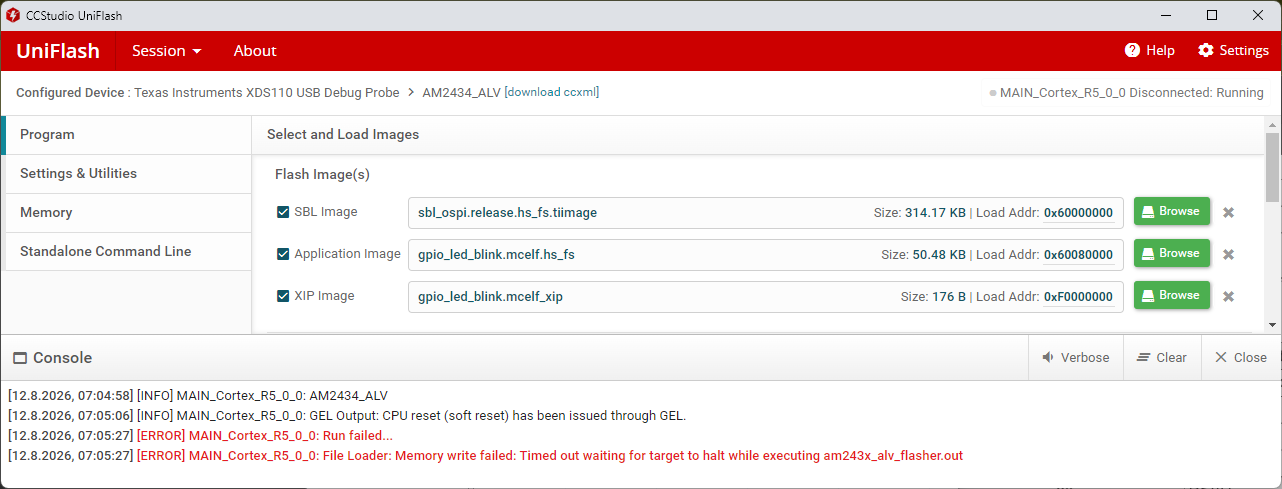
TMDS243EVM: Flash SOC Initialization Binary (SBL null)

Part Number: TMDS243EVM
Other Parts Discussed in Thread: AM2434, CCSTUDIO, UNIFLASH,

Hi, I was just following the EVM Setup and I performed Flash SOC Initialization Binary for AM243X-EVM successfully. Meaning I did:

python uart_uniflash.py -p COM<x> --cfg=sbl_prebuilt/am243x-lp/default_sbl_null.cfg

and then I saw:

  Parsing config file ...
  Parsing config file ... SUCCESS. Found 2 command(s) !

  Executing command 1 of 2 ...
  Found flash writer ... sending sbl_prebuilt/am243x-evm/sbl_uart_uniflash.release.hs_fs.tiimage
  Sent flashwriter sbl_prebuilt/am243x-evm/sbl_uart_uniflash.release.hs_fs.tiimage of size 244220 bytes in 24.84s.

  Executing command 2 of 2
  Command arguments : -—file=sbl _prebuilt/am243x-evm/sbl null.release.hs_fs.tiimage --operation=flash --flash-offset=0x0
  Sent sbl_prebuilt/am243x-evm/sbl_null.release.hs_fs.tiimage of size 231036 bytes in 24.06s.

  [STATUS] SUCCESS

  All commands from config file are executed !

But after that, when I change to OSPI as described in the next steps, I didn't see the Starting NULL Bootloader ... message via UART. I restart the board and even the computer, but I had no success.

I am not able to connect to debug/flash any program via CCS. I always get the following error:

MAIN_Cortex_R5_0_0: AM2434_ALV
MAIN_Cortex_R5_0_0: Trouble Writing Memory Block at 0x0 on Page 0 of Length 0x40: (Error -1065 @ 0x40) Unable to access device memory. Verify that the memory address is in valid memory. If error persists, confirm configuration, power-cycle board, and/or try more reliable JTAG settings (e.g. lower TCLK). (Emulation package 20.5.0.3920) 
MAIN_Cortex_R5_0_0: File Loader: Verification failed: Target failed to write 0x00000000
MAIN_Cortex_R5_0_0: GEL: File: A:\ccstudio_workspaces\nomal_workspace\gpio_led_blink\Release\gpio_led_blink.out: Load failed.

And with UniFlash I can read the memory
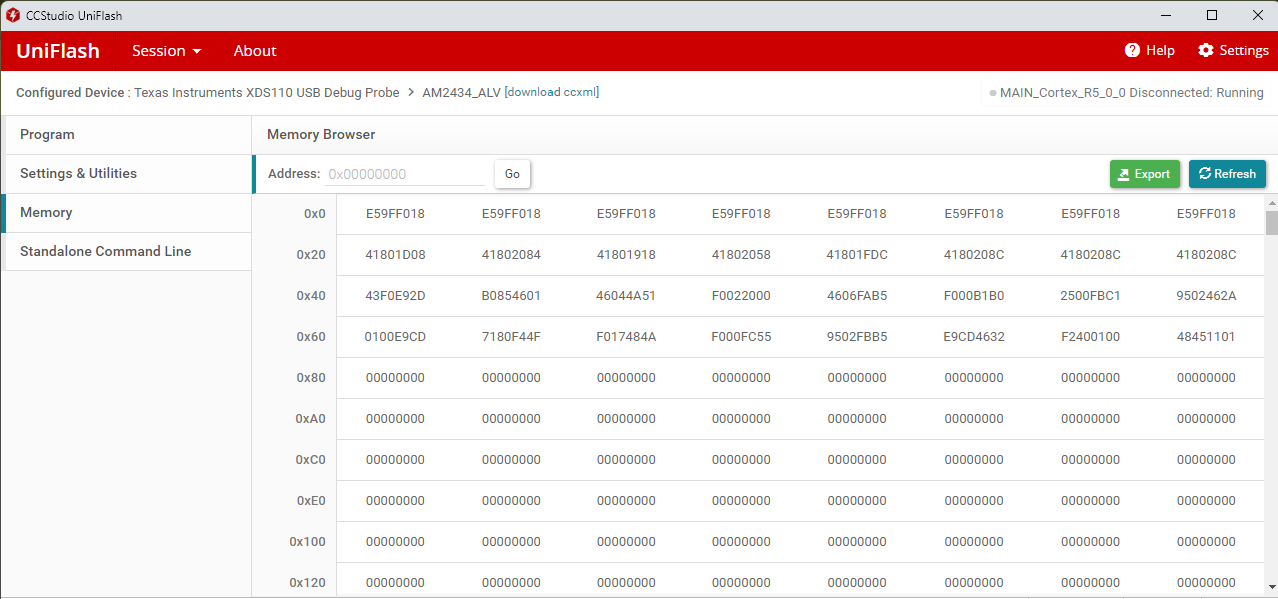
image.png

But I can not flash any image

image.png

I tried to repeat the Flash SOC Initialization Binary with the sbl_null configuration and also with the sbl_ospi. The problem persists.

  • Hi Alan Gomez,

    But after that, when I change to OSPI as described in the next steps, I didn't see the Starting NULL Bootloader ... message via UART. I restart the board and even the computer, but I had no success.

    For better clarity, could you let me know which version of the MCU+ SDK you used for flashing?

    Thanks,

    JOMY

  • I'm using the version 12_00_00_27, it was installed via CCS 20.5.1.12

  • Could you please verify the flashing process using the older MCU+ SDK version.
    12_00_00_27  this version is not listed on the MCU+ SDK AM243x download page.

    https://www.ti.com/tool/download/MCU-PLUS-SDK-AM243X

  • I just did it with the version 12_00_00_26 and the result is the same:

    • I saw the same succes message
    • After reboot I see this symbol in the Serial Console: ÿ
    • After some seconds it switches again to UART boot mode because I start seeing: 02000000011a0000616d3634780000000000000048534653000002000000020002a6000000000000b018658ad99dc903c8c9bfb27b12751099920a042ad1dfea7b7ba57369f15546de285edde6a7b39a8bdc40a27b237f8fb1e57f245e80b929c1e28b024aa2ecc6ad0bc40b0000000000000000000000000000000000000000000000000000000000000000000000000000000000000000000000000000000000000000000000001536efca3cb1d101e082fa8c4802705065fcd799ec218efc8a9c68e3abd61aa6C
    • The memory reading via UniFlash shows exactly the same results
    • The other errors stay the same
  • It switches to UART boot mode because I select it as Backup Boot Mode to see if there was an error with the Primary Boot Media

  • python uart_uniflash.py -p COM<x> --cfg=sbl_prebuilt/am243x-lp/default_sbl_null.cfg

    Could you please clarify whether you used the am243x-lp or am243x-evm directory when executing this command?
    Please execute this .cfg file and send me the logs for review
    --flash-writer=sbl_prebuilt/am243x-evm/sbl_uart_uniflash.release.hs_fs.tiimage
    
    # Erase 512KB starting at offset 0x0 (covers the SBL region with margin).
    # ROM expects the bootloader at offset 0x0.
    --operation=erase --flash-offset=0x0 --erase-size=0x80000
    
    # Write SBL_NULL fresh onto the just-erased region
    --file=sbl_prebuilt/am243x-evm/sbl_null.release.hs_fs.tiimage --operation=flash --flash-offset=0x0
    
    # Read back what is actually on OSPI and byte-compare it against this same
    # local file
    --file=sbl_prebuilt/am243x-evm/sbl_null.release.hs_fs.tiimage --operation=flashverify --flash-offset=0x0
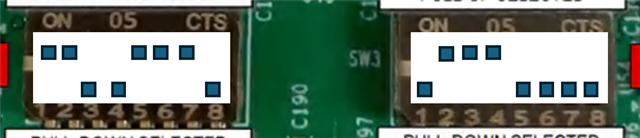
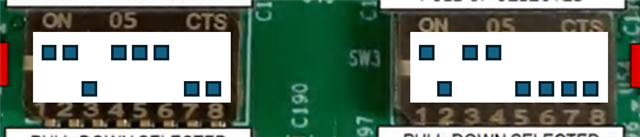
    share the boot-switch image, or the boot configuration bit settings you used during the flashing process and at boot time?
    Thanks,
    JOMY
  • I just verified, I was using --cfg=sbl_prebuilt/am243x-evm/default_sbl_null.cfg because I have that evaluation board. I wrote that in the question cause I copy pasted it from the documentation.

    Logs of the provided configuration:

    $ py uart_uniflash.py -p COM7 --cfg=sbl_prebuilt/am243x-evm/ti_special.cfg
    
    Parsing config file ...
    Parsing config file ... SUCCESS. Found 4 command(s) !!!
    
    Executing command 1 of 4 ...
    Found flash writer ... sending sbl_prebuilt/am243x-evm/sbl_uart_uniflash.release.hs_fs.tiimage
    
    Sent flashwriter sbl_prebuilt/am243x-evm/sbl_uart_uniflash.release.hs_fs.tiimage of size 333309 bytes in 33.93s.
    
    Executing command 2 of 4 ...
    Command arguments : --operation=erase --flash-offset=0x0 --erase-size=0x80000
    Sent flash erase command.
    [STATUS] SUCCESS !!!
    
    Executing command 3 of 4 ...
    Command arguments : --file=sbl_prebuilt/am243x-evm/sbl_null.release.hs_fs.tiimage --operation=flash --flash-offset=0x0
    Sent sbl_prebuilt/am243x-evm/sbl_null.release.hs_fs.tiimage of size 293005 bytes in 30.43s.
    [STATUS] SUCCESS !!!
    
    Executing command 4 of 4 ...
    Command arguments : --file=sbl_prebuilt/am243x-evm/sbl_null.release.hs_fs.tiimage --operation=flashverify --flash-offset=0x0
    Sent sbl_prebuilt/am243x-evm/sbl_null.release.hs_fs.tiimage of size 293005 bytes in 30.41s.
    [STATUS] SUCCESS !!!
    
    All commands from config file are executed !!!

    boot switch configuration during the flashing process:

    at the boot time: with UART as a Backup Boot Mode. Results without backup boot mode are the same

    I still have the same problems, so far no  Starting NULL Bootloader ... message on Serial Console

  • It seems everything looks fine. I tried it on my side with the AM243x, and it's working as expected. Were there any board rework modifications on the EVM setup, or were any SDK-related changes made?
  • There were no modifications made, just as I receive the board is how I've been using it. Teh ASSY# is PROC101D, SL# is 05251010051, and the OPN# is TMDS243EVM. I've been using the board only with the sofware provided by the SDK provided by the CCS. 

    Just after running py uart_uniflash.py -p COM7 --cfg=sbl_prebuilt/am243x-evm/ti_special.cfg I can see different values on the memory:

    But when I turn off the board, change the boot mode and turn on the board again, the memory always shows what I posted in the question. I was also able to flah an example code by using py uart_bootloader.py -p COM7 --cfg=sbl_prebuilt/am243x-evm/default_sbl_uart.cfg. Does the ROM fails to find the SBL?

    Is there any other suggestion about what can I try?

  • Frist thing I did:

    I can't connect load sciclient_ccs_init.release.out as described in the second link. What I did before that to be able to load it was to use py uart_bootloader.py -p COM7 --cfg=sbl_prebuilt/am243x-evm/default_sbl_uart.cfg to load the empty example from TI and only after that I'm able to connect to load the file. However, when I run it as described in the second link, there is no output in the CIO console. And after I restarted the device, the problem was still the same.

    Second thing I tried:

    I then tried with the frist link by compiling the code and loading the .out file. Again, this is only possible if I first load an empty project via UART. The code was running and I was able to interact as described in the documentation and everything was performed successfully. However, after I restarted the evaluation board, the problem was still the same.

    Third thing I tried:

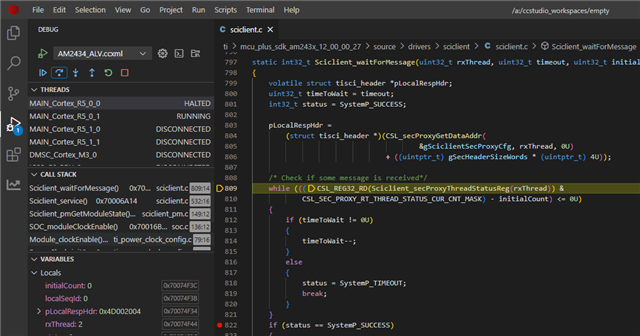
    I then did the same thing as before, but with sbl_null. The code always get stucked here:


    Main points:

    1. I can connect to all cores and load/debug code via CCS, if I load an empty project before via UART with py uart_bootloader.py -p COM7 --cfg=sbl_prebuilt/am243x-evm/default_sbl_uart.cfg. If I don't do that I can only connect to core r5_0_0 and r5_0_1, and for the rest of the cores I get this messages:
      MAIN_Cortex_R5_1_0: Error connecting to the target: (Error -1170 @ 0x0) Unable to access the DAP. Reset the device, and retry the operation. If error persists, confirm configuration, power-cycle the board, and/or try more reliable JTAG settings (e.g. lower TCLK). (Emulation package 20.5.0.3920)

      MAIN_Cortex_R5_1_1: Error connecting to the target: (Error -1170 @ 0x0) Unable to access the DAP. Reset the device, and retry the operation. If error persists, confirm configuration, power-cycle the board, and/or try more reliable JTAG settings (e.g. lower TCLK). (Emulation package 20.5.0.3920)

      BLAZAR_Cortex_M4F_0: Error connecting to the target: (Error -1274 @ 0x0) Error encountered during connect sequence. The specific reason is unknown but may be the result of trying to access a Core or logic that is inaccessible due to a lack of Power, Clocks, or Authentication (i.e. Security is preventing). If blocked by security, and if supported, access may be allowed after following the Authentication process. (Emulation package 20.5.0.3920)
    2. If I don't pre load the empty project I can still load/debug sbl_null.out and sbl_jtag_unifalsh.out, but I can't load any other .out file, not even sciclient_ccs_init.release.out. One interesting point for me is that in the .map of those to file it says ENTRY POINT SYMBOL: "_vectors_sbl"  address: 70000000, while that adress is 00000000 in all other examples

    3. Using sbl_jtag_unifalsh.out is only possible if I preload the empty example via UART. Otherwise I can load it, but it get stucked here
  • Maybe another useful information is that running sciclient_get_version outputs this:
    DMSC Firmware Version 12.0.2--v12.00.02 (Clever Cat)
    Firmware revision 0xc
    ABI revision 4.0
    [SCICLIENT] CPU clock frequency = 800000000 Hz
    All tests have passed!!

  • Hi ,

    Can you please confirm whether this boot issue is reproducible on another board as well? I tested the same UART UniFlash procedure on my side using the TMDS243EVM, and it is working perfectly without any boot issues.

    Thanks,

    JOMY

  • Hi Jomy, I have another board, but that will be my last option, because is the only board that I can use as expected. I would prefer to explore other options on this board. Furthermore, before loading the sbl_null it was working and giving this output via UART:

    Starting NULL Bootloader ...
    
    DMSC Firmware Version 8.4.7--v08.04.07 (Jolly Jellyfi
    DMSC Firmware revision 0x8
    DMSC ABI revision 3.1
    
    
    INFO: Bootloader_runCpu:155: CPU r5f1-0 is initialized to 800000000 Hz !!!
    INFO: Bootloader_runCpu:155: CPU r5f1-1 is initialized to 800000000 Hz !!!
    INFO: Bootloader_runCpu:155: CPU m4f0-0 is initialized to 400000000 Hz !!!
    INFO: Bootloader_loadSelfCpu:207: CPU r5f0-0 is initialized to 800000000 Hz !!!
    INFO: Bootloader_loadSelfCpu:207: CPU r5f0-1 is initialized to 800000000 Hz !!!
    INFO: Bootloader_runSelfCpu:217: All done, reseting self …

    And as I commented before, if I run the sciclient_get_version, I get:

    DMSC Firmware Version 12.0.2--v12.00.02 (Clever Cat)
    Firmware revision 0xc
    ABI revision 4.0
    [SCICLIENT] CPU clock frequency = 800000000 Hz
    All tests have passed!!

    So I guess this changed after I use sciclient_ccs_init. However, is not the same version described in the most recent documentation.

    I was reading more about the bootloader here.

    1. Is the problem maybe related to the sysfw (the sbl_null.out stops in Bootloader_socWaitForFWBoot) and the boardcfg? any way I can update/correct those? 
    2. Do you also have the TMDS243EVM Revision D?
    3. Can you provide the image you are using so I can test it?
  • But after that, when I change to OSPI as described in the next steps, I didn't see the Starting NULL Bootloader ... message via UART. I restart the board and even the computer, but I had no success.

    1. I need some clarification. The issue you were seeing initially was that the board was unable to boot from OSPI after flashing SBL Null, correct? If so, is the board working properly now?

    2. Are you currently reporting an issue with SBL JTAG flashing, or is the problem related to something else? Could you please clarify?

  • 1. The board is still not booting in OSPI mode after flashing SBL Null as described in the documentation Flash SOC Initialization Binary. Even after I tried the .cfg you send me. Why I know this doesn't work: the board doesn't even output the initial message Starting NULL Bootloader ... 

    Maybe there is misunderstanding becuase I said:

    Furthermore, before loading the sbl_null it was working and giving this output via UART

    But again, this was befofore I reported the issue. I saved that output becaused I was expecting a similar one after updating the SBL Null.

    2. I tried this and that's why I also detected that the SBL JTAG flashing is not working either.

    So, both issues remain unsolved.

  • There are good and bad news. What I have just done:

    1. UART boot mode
    2. Load the sbl null with the .cfg you send me
    3. Connect to the target with CCS using a generic .ccxml file and connect to core r5_0_0 and core r5_0_1, I was not able to connect to the other cores
    4. Turn off the board
    5. Change to OSPI (xSPI according to the Technical Reference Manual)
    6. Turn on the board

    The only difference I can spot between this attempt and the other many times I tried to load the SBL Null is step 3. However, in the serial console I see:

    Starting NULL Bootloader ... 
    
    DMSC Firmware Version 12.0.2--v12.00.02 (Clever Cat)
    DMSC Firmware revision 0xc
    DMSC ABI revision 4.0
    
    INFO: Bootloader_runCpu:307: CPU r5f1-0  is initialized to 800000000 Hz !!!
    INFO: Bootloader_runCpu:307: CPU r5f1-1 is initialized to 800000000 Hz !!!
    INFO: Bootloader_runCpu:307: CPU m4f0-0 is initialized to 400000000 Hz !!!
    INFO: Bootloader_runSelfCpu:318: All done, reseting self ...

    Where is CPU r5f0-0 and r5f0-1?

  • Where is CPU r5f0-0 and r5f0-1?

    R5F0-0 and R5F0-1 are the cores running the SBL itself, so they print "resetting self" instead of "CPU initialized". The other three cores display the "CPU initialized" message because they are booted by the SBL