This thread has been locked.

If you have a related question, please click the "Ask a related question" button in the top right corner. The newly created question will be automatically linked to this question.

Waiting for SFT on the OMAP-L138

Other Parts Discussed in Thread: OMAP-L138, OMAPL138, OMAP-L132

I tried to download the pre-complied uart code in C6748 LCDK kit, my serial port works ok, but it stops at "Waiting for SFT on the OMAP-L138

  • By trying command  "sfh_OMAP-L138.exe -flash  -targetType C6748_LCDK -FlashType NAND boot.ais uartEcho.bin -p COM3 -baud 115200" again and again, I am able to download the image sucessfuly.. But after power reset  When I run it, its not wok (also change the position of SW1, according to NAND FLASH boot mode).

    Similarly I also try the GPIOLED code (i.e. blinking led). but it also not work.

    regards

    Sachin Arora

  • Hi,

     Take a look at the following query link which explains your error scenario. http://e2e.ti.com/support/dsp/tms320c6000_high_performance_dsps/f/115/p/43045/150602.aspx#150602

    If you have further queries ensure whether you use the correct .bin and ais files. Also take a look at the following wiki: http://processors.wiki.ti.com/index.php/Serial_Boot_and_Flash_Loading_Utility_for_OMAP-L138


    Thanks

     Iyshwarya

    If this answers your question, please click the Verify Answer button below. If not, please reply back with more information

  • Iyshwarya,

    Thanks for the links.

    Sachin and I have OMAPL138 LCDK which only has NAND and no SPI/NOR memory. This board doesn't have a serial port either and we have to use a USB-to-serial convertor (I have configured for COM2). We want to burn a ARM/DSP/ARM+DSP image to the NAND and boot from there. We are not using Linux/uBoot and are using Starterware examples.

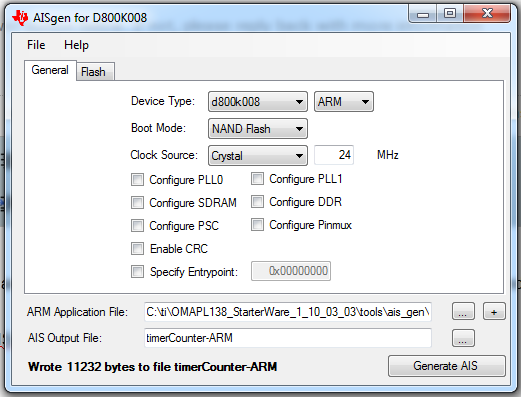
    I tried converting a ARM .out file into AIS format using the AISgen utility, see snapshot below:

    (Flash data width is 8 bits by default which I have not changed)

    After this, I used the below command to flash the image on NAND:

    sfh_OMAP-L138.exe -flash_noubl -flashType NAND -p COM2 C:\ti\OMAPL138_StarterWare_1_10_03_03\tools\ais_gen\timerCounter-ARM

    Output of the command is:

    -----------------------------------------------------
       TI Serial Flasher Host Program for OMAP-L138
       (C) 2012, Texas Instruments, Inc.
       Ver. 1.67
    -----------------------------------------------------


          [TYPE] Single boot image
    [BOOT IMAGE] C:\ti\OMAPL138_StarterWare_1_10_03_03\tools\ais_gen\timerCounter-ARM
        [TARGET] OMAPL138
        [DEVICE] NAND
        [NAND Block] 1

    Attempting to connect to device COM2...
    Press any key to end this program at any time.

    (AIS Parse): Read magic word 0x41504954.
    (AIS Parse): Waiting for BOOTME... (power on or reset target now)
    (AIS Parse): BOOTME received!
    (AIS Parse): Performing Start-Word Sync...
    (AIS Parse): Performing Ping Opcode Sync...
    (AIS Parse): Processing command 0: 0x58535901.
    (AIS Parse): Performing Opcode Sync...
    (AIS Parse): Loading section...
    (AIS Parse): Loaded 14372-Byte section to address 0x80000000.
    (AIS Parse): Processing command 1: 0x58535901.
    (AIS Parse): Performing Opcode Sync...
    (AIS Parse): Loading section...
    (AIS Parse): Loaded 1320-Byte section to address 0x80003824.
    (AIS Parse): Processing command 2: 0x58535906.
    (AIS Parse): Performing Opcode Sync...
    (AIS Parse): Performing jump and close...
    (AIS Parse): AIS complete. Jump to address 0x80000000.
    (AIS Parse): Waiting for DONE...
    (AIS Parse): Boot completed successfully.

    Waiting for SFT on the OMAP-L138...

    It didn't go after this. I tried multiple times but same result. After that, I used the Uarthost utility:

    Output of this is:

    (File IO): Read 11232 bytes from file C:\ti\OMAPL138_StarterWare_1_10_03_03\tools\ais_gen\timerCounter-ARM.
    (Serial Port): Opening COM2 at 115200 baud...
    (AIS Parse): Read magic word 0x41504954.
    (AIS Parse): Waiting for BOOTME... (power on or reset target now)
    (AIS Parse): BOOTME received!
    (AIS Parse): Performing Start-Word Sync...
    (AIS Parse): Performing Ping Opcode Sync...
    (AIS Parse): Processing command 0: 0x5853590D.
    (AIS Parse): Performing Opcode Sync...
    (AIS Parse): Executing function...
    (AIS Parse): Processing command 1: 0x58535901.
    (AIS Parse): Performing Opcode Sync...
    (AIS Parse): Loading section...
    (AIS Parse): Loaded 156-Byte section to address 0xC1080000.
    (AIS Parse): Processing command 2: 0x58535901.
    (AIS Parse): Performing Opcode Sync...
    (AIS Parse): Loading section...
    (AIS Parse): Loaded 10844-Byte section to address 0xC108009C.
    (AIS Parse): Processing command 3: 0x58535901.
    (AIS Parse): Performing Opcode Sync...
    (AIS Parse): Loading section...
    (AIS Parse): Loaded 80-Byte section to address 0xC1082C8C.
    (AIS Parse): Processing command 4: 0x58535901.
    (AIS Parse): Performing Opcode Sync...
    (AIS Parse): Loading section...
    (AIS Parse): Loaded 64-Byte section to address 0xC1082CF0.
    (AIS Parse): Processing command 5: 0x58535906.
    (AIS Parse): Performing Opcode Sync...
    (AIS Parse): Performing jump and close...
    (AIS Parse): AIS complete. Jump to address 0xC1080000.
    (AIS Parse): Waiting for DONE...
    (AIS Parse): Boot completed successfully.
    (Serial Port): Closing COM2.

    The image got written successfully (I believe so) but when I changed the switch settings from UART boot (SW1: 01010000) to NAND boot (SW1: 11100000), it didn't show anything on the hyper terminal.

    Can you help? We are stuck with this issue for quite some time now and not able to find the right steps specifically for LCDK.

    Thanks.

  • Hi,


                Kindly check the command you are using for sfh as the targettype has not been given and the utility is using the default targettype as OMAPL138 whereas we need to give the targetType as OMAPL138_LCDK.


    You can use the following command to do so


    sfh_OMAP-L138.exe -targettype OMAPL138_LCDK -flashtype NAND -p COMx –erase


    sfh_OMAP-L138.exe -targettype OMAPL138_LCDK -flashtype NAND -p COMx -flash_noubl ais_image.bin


    cheers

    Iyshwarya


    If this answers your question, please click the Verify Answer button below. If not, please reply back with more information


  • Iyshwarya,

    I used the aisgen config file for this LCDK mentioned in the user guide link mentioned below and after that I was able to flash the binary successfully. Somehow I missed using the config file as it was not on the main LCDK link.

    http://processors.wiki.ti.com/index.php/LCDK_User_Guide#NAND_Flashing

    Thanks for your support; if I need anything further, I would contact you.

  • Anuj, Iyshwarya,

    According to above method, I tried to boot C6748 LCDK DSP from NAND but it's not work.

    So, you please check on dsp part of OMAP-L138 not only on arm part of OMAP-L138 .

    regards

    Sachin Arora

  • Sachin,

    I followed the steps mentioned in the below wiki:

    http://processors.wiki.ti.com/index.php/Boot_Images_for_OMAP-L138#Booting_DSP_Binaries

    As per this, ARM user boot loader (UBL) will run first and is required to wake up the DSP, which will begin execution of the DSP application. The ARM and DSP programs are combined into a single AIS image which can be flashed and booted directly.

    I used the OMAPL138-DSP-LED-ARM.out as ARM binary which is included the package mentioned in the above wiki. I used the C6748 LCDK RTC starterware application with the linker command file "linker_dsp.cmd" to make sure the sections are getting properly placed and are not overlapping. I then combined them in a single .bin file as mentioned in the wiki and flashed the .bin file on NAND.

    It worked fine for me, see the below snapshot:

    I have also attached all the binaries & linker command file for your reference. You can follow the steps mentioned in the wiki for C6748 LCDK and see whether things work for you or not.

    5466.LCDK.zip

  • I try with two different .cfg & use gpioled. out from "C:\ti\C6748_StarterWare_1_20_03_03\binary\c674x\cgt_ccs\c6748\lcdkC6748\gpio\Debug" and make gpioled.bin from AIS tool with below sanp shoot use the command "sfh_OMAP-L138.exe -targettype C6748_LCDK -flashtype NAND -p COM3 -flash_noubl gpioLed.bin" for download. Then I change the sw settings to 0111 but its not work.

    Please suggest for that.

    0081.LCDK_AISGen_Config.cfg

    3125.C6748-LED-NAND-SPI-UART.cfg

  • Sachin,


                I checked the booting part of C6748 LCDK from NAND boot as per the following wiki Link.

    http://processors.wiki.ti.com/index.php/LCDK_User_Guide#NAND_Flashing


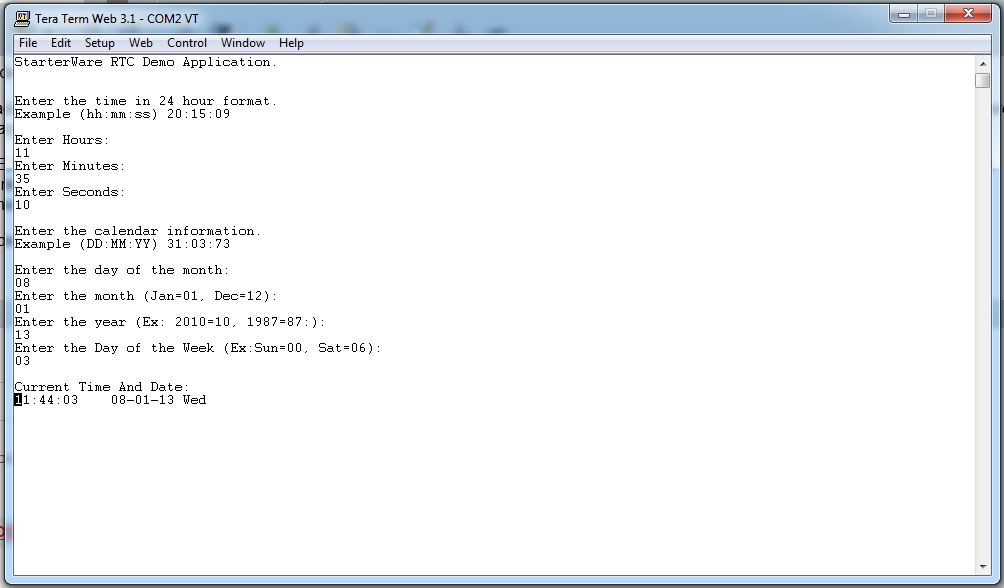
    I tested the C6748 Starterware Timer example to do this.


    The steps which I followed are as follows.

    1.    I used the timer example from the C6748 starterware: C6748_StarterWare_1_20_03_03\build\c674x\cgt_ccs\c6748\lcdkC6748\timer.Debugged this example in CCS and obtained the timecounter.out file.

     2.    Then downloaded the LCDK AISGen config file from the wiki Link mentioned above. Loaded this config file to the AISGen utility and gave the timecounter.out as the inputfile to the utility and created the timecounter_C6748lcdk_ais.bin.

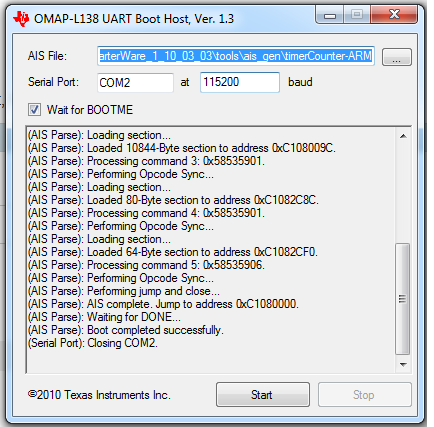
     3.     Changed the board switch settings to UART boot mode [0101] and using the serial flasher utility I flashed the images to the board.

                              Use C6748_StarterWare_1_20_03_03\tools\flash_writer

                                            sfh_OMAP-L138.exe -targetType C6748_LCDK -flashtype NAND -p COM3 –erase

                                             sfh_OMAP-L138.exe -targetType C6748_LCDK -flashtype NAND -p COM3 -flash_noubl timecounter_C6748lcdk_ais.bin

     4.      Change the switch settings to NAND bootmode[0111] and poweron the board.


     I am also attaching all the binaries and config files for your reference. You can follow the steps as per the LCDK user guide wiki page and check whether its working for you.


    Regards

    Iyshwarya


    If this answers your question, please click the Verify Answer button below. If not, please reply back with more information


    5808.time_counter_C6748lcdk.zip

  • Iyshwarya,

    I use yours  time_counter_C6748lcdk_ais.bin file use the command

    sfh_OMAP-L138.exe -targettype C6748_LCDK -flashtype NAND -p COM3 -erase

    sfh_OMAP-L138.exe -targettype C6748_LCDK -flashtype NAND -p COM3 -flash_noubl time_counter_C6748lcdk_ais.bin  via command promt . But when I change the switch setting 1010 to 0111 for booting from NAND . Then nothing happens.

    I see from this code in starting it send string "Tencounter: 9", -1". but in my case nothing happen.

    So, Please suggest for that.

    regards

    Sachin Arora

  • Sachin,

    You are not using the right switch settings, please correct that and try again.

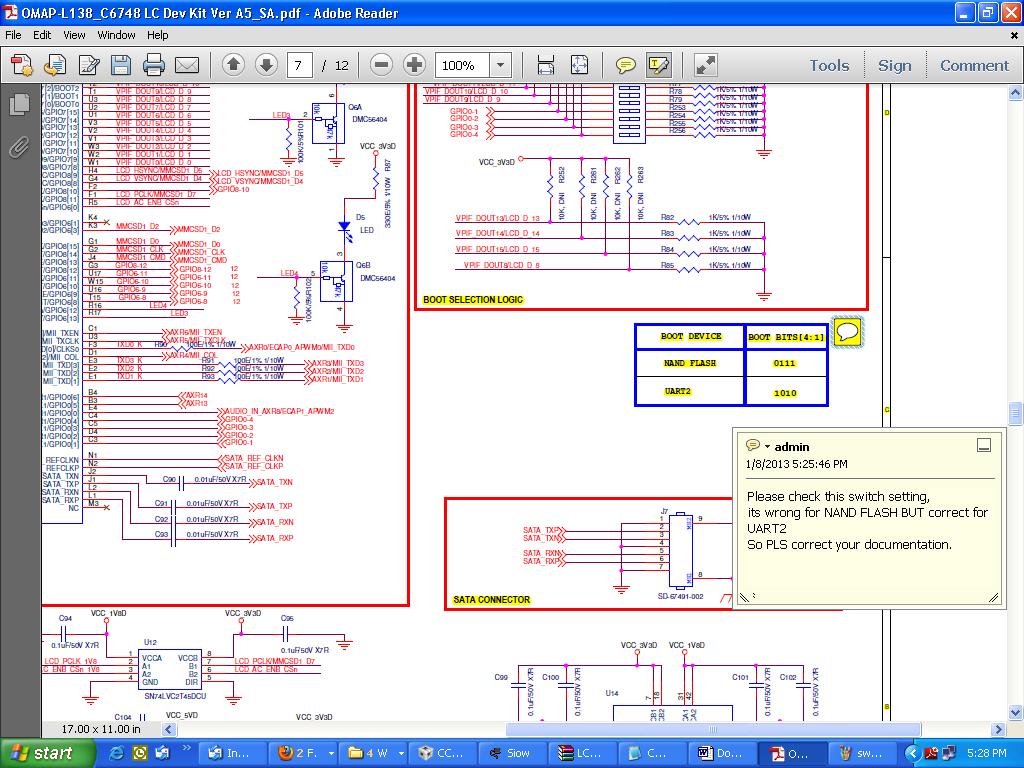
  •  I saw the switch settings from your schmatics. Its correct for uart2 but wrong for NAND FLASH. So, Please correct this. Due to this my lots of time waste.

    regards

    Sachin Arora

  • Hi Sachin,

                 Kindly note that in the schematics of LCDK , the table represents the BIT value and you have mis interpreted it with the switch settings.

    The schematics doesn’t represent the switch settings and the switch settings is as per the LCDK user guide wiki link.

    Note:

    For further clarifications, Please refer the SPRAB41D OMAP-L132/L138 Boot loader Doc (sprab41d.pdf) for Boot mode Switch Settings on page no 29


    Regards

    Iyshwarya


    If this answers your question, please click the Verify Answer button below. If not, please reply back with more information


  • Hello Iyshwarya, Anuj,

    I test usb_host_msc example of C6748 lcdk, it's work fine while debugging with xds100v2 emulator.

    But when I download .bin ( making from AISgen tool) it's not work.

    For your reference I also attach the .cfg file of AISgen.

    Please suggest some solution.1200.LCDK_AISGen_Config.cfg

    regards

    Sachin Arora

  • Sachin,

    When you run the Starterware example in the CCS environment, your device is initialized by the GEL file. When you do the same while creating the boot image the device configuration is done by the AIS configuration you provide. Can confirm that your AIS configurations match the GEL file settings. There are few other tips to debug boot:

    1. If the example doesn`t boot as expected connect to the device using emulator, remove the GEL file for the DSP from the target configurations before you connect as the device is already initialized from the AIS settings. Instead of load programs, go to Run->load sysmbols and select the out file you used to create the boot image. Once you load the symbols you can see where the code is hung.3. Go to View->Register settings and check if system clocks, PINMUX, PSC and USB Register settings are as required by the app.

    2. Use Debug GEL file to run diagnostics on the boot process. 

    http://processors.wiki.ti.com/index.php/OMAP-L1x_Debug_Gel_Files

    Regards,

    Rahul