This thread has been locked.

If you have a related question, please click the "Ask a related question" button in the top right corner. The newly created question will be automatically linked to this question.

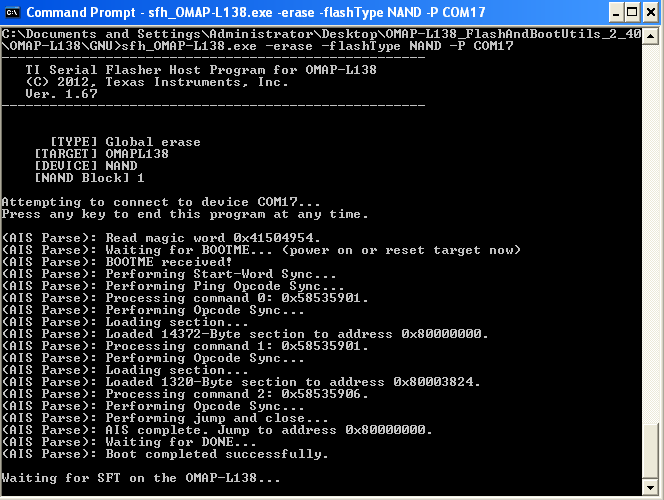
Connection Error while erasing NAND using Serial Boot

Other Parts Discussed in Thread: OMAP-L138, OMAPL138, AM1808, AM1810

How can i change the settings of Serial Boot tool for my custom board.
The board connect on COM17 and has a NAND Flash.

  • Hi,

    The sfh_OMAP-L138.exe can take following options,

    -targetType         : Specifies exact target type within OMAP-L138 family (default OMAP-L138)
    -flashType          : Specifies exact flash type (default SPI_MEM)
    -p <COM PORT NAME>  : Allows specifying com port other than default 'COM1' or '/dev/ttyS0'.
    -h                  : Show help text.
    -v                  : See verbose output from target device
    -baud <BAUD RATE>   : Allows specifying baud rate other than default (115200)
    -APPStartAddr       : Changes entry point of application (default 0xC1080000)
    -APPLoadAddr        : Changes load address of application (default 0xC1080000)
    -APPFlashBlock      : Changes the block to flash the image into (only for no_ubl mode)

    So in your case to change the COM port use -p option (-p COM17)

    Thanks,
    --Prabhakar Lad
  • so should i use,

    •  sfh_OMAP-L138.exe -p COM17 (for changing port)
    •  sfh_OMAP-L138.exe -flashType NAND_MEM (for changing MEM type) 
  • Hi,

    I am not sure which version of flasher you are using if you can just type 'sfh_OMAP-L138.exe -h' or 'sfh_OMAP-L138.exe' on the command prompt it will list out all the options If you can post the output of this command I can confirm you.


    Thanks,

    --Prabhakar Lad

  • Same Error. I guess i am not writing the correct command

  • Hi,

    1: Can you post what command you typed ?

    2; Can you post the output of by only jsut typing 'sfh_OMAP-L138.exe' ?

    Thanks,

    --Prabhakar Lad

    • sfh_OMAP-L138.exe -p COM17
    • sfh_OMAP-L138.exe -flashtype NAND

  • Hi,

    You need to give following command (Assuming its on COM port 17)'

    sfh_OMAP-L138.exe -erase -flashType NAND -P COM17

    Note:- you need to change the target type also if it is different from the  default from default one ie (OMAPL138)


    Thanks,

    --Prabhakar Lad

  • Thanks for your help, i need to ask you one more thing. How can i flash AIS image using Serial Boot ? what is the command for that ?

  • Boot is completed but it keep on waiting for SFT on OMAPL138?

  • Hi,

    To flash the ais image you need to give following command,

    sfh_OMAP-L138.exe  -flash_noubl <PATH TO AIS>/u-boot.ais -p COM17

    So in the above command the u-boot.ais is flashed to SPI and target is OMAPL138

    So If you want to do it for say NAND it would be,

    sfh_OMAP-L138.exe  -flashType NAND -flash_noubl <PATH TO AIS>/u-boot.ais -p COM17

    Note:- The AIS images needs to be built appropriately for NAND & SPI.


    Thanks,

    --Prabhakar Lad

  • Hi,

    This happens some times..  to be just sure check your switch settings and retry the same command.

    Thanks,

    --Prabhakar Lad

  • I have just checked the switches, they are OK. But the Serial Boot is still waiting for SFT. If i press any key, the cmd just gives an exception.

    same case if i try to write

    sfh_OMAP-L138.exe  -flashType NAND -flash_noubl ../../../arm.ais -p COM17

    it waits for SFT.

    Thanks for your support

  • Hi Taqi,

    First-of-all, If it is a custom board, the sfh utility needs to be modified as per the TI WIKI link given below.

    http://processors.wiki.ti.com/index.php/Serial_Boot_and_Flash_Loading_Utility_for_OMAP-L138#Modifications_for_Custom_Boards


    Regards,

    Shankari

    -------------------------------------------------------------------------------------------------------

    Please click the Verify Answer button on this post if it answers your question.
    --------------------------------------------------------------------------------------------------------

  • Hi,

    1: What is your target type ?

    2: What are the switch settings for NAND ?

    3: The NAND flash for OMAP-L138 is on daughter card have you connected it ?

    Thanks,

    --Prabhakar Lad

  • 1: What is your target type ?

    Ans. AM1808

    2: What are the switch settings for NAND ?

    Ans. xxx10100

    3: The NAND flash for OMAP-L138 is on daughter card have you connected it ?

    Ans. I don't understand this question, Sorry.

  • Hi,

    If your target type is AM1808 shouldn’t your command be the following ?

    sfh_OMAP-L138.exe -targetType AM1808 -erase -flashType NAND -P COM17


    Let me know if the above works.

    Thanks,

    --Prabhakar Lad


  • Its still waiting for SFT. The ARM Processor AM1808 is connected through a custom board. But i don't know how to modify the header files.

    • DDR Configuration
      • OMAP-L138/Common/src/device.c: Modify the parameters passed to the function DEVICE_ExternalMemInit to match the DDR timing requirements for the custom board
    • UART Settings
      • OMAP-L138/Common/include/device_uart.h: Modify the #define DEVICE_UART_PERIPHNUM to set which UART is connected to the host PC.
      • Note that flow control is not used, so only the RX and TX lines need to be connected for boot and flashing purposes.
    • NAND Settings
      • OMAP-L138/Common/include/device_async_mem.h: Modify the #define DEVICE_ASYNC_MEM_NANDBOOT_BUSWIDTH to match the bus width of your NAND
    • PLL Settings (for non 24 MHz input clocks)
      • OMAP-L138/Common/src/device.c: Modify the parameters passed into the function DEVICE_PLL0Init and DEVICE_PLL1Init to set the proper PLL output frequencies
    • OMAP-L138/Common/src/device_uart.c: Modify the 'divider' field in DEVICE_UART_config to achieve 115200 baud rate


    Can you help me with changing the header files ?

  • Hi,

    What is your NAND bus width can you appropriately change it and rebuild the flasher tool and try ?

    Thanks,

    --Prabhakar Lad

    • DDR Configuration
      • OMAP-L138/Common/src/device.c: Modify the parameters passed to the function DEVICE_ExternalMemInit to match the DDR timing requirements for the custom board
    • UART Settings UART 2 is required
      • OMAP-L138/Common/include/device_uart.h: Modify the #define DEVICE_UART_PERIPHNUM to set which UART is connected to the host PC.
      • Note that flow control is not used, so only the RX and TX lines need to be connected for boot and flashing purposes.
    • NAND Settings 8bit width
      • OMAP-L138/Common/include/device_async_mem.h: Modify the #define DEVICE_ASYNC_MEM_NANDBOOT_BUSWIDTH to match the bus width of your NAND
    • PLL Settings: 24HZ frequency

    For DDR Configuration

    1
    2
    3
    4
    5
    6
    7
    8
    9
    10
    11
    12
    #if defined(AM1810)
      // Timings for DDR2 at 150 MHz
      status |= DEVICE_ExternalMemInit(0x00000047, 0x08934832, 0x204929C9, 0x0C12C722, 0x00000406, 0x00000000);
        #elif defined(OMAPL138_LCDK)
      // Timings for DDR2 at 150 MHz
      status |= DEVICE_ExternalMemInit(0x000000C5, 0x00134832, 0x264A3209, 0x3C14C722, 0x00000492, 0x00000000);
       #elif defined(C6748_LCDK)
      // Timings for DDR2 at 150 MHz
      status |= DEVICE_ExternalMemInit(0x000000C5, 0x00134832, 0x264A3209, 0x3C14C722, 0x00000492, 0x00000000);
    <span style="background-color:#ffff00;">   #else
      // Timings for mDDR at 150 MHz
      status |= DEVICE_ExternalMemInit(0x000000C4, 0x0A034622, 0x1C912A08, 0x3811C700, 0x00000494, 0x00000000);</span>

    Since my device is AM1808, so where can  i find the address to modify it here?

  • I just need to modify the DDR2 setting, other than that, its the same

  • Hi,

    So to set appropriate DDR settings DEVICE_ExternalMemInit() is  called so depending on your custom board in you need to pass the parameters to it.

    Currently in your case  the last one is getting executed if you set targetType to AM1808.
    So on your custom board you need to figure out the values from datasheet.

    Thanks,

    --Prabhakar Lad

  • I have modified it but still not working

  • Dear Prabhakar, I have modified the Serial Boot Setting according to my board specifications. But still it is Waiting for SFT.

  • Hi,

    Have you rebuild your serial flash source according the below TI wiki?

    http://processors.wiki.ti.com/index.php/Rebuilding_the_Flash_and_Boot_Utils_Package

    Modify the "build.mak" according to your compiler location.

    OMAP-L138_FlashAndBootUtils_2_40/OMAP-L138/Common/build.mak

    Which OS (linux or win) are you using for rebuilding the serial flash tool?

    Ex:

    cat /home/titus/workdir/ti-e2e/test/OMAP-L138_FlashAndBootUtils_2_40/Common/build.mak


    #Titus

    #############################################################
    # Common build definitions for Makefile use                 #
    #############################################################
    #

    #Titus
    ARM_TOOLS_PATH?=/opt/ti/ccsv5/tools/compiler/gcc-arm-none-eabi-4_7-2012q4/
    ARM_TOOLS_PREFIX?=arm-none-eabi-

    CROSSCOMPILE?=$(ARM_TOOLS_PATH)bin/$(ARM_TOOLS_PREFIX)
    ARM_CROSSCOMPILE=$(CROSSCOMPILE)

    #Titus
    #DSP_TOOLS_PATH?=/opt/ti/ccsv5/tools/compiler/c6000_7.4.4/

    DSP_TOOLS_PATH?=/opt/ti/C6000CGT7.4.6/

    DSP_LIB_PATH=$(DSP_TOOLS_PATH)lib/
    DSP_CROSSCOMPILE=$(DSP_TOOLS_PATH)bin/

  • #############################################################
    # Common build definitions for Makefile use                 #
    #############################################################
    #

    ARM_TOOLS_PATH?=C:\\CodeSourcery\\Sourcery G++\\arm-none-linux-gnueabi\\
    ARM_TOOLS_PREFIX?=arm-none-gnueabi-

    CROSSCOMPILE?=$(ARM_TOOLS_PATH)bin\\$(ARM_TOOLS_PREFIX)
    ARM_CROSSCOMPILE=$(CROSSCOMPILE)

    DSP_TOOLS_PATH?=C:\\Program Files\\Texas Instruments\\ccsv4\\tools\\compiler\\c6000\\

    DSP_LIB_PATH=$(DSP_TOOLS_PATH)lib\\
    DSP_CROSSCOMPILE=$(DSP_TOOLS_PATH)bin\\

    Can someone verify is this Build.mak is correct or not ?