This thread has been locked.

If you have a related question, please click the "Ask a related question" button in the top right corner. The newly created question will be automatically linked to this question.

Booting from NAND flash memory

Other Parts Discussed in Thread: CCSTUDIO, TEST2, PCF8575, TPS65910, PMP

Hi,

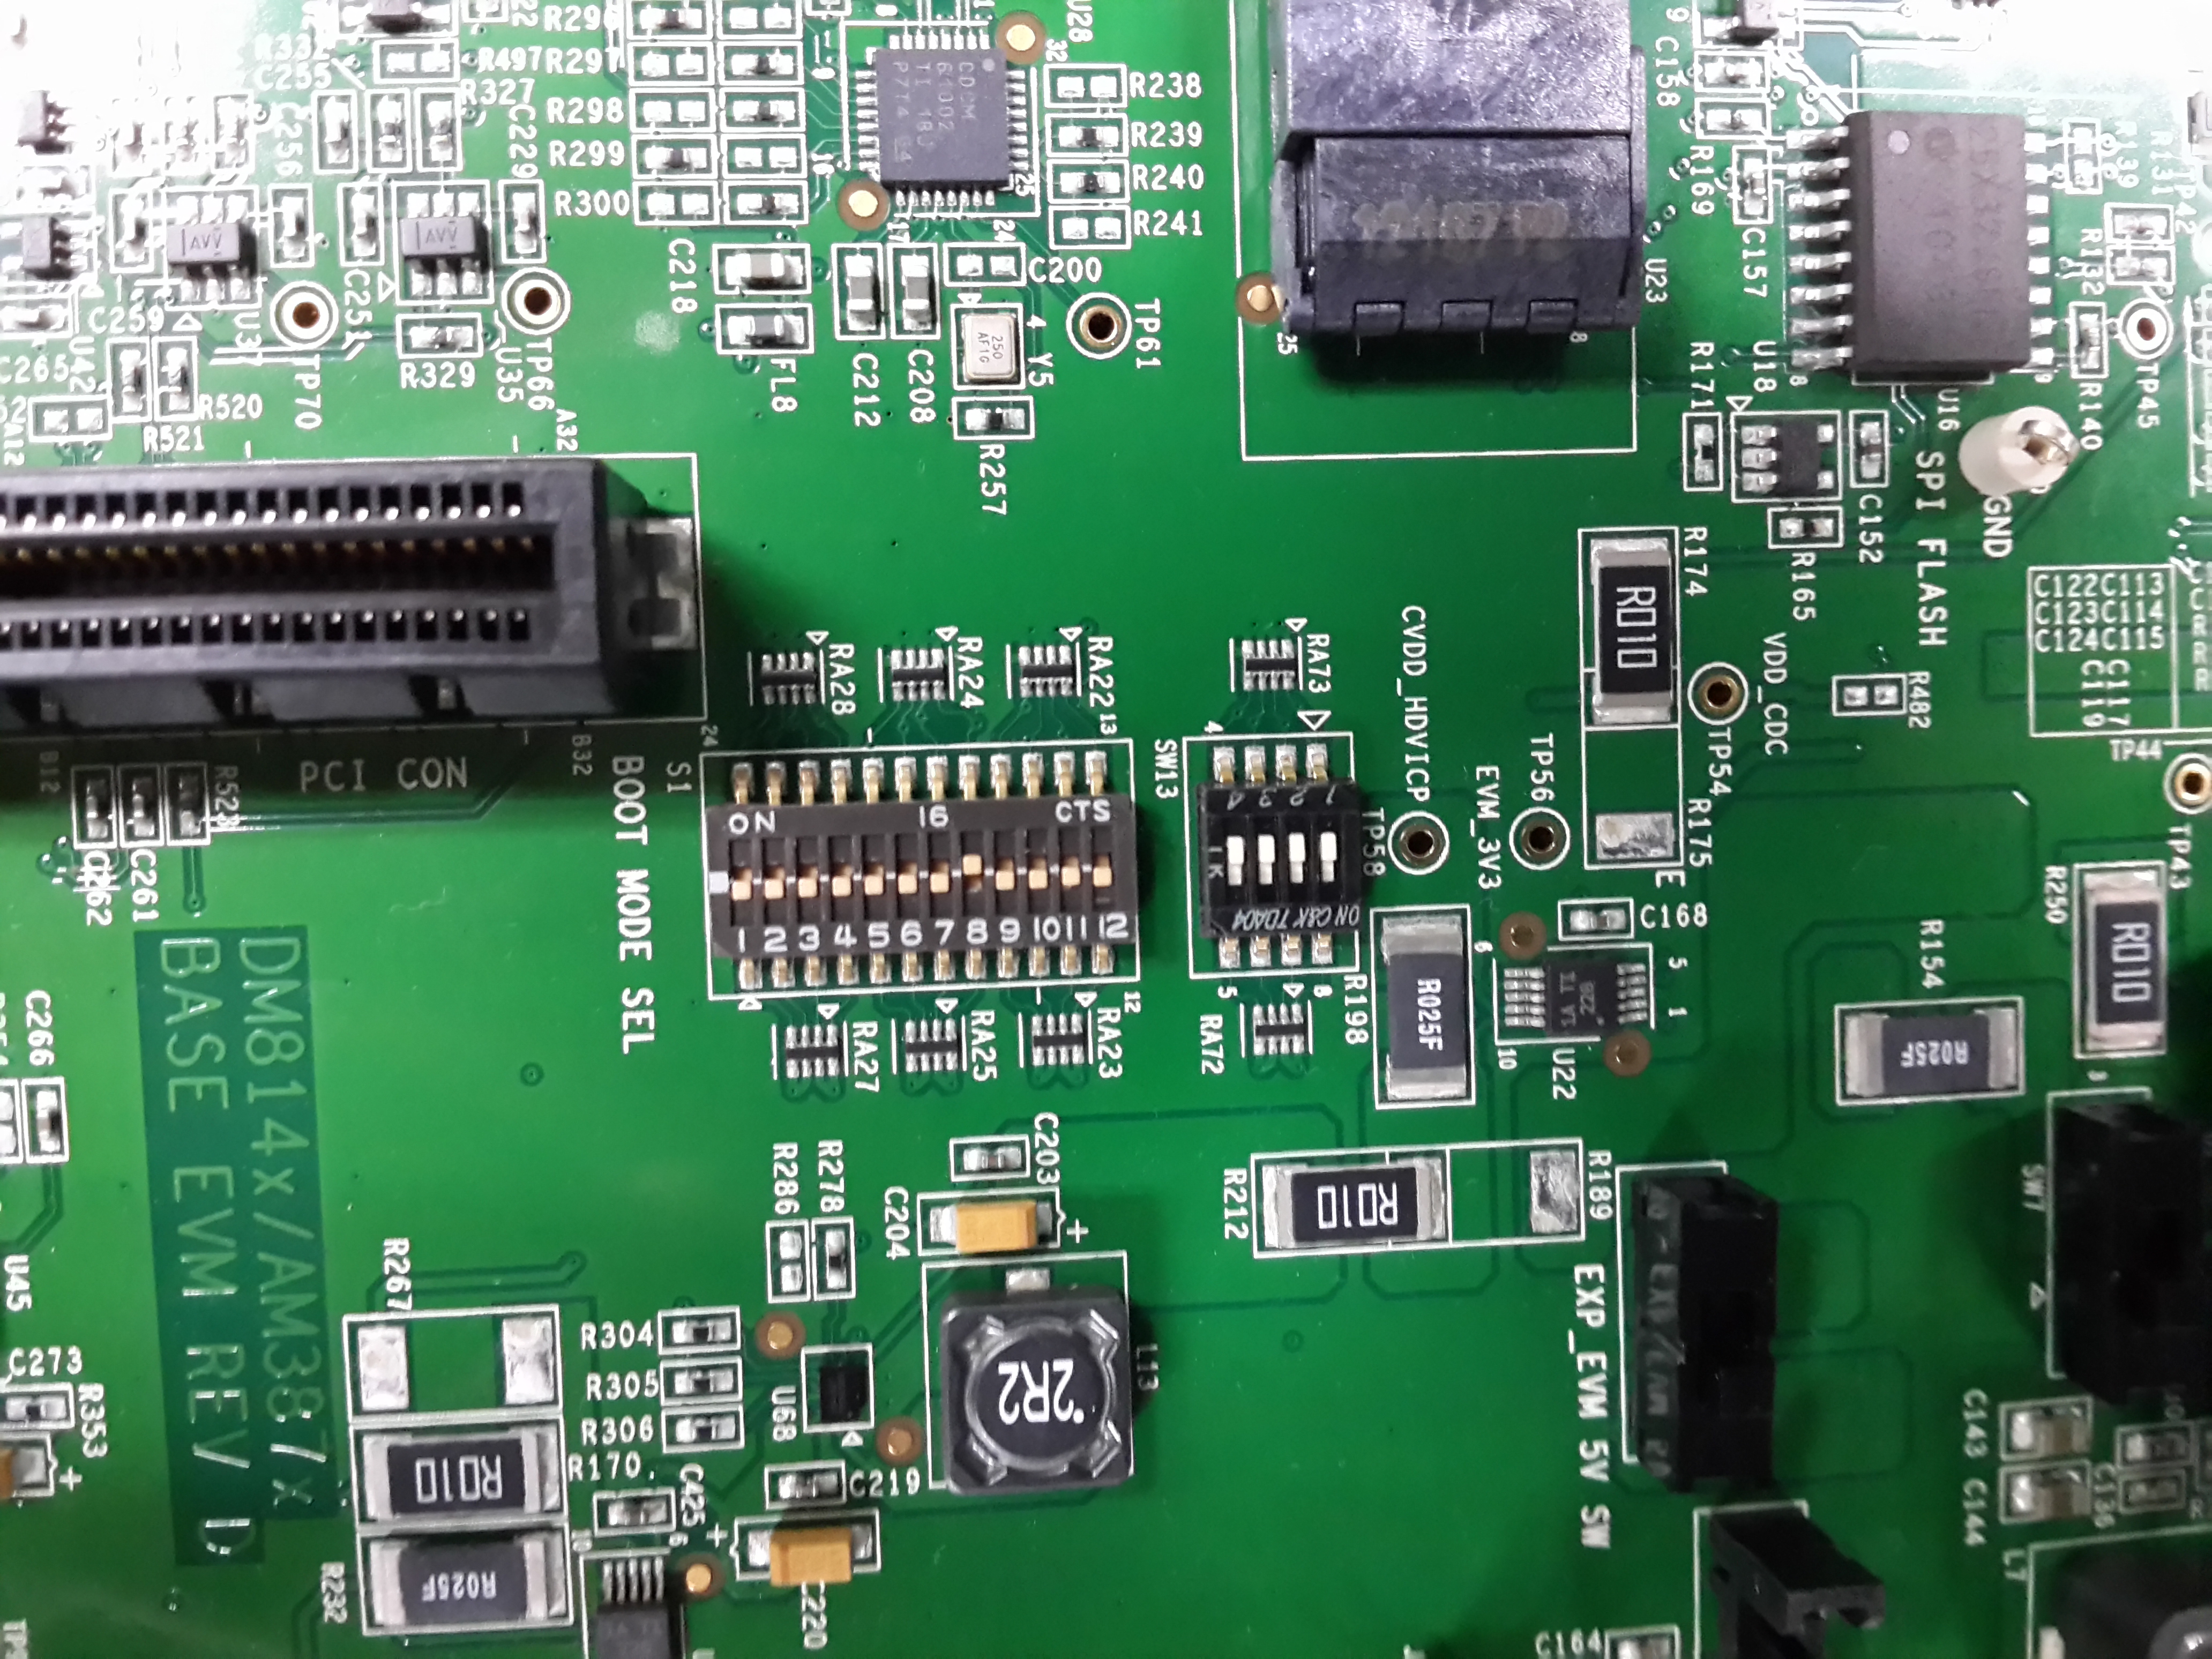
I'm currently doing my training under my university as a research assistant. I was asked to boot DM8148 entirely from the NAND flash memory. However, I'm a first timer in dealing with devices like this.

So far, I have been searching on many places. I seen many of them got a console to input their command, but I don't know where to get that console from. 

Anyway, I tried to flash u-boot.min.nand and it was successful. However, the board is still not booting up and then I tried to flash the other prebuilt-images given in the EZSDK like uImage-dm814x-evm.bin, u-boot,bin. All failed and I tend to have an error stated exit.c is not found, it was in the /tmp directory something. I know the sequence is bootloader > kernel > filesystem, but I not sure what are they.

By the way, when I do the flashing, it takes me more than 12 hours to flash the u-boot.min.nand and few days to flash the uImage-dm814x-evm.bin. Is it normal? Or I doing it wrong? If so, can I somehow speed it up?

It would be nice if someone can help me on how to do this booting from NAND. I running out of idea on how to deal with this device.

Best regards,

Benz

  • Hi Benz,

    I would recommend you to start from flashing the 2 bootloaders and successfully booting the DM814x device in the u-boot environment. Then we can proceed with flashing the linux kernel and the root filesystem.

    http://processors.wiki.ti.com/index.php/TI81XX_PSP_UBOOT_User_Guide#Flashing_U-Boot_without_CCS

    http://processors.wiki.ti.com/index.php/TI81XX_PSP_UBOOT_User_Guide#TI814X.2FTI813X

    http://processors.wiki.ti.com/index.php/TI81XX_PSP_UBOOT_User_Guide#U-Boot_NAND_Support

    You need to write (flash) into the NAND flash these two bootloaders:

    1st stage bootloader - u-boot.min.nand

    2nd stage bootloader - u-boot.bin

    Below you can have a read how to create these two:

    http://processors.wiki.ti.com/index.php/TI81XX_PSP_UBOOT_User_Guide#Building_U-Boot

    You can also use a script to flash the NAND:

    http://processors.wiki.ti.com/index.php/EZSDK_DM814x_Flashing_NAND

    You can also you CCStudio to flash the NAND:

    http://processors.wiki.ti.com/index.php/TI81XX_PSP_UBOOT_User_Guide#Flashing_U-Boot_using_CCS
    http://processors.wiki.ti.com/index.php/DM814x_AM387x_PSP_Flashing_Tools_Guide

    Benz Kek said:
    By the way, when I do the flashing, it takes me more than 12 hours to flash the u-boot.min.nand and few days to flash the uImage-dm814x-evm.bin. Is it normal? Or I doing it wrong? If so, can I somehow speed it up?

    This is not normal, it should be much more faster.

    Regards,
    Pavel

  • Thanks for the fast reply! 

    For the flashing, u-boot.min.nand, I start with the offset of 0x0. What about the u-boot.bin? What do I set for the offset? 

    Pavel Botev said:

    By the way, when I do the flashing, it takes me more than 12 hours to flash the u-boot.min.nand and few days to flash the uImage-dm814x-evm.bin. Is it normal? Or I doing it wrong? If so, can I somehow speed it up?

    This is not normal, it should be much more faster.

    [/quote]
    Since it's not normal, from your opinion, is there anything I can do?
    Best regards,
    Benz
  • Benz,

    Benz Kek said:
    For the flashing, u-boot.min.nand, I start with the offset of 0x0. What about the u-boot.bin? What do I set for the offset?

    Please have a read what I have just send you. When you read the below wiki page, you will find out that the u-boot.bin (2nd stage bootloader) is at offset 0x00020000:

    http://processors.wiki.ti.com/index.php/TI81XX_PSP_UBOOT_User_Guide#NAND_Layout

    -->0x00020000-> U-Boot 2nd stage start


    Benz Kek said:
    Since it's not normal, from your opinion, is there anything I can do?


    Yes, you can do follow what I have sent you in my previous post.

    Regards,
    Pavel
  • Pavel,

    I'm done flashing that two stage with CCS, what is the next step? Oh, and whenever the flashing is done, CCS shown this, "Can't find a source file at "/tmp/TI_MKLIB1s7Tl0/SRC/exit.c" ".

    Regards,

    Benz

  • Benz,

    Benz Kek said:
    I'm done flashing that two stage with CCS, what is the next step?

    The next step is flashing the linux kernel. But let us first verify that you have flashed the NAND with the two bootloaders successfully. If everything is correct so far, at this stage you should be able to boot the bootloaders from NAND and reach the u-boot prompt:

    TI8148_EVM#

    So, can you boot successfully the bootloaders from NAND? Use the appropriate switch settings to boot from NAND:

    http://processors.wiki.ti.com/index.php/TI81XX_PSP_UBOOT_User_Guide#EVM_Switch_Settings

    Benz Kek said:
    Oh, and whenever the flashing is done, CCS shown this, "Can't find a source file at "/tmp/TI_MKLIB1s7Tl0/SRC/exit.c" "

    Normally this message can be ignored.

    Regards,
    Pavel


  • Benz,

    Benz Kek said:
    I'm done flashing that two stage with CCS, what is the next step?

    Are you sure you have flashed the two bootloaders with CCS? In the wiki page below is stated that only the 1st stage bootloader (u-boot.min.nand) can be flashed under CCS:

    http://processors.wiki.ti.com/index.php/DM814x_AM387x_PSP_Flashing_Tools_Guide#Burning_images_to_NAND_Flash_.28using_CCS.29

    Note: NAND flashing tool supports flashing only 1st stage u-boot. For flashing 2nd stage u-boot, use 1st stage u-boot and loadb command as mentioned in user guide.

    Regards,
    Pavel

  • Pavel,

    It's not booting up, is it supposed to show something on the LCD (the one that comes with it) ? 

    I just relaunch the Netra NAND and flash an image just like 1st stage but with u-boot.bin.

    Regards, 

    Benz

  • Benz Kek said:
    It's not booting up, is it supposed to show something on the LCD (the one that comes ? 

    No, it is not supposed to show anything on the LCD. It is supposed to show something on the UART terminal console output. This is what I have when flashing the 1st stage bootloader in NAND, then boot it from NAND:

    picocom v1.4

    port is        : /dev/ttyUSB0
    flowcontrol    : none
    baudrate is    : 115200
    parity is      : none
    databits are   : 8
    escape is      : C-a
    noinit is      : no
    noreset is     : no
    nolock is      : no
    send_cmd is    : sx -vv
    receive_cmd is : rz -vv

    Terminal ready


    U-Boot 2010.06-dirty (Mar 29 2013 - 17:44:47)

    TI8148-GP rev 2.1

    ARM clk: 600MHz
    DDR clk: 400MHz

    DRAM:  2 GiB
    NAND:  HW ECC BCH8 Selected
    256 MiB
    Using default environment

    The 2nd stage U-Boot will now be auto-loaded
    Please do not interrupt the countdown till TI8148_EVM prompt if 2nd stage is already flashed
    TI-MIN#help
    ?       - alias for 'help'
    base    - print or set address offset
    bootm   - boot application image from memory
    cmp     - memory compare
    cp      - memory copy
    crc32   - checksum calculation
    dcache  - enable or disable data cache
    echo    - echo args to console
    go      - start application at address 'addr'
    help    - print command description/usage
    icache  - enable or disable instruction cache
    loadb   - load binary file over serial line (kermit mode)
    loady   - load binary file over serial line (ymodem mode)
    loop    - infinite loop on address range
    md      - memory display
    mm      - memory modify (auto-incrementing address)
    mtest   - simple RAM read/write test
    mw      - memory write (fill)
    nand    - NAND sub-system
    nandecc - Switch NAND ECC calculation algorithm b/w hardware and software
    nboot   - boot from NAND device
    nm      - memory modify (constant address)
    printenv- print environment variables
    reset   - Perform RESET of the CPU
    setenv  - set environment variables
    version - print monitor version
    TI-MIN#

    You should reach at least this 1st stage bootloader prompt (TI-MIN#).

    Benz Kek said:
    I just relaunch the Netra NAND

    Netra NAND? Are you using Netra/DM816x device or Centaurus/DM814x device?

    Regards,
    Pavel

  • Pavel,

    I think I got it wrong, I try redo it. I flash it using NETRA Nand provided in ti-ezsdk_dm814x-evm_5_05_02_00.

    Okay, allow me to list out the details so that you can verify if my understanding is correct.

    My device is TMDXEVM8148 (according to the box) which I believed it is DM8148 EVM, but when I do the flashing, NETRA Nand actually detected the device as DM8148. I connected the device via JTAG (the one provided with the device) to my host computer which running on Windows 8. Then, I uses Virtualbox and created a Ubuntu machine where I installed all the EZSDK, CodeSourcery and CCS. 

    So now, what I need to do is:

    1. Use NETRA Nand again to erase the image on the current NAND flash memory.
    2. Then flash it with u-boot.min.nand.
    3. After flashing, I use Picocom to bring up the console and hopefully get the output you posted just now.

    Is it correct for me to think like this?

    Best regards,

    Benz

  • Pavel,

    One more thing, when I do the flashing, the switch should be all off? Or I should configured it to NAND boot like the link you posted? Previously, I configured it to NAND boot when I flash.

    Regards,

    Benz

  • Benz,

    Benz Kek said:
    I flash it using NETRA Nand provided in ti-ezsdk_dm814x-evm_5_05_02_00.

    Do you mean you are using the pre-built NAND flash writer, available at:

    ti-ezsdk_dm814x-evm_5_05_02_00/board-support/host-tools/nand-flash-writer.out

    If yes, this is correct.

    You need to follow the steps described in:

    http://processors.wiki.ti.com/index.php/DM814x_AM387x_PSP_Flashing_Tools_Guide#Burning_images_to_NAND_Flash_.28using_CCS.29

    Before connecting to CCS, make S1 switches BTMODE[4:0] = 00000, S1.8 = 1 (16-bit NAND selected), and SW2.1 = 1 (NAND enable).

    After you flash the u-boot.min.nand successfully, you need to configure S1 switches BTMODE[4:0] to boot from NAND.

    The CCS console output (during the NAND flash) should be something like below:

    [CortexA8] Welcome to CCS Nand Flash Utility


    Choose your operation
    Enter 1 ---> To Flash an Image
    Enter 2 ---> To ERASE the whole NAND
    Enter 3 ---> To EXIT
    1
    Enter image file path
    /home/users/pbotev/ti-ezsdk_dm814x-evm_5_05_02_00/board-support/prebuilt-images/u-boot.min.nand
    Enter offset (in hex):
    0x0
    Choose the ECC scheme from given options :
    Enter 1 ---> BCH 8 bit
    Enter 2 ---> HAM  
    Enter 3 ---> T0 EXIT
    Please enter ECC scheme type :
    1
    Starting NETRA NAND writer

    The NAND Flash is ONFI compatible
     

    ----------------------
      NAND FLASH DETAILS
    ----------------------
     Device ID : 0xca
     Manufacture ID : 0x2c
     Page Size : 2048 Bytes
     Spare Size : 64 Bytes
     Pages_Per_Block : 64
     Number_of_Blocks : 2048
     Device_width : 2 Byte
     DeviceSize : 256 MB

     Setting the ECC scheme
      Set the BCH 8 bit ECC scheme  .... done
    Preparing to Flash image ....
    Opening image ... done.
    Erasing Required Blocks [start = 0, count = 1]...Done
    Flashing image ...
    Number of blocks needed for header and data: 0x1
    Attempting to start write in block number 0x0.
    Writing image data to Block 0 Page0x0
    Writing image data to Block 0 Page0x1
    Writing image data to Block 0 Page0x2
    Writing image data to Block 0 Page0x3
    Writing image data to Block 0 Page0x4
    Writing image data to Block 0 Page0x5
    Writing image data to Block 0 Page0x6
    Writing image data to Block 0 Page0x7
    Writing image data to Block 0 Page0x8
    Writing image data to Block 0 Page0x9
    Writing image data to Block 0 Page0xa
    Writing image data to Block 0 Page0xb
    Writing image data to Block 0 Page0xc
    Writing image data to Block 0 Page0xd
    Writing image data to Block 0 Page0xe
    Writing image data to Block 0 Page0xf
    Writing image data to Block 0 Page0x10
    Writing image data to Block 0 Page0x11
    Writing image data to Block 0 Page0x12
    Writing image data to Block 0 Page0x13
    Writing image data to Block 0 Page0x14
    Writing image data to Block 0 Page0x15
    Writing image data to Block 0 Page0x16
    Writing image data to Block 0 Page0x17
    Writing image data to Block 0 Page0x18
    Writing image data to Block 0 Page0x19
    Writing image data to Block 0 Page0x1a
    Writing image data to Block 0 Page0x1b
    Writing image data to Block 0 Page0x1c
    Writing image data to Block 0 Page0x1d
    Writing image data to Block 0 Page0x1e
    Writing image data to Block 0 Page0x1f
    Writing image data to Block 0 Page0x20
    Writing image data to Block 0 Page0x21
    Writing image data to Block 0 Page0x22
    Writing image data to Block 0 Page0x23
    Writing image data to Block 0 Page0x24
    Writing image data to Block 0 Page0x25
    Writing image data to Block 0 Page0x26
    Writing image data to Block 0 Page0x27
    Writing image data to Block 0 Page0x28
    Writing image data to Block 0 Page0x29
    Writing image data to Block 0 Page0x2a
    Writing image data to Block 0 Page0x2b
    Writing image data to Block 0 Page0x2c
    Writing image data to Block 0 Page0x2d
    Application is successfully flashed


    NAND flashing successful!

  • Pavel,

    The following images is my switch configuration.

    Now I in the middle of flashing, but the details doesn't seems correct. 

    [CortexA8] Welcome to CCS Nand Flash Utility


    Choose your operation
    Enter 1 ---> To Flash an Image
    Enter 2 ---> To ERASE the whole NAND
    Enter 3 ---> To EXIT
    1
    Enter image file path
    /home/test2/ti-ezsdk_dm814x-evm_5_05_02_00/board-support/prebuilt-images/u-boot.min.nand
    Enter offset (in hex):
    0x0
    Choose the ECC scheme from given options :
    Enter 1 ---> BCH 8-bit
    Enter 2 ---> HAM
    Enter 3 ---> T0 EXIT
    Please enter ECC scheme type :
    1
    Starting NETRA NAND writer

    ----------------------
    NAND FLASH DETAILS
    ----------------------
    Device ID : 0x0
    Manufacture ID : 0x0
    Page Size : 1024 Bytes
    Spare Size : 32 Bytes
    Pages_Per_Block : 64
    Number_of_Blocks : 427452753
    Device_width : 1 Byte
    DeviceSize : 1685 MB

    Setting the ECC scheme
    Set the BCH 8 bit ECC scheme .... done
    Preparing to Flash image ....
    Opening image ... done.
    Erasing Required Blocks [start = 0, count = 2]...FAILED to erase block number 0x0
    FAILED to erase block number 0x1
    Done
    Flashing image...

    It keeps failing in erasing like what I faced during the beginning time when I do this on my own until I configure the switch to NAND boot but with S1.8 = 1 (16-bit NAND selected) as shown below.


    Regards,

    Benz

  • Benz,

    It seems that you have very old DM814x EVM PG1.x (where NAND is 8-bit), while I am having DM814x EVM PG2.x (where NAND is 16-bit).

    Next to the S1 switch, you have "DM814x/AM387x BASE EVM REV D", while I have "814x/387x BASE EVM DDR3 PG2.0 EVM REV C"

    So, can you try with S1 BTMODE[4:0] = 00000, S1.8 = 0 (NAND 8-bit)

    Also, you should invoke the GEL file scripts with its PG1.x option:

    http://processors.wiki.ti.com/index.php/DM814x_AM387x_PSP_Flashing_Tools_Guide#Loading_GEL_File

    PG1.x

    • Select Scripts --> Centaurus System Initialization --> PLL_CLOCKS_Config. This should setup all the clocks.
    • Now select Scripts --> Centaurus System Initialization --> DDR2_Initialization. This should setup EMIF for DDR2.
    • And then select Scripts --> Centaurus System Initialization --> GPMC_ClkEnable. This should initialize GPMC.

    Let me know the result.

    BR
    Pavel

  • Benz,

    I also tried to flash the 2ns stage bootloader (u-boot.bin) from the CCS NAND flash writer, and I can do this successful. Before flashing the NAND, my S1 BTMODE[4:0] = 00000

    [CortexA8] Welcome to CCS Nand Flash Utility


    Choose your operation
    Enter 1 ---> To Flash an Image
    Enter 2 ---> To ERASE the whole NAND
    Enter 3 ---> To EXIT
    1
    Enter image file path
    /home/users/pbotev/ti-ezsdk_dm814x-evm_5_05_02_00/board-support/prebuilt-images/u-boot.bin
    Enter offset (in hex):
    0x20000
    Choose the ECC scheme from given options :
    Enter 1 ---> BCH 8 bit
    Enter 2 ---> HAM 
    Enter 3 ---> T0 EXIT
    Please enter ECC scheme type :
    1
    Starting NETRA NAND writer

    The NAND Flash is ONFI compatible
     

    ----------------------
      NAND FLASH DETAILS
    ----------------------
     Device ID : 0xca
     Manufacture ID : 0x2c
     Page Size : 2048 Bytes
     Spare Size : 64 Bytes
     Pages_Per_Block : 64
     Number_of_Blocks : 2048
     Device_width : 2 Byte
     DeviceSize : 256 MB

     Setting the ECC scheme
      Set the BCH 8 bit ECC scheme  .... done
    Preparing to Flash image ....
    Opening image ... done.
    Erasing Required Blocks [start = 1, count = 2]...Done
    Flashing image ...
    Number of blocks needed for header and data: 0x2
    Attempting to start write in block number 0x1.
    Writing image data to Block 1 Page0x0
    Writing image data to Block 1 Page0x1
    Writing image data to Block 1 Page0x2
    Writing image data to Block 1 Page0x3
    Writing image data to Block 1 Page0x4
    Writing image data to Block 1 Page0x5
    Writing image data to Block 1 Page0x6
    Writing image data to Block 1 Page0x7
    Writing image data to Block 1 Page0x8
    Writing image data to Block 1 Page0x9
    Writing image data to Block 1 Page0xa
    Writing image data to Block 1 Page0xb
    Writing image data to Block 1 Page0xc
    Writing image data to Block 1 Page0xd
    Writing image data to Block 1 Page0xe
    Writing image data to Block 1 Page0xf
    Writing image data to Block 1 Page0x10
    Writing image data to Block 1 Page0x11
    Writing image data to Block 1 Page0x12
    Writing image data to Block 1 Page0x13
    Writing image data to Block 1 Page0x14
    Writing image data to Block 1 Page0x15
    Writing image data to Block 1 Page0x16
    Writing image data to Block 1 Page0x17
    Writing image data to Block 1 Page0x18
    Writing image data to Block 1 Page0x19
    Writing image data to Block 1 Page0x1a
    Writing image data to Block 1 Page0x1b
    Writing image data to Block 1 Page0x1c
    Writing image data to Block 1 Page0x1d
    Writing image data to Block 1 Page0x1e
    Writing image data to Block 1 Page0x1f
    Writing image data to Block 1 Page0x20
    Writing image data to Block 1 Page0x21
    Writing image data to Block 1 Page0x22
    Writing image data to Block 1 Page0x23
    Writing image data to Block 1 Page0x24
    Writing image data to Block 1 Page0x25
    Writing image data to Block 1 Page0x26
    Writing image data to Block 1 Page0x27
    Writing image data to Block 1 Page0x28
    Writing image data to Block 1 Page0x29
    Writing image data to Block 1 Page0x2a
    Writing image data to Block 1 Page0x2b
    Writing image data to Block 1 Page0x2c
    Writing image data to Block 1 Page0x2d
    Writing image data to Block 1 Page0x2e
    Writing image data to Block 1 Page0x2f
    Writing image data to Block 1 Page0x30
    Writing image data to Block 1 Page0x31
    Writing image data to Block 1 Page0x32
    Writing image data to Block 1 Page0x33
    Writing image data to Block 1 Page0x34
    Writing image data to Block 1 Page0x35
    Writing image data to Block 1 Page0x36
    Writing image data to Block 1 Page0x37
    Writing image data to Block 1 Page0x38
    Writing image data to Block 1 Page0x39
    Writing image data to Block 1 Page0x3a
    Writing image data to Block 1 Page0x3b
    Writing image data to Block 1 Page0x3c
    Writing image data to Block 1 Page0x3d
    Writing image data to Block 1 Page0x3e
    Writing image data to Block 1 Page0x3f
    Writing image data to Block 2 Page0x0
    Writing image data to Block 2 Page0x1
    Writing image data to Block 2 Page0x2
    Writing image data to Block 2 Page0x3
    Writing image data to Block 2 Page0x4
    Writing image data to Block 2 Page0x5
    Writing image data to Block 2 Page0x6
    Writing image data to Block 2 Page0x7
    Writing image data to Block 2 Page0x8
    Writing image data to Block 2 Page0x9
    Writing image data to Block 2 Page0xa
    Writing image data to Block 2 Page0xb
    Writing image data to Block 2 Page0xc
    Writing image data to Block 2 Page0xd
    Writing image data to Block 2 Page0xe
    Writing image data to Block 2 Page0xf
    Writing image data to Block 2 Page0x10
    Writing image data to Block 2 Page0x11
    Writing image data to Block 2 Page0x12
    Writing image data to Block 2 Page0x13
    Writing image data to Block 2 Page0x14
    Writing image data to Block 2 Page0x15
    Writing image data to Block 2 Page0x16
    Writing image data to Block 2 Page0x17
    Writing image data to Block 2 Page0x18
    Writing image data to Block 2 Page0x19
    Writing image data to Block 2 Page0x1a
    Writing image data to Block 2 Page0x1b
    Writing image data to Block 2 Page0x1c
    Writing image data to Block 2 Page0x1d
    Writing image data to Block 2 Page0x1e
    Writing image data to Block 2 Page0x1f
    Writing image data to Block 2 Page0x20
    Writing image data to Block 2 Page0x21
    Writing image data to Block 2 Page0x22
    Writing image data to Block 2 Page0x23
    Writing image data to Block 2 Page0x24
    Writing image data to Block 2 Page0x25
    Writing image data to Block 2 Page0x26
    Application is successfully flashed


    NAND flashing successful!

    Then I make my S1 BTMODE[4:0] for NAND boot, and I can boot successful:

    picocom v1.4

    port is        : /dev/ttyUSB0
    flowcontrol    : none
    baudrate is    : 115200
    parity is      : none
    databits are   : 8
    escape is      : C-a
    noinit is      : no
    noreset is     : no
    nolock is      : no
    send_cmd is    : sx -vv
    receive_cmd is : rz -vv

    Terminal ready


    U-Boot 2010.06 (Dec 26 2012 - 18:16:40)

    TI8148-GP rev 2.1

    ARM clk: 600MHz
    DDR clk: 400MHz

    DRAM:  2 GiB
    NAND:  HW ECC BCH8 Selected
    256 MiB
    Using default environment

    The 2nd stage U-Boot will now be auto-loaded
    Please do not interrupt the countdown till TI8148_EVM prompt if 2nd stage is already flashed
    Hit any key to stop autoboot:  0

    NAND read: device 0 offset 0x20000, size 0x40000
     262144 bytes read: OK
    ## Starting application at 0x81000000 ...


    U-Boot 2010.06 (Dec 26 2012 - 18:12:01)

    TI8148-GP rev 2.1

    ARM clk: 600MHz
    DDR clk: 400MHz

    I2C:   ready
    DRAM:  2 GiB
    NAND:  HW ECC BCH8 Selected
    256 MiB
    MMC:   OMAP SD/MMC: 0
    *** Warning - bad CRC or NAND, using default environment

                              .:;rrr;;.                  
                        ,5#@@@@#####@@@@@@#2,            
                     ,A@@@hi;;;r5;;;;r;rrSG@@@A,         
                   r@@#i;:;s222hG;rrsrrrrrr;ri#@@r       
                 :@@hr:r;SG3ssrr2r;rrsrsrsrsrr;rh@@:     
                B@H;;rr;3Hs;rrr;sr;;rrsrsrsrsrsr;;H@B    
               @@s:rrs;5#;;rrrr;r#@H:;;rrsrsrsrsrr:s@@   
              @@;;srs&X#9;r;r;;,2@@@rrr:;;rrsrsrsrr;;@@  
             @@;;rrsrrs@MB#@@@@@###@@@@@@#rsrsrsrsrr;;@@ 
            G@r;rrsrsr;#X;SX25Ss#@@#M@#9H9rrsrsrsrsrs;r@G
            @9:srsrsrs;2@;:;;:.X@@@@@H::;rrsrsrsrsrsrr:3@
           X@;rrsrsrsrr;XAi;;:&@@#@Bs:rrsrsrsrsrsrsrsrr;@X
           @#;rsrsrsrsrr;r2ir@@@###::rrsrsrsrsrsrsrsrsr:@@
           @A:rrsrsrsrr;:2@29@@M@@@;:;rrrrsrsrsrsrsrsrs;H@
           @&;rsrsrsrr;A@@@@@@###@@@s::;:;;rrsrsrsrsrsr;G@
           @#:rrsrsrsr;G@5Hr25@@@#@@@#9XG9s:rrrrsrsrsrs:#@
           M@;rsrsrsrs;r@&#;::S@@@@@@@M@@@@Grr:;rsrsrsr;@#
           :@s;rsrsrsrr:M#Msrr;;&#@@@@@@@@@@H@@5;rsrsr;s@,
            @@:rrsrsrsr;S@rrrsr;:;r3MH@@#@M5,S@@irrsrr:@@
             @A:rrsrsrsrrrrrsrsrrr;::;@##@r:;rH@h;srr:H@ 
             ;@9:rrsrsrsrrrsrsrsrsr;,S@Hi@i:;s;MX;rr:h@; 
              r@B:rrrrsrsrsrsrsrr;;sA@#i,i@h;r;S5;r:H@r  
               ,@@r;rrrsrsrsrsrr;2BM3r:;r:G@:rrr;;r@@,   
                 B@Mr;rrrrsrsrsr@@S;;;rrr:5M;rr;rM@H     
                  .@@@i;;rrrrsrs2i;rrrrr;r@M:;i@@@.      
                    .A@@#5r;;;r;;;rrr;r:r#AsM@@H.        
                       ;&@@@@MhXS5i5SX9B@@@@G;           
                           :ihM#@@@@@##hs,               

    Net:   <ethaddr> not set. Reading from E-fuse
    Detected MACID:90:d7:eb:d5:13:96
    cpsw
    Hit any key to stop autoboot:  0
    TI8148_EVM#nand info

    Device 0: nand0, sector size 128 KiB
    TI8148_EVM#

    Regards,
    Pavel

  • Pavel,

    After flashing the 1st stage of u-boot.min.nand, how do you connect the Picocom to the board? Is it through JTAG or we have to use UART port? If UART, I think I might need a convertor or something.

    Regards,

    Benz

  • Benz,

    Benz Kek said:
    After flashing the 1st stage of u-boot.min.nand, how do you connect the Picocom to the board? Is it through JTAG or we have to use UART port? If UART, I think I might need a convertor or something.

    You have to use the UART port (CENT DB9). I am using UART-to-USB convertor, thus one side of my cable goes to the DM814x EVM CENT DB9 UART port, the other side goes to my host (desktop PC) USB port, mapped as /dev/ttyUSBx (x=0 or 1).

    Then start console (in Ubuntu 10.04: Application -> Accessories -> Terminal), and type into that console

    $picocom -b 115200 /dev/ttyUSB0

    Regards,
    Pavel

  • Pavel,

    I did everything I could, but it doesn't seems working. Could you tell me how would you set up DM8148 right from the box? For example:

    • Your CCS, EZSDK version, so far my CCS interface is not the one shown in the guidelines. Perhaps it is because the version as I using CCSv5, but the one provided with the board having the same interface. So, I thought it would be okay to use version 5.
    • How you connect to the board (JTAG or UART) when you do the flashing?
    • The switch setting (because when the SW1 set to all 0, I couldn't flash the 1st stage u-boot.min.nand, I have to set it to NAND boot mode in order to flash.)
    • Other switch setting? I know SW2 is [10] to enable NAND. What about other switch? I saw some posts on the forum mentioned about SW12.

    Perhaps, I will redo everything including installing the EZSDK, CCS and the CodeSourcery. 

    Best regards,

    Benz

  • Benz,

    Yes, may be it is better to make a fresh start.

    I am using CCS5.4.0 (Linux version), so CCS5 should not be an issue.

    I am using the latest EZSDK 5.05.02.00 on Ubuntu 10.04 LTS PC (I have no Windows OS).

    For flashing the NAND from CCS, I connect to the EVM through JTAG. For console message I connect to EVM through UART.

    As a beginning, you can install EZSDK 5.05.02.00 from the below link:

    http://software-dl.ti.com/dsps/dsps_public_sw/ezsdk/latest/index_FDS.html

    Then you can try booting the EVM through a MMC/SD card.

    Refer to the

    http://downloads.ti.com/dsps/dsps_public_sw/ezsdk/latest/exports/DM814x_AM387x_EVM_Quick_start_guide.pdf - the important for you switches are described here

    http://downloads.ti.com/dsps/dsps_public_sw/ezsdk/latest/exports/DM814x_EZ_Software_Developers_Guide.pdf

    section 2 Starting your software development

    section 2.1 Setting up the EZ SDK

    section 6.6 How to create an SD card

    You can also use TeraTerm instead of Picocom:

    section 6.5 Setting up Tera Term

    BR
    Pavel

  • Pavel,

    I now trying to flash without using the CCS, instead, I running a script called setup-nand-images.sh located in the ${EZSDK}/bin. By using this guide ( http://processors.wiki.ti.com/index.php/EZSDK_DM814x_Flashing_NAND ), I'm able to run/ flash as described. I configured my switches to SD boot and SW2.1 to ON. The following is the log:

    test2@test2-EVM:~$ export EZSDK="/home/test2/ti-ezsdk_dm814x-evm_5_05_02_00"
    test2@test2-EVM:~$ $EZSDK/bin/setup-nand-images.sh

    --------------------------------------------------------------------------------
    This step will create a minicom script for flashing images to NAND

    Would you like to flash the kernel image to NAND (y/n)?
    [ y ]

    Deleting the old setup_u-boot_uImage-nand.minicom
    Successfully wrote setup_u-boot_uImage-nand.minicom

    Would you like to run the setup script now (y/n)? This requires you to connect
    the RS-232 cable between your host and EVM as well as your ethernet cable as
    described in the Quick Start Guide. Please ensure that SW2 switch for NAND is
    in ON position and EVM switch settings is for SD boot mode.

    Once answering 'y' on the prompt below you will have 300 seconds to connect
    the board and power cycle it before the setup times out

    Press any key to stop autoboot of the uboot second stage. Once the autoboot is
    stopped, this script will automatically set parameters.

    After successfully executing this script, your EVM will be set up. You will be
    able to connect to it by executing 'minicom -w' or if you prefer a windows host
    you can set up Tera Term as explained in the Software Developer's Guide.
    If you connect minicom or Tera Term and power cycle the board Linux will boot.

    [ y ]
    ~/ti-ezsdk_dm814x-evm_5_05_02_00 ~


    Welcome to minicom 2.4

    OPTIONS: I18n
    Compiled on Jan 25 2010, 06:49:09.
    Port /dev/ttyUSB1

    Press CTRL-A Z for help on special keys

    U-Boot 2010.06 (Nov 10 2011 - 23:50:16)

    TI8148-GP rev 2.1

    ARM clk: 600MHz
    DDR clk: 400MHz

    DRAM: 2 GiB
    Using default environment

    The 2nd stage U-Boot will now be auto-loaded
    Please do not interrupt the countdown till TI8148_EVM prompt if 2nd stage is ald
    MMC: OMAP SD/MMC: 0
    Hit any key to stop autoboot: 0
    reading u-boot.bin

    185044 bytes read
    ## Starting application at 0x80800000 ...


    U-Boot 2010.06 (Nov 10 2011 - 23:45:47)

    TI8148-GP rev 2.1

    ARM clk: 600MHz
    DDR clk: 400MHz

    I2C: ready
    DRAM: 2 GiB
    NAND: HW ECC Hamming Code selected
    256 MiB
    *** Warning - bad CRC or NAND, using default environment

    .:;rrr;;.
    ,5#@@@@#####@@@@@@#2,
    ,A@@@hi;;;r5;;;;r;rrSG@@@A,
    r@@#i;:;s222hG;rrsrrrrrr;ri#@@r
    :@@hr:r;SG3ssrr2r;rrsrsrsrsrr;rh@@:
    B@H;;rr;3Hs;rrr;sr;;rrsrsrsrsrsr;;H@B
    @@s:rrs;5#;;rrrr;r#@H:;;rrsrsrsrsrr:s@@
    @@;;srs&X#9;r;r;;,2@@@rrr:;;rrsrsrsrr;;@@
    @@;;rrsrrs@MB#@@@@@###@@@@@@#rsrsrsrsrr;;@@
    G@r;rrsrsr;#X;SX25Ss#@@#M@#9H9rrsrsrsrsrs;r@G
    @9:srsrsrs;2@;:;;:.X@@@@@H::;rrsrsrsrsrsrr:3@
    X@;rrsrsrsrr;XAi;;:&@@#@Bs:rrsrsrsrsrsrsrsrr;@X
    @#;rsrsrsrsrr;r2ir@@@###::rrsrsrsrsrsrsrsrsr:@@
    @A:rrsrsrsrr;:2@29@@M@@@;:;rrrrsrsrsrsrsrsrs;H@
    @&;rsrsrsrr;A@@@@@@###@@@s::;:;;rrsrsrsrsrsr;G@
    @#:rrsrsrsr;G@5Hr25@@@#@@@#9XG9s:rrrrsrsrsrs:#@
    M@;rsrsrsrs;r@&#;::S@@@@@@@M@@@@Grr:;rsrsrsr;@#
    :@s;rsrsrsrr:M#Msrr;;&#@@@@@@@@@@H@@5;rsrsr;s@,
    @@:rrsrsrsr;S@rrrsr;:;r3MH@@#@M5,S@@irrsrr:@@
    @A:rrsrsrsrrrrrsrsrrr;::;@##@r:;rH@h;srr:H@
    ;@9:rrsrsrsrrrsrsrsrsr;,S@Hi@i:;s;MX;rr:h@;
    r@B:rrrrsrsrsrsrsrr;;sA@#i,i@h;r;S5;r:H@r
    ,@@r;rrrsrsrsrsrr;2BM3r:;r:G@:rrr;;r@@,
    B@Mr;rrrrsrsrsr@@S;;;rrr:5M;rr;rM@H
    .@@@i;;rrrrsrs2i;rrrrr;r@M:;i@@@.
    .A@@#5r;;;r;;;rrr;r:r#AsM@@H.
    ;&@@@@MhXS5i5SX9B@@@@G;
    :ihM#@@@@@##hs,

    MMC: OMAP SD/MMC: 0
    Net: <ethaddr> not set. Reading from E-fuse
    Detected MACID:50:56:63:9c:6d:dc
    cpsw
    Hit any key to stop autoboot: 0
    TI8148_EVM#mmc rescan 0
    TI8148_EVM#mw.b 0x81000000 0xFF 0x00020000
    TI8148_EVM#fatload mmc 0 0x81000000 u-boot.min.nand
    reading u-boot.min.nand

    ** Unable to read "u-boot.min.nand" from mmc 0:1 **
    TI8148_EVM#nand erase 0x0 0x00020000

    NAND erase: device 0 offset 0x0, size 0x20000
    Erasing at 0x0 -- 100% complete.
    OK
    TI8148_EVM#nand write.i 0x81000000 0x0 0x00018000

    NAND write: device 0 offset 0x0, size 0x18000
    98304 bytes written: OK
    TI8148_EVM#mw.b 0x81000000 0xFF 0x00240000
    TI8148_EVM#fatload mmc 0 0x81000000 u-boot.bin
    reading u-boot.bin

    185044 bytes read
    TI8148_EVM#nand erase 0x00020000 0x00240000

    NAND erase: device 0 offset 0x20000, size 0x240000
    Erasing at 0x240000 -- 100% complete.
    OK
    TI8148_EVM#nand write.i 0x81000000 0x00020000 0x00034800

    NAND write: device 0 offset 0x20000, size 0x34800
    215040 bytes written: OK
    TI8148_EVM#mw.b 0x81000000 0xFF 0x00440000
    TI8148_EVM#fatload mmc 0 0x81000000 uImage
    reading uImage

    2570080 bytes read
    TI8148_EVM#nand erase 0x00280000 0x00440000

    NAND erase: device 0 offset 0x280000, size 0x440000
    Erasing at 0x6a0000 -- 100% complete.
    OK
    TI8148_EVM#nand write.i 0x81000000 0x00280000 0x002AC000

    NAND write: device 0 offset 0x280000, size 0x2ac000
    2801664 bytes written: OK
    TI8148_EVM#

    You can manually run minicom in the future with this setup script using: minicom -S setup_u-boot_uImage-nand.minicom

    And then I configured it to NAND boot and connect it with minicom -w. The following is the output:

    Welcome to minicom 2.4

    OPTIONS: I18n
    Compiled on Jan 25 2010, 06:49:09.
    Port /dev/ttyUSB1

    Press CTRL-A Z for help on special keys

    CCCCCCCCCCCCCCCCCCCCCCCCCCCCCCCCCCCCCCCC

    It will only keep output the "CCCCCCCCCCC..." endlessly. I found a previous post ( http://e2e.ti.com/support/dsp/davinci_digital_media_processors/f/716/t/233142.aspx ) here which having the same "CCCCCCC..." output. From my understanding from the post, is it because of the 8-bits and 16-bits problem?

    Best regards,

    Benz


  • Benz,

    I have NAND with 16-bit bus, thus my S1.8 is set to 1. Thus when I load the u-boot from SD I have:

    picocom v1.4

    port is        : /dev/ttyUSB0
    flowcontrol    : none
    baudrate is    : 115200
    parity is      : none
    databits are   : 8
    escape is      : C-a
    noinit is      : no
    noreset is     : no
    nolock is      : no
    send_cmd is    : sx -vv
    receive_cmd is : rz -vv

    Terminal ready


    U-Boot 2010.06 (Dec 26 2012 - 18:17:23)

    TI8148-GP rev 2.1

    ARM clk: 600MHz
    DDR clk: 400MHz

    DRAM:  2 GiB
    MMC:   OMAP SD/MMC: 0
    Using default environment

    The 2nd stage U-Boot will now be auto-loaded
    Please do not interrupt the countdown till TI8148_EVM prompt if 2nd stage is already flashed
    Hit any key to stop autoboot:  0
    reading u-boot.bin

    210400 bytes read
    ## Starting application at 0x80800000 ...


    U-Boot 2010.06 (Dec 26 2012 - 18:12:01)

    TI8148-GP rev 2.1

    ARM clk: 600MHz
    DDR clk: 400MHz

    I2C:   ready
    DRAM:  2 GiB
    NAND:  HW ECC BCH8 Selected
    256 MiB
    MMC:   OMAP SD/MMC: 0
    *** Warning - bad CRC or NAND, using default environment

                              .:;rrr;;.                  
                        ,5#@@@@#####@@@@@@#2,            
                     ,A@@@hi;;;r5;;;;r;rrSG@@@A,         
                   r@@#i;:;s222hG;rrsrrrrrr;ri#@@r       
                 :@@hr:r;SG3ssrr2r;rrsrsrsrsrr;rh@@:     
                B@H;;rr;3Hs;rrr;sr;;rrsrsrsrsrsr;;H@B    
               @@s:rrs;5#;;rrrr;r#@H:;;rrsrsrsrsrr:s@@   
              @@;;srs&X#9;r;r;;,2@@@rrr:;;rrsrsrsrr;;@@  
             @@;;rrsrrs@MB#@@@@@###@@@@@@#rsrsrsrsrr;;@@ 
            G@r;rrsrsr;#X;SX25Ss#@@#M@#9H9rrsrsrsrsrs;r@G
            @9:srsrsrs;2@;:;;:.X@@@@@H::;rrsrsrsrsrsrr:3@
           X@;rrsrsrsrr;XAi;;:&@@#@Bs:rrsrsrsrsrsrsrsrr;@X
           @#;rsrsrsrsrr;r2ir@@@###::rrsrsrsrsrsrsrsrsr:@@
           @A:rrsrsrsrr;:2@29@@M@@@;:;rrrrsrsrsrsrsrsrs;H@
           @&;rsrsrsrr;A@@@@@@###@@@s::;:;;rrsrsrsrsrsr;G@
           @#:rrsrsrsr;G@5Hr25@@@#@@@#9XG9s:rrrrsrsrsrs:#@
           M@;rsrsrsrs;r@&#;::S@@@@@@@M@@@@Grr:;rsrsrsr;@#
           :@s;rsrsrsrr:M#Msrr;;&#@@@@@@@@@@H@@5;rsrsr;s@,
            @@:rrsrsrsr;S@rrrsr;:;r3MH@@#@M5,S@@irrsrr:@@
             @A:rrsrsrsrrrrrsrsrrr;::;@##@r:;rH@h;srr:H@ 
             ;@9:rrsrsrsrrrsrsrsrsr;,S@Hi@i:;s;MX;rr:h@; 
              r@B:rrrrsrsrsrsrsrr;;sA@#i,i@h;r;S5;r:H@r  
               ,@@r;rrrsrsrsrsrr;2BM3r:;r:G@:rrr;;r@@,   
                 B@Mr;rrrrsrsrsr@@S;;;rrr:5M;rr;rM@H     
                  .@@@i;;rrrrsrs2i;rrrrr;r@M:;i@@@.      
                    .A@@#5r;;;r;;;rrr;r:r#AsM@@H.        
                       ;&@@@@MhXS5i5SX9B@@@@G;           
                           :ihM#@@@@@##hs,               

    Net:   <ethaddr> not set. Reading from E-fuse
    Detected MACID:90:d7:eb:d5:13:96
    cpsw
    Hit any key to stop autoboot:  0
    TI8148_EVM#   


    When I set this S1.8 switch to 0 (8-bit NAND), I have the below console output (booting from SD card):

    picocom v1.4

    port is        : /dev/ttyUSB0
    flowcontrol    : none
    baudrate is    : 115200
    parity is      : none
    databits are   : 8
    escape is      : C-a
    noinit is      : no
    noreset is     : no
    nolock is      : no
    send_cmd is    : sx -vv
    receive_cmd is : rz -vv

    Terminal ready


    U-Boot 2010.06 (Dec 26 2012 - 18:17:23)

    TI8148-GP rev 2.1

    ARM clk: 600MHz
    DDR clk: 400MHz

    DRAM:  2 GiB
    MMC:   OMAP SD/MMC: 0
    Using default environment

    The 2nd stage U-Boot will now be auto-loaded
    Please do not interrupt the countdown till TI8148_EVM prompt if 2nd stage is already flashed
    Hit any key to stop autoboot:  0
    reading u-boot.bin

    210400 bytes read
    ## Starting application at 0x80800000 ...


    U-Boot 2010.06 (Dec 26 2012 - 18:12:01)

    TI8148-GP rev 2.1

    ARM clk: 600MHz
    DDR clk: 400MHz

    I2C:   ready
    DRAM:  2 GiB
    NAND:  HW ECC BCH8 Selected
    NAND device: Manufacturer ID: 0x2c, Chip ID: 0xca (Micron NAND 256MiB 3,3V 16-bit)
    NAND bus width 8 instead 16 bit
    No NAND device found!!!
    0 MiB
    MMC:   OMAP SD/MMC: 0
    *** Warning - bad CRC or NAND, using default environment

                              .:;rrr;;.                  
                        ,5#@@@@#####@@@@@@#2,            
                     ,A@@@hi;;;r5;;;;r;rrSG@@@A,         
                   r@@#i;:;s222hG;rrsrrrrrr;ri#@@r       
                 :@@hr:r;SG3ssrr2r;rrsrsrsrsrr;rh@@:     
                B@H;;rr;3Hs;rrr;sr;;rrsrsrsrsrsr;;H@B    
               @@s:rrs;5#;;rrrr;r#@H:;;rrsrsrsrsrr:s@@   
              @@;;srs&X#9;r;r;;,2@@@rrr:;;rrsrsrsrr;;@@  
             @@;;rrsrrs@MB#@@@@@###@@@@@@#rsrsrsrsrr;;@@ 
            G@r;rrsrsr;#X;SX25Ss#@@#M@#9H9rrsrsrsrsrs;r@G
            @9:srsrsrs;2@;:;;:.X@@@@@H::;rrsrsrsrsrsrr:3@
           X@;rrsrsrsrr;XAi;;:&@@#@Bs:rrsrsrsrsrsrsrsrr;@X
           @#;rsrsrsrsrr;r2ir@@@###::rrsrsrsrsrsrsrsrsr:@@
           @A:rrsrsrsrr;:2@29@@M@@@;:;rrrrsrsrsrsrsrsrs;H@
           @&;rsrsrsrr;A@@@@@@###@@@s::;:;;rrsrsrsrsrsr;G@
           @#:rrsrsrsr;G@5Hr25@@@#@@@#9XG9s:rrrrsrsrsrs:#@
           M@;rsrsrsrs;r@&#;::S@@@@@@@M@@@@Grr:;rsrsrsr;@#
           :@s;rsrsrsrr:M#Msrr;;&#@@@@@@@@@@H@@5;rsrsr;s@,
            @@:rrsrsrsr;S@rrrsr;:;r3MH@@#@M5,S@@irrsrr:@@
             @A:rrsrsrsrrrrrsrsrrr;::;@##@r:;rH@h;srr:H@ 
             ;@9:rrsrsrsrrrsrsrsrsr;,S@Hi@i:;s;MX;rr:h@; 
              r@B:rrrrsrsrsrsrsrr;;sA@#i,i@h;r;S5;r:H@r  
               ,@@r;rrrsrsrsrsrr;2BM3r:;r:G@:rrr;;r@@,   
                 B@Mr;rrrrsrsrsr@@S;;;rrr:5M;rr;rM@H     
                  .@@@i;;rrrrsrs2i;rrrrr;r@M:;i@@@.      
                    .A@@#5r;;;r;;;rrr;r:r#AsM@@H.        
                       ;&@@@@MhXS5i5SX9B@@@@G;           
                           :ihM#@@@@@##hs,               

    Net:   <ethaddr> not set. Reading from E-fuse
    Detected MACID:90:d7:eb:d5:13:96
    cpsw
    Hit any key to stop autoboot:  0
    TI8148_EVM#

    Can you do the same at your side and post the console output here? I mean first boot from MMC/SD card with S1.8=1 (NAND 16-bit) then with S1.8=0 (NAND 8-bit).

    Regards,
    Pavel

  • Pavel,

    With S1.8 set to 0:

    test2@test2-EVM:~$ minicom -w


    Welcome to minicom 2.4

    OPTIONS: I18n
    Compiled on Jan 25 2010, 06:49:09.
    Port /dev/ttyUSB1

    Press CTRL-A Z for help on special keys

    U-Boot 2010.06 (Nov 10 2011 - 23:50:16)

    TI8148-GP rev 2.1

    ARM clk: 600MHz
    DDR clk: 400MHz

    DRAM: 2 GiB
    Using default environment

    The 2nd stage U-Boot will now be auto-loaded
    Please do not interrupt the countdown till TI8148_EVM prompt if 2nd stage is alr
    eady flashed
    MMC: OMAP SD/MMC: 0
    Hit any key to stop autoboot: 0
    reading u-boot.bin

    185044 bytes read
    ## Starting application at 0x80800000 ...


    U-Boot 2010.06 (Nov 10 2011 - 23:45:47)

    TI8148-GP rev 2.1

    ARM clk: 600MHz
    DDR clk: 400MHz

    I2C: ready
    DRAM: 2 GiB
    NAND: HW ECC Hamming Code selected
    256 MiB
    *** Warning - bad CRC or NAND, using default environment

    .:;rrr;;.
    ,5#@@@@#####@@@@@@#2,
    ,A@@@hi;;;r5;;;;r;rrSG@@@A,
    r@@#i;:;s222hG;rrsrrrrrr;ri#@@r
    :@@hr:r;SG3ssrr2r;rrsrsrsrsrr;rh@@:
    B@H;;rr;3Hs;rrr;sr;;rrsrsrsrsrsr;;H@B
    @@s:rrs;5#;;rrrr;r#@H:;;rrsrsrsrsrr:s@@
    @@;;srs&X#9;r;r;;,2@@@rrr:;;rrsrsrsrr;;@@
    @@;;rrsrrs@MB#@@@@@###@@@@@@#rsrsrsrsrr;;@@
    G@r;rrsrsr;#X;SX25Ss#@@#M@#9H9rrsrsrsrsrs;r@G
    @9:srsrsrs;2@;:;;:.X@@@@@H::;rrsrsrsrsrsrr:3@
    X@;rrsrsrsrr;XAi;;:&@@#@Bs:rrsrsrsrsrsrsrsrr;@X
    @#;rsrsrsrsrr;r2ir@@@###::rrsrsrsrsrsrsrsrsr:@@
    @A:rrsrsrsrr;:2@29@@M@@@;:;rrrrsrsrsrsrsrsrs;H@
    @&;rsrsrsrr;A@@@@@@###@@@s::;:;;rrsrsrsrsrsr;G@
    @#:rrsrsrsr;G@5Hr25@@@#@@@#9XG9s:rrrrsrsrsrs:#@
    M@;rsrsrsrs;r@&#;::S@@@@@@@M@@@@Grr:;rsrsrsr;@#
    :@s;rsrsrsrr:M#Msrr;;&#@@@@@@@@@@H@@5;rsrsr;s@,
    @@:rrsrsrsr;S@rrrsr;:;r3MH@@#@M5,S@@irrsrr:@@
    @A:rrsrsrsrrrrrsrsrrr;::;@##@r:;rH@h;srr:H@
    ;@9:rrsrsrsrrrsrsrsrsr;,S@Hi@i:;s;MX;rr:h@;
    r@B:rrrrsrsrsrsrsrr;;sA@#i,i@h;r;S5;r:H@r
    ,@@r;rrrsrsrsrsrr;2BM3r:;r:G@:rrr;;r@@,
    B@Mr;rrrrsrsrsr@@S;;;rrr:5M;rr;rM@H
    .@@@i;;rrrrsrs2i;rrrrr;r@M:;i@@@.
    .A@@#5r;;;r;;;rrr;r:r#AsM@@H.
    ;&@@@@MhXS5i5SX9B@@@@G;
    :ihM#@@@@@##hs,

    MMC: OMAP SD/MMC: 0
    Net: <ethaddr> not set. Reading from E-fuse
    Detected MACID:50:56:63:9c:6d:dc
    cpsw
    Hit any key to stop autoboot: 0
    TI8148_EVM#

    With S1.8 set to 1:

    test2@test2-EVM:~$ minicom -w


    Welcome to minicom 2.4

    OPTIONS: I18n
    Compiled on Jan 25 2010, 06:49:09.
    Port /dev/ttyUSB1

    Press CTRL-A Z for help on special keys

    U-Boot 2010.06 (Nov 10 2011 - 23:50:16)

    TI8148-GP rev 2.1

    ARM clk: 600MHz
    DDR clk: 400MHz

    DRAM: 2 GiB
    Using default environment

    The 2nd stage U-Boot will now be auto-loaded
    Please do not interrupt the countdown till TI8148_EVM prompt if 2nd stage is alr
    eady flashed
    MMC: OMAP SD/MMC: 0
    Hit any key to stop autoboot: 0
    reading u-boot.bin

    185044 bytes read
    ## Starting application at 0x80800000 ...


    U-Boot 2010.06 (Nov 10 2011 - 23:45:47)

    TI8148-GP rev 2.1

    ARM clk: 600MHz
    DDR clk: 400MHz

    I2C: ready
    DRAM: 2 GiB
    NAND: HW ECC Hamming Code selected
    NAND device: Manufacturer ID: 0x2c, Chip ID: 0xca (Micron NAND 256MiB 3,3V 16-bi
    t)
    NAND bus width 8 instead 16 bit
    No NAND device found!!!
    0 MiB
    *** Warning - bad CRC or NAND, using default environment

    .:;rrr;;.
    ,5#@@@@#####@@@@@@#2,
    ,A@@@hi;;;r5;;;;r;rrSG@@@A,
    r@@#i;:;s222hG;rrsrrrrrr;ri#@@r
    :@@hr:r;SG3ssrr2r;rrsrsrsrsrr;rh@@:
    B@H;;rr;3Hs;rrr;sr;;rrsrsrsrsrsr;;H@B
    @@s:rrs;5#;;rrrr;r#@H:;;rrsrsrsrsrr:s@@
    @@;;srs&X#9;r;r;;,2@@@rrr:;;rrsrsrsrr;;@@
    @@;;rrsrrs@MB#@@@@@###@@@@@@#rsrsrsrsrr;;@@
    G@r;rrsrsr;#X;SX25Ss#@@#M@#9H9rrsrsrsrsrs;r@G
    @9:srsrsrs;2@;:;;:.X@@@@@H::;rrsrsrsrsrsrr:3@
    X@;rrsrsrsrr;XAi;;:&@@#@Bs:rrsrsrsrsrsrsrsrr;@X
    @#;rsrsrsrsrr;r2ir@@@###::rrsrsrsrsrsrsrsrsr:@@
    @A:rrsrsrsrr;:2@29@@M@@@;:;rrrrsrsrsrsrsrsrs;H@
    @&;rsrsrsrr;A@@@@@@###@@@s::;:;;rrsrsrsrsrsr;G@
    @#:rrsrsrsr;G@5Hr25@@@#@@@#9XG9s:rrrrsrsrsrs:#@
    M@;rsrsrsrs;r@&#;::S@@@@@@@M@@@@Grr:;rsrsrsr;@#
    :@s;rsrsrsrr:M#Msrr;;&#@@@@@@@@@@H@@5;rsrsr;s@,
    @@:rrsrsrsr;S@rrrsr;:;r3MH@@#@M5,S@@irrsrr:@@
    @A:rrsrsrsrrrrrsrsrrr;::;@##@r:;rH@h;srr:H@
    ;@9:rrsrsrsrrrsrsrsrsr;,S@Hi@i:;s;MX;rr:h@;
    r@B:rrrrsrsrsrsrsrr;;sA@#i,i@h;r;S5;r:H@r
    ,@@r;rrrsrsrsrsrr;2BM3r:;r:G@:rrr;;r@@,
    B@Mr;rrrrsrsrsr@@S;;;rrr:5M;rr;rM@H
    .@@@i;;rrrrsrs2i;rrrrr;r@M:;i@@@.
    .A@@#5r;;;r;;;rrr;r:r#AsM@@H.
    ;&@@@@MhXS5i5SX9B@@@@G;
    :ihM#@@@@@##hs,

    MMC: OMAP SD/MMC: 0
    Net: <ethaddr> not set. Reading from E-fuse
    Detected MACID:50:56:63:9c:6d:dc
    cpsw
    Hit any key to stop autoboot: 0
    TI8148_EVM#


    Both was executed with SW2.1 set to 1.

    Regards,

    Benz

  • Pavel, 

    I noticed that we having the inverted result.

    When the SW1.8 is 0:

    Your side:

    NAND:  HW ECC BCH8 Selected
    NAND device: Manufacturer ID: 0x2c, Chip ID: 0xca (Micron NAND 256MiB 3,3V 16-bit)
    NAND bus width 8 instead 16 bit
    No NAND device found!!!
    0 MiB

    My side:

    NAND: HW ECC Hamming Code selected 
    256 MiB 


    When the SW1.8 is 1:

    Your side:

    NAND:  HW ECC BCH8 Selected
    256 MiB

    My side:

    NAND: HW ECC Hamming Code selected 
    NAND device: Manufacturer ID: 0x2c, Chip ID: 0xca (Micron NAND 256MiB 3,3V 16-bit) 
    NAND bus width 8 instead 16 bit 
    No NAND device found!!! 
    0 MiB 


    I also noticed that the ECC is different, yours is using BCH8 while mine is using Hamming Code. If the problem is there, how can I change it to BCH8? I remember the guidelines did stated to use BCH8 instead of Hamming Code, but that guide was meant for the CCS Netra NAND. Guess that still applied here, right?


    Regards,

    Benz

  • Benz,

    Benz Kek said:
    I also noticed that the ECC is different, yours is using BCH8 while mine is using Hamming Code. If the problem is there, how can I change it to BCH8?

    Yes, this is a problem. The default ECC schema is BCH8. And for flashing the NAND, also BCH8 should be used. See the below wiki page:

    http://processors.wiki.ti.com/index.php/TI81XX_PSP_NAND_Driver_User_Guide#ECC_schemes_usage_table

    You can change it from the u-boot prompt:

    TI8148_EVM#nandecc hw 2
    HW ECC BCH8 Selected

    http://processors.wiki.ti.com/index.php/TI81XX_PSP_UBOOT_User_Guide#NAND_ECC_algorithm_selection

    It is strange for me that your default ECC is HW ECC hamming code, not HW ECC BCH8! Have you prepare your MMC/SD card as I explain in my previous posts or you are using the default one coming with the DM814x EVM box?

    The physical NAND chip (from Micron) is placed in a socket that can be easy open. When I open the NAND socket of the DM814x EVM (U23 - NAND FLASH), the Micron NAND chip inside is marked with "29F2G16AAD", and "16" means 16-bit NAND part. What about yours?

    Best regards,
    Pavel

  • Pavel,

    Pavel Botev said:

    You can change it from the u-boot prompt:

    TI8148_EVM#nandecc hw 2
    HW ECC BCH8 Selected

    I changed it, but it doesn't seems to be saved. After I reboot it, it back to hamming code.

    Pavel Botev said:
    DM814x EVM (U23 - NAND FLASH), the Micron NAND chip inside is marked with "29F2G16AAD", and "16" means 16-bit NAND part. What about yours?

    My one is 29F2G16ABAEA.

    Best regards,

    Benz

  • Pavel,

    Pavel Botev said:
    Have you prepare your MMC/SD card as I explain in my previous posts or you are using the default one coming with the DM814x EVM box?

    I using the default one coming with the DM814x EVM box. Should I make a new MMC/SD card?

    Regards,

    Benz

  • Benz,

    Benz Kek said:
    My one is 29F2G16ABAEA.

    Then your NAND chip is also 16-bit.

    BR
    Pavel

  • Benz Kek said:
    I using the default one coming with the DM814x EVM box. Should I make a new MMC/SD card?

    Yes, you should. The default one coming with the EVM box is with old version of the EZSDK (5.02 or 5.03), while in the latest EZSDK 5.05.02.00 with have NAND patches applied.

    Best regards,
    Pavel

  • Pavel,

    Then, could you somehow give me a rough idea on the process of creating it? So that I would be on the right track, unlike before I seek help here. 

    Best regards,

    Benz

  • Benz,

    To create bootable MMC/SD card, you will need a MMC/SD card reader connected to your host/development PC. From one side of this reader you should plug in the MMC/SD card you have, from the other side you should plug this card reader in the PC USB port. Then your MMC/SD card is auto mounted under /media as BOOT and ROOTFS partitions.

    /media/BOOT and /media/ROOTFS

    Then you should follow this doc:

    http://downloads.ti.com/dsps/dsps_public_sw/ezsdk/latest/exports/DM814x_EZ_Software_Developers_Guide.pdf

    section 6.6 How to create an SD card

    Regards,
    Pavel

  • Just to note that what version of the EZSDK you have in the MMC/SD card should not matter when flashing the NAND with u-boot from the CCStudio.

    Can you try with both S1.8=0 and S1.8=1, is there any difference when trying with the CCStudio?

    Best regards,
    Pavel

  • Pavel,

    Thank you very much, I will try create this SD card in the mean time. I get back to you as soon as possible.

    Best regards,

    Benz

  • Pavel,

    Pavel Botev said:
    Can you try with both S1.8=0 and S1.8=1, is there any difference when trying with the CCStudio?

    I tried that before I seek help here, it doesn't matter whether the S1.8 is ON or OFF. It still able to flash it successfully according to the NETRA Nand. 

    Best regards,

    Benz

  • Benz Kek said:
    t doesn't matter whether the S1.8 is ON or OFF

    In both cases, do you have the same CCS console output?

    Starting NETRA NAND writer

    ----------------------
    NAND FLASH DETAILS
    ----------------------
    Device ID : 0x0
    Manufacture ID : 0x0
    Page Size : 1024 Bytes
    Spare Size : 32 Bytes
    Pages_Per_Block : 64
    Number_of_Blocks : 427452753
    Device_width : 1 Byte
    DeviceSize : 1685 MB

    Regards,
    Pavel

  • Just to be sure we refer to the same thing, the S1.8 switch I refer is from the switch below:

    Regards,
    Pavel

  • Pavel,

    Ya, the switch shown in the photo. We change the number 8, right?

    Regards,

    Benz

  • Benz Kek said:
    We change the number 8, right?

    Right.

    Also, in this picture, number 1 to 5 correspond to BTMODE[0:4] and are configured for MMC/SD boot in this picture.

    So, when you flash the NAND, S1.[1:5] (BTMODE[0:4]) should be all OFF (0).

    When booting from MMC/SD card, S1.[1:5] = 11101 (BTMODE[4:0] = 10111)

    When booting from NAND, S1.[1:5] = 01001  (BTMODE[4:0] = 10010)

    Regards,
    Pavel

  • Pavel,

    Pavel Botev said:

    Also, in this picture, number 1 to 5 correspond to BTMODE[0:4] and are configured for MMC/SD boot in this picture.

    So, when you flash the NAND, S1.[1:5] (BTMODE[0:4]) should be all OFF (0).

    When booting from MMC/SD card, S1.[1:5] = 11101 (BTMODE[4:0] = 10111)

    When booting from NAND, S1.[1:5] = 01001  (BTMODE[4:0] = 10010)

    Yes, I kind of sorted out all these during our conversation previously, but one thing I not sure of. When we using the NETRA NAND to flash, it is supposed to set all the switch to 0, right? I was unable to do so, because it will failed to erase and write on the NAND.

    Therefore, every times I use NETRA NAND, I have to set it to NAND boot in order to "flash" it successfully. However, yesterday I tried connect it with minicom after the 1st stage flashing with NETRA NAND, it doesn't show any output. 

    After that, I tried to flash without CCS as I mentioned in my previous post.

    Best regards,

    Benz

  • Benz,

    Benz Kek said:
    When we using the NETRA NAND to flash, it is supposed to set all the switch to 0, right?

    If by "all the switch to 0" you mean S1.[1:5] switches to 0, then yes, this is right. And this works fine on my side.

    Regards,
    Pavel

  • Pavel,

    The following is my log after I flash the NAND flash memory with the newly-created SD card:

    test2@test2-EVM:~$ minicom -w


    Welcome to minicom 2.4

    OPTIONS: I18n
    Compiled on Jan 25 2010, 06:49:09.
    Port /dev/ttyUSB1

    Press CTRL-A Z for help on special keys

    U-Boot 2010.06 (Dec 26 2012 - 18:16:40)

    TI8148-GP rev 2.1

    ARM clk: 600MHz
    DDR clk: 400MHz

    DRAM: 2 GiB
    NAND: HW ECC BCH8 Selected
    256 MiB
    Using default environment

    The 2nd stage U-Boot will now be auto-loaded
    Please do not interrupt the countdown till TI8148_EVM prompt if 2nd stage is alr
    eady flashed
    Hit any key to stop autoboot: 0

    NAND read: device 0 offset 0x20000, size 0x40000
    262144 bytes read: OK
    ## Starting application at 0x81000000 ...


    U-Boot 2010.06 (Dec 26 2012 - 18:12:01)

    TI8148-GP rev 2.1

    ARM clk: 600MHz
    DDR clk: 400MHz

    I2C: ready
    DRAM: 2 GiB
    NAND: HW ECC BCH8 Selected
    256 MiB
    MMC: OMAP SD/MMC: 0
    *** Warning - bad CRC or NAND, using default environment

    .:;rrr;;.
    ,5#@@@@#####@@@@@@#2,
    ,A@@@hi;;;r5;;;;r;rrSG@@@A,
    r@@#i;:;s222hG;rrsrrrrrr;ri#@@r
    :@@hr:r;SG3ssrr2r;rrsrsrsrsrr;rh@@:
    B@H;;rr;3Hs;rrr;sr;;rrsrsrsrsrsr;;H@B
    @@s:rrs;5#;;rrrr;r#@H:;;rrsrsrsrsrr:s@@
    @@;;srs&X#9;r;r;;,2@@@rrr:;;rrsrsrsrr;;@@
    @@;;rrsrrs@MB#@@@@@###@@@@@@#rsrsrsrsrr;;@@
    G@r;rrsrsr;#X;SX25Ss#@@#M@#9H9rrsrsrsrsrs;r@G
    @9:srsrsrs;2@;:;;:.X@@@@@H::;rrsrsrsrsrsrr:3@
    X@;rrsrsrsrr;XAi;;:&@@#@Bs:rrsrsrsrsrsrsrsrr;@X
    @#;rsrsrsrsrr;r2ir@@@###::rrsrsrsrsrsrsrsrsr:@@
    @A:rrsrsrsrr;:2@29@@M@@@;:;rrrrsrsrsrsrsrsrs;H@
    @&;rsrsrsrr;A@@@@@@###@@@s::;:;;rrsrsrsrsrsr;G@
    @#:rrsrsrsr;G@5Hr25@@@#@@@#9XG9s:rrrrsrsrsrs:#@
    M@;rsrsrsrs;r@&#;::S@@@@@@@M@@@@Grr:;rsrsrsr;@#
    :@s;rsrsrsrr:M#Msrr;;&#@@@@@@@@@@H@@5;rsrsr;s@,
    @@:rrsrsrsr;S@rrrsr;:;r3MH@@#@M5,S@@irrsrr:@@
    @A:rrsrsrsrrrrrsrsrrr;::;@##@r:;rH@h;srr:H@
    ;@9:rrsrsrsrrrsrsrsrsr;,S@Hi@i:;s;MX;rr:h@;
    r@B:rrrrsrsrsrsrsrr;;sA@#i,i@h;r;S5;r:H@r
    ,@@r;rrrsrsrsrsrr;2BM3r:;r:G@:rrr;;r@@,
    B@Mr;rrrrsrsrsr@@S;;;rrr:5M;rr;rM@H
    .@@@i;;rrrrsrs2i;rrrrr;r@M:;i@@@.
    .A@@#5r;;;r;;;rrr;r:r#AsM@@H.
    ;&@@@@MhXS5i5SX9B@@@@G;
    :ihM#@@@@@##hs,

    Net: <ethaddr> not set. Reading from E-fuse
    Detected MACID:50:56:63:9c:6d:dc
    cpsw
    Hit any key to stop autoboot: 0
    Card did not respond to voltage select!
    ** Can't read from device 0 **

    ** Unable to use mmc 0:1 for fatload **
    In case ENV on MMC/SD is required
    Please put a valid script named boot.scr on the card
    Refer to the User Guide on how to generate the image
    TI8148_EVM#

    I think successfully booted from NAND flash memory, but this few lines is not the same output as yours, is it okay? 

    ** Unable to use mmc 0:1 for fatload ** 
    In case ENV on MMC/SD is required 
    Please put a valid script named boot.scr on the card 
    Refer to the User Guide on how to generate the image


    If it doesn't matter, then I think it is successfully booted from NAND. Thanks a lot for your help, it was a great assistance you provided! 

    Best regards,

    Benz

  • Oh, allow me to conclude everything, so that people like me would not face the same issue in the future.

    Steps to boot from NAND:

    1. Prepare a Linux host. (Ubuntu 10.04 LTS in this case) or virtual machine is okay too.
    2. Install the EZSDK on the host. 
    3. Install the minicom on the host by executing sudo apt-get install minicom
    4. Configure the minicom and set its serial port to /dev/ttyUSB0 (it may vary for different case, normally try /dev/ttyUSB1 if /dev/ttyUSB0 didn't work)
    5. Prepare a UART to USB converter. (as it is NOT provided)
    6. Connect the UART from DM8148 to USB port of the host. (UART port is the one beside the SD card slot on DM8148)
    7. Connect power supply to DM8148.
    8. Configure DM8148 to SD boot mode. The following is the configuration:
      1. SW1.1 = 1
      2. SW1.2 = 1
      3. SW1.3 = 1
      4. SW1.4 = 0
      5. SW1.5 = 1
      6. SW1.8 = 1 (To enable 16-bits of NAND usage)
      7. SW2.1 = 1 (To enable NAND)
    9. Go to your bin folder located in the EZSDK directory. (usually in home folder named ti-ezsdk_dm814x-evm_X_XX_XX_XX, where X is the version number)
    10. Now, you need to create a new SD card and use this card instead of the provided SD card.
    11. Connect your new SD card via a SD card reader to your Ubuntu host.
    12. Open a new terminal and execute the following code:
      1. export EZSDK="Your ti-ezsdk_dm814x-evm_X_XX_XX_XX/bin directory"
      2. sudo $EZSDK/bin/mksdboot.sh --device /dev/sdb --sdk $EZSDK (make sure /dev/sdb is the new SD card and no valuable data on it)
      3. After done, disconnect the new SD card and insert to DM8184 SD card slot.
    13. Open a new terminal (Ctrl + Alt + t) and simply drag and drop a file named setup-nand-images.sh located in the same directory as $EZSDK/bin/.
    14. Just use the default setting, by pressing Enter twice, the script will automatically bring you to minicom.
    15. By that time, power up your DM8148. You will see some output and then a timer for autoboot. Cancel it by pressing any keys. It will start flashing everything.
    16. If you don't see any output, your minicom configuration might wrong. I mean the /dev/ttyUSBX part.
    17. After the script is successfully executed, power off your machine. Configure it to NAND boot by just simply set the current SW1.1 and SW1.3 to 0.
    18. On a terminal, execute minicom -w.
    19. Power up your DM8148 and there you have it, booted from NAND. No need go through NETRA NAND or CCS.


    Hopefully this sharing of my experience helps!


    Best regards,

    Benz

  • Benz,

    Benz Kek said:

    I think successfully booted from NAND flash memory, but this few lines is not the same output as yours, is it okay? 

    ** Unable to use mmc 0:1 for fatload ** 
    In case ENV on MMC/SD is required 
    Please put a valid script named boot.scr on the card 
    Refer to the User Guide on how to generate the image

    You should press a keyboard button (in example "space") to stop the autoboot, you have 3 seconds for that when you see this on the console output:

    Hit any key to stop autoboot: 3

    When not hitting a key, the boot process is trying to load the linux kernel (uImage) from the MMC/SD card.

    Benz Kek said:
    If it doesn't matter, then I think it is successfully booted from NAND.

    Yes, you successfully booted from NAND, but you have just boot the u-boot. You still can flash and boot from NAND the linux kernel (uImage) and the root filesystem (JFFS2 or UBIFS), for complete NAND boot process.

    Can you also try booting the u-boot from NAND when you remove the MMC/SD card from the EVM.

    Best regards,
    Pavel

  • Benz,

    Benz Kek said:
    After the script is successfully executed, power off your machine. Configure it to NAND boot by just simply set the current SW1.1 and SW1.3 to 0.

    At this step, remove the MMC/SD card from the DM8148 EVM, thus you will be sure you are booting from NAND, not from MMC/SD.

    Best Regards,
    Pavel

  • Pavel,

    Pavel Botev said:
    Yes, you successfully booted from NAND, but you have just boot the u-boot. You still can flash and boot from NAND the linux kernel (uImage) and the root filesystem (JFFS2 or UBIFS), for complete NAND boot process.

    Now that the u-boot is completed, how do I flash the kernel and filesystem for the complete NAND boot process?

    Regards,

    Benz

  • Benz,

    Benz Kek said:
    Now that the u-boot is completed, how do I flash the kernel and filesystem for the complete NAND boot process?

    Let us start from the linux kernel (uImage). There are several ways to flash the linux kernel into the NAND:

    1. Though the setup-nand-images.sh script and MMC/SD card

    ti-ezsdk_dm814x-evm_5_05_02_00/bin/setup-nand-images.sh

    #offset to partition for kernel in NAND
    kernel_offset=0x00280000

    #size of the partition for kernel
    partition_kernel=0x00440000

    #size of the uImage with a buffer of 4KB along the size of default image
    kernel_size=0x002AC000

    if [ "$kernel" = "y" ]; then
        do_expect "\"$prompt\"" "send \"mw.b $loadaddr 0xFF $partition_kernel\"" $flashfilepath
        do_expect "\"$prompt\"" "send \"fatload mmc 0 $loadaddr uImage\"" $flashfilepath
        do_expect "\"$prompt\"" "send \"nand erase $kernel_offset $partition_kernel\"" $flashfilepath
        do_expect "\"$prompt\"" "send \"nand write.i $loadaddr $kernel_offset $kernel_size\"" $flashfilepath
    fi

    2. Through Network/TFTP, UART or MMC/SD:

    http://processors.wiki.ti.com/index.php/TI81XX_PSP_UBOOT_User_Guide#TI814X_and_TI813X_2

    TI8148_EVM# tftp 81000000 <kernel_image>
    

    Now flash the kernel image to NAND at the appropriate offset (refer to NAND layout section for the offsets)

    TI8148_EVM# nand erase 0x00280000 0x00400000
    TI8148_EVM# nand write 0x81000000 0x00280000 <image_size> (example, 0x200000)
    
    The example is using the network to load the linux kernel into the DDR memory, but you can also use UART or
    MMC/SD card to load the linux kernel (uImage) into the DDR (0x81000000).

    Regards,

    Pavel
  • Pavel,

    Okay, I'm done with the kernel. The next one is filesystem, right? 

    Regards,

    Benz

  • Benz,

    Benz Kek said:
    The next one is filesystem, right? 

    Right.

    You can use RAMDISK, JFFS2 or UBIFS filesystem for NAND. If you select JFFS2 or UBIFS, you should first create these.

    For UBIFS:

    http://processors.wiki.ti.com/index.php/TI81XX_PSP_UBOOT_User_Guide#Creating_UBIFS_File-System

    For JFFS2:

    http://processors.wiki.ti.com/index.php/TI81XX_PSP_UBOOT_User_Guide#Creating_JFFS2_File-system

    Once ready with creating, you can proceed with flashing the filesystem to NAND:

    http://processors.wiki.ti.com/index.php/TI81XX_PSP_UBOOT_User_Guide#TI814X_and_TI813X_3

    After flashing the filesystem, you need to set the u-boot boot arguments (environment variables) like below:

    http://processors.wiki.ti.com/index.php/TI81XX_PSP_UBOOT_User_Guide#U-Boot_Environment_Variables

    Regards,
    Pavel

  • Pavel,

    Pavel Botev said:
    For JFFS2:

    http://processors.wiki.ti.com/index.php/TI81XX_PSP_UBOOT_User_Guide#Creating_JFFS2_File-system

    I don't understand the part, I mean I don't have the rd-jffs2.bin.

    mkfs.jffs2 -lqn –e 128 -r target -o /tftpboot/rd-jffs2.bin

    It is also stated that the erase block size is for 8168 instead of 8148. 

    For the NAND part on the TI8168 EVM board the erase block is 128k Consult either u-boot, the kernel, or the data manual for the flash part used to find the erase block size. 

    And is it flashing from tftp? Can't we like straight flash it through the console we brought up with minicom?


    Best regards,

    Benz

  • Benz Kek said:
    I mean I don't have the rd-jffs2.bin

    [root@localhost]# ./mkfs.jffs2 -lqn –e 128 -r <target_fs> -o /tftpboot/rd-jffs2.bin

    The above command should create the rd-jffs2.bin file into the /tftpboot/ folder.
    The <target_fs> should be one of these two:

    1. ti-ezsdk_dm814x-evm_5_05_02_00/filesystem/arago-base-tisdk-image-dm814x-evm

    2. ti-ezsdk_dm814x-evm_5_05_02_00/filesystem/ezsdk-dm814x-evm-rootfs

    For the difference between these two file  systems see the below wiki page:

    http://processors.wiki.ti.com/index.php/EZSDK_Filesystems

    Benz Kek said:
    It is also stated that the erase block size is for 8168 instead of 8148.

    The erase block size for the DM814x EVM is also 128K. See the below wiki page how to determine it:

    http://processors.wiki.ti.com/index.php/Get_the_Flash_Erase_Block_Size

    See also this wiki:

    http://processors.wiki.ti.com/index.php/TI81XX_PSP_FAQ#Uboot_Warning:_Erase_size_0x00002000_smaller_than_one_erase_block_0x00020000_Erasing_0x00020000_instead

    Benz Kek said:
    And is it flashing from tftp? Can't we like straight flash it through the console we brought up with minicom?

    Yes, you can use the UART instead of TFTP to flash the NAND, but it will be much more slower. You can also use the MMC/SD card.

    Regards,
    Pavel

  • Pavel,

    I able to set up things up to the point where I got the mkfs.jffs2. 

    Is the steps below are necessary?  

    http://processors.wiki.ti.com/index.php/MTD_Utilities#Target

    If so, I can't seems to use the arm-arago-linux-gnueabi-gcc command. 

    Best regards,

    Benz

  • Benz,

    Benz Kek said:

    Is the steps below are necessary?  

    http://processors.wiki.ti.com/index.php/MTD_Utilities#Target

    No, this step is not necessary, as you will use the MTD utilities (mkfs.jffs2) on the host platform. While this step is necessary when you are going to use the MTD utilities (mkfs.jffs2, flash_erase, flash_info, etc) on the target platform (DM814x EVM).

    [root@localhost util]# mkfs.jffs2 -lqn –e 128 -r target -o /tftpboot/rd-jffs2.bin

    http://processors.wiki.ti.com/index.php/Create_a_JFFS2_Target_Image
    host$ mkfs.jffs2 -r <root file system> -e <erase_block_size>  -s <page_size>  [-p]  [-n]  -o <output file>

    Regards,
    Pavel