This thread has been locked.

If you have a related question, please click the "Ask a related question" button in the top right corner. The newly created question will be automatically linked to this question.

release mode

Other Parts Discussed in Thread: OMAPL138

Hi,

I have made a project on c6748 lcdk, and everything is fine on debug mode. But, the problem is every time the power is cycled, it doesnt work.

When I view the memory allocation, the flash memory wasn't there, but the dspram is used.

How should I change the setting to use the flash instead of ram, so that it will work even after power recycling...?

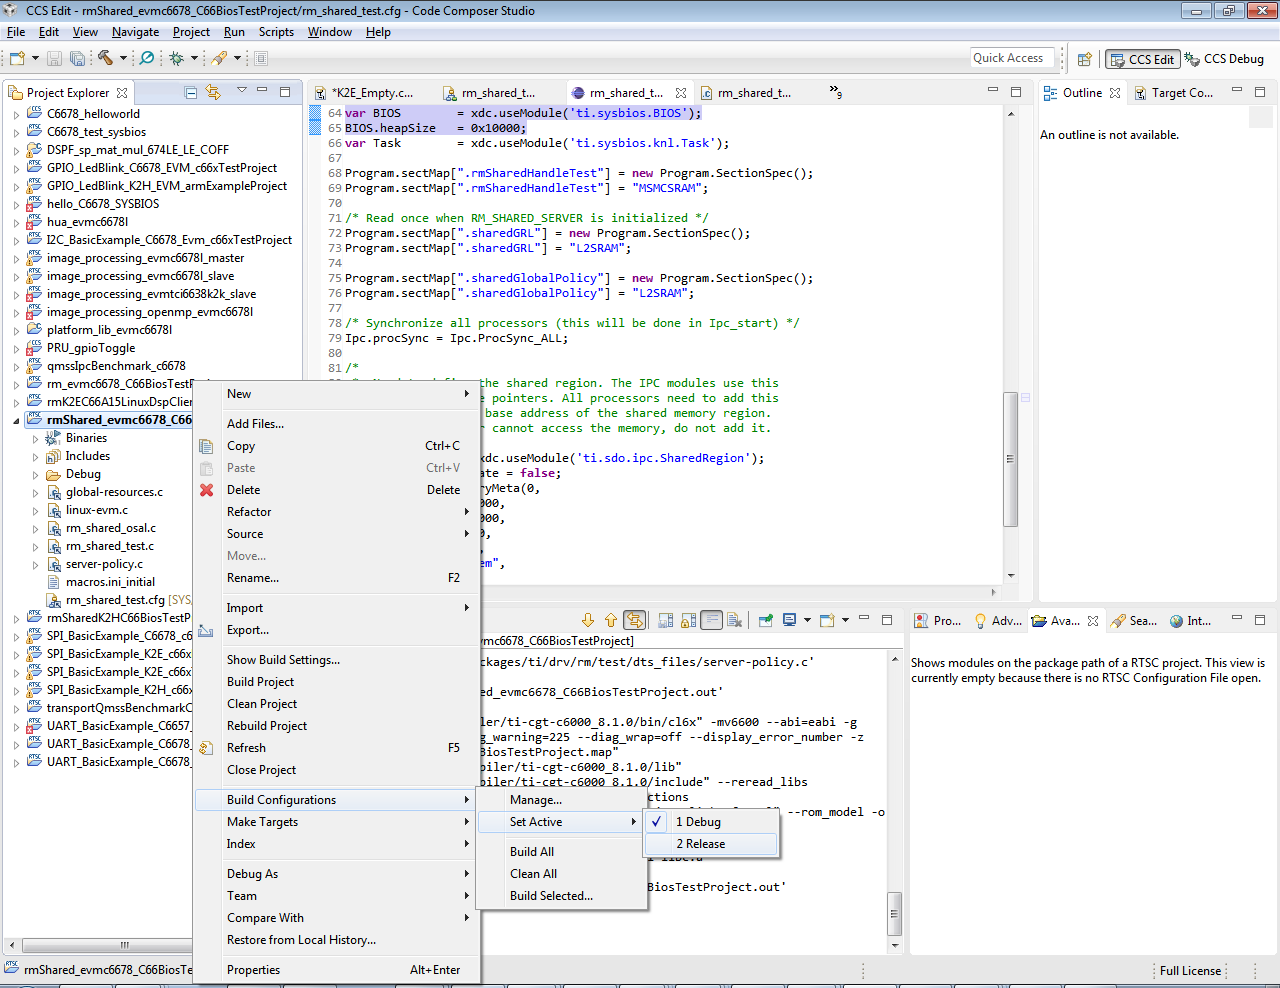
By the way, what should I do to change to release from debug mode ?

Is it as  simple as chenage the setting to release ..?

Thank you

Thank you

  • Hi siauhwa,

    For release mode you can do the changes like below. You can use both the release mode and the debug mode for Flashing the binary permanently into memories such as NAND/NOR/SPI.

     You have to use the flashing tool to flash the binary. The name of the tool is serial flasher utility.

    http://processors.wiki.ti.com/index.php/Serial_Boot_and_Flash_Loading_Utility_for_OMAP-L138

    Please refer to this WIKI for flashing and booting the program. For this purpose, you can use both the debug and release mode while building.


  •  in-out.zipHi Shankari,

    Basically what I need is to make a standalone lcdk ompal138 that will boot up upon power on and run my simple in-out audio c6748 code.
    so, I followed the steps on processors.wiki.ti.com/.../OMAPL138_StarterWare_Booting_And_Flashing, and it worked for the starterware gpio blinking project.

    And then I tried my simple in-out-audio project,  after aligning the code to 1024 and everything.

    When I tried to run my in-out-audio project I got the follwing message : 

    StarterWare OMAPL138 Boot Loader
    Jumping to StarterWare Application...

    Running DSP Application...

    But, I still don't get the loop back as expected, while If I run it all in DSPram (not standalone) it's working fine.

    I suspect in standalone mode, the program is stuck at init_AIC3106

    void DSP_Init()
    {
    Init_Interrupts();
    Init_I2C();
    if(!Init_AIC3106(SampleRateSetting)) {
    while(1); // stall on codec init failure
    }
    Init_McASP0();
    EnableInterrupts();
    }


    Do you have any suggestion on this issue ?


    Thank you

  • Hi siauhwa ong,

    siauhwa ong said:
    so, I followed the steps on processors.wiki.ti.com/.../OMAPL138_StarterWare_Booting_And_Flashing, and it worked for the starterware gpio blinking project.


    This is good news. You are able to flash the gpio blinking project and you made it work.

    In emulation mode, are you able to run your "in-out-audio project" project?

    Point 1:
    =========
    By emulation mode, you do a step by step debugging and understand the flow of the functions it gets into the variuos source files. Insert print messages accordingly. This will help where it got stuck.

    Point 2:
    ========
    In emulation method, you will run the gel file and initialise the peripherals.
    But in flashing, you will not use gel file instead you will use the configuration file in the AIS gen tool. So you can have a look at the differences with resepect to the initialisation portions in the gel file vs the *.cfg file which you uses for the AIS-gen tool.
  • Hi,
    Yes it works in emulation mode perfectly.
    I'll see the difference between ais CFg and gel
    I'll let you know later

    Please find attached the cfg file that I use for aisgen and the gel file used . Definitely they are configured diffrently. But, Iam not sure how set  the aisgen cfg to be the same as the gel file.OMAP-L138_LCDK.gelLCDK_AISGen_Config.cfg

    By the way, is there any uitity to create the aisgen cfg file from the gel file ?


    Thank you

  • Hi Siauhwa ong,

    I have attached the cfg file ( Nand_boot. cfg ) which you can use it by loading this CFG into the AIS gen tool and generate the binary which can be booted from NAND.

    Try the attached NaND-boot.cfg and tell me whether it works.

    7444.nand_boot.cfg