This thread has been locked.

If you have a related question, please click the "Ask a related question" button in the top right corner. The newly created question will be automatically linked to this question.

Compiler/J6EVM5777: building mailbox PDK example fails

Part Number: J6EVM5777
Other Parts Discussed in Thread: SYSBIOS, MATHLIB

Tool/software: TI C/C++ Compiler

HI all,

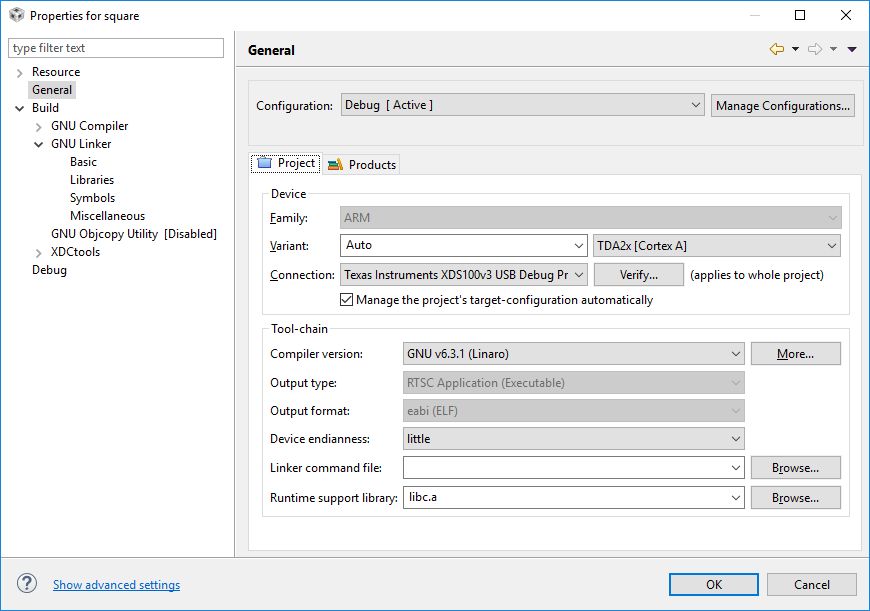
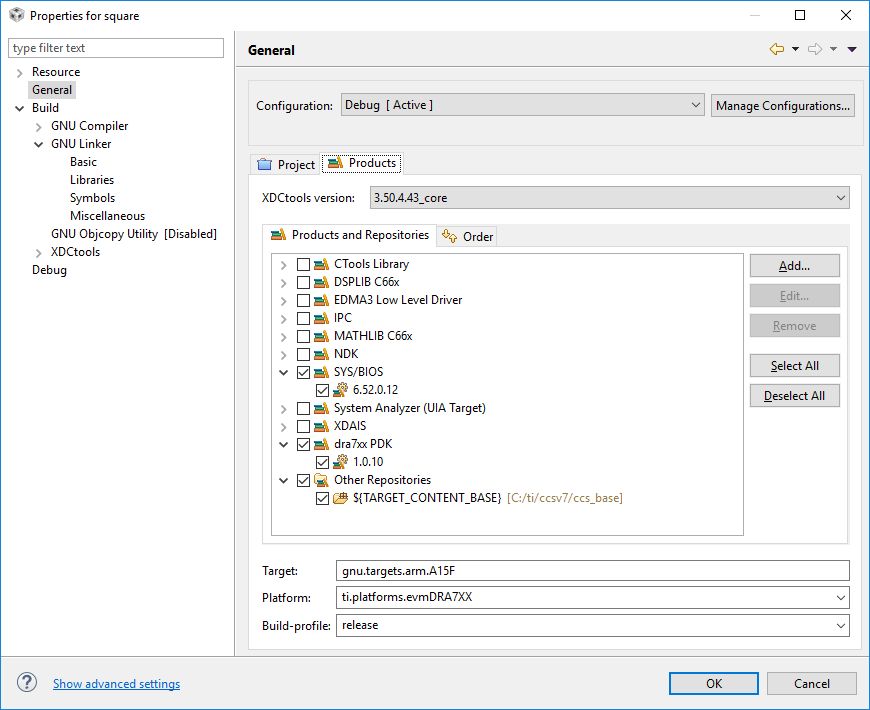
  We have CCS 8.3.1, RTOS SDK 04_03_00_05 and PDK DRA7xx 1.0.10 (these are not the latest versions of tools, but these are the versions J6EVM5777 page links to, so I assume we have to stay at this SDK version to develop for TDA2x).

  I am trying to compile multicore demo located at

packages\ti\boot\sbl_auto\examples\sbl_multicore_mbx\tda2xx

  The platform is Windows. According to we run pdksetupenv.bat, go to that directory, and run gmake. However, it seems like it is building for idkAM752x and fails with unresolved symbols.

  From folder name, one could expect that a build for tda2x would take place.

  Doing gmake LIMIT_SOCS=DRA75x does not change anything. The build log is below.

  Any advice would be much appreciated. Thanks.

Ramani

C:\ti\pdk_dra7xx_1_0_10\packages\ti\boot\sbl_auto\examples\sbl_multicore_mbx\tda2xx>gmake LIMIT_SOCS="DRA75x"
gmake -fmakefile csl csl_utils_common csl_uart_console csl_init 
gmake[1]: Entering directory `C:/ti/pdk_dra7xx_1_0_10/packages/ti/boot/sbl_auto/examples/sbl_multicore_mbx/tda2xx'
gmake -C /ti/PDK_DR~1/packages/ti/csl -fmakefile.mk
gmake[2]: Entering directory `C:/ti/PDK_DR~1/packages/ti/csl'
gmake[2]: Nothing to be done for `all'.
gmake[2]: Leaving directory `C:/ti/PDK_DR~1/packages/ti/csl'
gmake -C /ti/PDK_DR~1/packages/ti/csl/example/utils/common 
gmake[2]: Entering directory `C:/ti/PDK_DR~1/packages/ti/csl/example/utils/common'
gmake[2]: Nothing to be done for `all'.
gmake[2]: Leaving directory `C:/ti/PDK_DR~1/packages/ti/csl/example/utils/common'
gmake -C /ti/PDK_DR~1/packages/ti/csl/example/utils/uart_console 
gmake[2]: Entering directory `C:/ti/PDK_DR~1/packages/ti/csl/example/utils/uart_console'
gmake[2]: Nothing to be done for `all'.
gmake[2]: Leaving directory `C:/ti/PDK_DR~1/packages/ti/csl/example/utils/uart_console'
gmake -C /ti/PDK_DR~1/packages/ti/csl/arch -fmakefile_init.mk
gmake[2]: Entering directory `C:/ti/PDK_DR~1/packages/ti/csl/arch'
gmake[2]: Nothing to be done for `all'.
gmake[2]: Leaving directory `C:/ti/PDK_DR~1/packages/ti/csl/arch'
gmake[1]: Leaving directory `C:/ti/pdk_dra7xx_1_0_10/packages/ti/boot/sbl_auto/examples/sbl_multicore_mbx/tda2xx'
gmake -fmakefile /ti/PDK_DR~1/packages/ti/binary/sbl_multicore_mbx/bin/idkAM572x/sbl_multicore_mbx_a15_0_release.xa15fg
gmake[1]: Entering directory `C:/ti/pdk_dra7xx_1_0_10/packages/ti/boot/sbl_auto/examples/sbl_multicore_mbx/tda2xx'
# Compiling idkAM572x:am572x:a15_0:release:sbl_multicore_mbx: sbl_mbx_mpu_cpu0.c
C:/ti/gcc-arm-none-eabi-6-2017-q1-update/bin/arm-none-eabi-gcc -MD -MF /ti/PDK_DR~1/packages/ti/binary/sbl_multicore_mbx/obj/idkAM572x/a15_0/release/.deps/sbl_mbx_mpu_cpu0.P -DMAKEFILE_BUILD -Wimplicit -Wall -Wunused -Wunknown-pragmas -ffunction-sections -fdata-sections -c -mcpu=cortex-a15 -g -mfpu=neon -mfloat-abi=hard -mabi=aapcs -mapcs-frame -D__ARMv7 -Werror -O2 -s -DNDEBUG  -DBUILD_A15_0    -DSOC_AM572x -DidkAM572x -IC:/ti/gcc-arm-none-eabi-6-2017-q1-update/arm-none-eabi/include -IC:/ti/gcc-arm-none-eabi-6-2017-q1-update/arm-none-eabi/include/newlib-nano -I/ti/PDK_DR~1/packages -I/apps/apps_nonbam/inc -I/ -I/common  -o /ti/PDK_DR~1/packages/ti/binary/sbl_multicore_mbx/obj/idkAM572x/a15_0/release/sbl_mbx_mpu_cpu0.oa15fg sbl_mbx_mpu_cpu0.c
In file included from /ti/PDK_DR~1/packages/ti/csl/src/ip/mailbox/V0/mailbox.h:55:0,
                 from /ti/PDK_DR~1/packages/ti/csl/csl_mailbox.h:48,
                 from sbl_mbx_mpu_cpu0.c:41:
sbl_mbx_mpu_cpu0.c: In function 'padConfig_prcmEnable':
sbl_mbx_mpu_cpu0.c:68:48: error: 'CTRL_CORE_PAD_UART1_RXD' undeclared (first use in this function)
     HW_WR_REG32(SOC_CORE_PAD_IO_REGISTERS_BASE+CTRL_CORE_PAD_UART1_RXD,0x00040000);
                                                ^
/ti/PDK_DR~1/packages/ti/csl/hw_types.h:88:34: note: in definition of macro 'HW_WR_REG32'
     (HW_WR_REG32_RAW((uint32_t) (addr), (uint32_t) (value)))
                                  ^~~~
sbl_mbx_mpu_cpu0.c:68:48: note: each undeclared identifier is reported only once for each function it appears in
     HW_WR_REG32(SOC_CORE_PAD_IO_REGISTERS_BASE+CTRL_CORE_PAD_UART1_RXD,0x00040000);
                                                ^
/ti/PDK_DR~1/packages/ti/csl/hw_types.h:88:34: note: in definition of macro 'HW_WR_REG32'
     (HW_WR_REG32_RAW((uint32_t) (addr), (uint32_t) (value)))
                                  ^~~~
sbl_mbx_mpu_cpu0.c:69:48: error: 'CTRL_CORE_PAD_UART1_TXD' undeclared (first use in this function)
     HW_WR_REG32(SOC_CORE_PAD_IO_REGISTERS_BASE+CTRL_CORE_PAD_UART1_TXD,0x00000000);
                                                ^
/ti/PDK_DR~1/packages/ti/csl/hw_types.h:88:34: note: in definition of macro 'HW_WR_REG32'
     (HW_WR_REG32_RAW((uint32_t) (addr), (uint32_t) (value)))
                                  ^~~~
gmake[1]: *** [/ti/PDK_DR~1/packages/ti/binary/sbl_multicore_mbx/obj/idkAM572x/a15_0/release/sbl_mbx_mpu_cpu0.oa15fg] Error 1
gmake[1]: Leaving directory `C:/ti/pdk_dra7xx_1_0_10/packages/ti/boot/sbl_auto/examples/sbl_multicore_mbx/tda2xx'
gmake: *** [a15_0] Error 2

  • Hi Ramani,

    can you try to run command like:

    gmake LIMIT_SOCS=dra75x

    I am concerned that gmake is case sensitive.

    Regards,

    Yordan

  • Hi Yordan,

      Thanks for your suggestion. Unfortunately, it does not help. Gmake still thinks we are building for idkAM572x and still the same error (i.e. same log as above, nothing changed).

      I also tried to rebuild the whole PDK running both simply "gmake" and "gmake LIMIT_SOCS=dra75x" from PDK root directory, which is C:\ti\pdk_dra7xx_1_0_10\packages. It took a lot of time and directory "binary" got created under C:\ti\[dk_dra7xx_1_0_10\packages. However, the mailbox example I am referring to was not compiled.

      In gmake log, in both cases, I was not able to find any references to the directory where source code for the example is located (sbl_multicore_mbx).

    Ramani

  • Yordan (et al.) --

      I am also having problems trying to build diagnostics executable per

      I go into C:\ti\pdk_dra7xx_1_0_10\packages\ti\board\diag, but the makefile there does not have any references to DRA75x target. Here is the full list of possible targets (a like from said makefile):

    ALL_BOARDS = idkAM571x idkAM572x idkAM574x evmAM572x evmK2G iceK2G evmAM335x evmAM437x idkAM437x skAM437x bbbAM335x icev2AM335x skAM335x evmOMAPL137 iceAMIC110

      This is somewhat weird because the libraries provided are for evmDRA72x, 75x, and 78x:

     Volume in drive C has no label.
     Volume Serial Number is AA3E-2EF3

     Directory of C:\ti\pdk_dra7xx_1_0_10\packages\ti\board\lib

    05/26/2020  04:21 PM    <DIR>          .
    05/26/2020  04:21 PM    <DIR>          ..
    05/26/2020  04:21 PM    <DIR>          evmDRA72x
    05/26/2020  04:21 PM    <DIR>          evmDRA75x
    05/26/2020  04:21 PM    <DIR>          evmDRA78x
                   0 File(s)              0 bytes
                   5 Dir(s)  113,119,809,536 bytes free

      but gmake evmDRA75x obviously fails with "No such target" message.

      This starts to get extremely confusing. How do I compile diag executable for DRA75x as per 3.2 of SDK RTOS Developer Guide?

      Thanks.

    Ramani

  • Hi Ramani,

    can you confirm you use the SDK downloaded from here:

    and for building you refer the docs referred on the same page?

    Regards,

    Yordan

  • Yordan --

      Yes, this is the exact link I used to download SDK. Yes, I refer to the docs available at "Processor SDK RTOS Developer Guide" on this page. Thanks.

    Ramani

  • Hi Ramani,

    SBL mailbox example and board diagnostics builds are not supported for DRA75x platform in this SDK.

    What is your end goal? I can help guide you toward the functionality you are looking to enable.

    -Stephen

  • Stephen --

      My immediate goal is to get familiar with board, to understand how things are working, and to write some simple code in order to learn. I am able to run bare-metal examples using device drivers separately, and I am able to run BIOS examples separately. At this moment, I do not understand how one is supposed to join those together.

      In section 9.9, SDK Manual refers to "RTOS Template Application", which apparently does exactly what I need. It is supposed to reside in

    <Processor_sdk_rtos_<platform>_<version>/demos/rtos_template_app/<soc_name>/<evm_name>/<core_name>

      but this version of SDK does not have such directory either. Directories present under "demos" are "multicore-streaming" and "eve_audio".

      I took an example "Task Mutex" BIOS code from resource explorer and it runs OK in semi-hosted mode on A15 via JTAG. I am trying to add stdio over UART capabilities to it (again, the only specific goal here is to get something trivial working), so I added Board_init(BOARD_INIT_UART_STDIO) call at the beginning. I added all PDK libraries to the project necessary to compile. Now, BIOS throws exception in Board_init() call as follows:

    Hello World!
     0x0000bb80  R8  = 0x00000000
    R1 = 0x600001df  R9  = 0xffffffff
    R2 = 0x4ae06000  R10 = 0x00000000
    R3 = 0x8001dcf0  R11 = 0x8002b10c
    R4 = 0x0000008c  R12 = 0x8002b110
    R5 = 0x8001d28c  SP(R13) = 0x8002b0f8
    R6 = 0x00000000  LR(R14) = 0x800152c0
    R7 = 0x8002b150  PC(R15) = 0x80014dec
    PSR = 0x200001df
    DFSR = 0x00000206  IFSR = 0x00000000
    DFAR = 0x4ae06118  IFAR = 0x00000000
    ti.sysbios.family.arm.exc.Exception: line 205: E_dataAbort: pc = 0x80014dec, lr = 0x800152c0.
    xdc.runtime.Error.raise: terminating execution
    CortexA15_0: Unhandled ADP_Stopped exception 0x20023

      I suppose one has to configure every specific board differently somehow somewhere? Set some pins/registers to some values? Pass board-specific parameters to init? Where and how do I learn how to do that? Sort of lost here.

      W.r.t. end goal: I have working CCS project, in source code, supplied by third party, based on RTOS, which uses third-party libraries to process audio that streams through line-in and outputs it to line-out. Details of processing change based on packets sent over Ethernet. Everything is working, but code is too complex for me to understand/modify at this point. At the end, I need to a) replace control-over-Ethernet with control-over-UART; b) write/modify a driver/interface for 4 (four) AIC31 codecs on second I2C / McASP6 buses; and c) make sure that nothing breaks.

      For now, most of my attempts to modify the code result in either not getting what I want or everything being broken. So we figured out we should do things in small steps for now. Unfortunately, we're having problems even with small steps due to apparently SDK manual being out of sync with actual SDK.

      Thanks.

    Ramani

  • Hi again,

      I took UART example from PDK, and Board_init() fails with the same reason. Below are all related files, logs, and screenshots. Help would be appreciated.

      The board is jacinto6 EVM one (EVM5777), SDK 04.03.00.05, BIOS 6.52.00.12, PDK dra7xx 1.0.10, CCS version 7.4.0.00015. Thanks.

    Ramani

    ===================================== main.c =============================

    /**
     * @file   main_uart_example.c
     *
     * @brief  This file tests the UART driver APIs with all the supported
     *         input parameters values
     */

    /* XDCtools Header files */
    #include <xdc/std.h>
    #include <xdc/cfg/global.h>
    #include <xdc/runtime/Error.h>
    #include <xdc/runtime/System.h>

    /* BIOS Header files */
    #include <ti/sysbios/BIOS.h>
    #include <ti/sysbios/knl/Task.h>

    #include "stdio.h"
    #include "stdint.h"
    #include "stdlib.h"
    #include "string.h"

    /* UART Header files */
    #include <ti/drv/uart/UART.h>
    #include <ti/drv/uart/UART_stdio.h>

    #include <ti/drv/uart/test/src/UART_board.h>

     /* Length of the input in number of characters */
    #define INPUT_LENGTH           (16U)

    #if defined (SOC_AM572x) || defined (SOC_AM571x)
    void UART_CrossbarConfigure(void);
    #endif

    void Board_initUART(void)
    {
        Board_initCfg boardCfg;

        boardCfg = BOARD_INIT_PINMUX_CONFIG |
                   BOARD_INIT_MODULE_CLOCK  |
                   BOARD_INIT_UART_STDIO;

        Board_init(boardCfg);
    }

    Void uart_test(UArg arg0, UArg arg1)
    {
        char input = '\n';
        char *buffPointer;

        buffPointer = (char*)malloc(INPUT_LENGTH);
        memset(buffPointer,0,INPUT_LENGTH);

        UART_puts("\nuart driver and utils example test cases :\nEnter 16 characters or press Esc \n",sizeof("uart driver and utils example test cases : please enter 16 characters or press Esc or carriage return\n"));

        while(1) {
            memset(buffPointer,0,INPUT_LENGTH);
            UART_gets(buffPointer, INPUT_LENGTH);
            UART_puts(&input,1);
            UART_printf("Data received is\n");
            UART_puts(buffPointer, INPUT_LENGTH);
            UART_printStatus("\nTest Passed\n");
            UART_puts("\nuart driver and utils example test cases :\nEnter 16 characters or press Esc \n",sizeof("uart driver and utils example test cases : please enter 16 characters or press Esc or carriage return\n"));
        }
    } /* uart_test */

    *
     *  ======== main ========
     */
    int main(void)
    {
        /* Call board init functions */
        Task_Handle task;
        Error_Block eb;

        Board_initUART();

        Error_init(&eb);
        task = Task_create(uart_test, NULL, &eb);
            if (task == NULL) {
                System_printf("Task_create() failed!\n");
                BIOS_exit(0);
            }

        /* Start BIOS */
        BIOS_start();
        return (0);
    } /* main */

    ======================================== app.cfg ========================================

    var Defaults = xdc.useModule('xdc.runtime.Defaults');
    var Diags = xdc.useModule('xdc.runtime.Diags');
    var Error = xdc.useModule('xdc.runtime.Error');
    var Log = xdc.useModule('xdc.runtime.Log');
    var LoggerBuf = xdc.useModule('xdc.runtime.LoggerBuf');
    var Main = xdc.useModule('xdc.runtime.Main');
    var Memory = xdc.useModule('xdc.runtime.Memory')
    var SysMin = xdc.useModule('xdc.runtime.SysMin');
    var System = xdc.useModule('xdc.runtime.System');
    var Text = xdc.useModule('xdc.runtime.Text');
    var Program   = xdc.useModule("xdc.cfg.Program");

    var Clock = xdc.useModule('ti.sysbios.knl.Clock');
    var Swi = xdc.useModule('ti.sysbios.knl.Swi');
    var Task = xdc.useModule('ti.sysbios.knl.Task');
    var Semaphore = xdc.useModule('ti.sysbios.knl.Semaphore');
    var Hwi = xdc.useModule('ti.sysbios.hal.Hwi');
    var Startup = xdc.useModule('xdc.runtime.Startup');
    var InitXbar   = xdc.useModule('ti.sysbios.family.shared.vayu.IntXbar');
    var SemiHostSupport = xdc.useModule('ti.sysbios.rts.gnu.SemiHostSupport');

    var BIOS = xdc.useModule('ti.sysbios.BIOS');

    /*
     * The BIOS module will create the default heap for the system.
     * Specify the size of this default heap.
     */
    BIOS.heapSize = 0x10000;

    /*
     * Build a custom SYS/BIOS library from sources.
     */
    BIOS.libType = BIOS.LibType_Custom;

    var soc   = "dra75x"
    var board = "evmDRA75x";
    xdc.print("# !!!  Current soc is [" + soc + "] !!!");
    xdc.print("# !!!  Current board is [" + board + "] !!!");

    /* Load the OSAL package */
    var osType = "tirtos";
    var Osal   = xdc.loadPackage('ti.osal');
    Osal.Settings.osType = osType;

    /*use CSL package */
    var Csl = xdc.loadPackage('ti.csl');
    Csl.Settings.deviceType = soc;

    /* Load the uart package */
    var Uart = xdc.loadPackage('ti.drv.uart');
    Uart.Settings.socType = soc;

    /* Load the I2C package */
    var I2c = xdc.loadPackage('ti.drv.i2c');
    I2c.Settings.socType = soc;

    /* Load the Board package and set the board name */
    var Board = xdc.loadPackage('ti.board');
    Board.Settings.boardName = board;

    /*
     * Uncomment this line to globally disable Asserts.
     * All modules inherit the default from the 'Defaults' module.  You
     * can override these defaults on a per-module basis using Module.common$.
     * Disabling Asserts will save code space and improve runtime performance.
    Defaults.common$.diags_ASSERT = Diags.ALWAYS_OFF;
     */

    /*
     * Uncomment this line to keep module names from being loaded on the target.
     * The module name strings are placed in the .const section. Setting this
     * parameter to false will save space in the .const section.  Error and
     * Assert messages will contain an "unknown module" prefix instead
     * of the actual module name.
    Defaults.common$.namedModule = false;
     */

    /*
     * Minimize exit handler array in System.  The System module includes
     * an array of functions that are registered with System_atexit() to be
     * called by System_exit().
     */
    System.maxAtexitHandlers = 4;       

    /*
     * Uncomment this line to disable the Error print function.  
     * We lose error information when this is disabled since the errors are
     * not printed.  Disabling the raiseHook will save some code space if
     * your app is not using System_printf() since the Error_print() function
     * calls System_printf().
    Error.raiseHook = null;
     */

    /*
     * Uncomment this line to keep Error, Assert, and Log strings from being
     * loaded on the target.  These strings are placed in the .const section.
     * Setting this parameter to false will save space in the .const section.
     * Error, Assert and Log message will print raw ids and args instead of
     * a formatted message.
    Text.isLoaded = false;
     */

    /*
     * Uncomment this line to disable the output of characters by SysMin
     * when the program exits.  SysMin writes characters to a circular buffer.
     * This buffer can be viewed using the SysMin Output view in ROV.
    SysMin.flushAtExit = false;
     */

    /* Program heap size */
    Program.heap = 0x10000;

    /* System stack size (used by ISRs and Swis) */
    Program.stack = 0x20000;

    /* Circular buffer size for System_printf() */
    SysMin.bufSize = 0x1000;

    /*
     * Create and install logger for the whole system
     */
    var loggerBufParams = new LoggerBuf.Params();
    loggerBufParams.numEntries = 16;
    var logger0 = LoggerBuf.create(loggerBufParams);
    Defaults.common$.logger = logger0;
    Main.common$.diags_INFO = Diags.ALWAYS_ON;

    System.SupportProxy = SysMin;

    ===================================== build log =========================================


    **** Build of configuration Debug for project square ****

    "C:\\ti\\ccsv7\\utils\\bin\\gmake" -k -j 4 all -O
     
    making ../src/sysbios/sysbios.aa15fg ...
    gmake[1]: Nothing to be done for 'all'.
    'Building file: "../main.c"'
    'Invoking: GNU Compiler'
    "C:/ti/gcc-arm-none-eabi-6-2017-q1-update/bin/arm-none-eabi-gcc.exe" -c -mcpu=cortex-a15 -mtune=cortex-a15 -march=armv7-a -marm -mfloat-abi=hard -DTDA2xx -I"C:/Users/DOLBOEBIKI/dswork/square" -I"C:/ti/bios_6_52_00_12/packages/gnu/targets/arm/libs/install-native/arm-none-eabi/include/newlib-nano" -I"C:/ti/gcc-arm-none-eabi-6-2017-q1-update/arm-none-eabi/include" -g -gdwarf-3 -gstrict-dwarf -Wall -MMD -MP -MF"main.d" -MT"main.o" @"configPkg/compiler.opt" -o"main.o" "../main.c"
    ../main.c:1:0: warning: switch -mcpu=cortex-a15 conflicts with -march=armv7-a switch
     
     
    'Finished building: "../main.c"'
     
    making ../src/sysbios/sysbios.aa15fg ...
    gmake[2]: Nothing to be done for 'all'.
    'Building target: "square.out"'
    'Invoking: GNU Linker'
    "C:/ti/gcc-arm-none-eabi-6-2017-q1-update/bin/arm-none-eabi-gcc.exe" -mtune=cortex-a15 -marm -DTDA2xx -g -gdwarf-3 -gstrict-dwarf -Wall -mfloat-abi=hard -Wl,-Map,"square.map" -nostartfiles -static -Wl,--gc-sections -L"C:/ti/bios_6_52_00_12/packages/gnu/targets/arm/libs/install-native/arm-none-eabi/lib/hard" -Wl,--defsym,STACKSIZE=0x10000 -Wl,--defsym,HEAPSIZE=0x400 --specs=nano.specs -o"square.out" "./main.o" -Wl,-T"configPkg/linker.cmd" -Wl,--start-group -lgcc -lm -lrdimon -lc -Wl,--end-group
    'Finished building target: "square.out"'
     

    **** Build Finished ****

    ================================================ console debug log =======================

    Cortex_M4_IPU1_C0: GEL Output: --->>> TDA2xx Cortex M4 Startup Sequence In Progress... <<<---
    Cortex_M4_IPU1_C0: GEL Output: --->>> TDA2xx Cortex M4 Startup Sequence DONE! <<<---
    Cortex_M4_IPU1_C1: GEL Output: --->>> TDA2xx Cortex M4 Startup Sequence In Progress... <<<---
    Cortex_M4_IPU1_C1: GEL Output: --->>> TDA2xx Cortex M4 Startup Sequence DONE! <<<---
    Cortex_M4_IPU2_C0: GEL Output: --->>> TDA2xx Cortex M4 Startup Sequence In Progress... <<<---
    Cortex_M4_IPU2_C0: GEL Output: --->>> TDA2xx Cortex M4 Startup Sequence DONE! <<<---
    Cortex_M4_IPU2_C1: GEL Output: --->>> TDA2xx Cortex M4 Startup Sequence In Progress... <<<---
    Cortex_M4_IPU2_C1: GEL Output: --->>> TDA2xx Cortex M4 Startup Sequence DONE! <<<---
    C66xx_DSP1: GEL Output: --->>> TDA2xx C66x DSP Startup Sequence In Progress... <<<---
    C66xx_DSP1: GEL Output: --->>> TDA2xx C66x DSP Startup Sequence DONE! <<<---
    C66xx_DSP2: GEL Output: --->>> TDA2xx C66x DSP Startup Sequence In Progress... <<<---
    C66xx_DSP2: GEL Output: --->>> TDA2xx C66x DSP Startup Sequence DONE! <<<---
    CortexA15_0: GEL Output: --->>> TDA2xx Cortex A15 Startup Sequence In Progress... <<<---
    CortexA15_0: GEL Output: --->>> TDA2xx Cortex A15 Startup Sequence DONE! <<<---
    CortexA15_1: GEL Output: --->>> TDA2xx Cortex A15 Startup Sequence In Progress... <<<---
    CortexA15_1: GEL Output: --->>> TDA2xx Cortex A15 Startup Sequence DONE! <<<---
    ARP32_EVE_1: GEL Output: --->>> Configuring EVE Memory Map <<<---
    ARP32_EVE_1: GEL Output: --->>> EVE Memory Map Done! <<<---
    ARP32_EVE_2: GEL Output: --->>> Configuring EVE Memory Map <<<---
    ARP32_EVE_2: GEL Output: --->>> EVE Memory Map Done! <<<---
    ARP32_EVE_3: GEL Output: --->>> Configuring EVE Memory Map <<<---
    ARP32_EVE_3: GEL Output: --->>> EVE Memory Map Done! <<<---
    ARP32_EVE_4: GEL Output: --->>> Configuring EVE Memory Map <<<---
    ARP32_EVE_4: GEL Output: --->>> EVE Memory Map Done! <<<---
    IcePick_D: GEL Output: Ipu RTOS is released from Wait-In-Reset.
    IcePick_D: GEL Output: Ipu SIMCOP is released from Wait-In-Reset.
    IcePick_D: GEL Output: IVAHD C66 is released from Wait-In-Reset.
    IcePick_D: GEL Output: IVAHD ICONT1 is released from Wait-In-Reset.
    IcePick_D: GEL Output: IVAHD ICONT2 is released from Wait-In-Reset.
    CS_DAP_DebugSS: GEL Output: --->>> CONFIGURE DEBUG DPLL settings to 1.9 GHZs  <<<---
    CS_DAP_DebugSS: GEL Output: > Setup DebugSS 1.9GHz in progress...
    CS_DAP_DebugSS: GEL Output: < Done with Setup DebugSS Trace export clock (TPIU) to 97MHz
    CS_DAP_DebugSS: GEL Output: < Done with Setup DebugSS PLL Clocking 1.9GHz
    CS_DAP_DebugSS: GEL Output: < Done with Setup DebugSS ATB Clocking 380MHz
    CS_DAP_DebugSS: GEL Output: < Done with Setup DebugSS Trace export clock (TPIU) to 97MHz
    CS_DAP_DebugSS: GEL Output: --->>> TURNING ON L3_INSTR and L3_3 clocks required for debug instrumention <<<<<<----
    CS_DAP_DebugSS: GEL Output: ---<<< L3 instrumentation clocks are enabled >>>> ---
    CS_DAP_DebugSS: GEL Output: --->>> Mapping TIMER supsend sources to default cores <<<<<<----
    CS_DAP_PC: GEL Output: Cortex-A15 1 is not in WIR mode so nothing to do.
    CortexA15_0: GEL Output: --->>> TDA2xx Target Connect Sequence Begins ... <<<---
    CortexA15_0: GEL Output:     --->>> TDA2xx PG2.0 GP device <<<---
    CortexA15_0: GEL Output:     --->>> The core is in non-SECURE state. <<<---
    CortexA15_0: GEL Output: --->>> PRCM Clock Configuration for OPPNOM in progress... <<<---
    CortexA15_0: GEL Output:     Cortex A15 DPLL OPP 0 clock config is in progress...
    CortexA15_0: GEL Output:     Cortex A15 DPLL is already locked, now unlocking...  
    CortexA15_0: GEL Output:     Cortex A15 DPLL OPP 0 is DONE!
    CortexA15_0: GEL Output:     IVA DPLL OPP 0 clock config is in progress...
    CortexA15_0: GEL Output:     IVA DPLL already locked, now unlocking...
    CortexA15_0: GEL Output:     IVA DPLL OPP 0 is DONE!
    CortexA15_0: GEL Output:     PER DPLL OPP 0 clock config in progress...
    CortexA15_0: GEL Output:     PER DPLL already locked, now unlocking  
    CortexA15_0: GEL Output:     PER DPLL OPP 0 is DONE!
    CortexA15_0: GEL Output:     CORE DPLL OPP 0 clock config is in progress...
    CortexA15_0: GEL Output:     CORE DPLL OPP  already locked, now unlocking....  
    CortexA15_0: GEL Output:     CORE DPLL OPP 0 is DONE!
    CortexA15_0: GEL Output:     ABE DPLL OPP 0 clock config in progress...
    CortexA15_0: GEL Output:     ABE DPLL OPP is already locked, now unlocking....
    CortexA15_0: GEL Output:     ABE DPLL OPP 0 is DONE!
    CortexA15_0: GEL Output:     GMAC DPLL OPP 0 clock config is in progress...
    CortexA15_0: GEL Output:     GMAC DPLL already locked, now unlocking....
    CortexA15_0: GEL Output:     GMAC DPLL OPP 0 is DONE!
    CortexA15_0: GEL Output:     GPU DPLL OPP 0 clock config is in progress...
    CortexA15_0: GEL Output:     GPU DPLL already locked, now unlocking...
    CortexA15_0: GEL Output:     GPU DPLL OPP 0 is DONE!
    CortexA15_0: GEL Output:     DSP DPLL OPP 0 clock config is in progress...
    CortexA15_0: GEL Output:     DSP DPLL already locked, now unlocking....
    CortexA15_0: GEL Output:     DSP DPLL OPP 0 is DONE!
    CortexA15_0: GEL Output:     EVE DPLL OPP 0 clock config is in progress...
    CortexA15_0: GEL Output:     EVE DPLL already locked, now unlocking....
    CortexA15_0: GEL Output:     EVE DPLL OPP 0 is DONE!
    CortexA15_0: GEL Output:     PCIE_REF DPLL OPP 0 clock config is in progress...
    CortexA15_0: GEL Output:     PCIE_REF DPLL already locked, now unlocking....
    CortexA15_0: GEL Output:     PCIE_REF DPLL OPP 0 is DONE!
    CortexA15_0: GEL Output: --->>> PRCM Clock Configuration for OPP 0 is DONE! <<<---
    CortexA15_0: GEL Output: --->>> PRCM Configuration for all modules in progress... <<<---
    CortexA15_0: GEL Output: --->>> PRCM Configuration for all modules is DONE! <<<---
    CortexA15_0: GEL Output: --->>> DDR3 Initialization is in progress ... <<<---
    CortexA15_0: GEL Output:     DDR DPLL clock config for 532MHz is in progress...
    CortexA15_0: GEL Output:     DDR DPLL already locked, now unlocking....
    CortexA15_0: GEL Output:     DDR DPLL clock config for 532MHz is in DONE!
    CortexA15_0: GEL Output:        Launch full leveling
    CortexA15_0: GEL Output:        Updating slave ratios in PHY_STATUSx registers
    CortexA15_0: GEL Output:        as per HW leveling output
    CortexA15_0: GEL Output:        HW leveling is now disabled. Using slave ratios from
    CortexA15_0: GEL Output:        PHY_STATUSx registers
    CortexA15_0: GEL Output:        One EMIF - 512MB total memory
    CortexA15_0: GEL Output:        Same memory mapped at 0x80000000 and 0xA0000000
    CortexA15_0: GEL Output: --->>> DDR3 Initialization is DONE! <<<---
    CortexA15_0: GEL Output: --->>> TDA2xx Begin All Pad Configuration for Vision Platform <<<---
    CortexA15_0: GEL Output: --->>> TDA2xx Begin All Pad Configuration for RGMII usage on EVM Platform <<<---
    CortexA15_0: GEL Output:     --->>> TDA2xx Begin GMAC_SW MDIO Pad Configuration <<<---
    CortexA15_0: GEL Output:     --->>> TDA2xx End GMAC_SW MDIO Pad Configuration <<<---
    CortexA15_0: GEL Output:     --->>> TDA2xx Begin GMAC_SW RGMII0 Pad Configuration <<<---
    CortexA15_0: GEL Output:     --->>> TDA2xx End GMAC_SW RGMII0 Pad Configuration <<<---
    CortexA15_0: GEL Output:     --->>> TDA2xx Begin GMAC_SW RGMII1 Pad Configuration <<<---
    CortexA15_0: GEL Output:     --->>> TDA2xx End GMAC_SW RGMII1 Pad Configuration <<<---
    CortexA15_0: GEL Output: --->>> TDA2xx End All Pad Configuration for RGMII usage on EVM Platform <<<---
    CortexA15_0: GEL Output: --->>> TDA2xx End All Pad Configuration for Vision Platform <<<---
    CortexA15_0: GEL Output: --->>> TDA2xx Target Connect Sequence DONE !!!!!  <<<---
    [CortexA15_0] Exception occurred in ThreadType_Main.
    Main handle: 0x0.
    Main stack base: 0x80057580.
    Main stack size: 0x20000.
    R0 = 0x00000000  R8  = 0x4037ffbc
    R1 = 0x4a002824  R9  = 0xffffffff
    R2 = 0x00440043  R10 = 0x00000000
    R3 = 0x4ae0c000  R11 = 0x80077514
    R4 = 0x800210c0  R12 = 0x80077518
    R5 = 0x8001d4a0  SP(R13) = 0x800774f8
    R6 = 0x00000000  LR(R14) = 0x80015400
    R7 = 0x80077580  PC(R15) = 0x800153d4
    PSR = 0x000001df
    DFSR = 0x00000206  IFSR = 0x00000000
    DFAR = 0x4ae0c204  IFAR = 0x00000000
    ti.sysbios.family.arm.exc.Exception: line 205: E_dataAbort: pc = 0x800153d4, lr = 0x80015400.
    xdc.runtime.Error.raise: terminating execution
    CortexA15_0: Unhandled ADP_Stopped exception 0x20023

    ============================= JTAG "verify connection" log ==========================

    [Start]

    Execute the command:

    %ccs_base%/common/uscif/dbgjtag -f %boarddatafile% -rv -o -F inform,logfile=yes -S pathlength -S integrity

    [Result]


    -----[Print the board config pathname(s)]------------------------------------

    C:\Users\DOLBOE~1\AppData\Local\TEXASI~1\
        CCS\ti\0\0\BrdDat\testBoard.dat

    -----[Print the reset-command software log-file]-----------------------------

    This utility has selected a 100- or 510-class product.
    This utility will load the adapter 'jioserdesusbv3.dll'.
    The library build date was 'Nov  6 2017'.
    The library build time was '10:36:36'.
    The library package version is '7.0.100.0'.
    The library component version is '35.35.0.0'.
    The controller does not use a programmable FPGA.
    The controller has a version number of '4' (0x00000004).
    The controller has an insertion length of '0' (0x00000000).
    This utility will attempt to reset the controller.
    This utility has successfully reset the controller.

    -----[Print the reset-command hardware log-file]-----------------------------

    The scan-path will be reset by toggling the JTAG TRST signal.
    The controller is the FTDI FT2232 with USB interface.
    The link from controller to target is direct (without cable).
    The software is configured for FTDI FT2232 features.
    The controller cannot monitor the value on the EMU[0] pin.
    The controller cannot monitor the value on the EMU[1] pin.
    The controller cannot control the timing on output pins.
    The controller cannot control the timing on input pins.
    The scan-path link-delay has been set to exactly '0' (0x0000).

    -----[The log-file for the JTAG TCLK output generated from the PLL]----------

      Test  Size   Coord      MHz    Flag  Result       Description
      ~~~~  ~~~~  ~~~~~~~  ~~~~~~~~  ~~~~  ~~~~~~~~~~~  ~~~~~~~~~~~~~~~~~~~
        1     64  - 01 00  500.0kHz   O    good value   measure path length
        2     64  + 00 00  1.000MHz  [O]   good value   apply explicit tclk

    There is no hardware for measuring the JTAG TCLK frequency.

    In the scan-path tests:
    The test length was 2048 bits.
    The JTAG IR length was 6 bits.
    The JTAG DR length was 1 bits.

    The IR/DR scan-path tests used 2 frequencies.
    The IR/DR scan-path tests used 500.0kHz as the initial frequency.
    The IR/DR scan-path tests used 1.000MHz as the highest frequency.
    The IR/DR scan-path tests used 1.000MHz as the final frequency.

    -----[Measure the source and frequency of the final JTAG TCLKR input]--------

    There is no hardware for measuring the JTAG TCLK frequency.

    -----[Perform the standard path-length test on the JTAG IR and DR]-----------

    This path-length test uses blocks of 64 32-bit words.

    The test for the JTAG IR instruction path-length succeeded.
    The JTAG IR instruction path-length is 6 bits.

    The test for the JTAG DR bypass path-length succeeded.
    The JTAG DR bypass path-length is 1 bits.

    -----[Perform the Integrity scan-test on the JTAG IR]------------------------

    This test will use blocks of 64 32-bit words.
    This test will be applied just once.

    Do a test using 0xFFFFFFFF.
    Scan tests: 1, skipped: 0, failed: 0
    Do a test using 0x00000000.
    Scan tests: 2, skipped: 0, failed: 0
    Do a test using 0xFE03E0E2.
    Scan tests: 3, skipped: 0, failed: 0
    Do a test using 0x01FC1F1D.
    Scan tests: 4, skipped: 0, failed: 0
    Do a test using 0x5533CCAA.
    Scan tests: 5, skipped: 0, failed: 0
    Do a test using 0xAACC3355.
    Scan tests: 6, skipped: 0, failed: 0
    All of the values were scanned correctly.

    The JTAG IR Integrity scan-test has succeeded.

    -----[Perform the Integrity scan-test on the JTAG DR]------------------------

    This test will use blocks of 64 32-bit words.
    This test will be applied just once.

    Do a test using 0xFFFFFFFF.
    Scan tests: 1, skipped: 0, failed: 0
    Do a test using 0x00000000.
    Scan tests: 2, skipped: 0, failed: 0
    Do a test using 0xFE03E0E2.
    Scan tests: 3, skipped: 0, failed: 0
    Do a test using 0x01FC1F1D.
    Scan tests: 4, skipped: 0, failed: 0
    Do a test using 0x5533CCAA.
    Scan tests: 5, skipped: 0, failed: 0
    Do a test using 0xAACC3355.
    Scan tests: 6, skipped: 0, failed: 0
    All of the values were scanned correctly.

    The JTAG DR Integrity scan-test has succeeded.

    [End]

    =============== Project Properties screenshot #1: =========================

    ===================== Project Properties screenshot #2: ==========================

  • Hi Ramani,

    You are right that the software development guide does not match 100% with this platform.  This platform support in Processor SDK RTOS was only enabled for a subset of features and usecases for this family of devices.  It is best to start with the release notes and getting started guide for DRA7xx:

    https://processors.wiki.ti.com/index.php/Processor_SDK_RTOS_Automotive_Release_Notes

    https://processors.wiki.ti.com/index.php/Processor_SDK_RTOS_Automotive_Getting_Started_Guide

    There may be some differences with respect to the demo contents or foundational components in this package vs. what is mentioned in the developers guide, but the general folder structure, build steps, etc. are the same.

    Regarding the specific error, I am not sure how you built this example.  I would suggest to take the steps from http://software-dl.ti.com/processor-sdk-rtos/esd/docs/04_03_00_05/rtos/How_to_Guides.html#rebuild-drivers-from-pdk-directory --> PDK Example and Test Project Creation.  You can do try, for the UART example on A15:

    pdkProjectCreate.bat DRA75x all little uart all arm

    This can be imported into CCS and built to run on target as-is.  If this does not work, then there is something else incorrect in the setup which needs to be fixed.

    If your target is audio-related, you may also want to replace the above "uart" with "mcasp".

    Please confirm your build steps, and if you are facing issues still, we can look a bit more deeply at your setup and see what else may be causing things to not work correctly.

    -Stephen

  • Stephen --

      The .bat file does not work either. See the log below. OS is WIndows 10. I had a clean install performed today, followed by installation of CCS (version 8.3.1 this time) and RTOS PDK. Tried running from simple command prompt as well as from elevated one.

      As you can see, it tries to put output into the directory MyExampleProjects, but the directory was not created on the first run. Then, I created it manually and tried to run the batch file second time. The directory was still empty at the end of the second run as well.

      Help would be appreciated.

    Ramani

    Microsoft Windows [Version 10.0.14393]
    (c) 2016 Microsoft Corporation. All rights reserved.

    C:\Users\DOLBOEBIKI>cd \ti\pdk_dra7xx_1_0_10\packages

    C:\ti\pdk_dra7xx_1_0_10\packages>pdksetupenv.bat
    **************************************************************************
    Environment Configuration:
        LIMIT_SOCS                : dra72x dra75x dra78x
        LIMIT_BOARDS              : evmDRA72x evmDRA75x evmDRA78x
        PDK_INSTALL_PATH          : /ti/PDK_DR~1/packages
        IMGLIB_INSTALL_PATH       : C:/ti/imglib_c66x_3_1_1_0
        DSPLIB_INSTALL_PATH       : C:/ti/dsplib_c66x_3_4_0_0
        MATHLIB_INSTALL_PATH      : C:/ti/mathlib_c66x_3_1_1_0
        XDC_INSTALL_PATH          : C:/ti/xdctools_3_50_03_33_core

    C:\ti\pdk_dra7xx_1_0_10\packages>pdkProjectCreate.bat DRA75x all little uart all arm
    =========================================================================
    Configuration:
       SOC             :   DRA75x
       BOARD           :   all
       ENDIAN          :   little
       MODULE          :   uart
       PROJECT_TYPE    :   all
       PROCESSOR       :   arm
       PDK_SHORT_NAME  :   C:\ti\PDK_DR~1\packages\
    =========================================================================
    Checking Configuration...
    Complete
    =========================================================================
       PDK_PARTNO         : DRA75x
       PDK_ECLIPSE_ID     : com.ti.pdk.dra7xx
       RTSC_PLATFORM_NAME : ti.platforms.evmDRA7XX
       RTSC_TARGET        : gnu.targets.arm.A15F
       CCS_DEVICE         : "Cortex A.DRA75x_DRA74x"
    *****************************************************************************
    Detecting all projects in PDK and importing them in the workspace C:\ti\PDK_DR~1\packages\\MyExampleProjects
    Detected Test Project: UART_BasicExample_evmDRA75x_armExampleProject
    The system cannot find the path specified.
    Copying macro.ini
    The system cannot find the file specified.
    Detected Test Project: UART_BasicExample_evmDRA75x_armTestproject
    The system cannot find the path specified.
    Copying macro.ini
    The system cannot find the file specified.
    Detected Test Project: UART_BasicExample_evmDRA75x_DMA_armTestproject
    The system cannot find the path specified.
    Copying macro.ini
    The system cannot find the file specified.
    No projects detected
    Project generation complete
    *****************************************************************************

    C:\ti\pdk_dra7xx_1_0_10\packages>mkdir MyExampleProjects

    C:\ti\pdk_dra7xx_1_0_10\packages>pdkProjectCreate.bat DRA75x all little uart all arm
    =========================================================================
    Configuration:
       SOC             :   DRA75x
       BOARD           :   all
       ENDIAN          :   little
       MODULE          :   uart
       PROJECT_TYPE    :   all
       PROCESSOR       :   arm
       PDK_SHORT_NAME  :   C:\ti\PDK_DR~1\packages\
    =========================================================================
    Checking Configuration...
    Complete
    =========================================================================
       PDK_PARTNO         : DRA75x
       PDK_ECLIPSE_ID     : com.ti.pdk.dra7xx
       RTSC_PLATFORM_NAME : ti.platforms.evmDRA7XX
       RTSC_TARGET        : gnu.targets.arm.A15F
       CCS_DEVICE         : "Cortex A.DRA75x_DRA74x"
    *****************************************************************************
    Detecting all projects in PDK and importing them in the workspace C:\ti\PDK_DR~1\packages\\MyExampleProjects
    Detected Test Project: UART_BasicExample_evmDRA75x_armExampleProject
    The system cannot find the path specified.
    Copying macro.ini
    The system cannot find the file specified.
    Detected Test Project: UART_BasicExample_evmDRA75x_armTestproject
    The system cannot find the path specified.
    Copying macro.ini
    The system cannot find the file specified.
    Detected Test Project: UART_BasicExample_evmDRA75x_DMA_armTestproject
    The system cannot find the path specified.
    Copying macro.ini
    The system cannot find the file specified.
    No projects detected
    Project generation complete
    *****************************************************************************

    C:\ti\pdk_dra7xx_1_0_10\packages>dir MyExampleProjects
     Volume in drive C has no label.
     Volume Serial Number is 8C34-0279

     Directory of C:\ti\pdk_dra7xx_1_0_10\packages\MyExampleProjects

    06/02/2020  02:24 PM    <DIR>          .
    06/02/2020  02:24 PM    <DIR>          ..
                   0 File(s)              0 bytes
                   2 Dir(s)  119,596,212,224 bytes free

    C:\ti\pdk_dra7xx_1_0_10\packages>

  • Hi Ramani,

    This is likely because you do not have CCS installed in the default location that the script expects. The link here describes how to handle this: http://software-dl.ti.com/processor-sdk-rtos/esd/docs/04_03_00_05/rtos/How_to_Guides.html#update-environment-when-installing-to-a-custom-path.

    Main point is that you will need to override the TOOLS_INSTALL_PATH if you have CCSv7.x installed somewhere besides C:/ti.

    If you are using a different version of CCS, please first note that the SDK was not tested with this version, but in general I don't see any major issue with upgrading to CCSv8.x. In that case, you will have to manually update pdkProjectCreate.bat to update CCS_INSTALL_PATH which is expecting ccsv7.

    -Stephen

  • Stephen --

      Thank you.

      CCS was, in fact, installed in default path.

      I indeed had to change "ccsv7" to "ccsv8" in .bat file.

      After creating the project, I had another issue. The "locationURI" in generated .project file was pointing to

      C:/ti/ccsv8/eclipse/PDK_INSTALL_PATH/ti/drv/usb/sample/example/uart_example.c

      instead of expected

      C:/ti/pdk_dra7xx_1_0_10/ti/drv/usb/sample/....

      so somewhere PDK_INSTALL_PATH was not expanded correctly.

      I had to manually correct that. Now, I am able to build and run examples successfully.

      Thank you again.

    Ramani