This thread has been locked.

If you have a related question, please click the "Ask a related question" button in the top right corner. The newly created question will be automatically linked to this question.

AWR2944: AWR2944

Part Number: AWR2944
Other Parts Discussed in Thread: SYSCONFIG

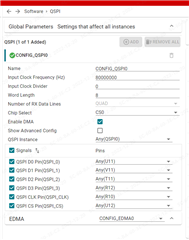
Our customer needs to make our boot time less than 200ms. Currently, I configure qspi to enable emda through sysconfig_1.12.1. When I read R5FSS0_0 during debugging, I find that the header.magic is wrong and an error occurs. How can I make the qspi of awr2944 support edma normally? load up normally.

  • Hi,

    Please give us some time to review this question

    thank you

    Cesar

  • Thank you very much, please reply as soon as possible how to enable edma to speed up the boot loading app time or other methods to speed up the boot loading app time.( Make the load time less than 200ms or less )

  • Hello Zonghu,

    What exact error are you seeing when debugging through the code in ccs?

    Regards,
    Saswat

  • When Boot calls the function when loading CSL_CORE_ID_R5FSS0_0, it reads the header value for the first time and finds that the obtained value is incorrect. The header.magic is 0x43520000 instead of 0x4352505. The values of other member variables of the header are also incorrect. At this time, the value of cpuInfo->rprcOffset is not 128 Integer multiples, I think it may be the case that emda needs 128-byte alignment, so how to deal with this situation?

  • Hello Zonghu,

    Which SDK version are you using right now?

    Regards,
    Saswat Kumar

  • Hello Saswat 

    Thank you for your reply, we using SDK version is 04_02_00_03.

    Regards,

    Zonghu Tao.

  • Hello Zonghu,

    So, there is an issue with the 4.2.0.3 SDK, you can follow the below steps for enabling DMA(install the 4.2.0.2 SDK first):

    1)Copy the APP generate scripts from SDK4.2.0.2 to SDK4.2.0.3. To combine the XE66 and XER5F to a single BIN
    2) Script is mentioned below that you need to perform in order:

    call C:\ti\mmwave_mcuplus_sdk_04_02_00_02\mmwave_mcuplus_sdk_04_02_00_02\scripts\windows\setenv.bat
    call C:\ti\mmwave_mcuplus_sdk_04_02_00_02\mmwave_mcuplus_sdk_04_02_00_02\scripts\windows\checkenv.bat
    call %MMWAVE_SDK_INSTALL_PATH%/scripts/windows/generateMetaImage.bat app_sdk4203_DDM.appimage awr2944
    _mmw_demo_mssDDM.xer5f %AWR294X_RADARSS_IMAGE_BIN% awr2944_mmw_demo_dssDDM.xe66
    call %MMWAVE_SDK_INSTALL_PATH%/scripts/windows/generateMetaImage.bat app_sdk4203_TDM.appimage awr2944
    _mmw_demo_mssTDM.xer5f %AWR294X_RADARSS_IMAGE_BIN% awr2944_mmw_demo_dssTDM.xe66


    3)This BIN can be load and run by SBL enable DMA.

    Regards,
    Saswat Kumar

  • Hello Saswat

    OK, thank you very much for your reply. I'll try it. By the way, the latest SDK version 04_ 03_ 00_ 01 still have this problem?

    Regards,

    Zonghu Tao

  • Hello zonghu,

    We have not tried this with the 4.3.0.1, you can try it out. The fix provided above is for the 4.2.0.3.

    Regards,
    Saswat

  • Hello Saswat

    A.

    Step1: I use the default configuration in SBL, and do not enable edma;

    Step2: copy three files of wr2943_mmw_demo_mssDDM.xer5f, xwr2xxx_radarss_metarprc.bin, awr2943_mmw_demo_dssDDM.xe6625335 from SDK 04_02_00_03 to SDK 04_02_00_02(in path of C:\ti\mmwave_mcuplus_sdk_04_02_00_02\mmwave_mcuplus_sdk_04_02_00_02\scripts\windows), then generate a new App image according to your steps.

    Step3: Brush the image generated in step 1 and step 2 into the board

    Step4:Connect UART to PC, and then power on and off the board again

    Step5:The results are shown in the following figure,is load successful.

    B.

    Step1: I use the change configuration in SBL, and only enable edma, then generated boot tiimage like this:

    Step2: copy three files of wr2943_mmw_demo_mssDDM.xer5f, xwr2xxx_radarss_metarprc.bin, awr2943_mmw_demo_dssDDM.xe6625335 from SDK 04_02_00_03 to SDK 04_02_00_02(in path of C:\ti\mmwave_mcuplus_sdk_04_02_00_02\mmwave_mcuplus_sdk_04_02_00_02\scripts\windows), then generate a new App image according to your steps.

    Step3: Brush the image generated in step 1 and step 2 into the board

    Step4:Connect UART to PC, and then power on and off the board again

    Step5:The results are shown in the following figure,is load fail.

    I tried to do this but failed. Is there anything I need to change?

    Regards,

    Zonghu Tao

  • Hello Zonghu,

    Copy the APP generate scripts from SDK4.2.0.2 to SDK4.2.0.3. To combine the XE66 and XER5F to a single BIN

    Please follow the exact steps and mentioned in the above thread.

    Regards,
    Saswat Kumar

  • Hello Saswat

    I want to confirm if you mean Copy the APP generate scripts the same as the following:

    1.Copy folder 'script' from C:/ti mmwave_ mcuplus_ sdk_ 04_ 02_ 00_ 02/mmwave_ mcuplus_ sdk_ 04_ 02_ 00_02 to the path C:/ti mmwave_ mcuplus_ sdk_ 04_ 02_ 00_ 03/mmwave_ mcuplus_ sdk_ 04_ 02_ 00_ 03 and replace the original 'srcipt' folder.
    2.Copy folder 'out2rprc' from C:/ti/mmwave_mcuplus_sdk_04_02_00_02/mcu_plus_sdk_awr294x_08_01_01_06/tools/boot to the path C:、ti、mmwave_mcuplus_sdk_04_02_00_03/mcu_plus_sdk_awr294x_08_02_00_25/tools/boot and replace the original 'out2rprc' folder.

    In addition, I have a question, since the script is copied to mmwave_ mcuplus_ sdk_ 04_ 02_ 00_ 03 from mmwave_ mcuplus_ sdk_ 04_ 02_ 00_ 02  Why do call C:\ti mmwave_ mcuplus_ sdk_ 04_ 02_ 00_ 02\mmwave_ mcuplus_ sdk_ 04_ 02_ 00_ 02\scripts\windows\setenv.bat instead of call C: ti mmwave_ mcuplus_ sdk_ 04_ 02_ 00_ 03\mmwave_ mcuplus_ sdk_ 04_ 02_ 00_ 03\scripts\windows\setenv.bat

    Thank you.

    Regards,

    Zonghu Tao