This thread has been locked.

If you have a related question, please click the "Ask a related question" button in the top right corner. The newly created question will be automatically linked to this question.

IWR1642BOOST: IWR1642BOOST,how to use CAN?

Part Number: IWR1642BOOST
Other Parts Discussed in Thread: IWR1642,

I want to use CAN in ppl lab. I mainly refer to the document about Adding CAN Tx and Rx to an Existing mmWave Project.

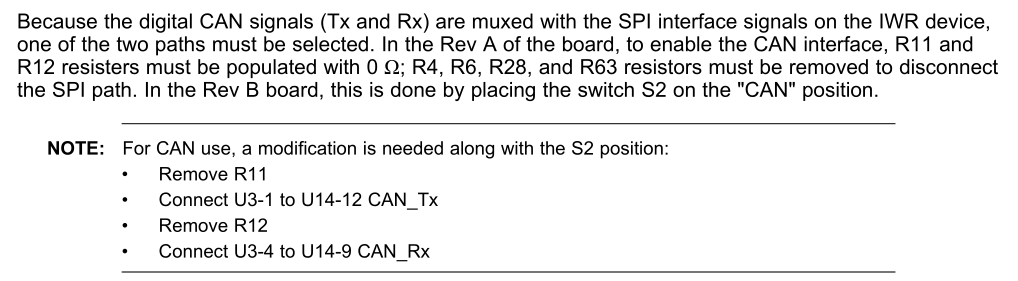
The program has been compiled. The switch S2 has beed placed on the "CAN" position.

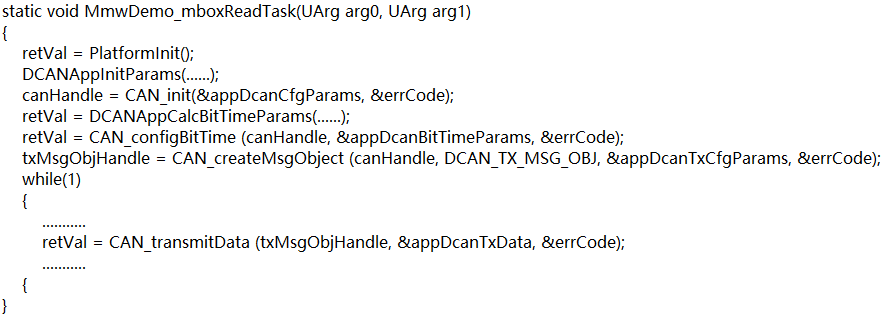
appdcantxdata has an assignment,which is in retVal = CAN_transmitData (txMsgObjHandle, &appDcanTxData, &errCode).

CAN settings are the same as those in the file, baud rate 1000K, frame id 0xc1, standard frame.

I use Oscilloscope to check canh and canl,which are both 2.3V when the program is running.

But why didn't the PC receive the data?

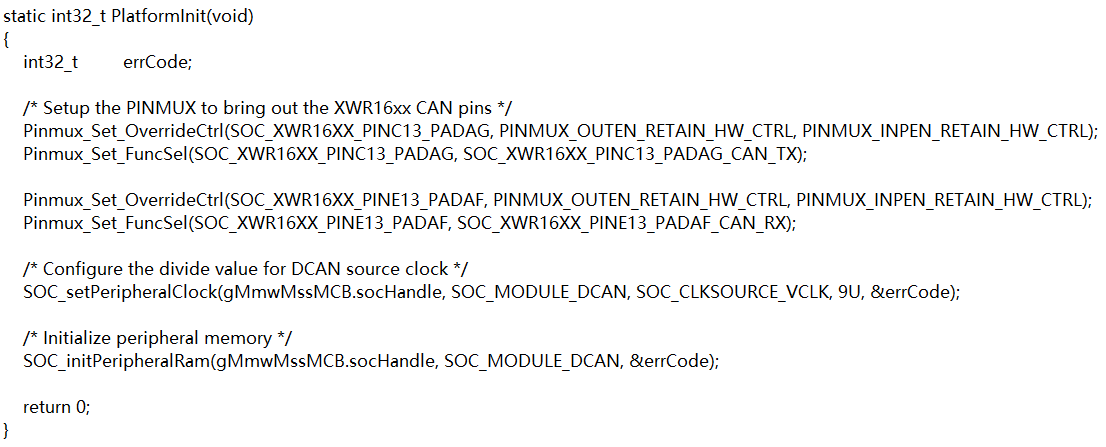
Is there something wrong with the program that causes CAN not send data at all?

Or The hardware needs to be modified?

Thank you

  • The board is marked 1642-evm proc011 Rev B.In addition to setting the switch S2 to the "CAN" position, the switch S2 needs to be modified

    But components are too small to modify.Is the modification of switch S2 necessary?

    Is it hardware or program problem that causes CAN not output?

  • I did CAN driver test.I use Oscilloscope to cheak CANH and CANL during doing CAN Unit Test Menu.

    CANH and CANL are both 2.3V.

    CAN Unit Test Menu
    Please select the type of test to execute:
    1. DCAN Internal loopback test
    2. DCAN External loopback test
    3. DCAN Parity test
    4. DCAN Tx/Rx test

    1 and 2 were successful.

    3 failed.

    4 was stuck and cannot be carried out.

    4 was stuck at > Enter your selection: Debug: External transmit testing.

    *******************************************************
    CAN Unit Test Menu
    Please select the type of test to execute:
    1. DCAN Internal loopback test
    2. DCAN External loopback test
    3. DCAN Parity test
    4. DCAN Tx/Rx test
    *******************************************************
    > Enter your selection: Debug: Internal loopback testing
    Debug: Number of iterations : 100
    Debug: Number of messages transmitted : 100
    Debug: Number of messages received : 100
    Debug: Number of messages lost : 0
    Debug: Number of data mismatch : 0
    Debug: Error Status Interrupt : 0


    Debug: Message object number : 1
    Debug: Direction : Transmit
    Debug: Number of interrupts received : 100
    Debug: Number of messages processed : 100


    Debug: Message object number : 2
    Debug: Direction : Receive
    Debug: Number of interrupts received : 100
    Debug: Number of messages processed : 100
    Debug: Receive & Transmit Measurements
    Debug: Rx Min:470 Max: 503 Average:476 ticks
    Debug: Tx Min:459 Max: 468 Average:466 ticks


    Debug: Internal loopback testing for 100 iterations Passed
    Feature: Internal loopback testing: Passed

    *******************************************************
    CAN Unit Test Menu
    Please select the type of test to execute:
    1. DCAN Internal loopback test
    2. DCAN External loopback test
    3. DCAN Parity test
    4. DCAN Tx/Rx test
    *******************************************************
    > Enter your selection: Debug: External loopback testing
    Debug: Number of iterations : 100
    Debug: Number of messages transmitted : 100
    Debug: Number of messages received : 100
    Debug: Number of messages lost : 0
    Debug: Number of data mismatch : 0
    Debug: Error Status Interrupt : 0


    Debug: Message object number : 1
    Debug: Direction : Transmit
    Debug: Number of interrupts received : 100
    Debug: Number of messages processed : 100


    Debug: Message object number : 2
    Debug: Direction : Receive
    Debug: Number of interrupts received : 100
    Debug: Number of messages processed : 100
    Debug: Receive & Transmit Measurements
    Debug: Rx Min:463 Max: 496 Average:470 ticks
    Debug: Tx Min:459 Max: 467 Average:464 ticks


    Debug: External loopback testing for 100 iterations Passed
    Feature: External loopback testing: Passed


    *******************************************************
    CAN Unit Test Menu
    Please select the type of test to execute:
    1. DCAN Internal loopback test
    2. DCAN External loopback test
    3. DCAN Parity test
    4. DCAN Tx/Rx test
    *******************************************************
    > Enter your selection: Debug: parity testing
    Error: ECC error status check failed. Single bit error 0 Double bit error 1 Message Number 49
    Feature: Parity testing: Failed
    Debug:CAN testing failed


    *******************************************************
    CAN Unit Test Menu
    Please select the type of test to execute:
    1. DCAN Internal loopback test
    2. DCAN External loopback test
    3. DCAN Parity test
    4. DCAN Tx/Rx test
    *******************************************************
    > Enter your selection: Debug: External transmit testing

  • Hi,

    Could you please refer to unit test document section 3 for CAN test setup:

    C:\ti\mmwave_sdk_03_05_00_04\docs\mmwave_sdk_unit_test_procedure.pdf

    Thanks

    Yogesh

  • [Cortex_R4_0] *******************************************************
    CAN Unit Test Menu
    Please select the type of test to execute:
    1. DCAN Internal loopback test
    2. DCAN External loopback test
    3. DCAN Parity test
    4. DCAN Tx/Rx test
    *******************************************************
    > Enter your selection: Debug: External transmit testing
    Debug: External transmit testing Passed
    Debug: Number of iterations : 1
    Debug: Number of messages transmitted : 0
    Debug: Number of messages received : 0
    Debug: Number of messages lost : 0
    Debug: Error Status Interrupt : 1


    Debug: Message object number : 1
    Debug: Direction : Transmit
    Debug: Number of interrupts received : 0
    Debug: Number of messages processed : 1


    Debug: Message object number : 2
    Debug: Direction : Receive
    Debug: Number of interrupts received : 0
    Debug: Number of messages processed : 0


    Debug: Receive passive error : 0
    Debug: Transmit Error Counter : 136
    Debug: Receive Error Counter : 0

    4. DCAN Tx/Rx test has been completed.The results are different from those in "\can_test\xwr16_R4_CAN_Tx_Rx_<timestamp>.log".

    Do I need to make more modifies to the hardware besides placing the switch S2 on the "CAN" position?

    Why DCAN transmission fails?

    thank you

  • Are you using PCAN or other CAN emulator?

  • I use a USB-CAN Adapter to receive data,a Oscilloscope to cheak CANH and CANL.

    PC did not receive the data, and the oscilloscope showed that canh and canl had no obvious waveform, which was about 2.3V

  • Hi,

    The only setting for ReV B EVM is to move S2 to CAN position to bring signal to CAN PHY.

    You may try and run CAN-FD test to see if the CAN PHY is working.

    Thanks

    Yogesh

  • I use functions in CAN to change my program.  retVal = CAN_transmitData (txMsgObjHandle, &appDcanTxData, &errCode);

    I looked at he Pin Attributes of iwr1642.There is no CAN-FD pin,only CAN pin,E13 and C13.

    Is it necessary to change the program according to can-fd?

  • Hi,

    There is different pin-muxing for CAN and CANFD. Please refer to test code PlatformInit() function in main.c :

    C:\ti\mmwave_sdk_03_05_00_04\packages\ti\drivers\canfd\test\xwr16xx

    and 

    C:\ti\mmwave_sdk_03_05_00_04\packages\ti\drivers\can\test\common

    Thanks

    Yogesh

  • CAN still has no output, I would like to ask if my program is wrong?

  • Hi,

    Please try and get the code @C:\ti\mmwave_sdk_03_05_00_04\packages\ti\drivers\can\test\xwr16xx working. 

    If this is not working, the issue is in your setup. Once you have the test code working we can debug your code.

    Thanks

    Yogesh

  • CAN Unit Test Menu
    Please select the type of test to execute:
    1. DCAN Internal loopback test
    2. DCAN External loopback test
    3. DCAN Parity test
    4. DCAN Tx/Rx test

    test 3 and test 4 is not working.At present, I have switched S2 to CAN ON.CANH and CANL of J3 are connected to a CAN-USB converter. Then I connect the computer and open the corresponding software.I use the oscilloscope to see CANH and CANL, and find that there is no CAN waveform.

    Except for the values of testselection and gdisplaystats, I didn't change the code of tested program in SDK.

    The specific console message is in my previous reply.

    Now I don't know what the problem is?

    Where might the setup be problematic?

    thank you

  • Hi,

    Could you please share the platformInit() function.

    Also please verify the bit-timing used here matches with the external CAN emulator bit timing.

    Thanks

    Yogesh

  • OK,I have made sure the bit-timing used here matches with the external CAN emulator bit timing.

  • Did you test CANFD to rule out issue with CAN Transceiver on the EVM.

    Also do you have any other 16xx platform EVM to rule out hardware issue.

    Thanks

    Yogesh

  • I learned from other places that iwr1642boost does not support CANFD.Is there no problem with  CAN program I use?

    I don't have another 1642 EVM at the moment.Maybe it's the hardware problem?

    Could you give me some advice?

    thank you

  • I am not aware of CANFD limitation on IWR1642Boost.

    Could you please run the CANFD and let me know the result:

    C:\ti\mmwave_sdk_03_05_00_04\packages\ti\drivers\canfd\test\xwr16xx

    Thanks

    Yogesh

  • According to Pin Attributes,the pins of IWR1642 do not support CANFD,only support CAN.

    I don't know if my understanding is correct, but I will try CANFD test later.

  • CANFD Unit Test Menu
    Please select the type of test to execute:
    1. MCAN Internal loopback test
    2. MCAN External loopback test
    3. MCAN Multiple Tx test
    4. MCAN External Tx/Rx test
    5. MCAN EVM-EVM test
    6. MCAN Tx Cancel test
    7. MCAN Power down test

    3. MCAN Multiple Tx test is successful.CANFD can use.

    thank you