This thread has been locked.

If you have a related question, please click the "Ask a related question" button in the top right corner. The newly created question will be automatically linked to this question.

Creating and writing loadable image file to SPI NOR

Other Parts Discussed in Thread: TMS320C6678, TMS320C6657

Hello dear friends,

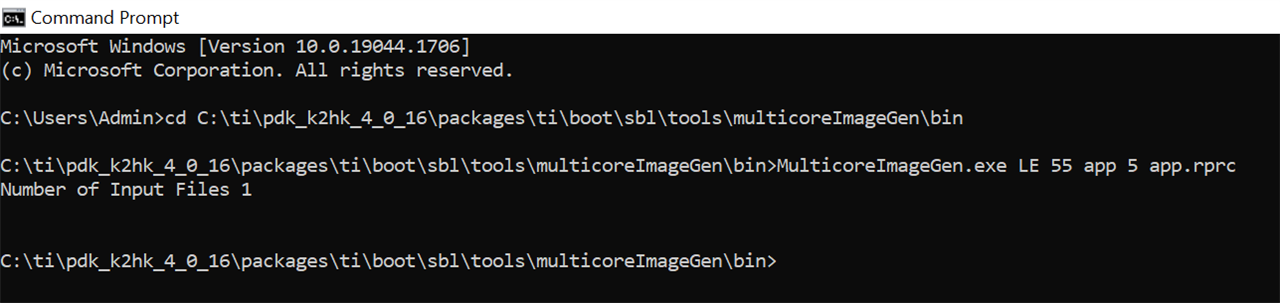
I want to make loadable image files of .out application to write on the EVMK2H board. as described in the link (https://software-dl.ti.com/processor-sdk-rtos/esd/docs/latest/rtos/index_Foundational_Components.html#k2h-k2e-k2l), I generated two files with these commands:

  1. out2rprc.exe [.out file] [rprc output]
  2. MulticoreImageGen.exe LE 55 [output name] 0 [rprc output]

then I'm using the file generated from the second phase:

I connect to the board

connect to the arm core and initialize it

connect to the DSP core 0 and load the spi_flash_writer.out

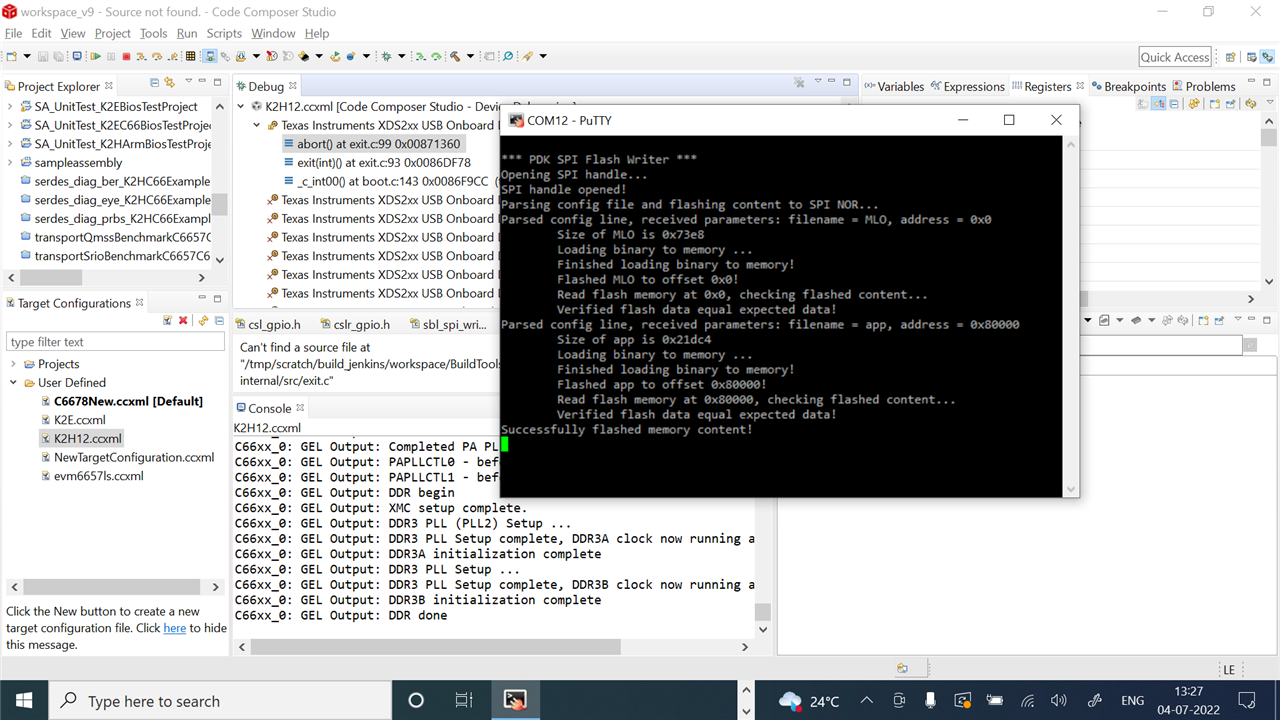
and here with the example nor boot example, it works fine and example is written successfully on the board but it cant write our main application and got error like below:

*** PDK SPI Flash Writer ***
Opening SPI handle...
SPI handle opened!
Parsing config file and flashing content to SPI NOR...
Parsed config line, received parameters: filename = multicore_generated, address = 0x80000000
        Size of multicore_generated is 0x91464
        Loading binary to memory ...
        Finished loading binary to memory!
        Error flashing memory! Error code -3
Error parsing config file!

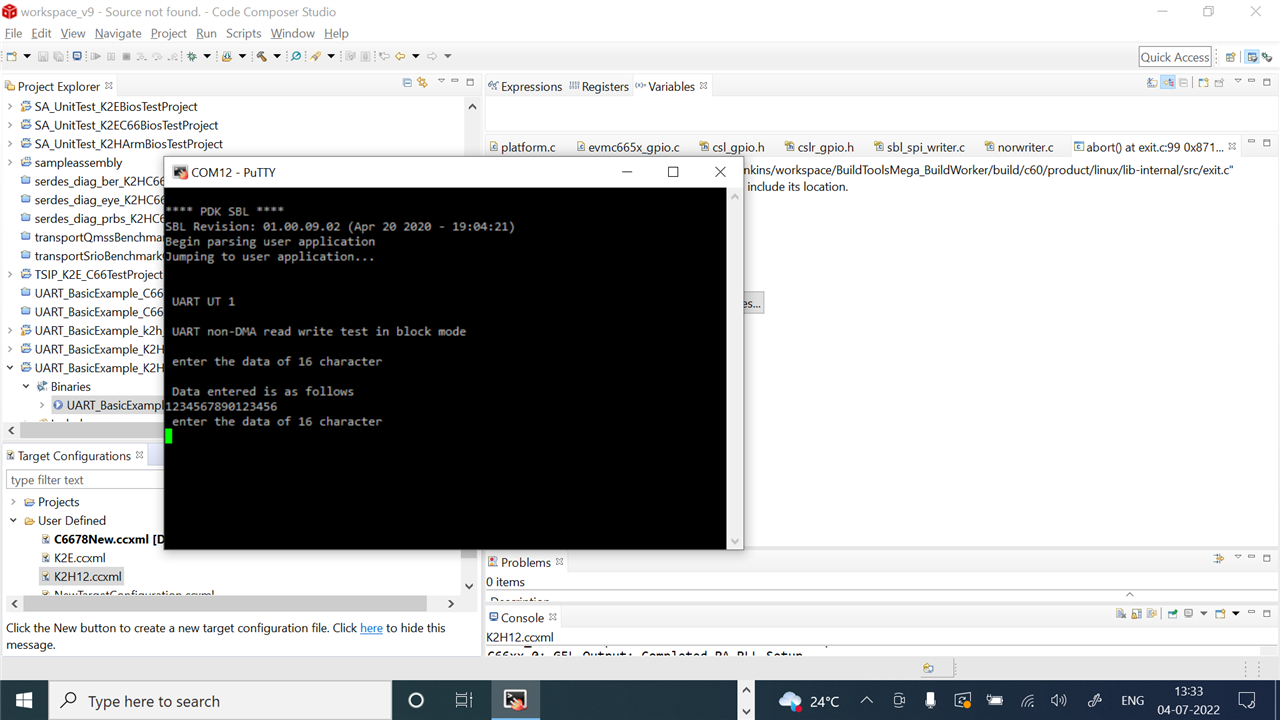
even when I try to write to memory address 80000 it going to be successful, but my program won't run after putting the dip switch on the spi nor boot and restart the device.

  •  

    I have created a bootable image and flashed the app binary into the NOR memory. ( Please note, this is on the DSP side of the C6657/C6678 EVM) 

    Able to boot the app from NOR. I have not tried with SPI flash.

    Let me try with SPI and on the ARM side of the K2H and get back to you.

    If, you are, OK, to boot the app with NOR flash, Please follow the steps given here: 

    https://e2e.ti.com/support/processors-group/processors/f/processors-forum/1073147/faq-tms320c6678-how-to-flash-the-ibl-intermediate-boot-loader-into-eeprom-and-how-to-flash-the-application-binary-into-nor-how-to-boot-the-ibl-application-binary 

    Regards

    Shankari G

  • Thanks for your attention.

    Plus what you have mentioned above, would you please help me to generate (.dat) and (.bin) files from the user application (.out) file? I searched and tried different ways to do that, but I didn't get the result. I only have (.out) file and need to generate (.dat) or (.bin) file to load to the memory browser into the address 0x80000000 and flash it via norwriter_evmk2X.out or spi_flash_writer.out with memory address 80000 that was written in the config file.

    The only way that I got results was only for example based on the (KeystoneII_Boot_Examples_UserGuide.pdf - page 7):

    1. connect to the evmk2h board via ccs v9.3 (board is on the NO BOOT mode (0001))

    2. connect to the arm core0 and initial the core with xtcievmk2x_arm.gel

    3. connect to the DSP core0 and load norwriter_evmk2X.out

    4. load the spiImage.dat  file into the memory address 0x80000000 via the memory browser window

    5. resume the running to flash

    6. power off the board, changing the dip switch to the SPI NOR mode (0010)

    7. finally, I see the result that we expect to see on the UART console (Tera Term) like this: (Mentioned in the PDF)

    Core 0 standing by...
    Core 1 standing by...
    Core 2 standing by...
    Core 3 standing by...

    But I need to generate (.dat) from the user application (.out) file to flash it instead of the keystone example dat file.

    If I should do something more please help me.

    Thanks.

  • Majid,

    In the latest processor SDK 6.3, the conversion of ---- ".out " to .bin/dat is not required.

    We can boot the .out directly.

    I have tried only on the DSP side of the K2X boards and not on the ARM side.

    Let me try and get back...

    Meanwhile, the following are the steps followed.

    --------------------

    Step 4 - Flashing app

    1. The sample binary taken for this demonstration is UART_BasicExample_C6657_c66xTestProject.

    2. Located at C:\ti\pdk_c665x_2_0_16\packages\MyExampleProjects\UART_BasicExample_C6657_c66xTestProject

    3. Build and create the app binary using CCS 9.3

    4. App binary, UART_BasicExample_C6657_c66xTestProject.out will be located at  "C:\ti\pdk_c665x_2_0_16\packages\MyExampleProjects\UART_BasicExample_C6657_c66xTestProject\Debug\"

    5. Flashing app binary into NOR-memory using NOR-writer.

    1. Set your EVM to NO BOOT. Power on, launch target configuration in CCS, and connect to Core 0. Be sure the GEL file is used and DDR is initialized.
    2. Copy the UART-app binary you want to flash to "C:\ti\pdk_c665x_2_0_16\packages\ti\boot\writer\nor\evmc6657l\bin" directory.
    3. Rename the binary you copied in the previous step to “app.bin”.
    4. In CCS, select Core 0 and open the Memory Browser
    5. In the Memory Browser window, right click and select “Load Memory”
    6. Load your app.bin to 0x80000000. Do so by selecting app.bin for the file, click Next, and input 0x80000000 for Start Address (Type-size selected should be 32-bit)
    7. Load C:\ti\pdk_c665x_2_0_16\packages\ti\boot\writer\nor\evmc6657l\bin\norwriter_evm6657l.out
    8. Run Core 0. This will program the flash memory.

    If it succeeds, the console will print “NOR programming completed successfully”

    ---------------

    Regards

    Shankari G

  • Majid,

    1. Just rename the application ".out" into "app.bin".

    2. I do not find the spi flash writer in the latest processor SDK 6.3. So I used the Nor_flash writer located at "C:\ti\pdk_c665x_2_0_16\packages\ti\boot\writer\nor\evmc6657l\bin"

    3. Try the steps one by one given in my previous post.

    Regards

    Shankari G

  • I don't have the directory (evmc6657l) so:

    (my pdk is pdk_k2hk_4_0_16)

    (using ccs v 9.3)

    at first, i created a new ccs project  type (c66xx [c6000])

    then I selected basic examples > hello world from the project templates and examples box and click finish. I built it to make (.out) file.

    I renamed my application (.out) to app.bin and put it in the directory (C:\ti\pdk_k2hk_4_0_16\packages\ti\boot\writer\nor\evmk2h\bin)

    now, as I described in my second reply, I connected to the board and initialize the arm core 0, then connected to the DSP core 0 and load the norwriter_evmk2h.out application from the path I mentioned above. after resuming the application, it processed flashing and verifying the application and finally I got the message NOR programming completed successfully, but when I stop the ccs and change the dip switch and power on the board I don't see anything on the serial port and nothing happened.

  • spi flash writer is in (C:\ti\pdk_k2hk_4_0_16\packages\ti\boot\sbl\tools\flashWriter\spi\bin\evmK2H)

    plus I dont have (MyExampleProjects\UART_BasicExample_C6657_c66xTestProject) in the (C:\ti\pdk_k2hk_4_0_16) as my platform development kit directory for sdk version 06.03 and even I dont have it in my (pdk_keystone2_3_00_03_15) version and even in (mcsdk_2_01_02_06).

  • Majid,

    I understand you.

    plus I dont have (MyExampleProjects\UART_BasicExample_C6657_c66xTestProject) in the (C:\ti\pdk_k2hk_4_0_16) as my platform development kit directory for sdk version 06.03 and even I dont have it in my (pdk_keystone2_3_00_03_15) version and even in (mcsdk_2_01_02_06).

    It exists in the form of scripts.

    We have to generate those "MyExampleProjects" using the scripts.

    When we generate, we will get 96 examples in total.

    These example projects needs to be generated by us, by following the steps given in this link... : https://e2e.ti.com/support/processors-group/processors/f/processors-forum/1083353/faq-66ak2h14-how-to-generate-the-ccs-pdk-examples-for-66ak2h14---k2h-evm


    Regards

    Shankari G

  • I don't understand the phase:

    3. Build and create the app binary using CCS 9.3

    --------------------------------

    Do you mean (.out) file in debug directory? How can I create the app binary using CCS 9.3?

    and is UART_BasicExample_C6657_c66xTestProject compatible with EVMK2H?

  • Q:  UART_BasicExample_C6657_c66xTestProject compatible with EVMK2H?

    ---- Yes, it is compatible. It was tested on EVMK2H.

    Q: I don't understand the phase:

    3. Build and create the app binary using CCS 9.3

    https://e2e.ti.com/support/processors-group/processors/f/processors-forum/1083353/faq-66ak2h14-how-to-generate-the-ccs-pdk-examples-for-66ak2h14---k2h-evm

    There are six steps given in the above link. Which step. you are not able to do ??

    Regards

    Shankari G

  • Thanks, but I have these files after downloading 96 examples:

    after that, I imported it into ccs v9.3 and built that. than copy the file UART_BasicExample_K2H_c66xTestProject.out to the directory C:\ti\pdk_k2hk_4_0_16\packages\ti\boot\writer\nor\evmk2h\bin and renamed it to the app.bin.

    now, I lunched the configuration and connected to the arm core 0 and initialized that with the gel file, then I connected to the DSP core 0 and initialize that too with the gel file. finally opened the memory browser and loaded the app.bin file to the address 0x80000000 as you said and load the norwriter_evmk2h.out on the DSP core 0 and ran it.

    I got the messages:

    [C66xx_0] NOR Writer Utility Version 01.00.00.04

    Flashing sector 0 (0 bytes of 3014656)
    Flashing sector 1 (65536 bytes of 3014656)
    Flashing sector 2 (131072 bytes of 3014656)
    Flashing sector 3 (196608 bytes of 3014656)
    Flashing sector 4 (262144 bytes of 3014656)
    Flashing sector 5 (327680 bytes of 3014656)
    Flashing sector 6 (393216 bytes of 3014656)
    Flashing sector 7 (458752 bytes of 3014656)
    Flashing sector 8 (524288 bytes of 3014656)
    Flashing sector 9 (589824 bytes of 3014656)
    Flashing sector 10 (655360 bytes of 3014656)
    Flashing sector 11 (720896 bytes of 3014656)
    Flashing sector 12 (786432 bytes of 3014656)
    Flashing sector 13 (851968 bytes of 3014656)
    Flashing sector 14 (917504 bytes of 3014656)
    Flashing sector 15 (983040 bytes of 3014656)
    Flashing sector 16 (1048576 bytes of 3014656)
    Flashing sector 17 (1114112 bytes of 3014656)
    Flashing sector 18 (1179648 bytes of 3014656)
    Flashing sector 19 (1245184 bytes of 3014656)
    Flashing sector 20 (1310720 bytes of 3014656)
    Flashing sector 21 (1376256 bytes of 3014656)
    Flashing sector 22 (1441792 bytes of 3014656)
    Flashing sector 23 (1507328 bytes of 3014656)
    Flashing sector 24 (1572864 bytes of 3014656)
    Flashing sector 25 (1638400 bytes of 3014656)
    Flashing sector 26 (1703936 bytes of 3014656)
    Flashing sector 27 (1769472 bytes of 3014656)
    Flashing sector 28 (1835008 bytes of 3014656)
    Flashing sector 29 (1900544 bytes of 3014656)
    Flashing sector 30 (1966080 bytes of 3014656)
    Flashing sector 31 (2031616 bytes of 3014656)
    Flashing sector 32 (2097152 bytes of 3014656)
    Flashing sector 33 (2162688 bytes of 3014656)
    Flashing sector 34 (2228224 bytes of 3014656)
    Flashing sector 35 (2293760 bytes of 3014656)
    Flashing sector 36 (2359296 bytes of 3014656)
    Flashing sector 37 (2424832 bytes of 3014656)
    Flashing sector 38 (2490368 bytes of 3014656)
    Flashing sector 39 (2555904 bytes of 3014656)
    Flashing sector 40 (2621440 bytes of 3014656)
    Flashing sector 41 (2686976 bytes of 3014656)
    Flashing sector 42 (2752512 bytes of 3014656)
    Flashing sector 43 (2818048 bytes of 3014656)
    Flashing sector 44 (2883584 bytes of 3014656)
    Flashing sector 45 (2949120 bytes of 3014656)
    Reading and verifying sector 0 (0 bytes of 3014656)
    Reading and verifying sector 1 (65536 bytes of 3014656)
    Reading and verifying sector 2 (131072 bytes of 3014656)
    Reading and verifying sector 3 (196608 bytes of 3014656)
    Reading and verifying sector 4 (262144 bytes of 3014656)
    Reading and verifying sector 5 (327680 bytes of 3014656)
    Reading and verifying sector 6 (393216 bytes of 3014656)
    Reading and verifying sector 7 (458752 bytes of 3014656)
    Reading and verifying sector 8 (524288 bytes of 3014656)
    Reading and verifying sector 9 (589824 bytes of 3014656)
    Reading and verifying sector 10 (655360 bytes of 3014656)
    Reading and verifying sector 11 (720896 bytes of 3014656)
    Reading and verifying sector 12 (786432 bytes of 3014656)
    Reading and verifying sector 13 (851968 bytes of 3014656)
    Reading and verifying sector 14 (917504 bytes of 3014656)
    Reading and verifying sector 15 (983040 bytes of 3014656)
    Reading and verifying sector 16 (1048576 bytes of 3014656)
    Reading and verifying sector 17 (1114112 bytes of 3014656)
    Reading and verifying sector 18 (1179648 bytes of 3014656)
    Reading and verifying sector 19 (1245184 bytes of 3014656)
    Reading and verifying sector 20 (1310720 bytes of 3014656)
    Reading and verifying sector 21 (1376256 bytes of 3014656)
    Reading and verifying sector 22 (1441792 bytes of 3014656)
    Reading and verifying sector 23 (1507328 bytes of 3014656)
    Reading and verifying sector 24 (1572864 bytes of 3014656)
    Reading and verifying sector 25 (1638400 bytes of 3014656)
    Reading and verifying sector 26 (1703936 bytes of 3014656)
    Reading and verifying sector 27 (1769472 bytes of 3014656)
    Reading and verifying sector 28 (1835008 bytes of 3014656)
    Reading and verifying sector 29 (1900544 bytes of 3014656)
    Reading and verifying sector 30 (1966080 bytes of 3014656)
    Reading and verifying sector 31 (2031616 bytes of 3014656)
    Reading and verifying sector 32 (2097152 bytes of 3014656)
    Reading and verifying sector 33 (2162688 bytes of 3014656)
    Reading and verifying sector 34 (2228224 bytes of 3014656)
    Reading and verifying sector 35 (2293760 bytes of 3014656)
    Reading and verifying sector 36 (2359296 bytes of 3014656)
    Reading and verifying sector 37 (2424832 bytes of 3014656)
    Reading and verifying sector 38 (2490368 bytes of 3014656)
    Reading and verifying sector 39 (2555904 bytes of 3014656)
    Reading and verifying sector 40 (2621440 bytes of 3014656)
    Reading and verifying sector 41 (2686976 bytes of 3014656)
    Reading and verifying sector 42 (2752512 bytes of 3014656)
    Reading and verifying sector 43 (2818048 bytes of 3014656)
    Reading and verifying sector 44 (2883584 bytes of 3014656)
    Reading and verifying sector 45 (2949120 bytes of 3014656)
    NOR programming completed successfully

    everything is like to be successful, but when I stop the ccs, turn off the board and change the dip switch to the SPI nor boot and turn it on again, I don't see anything on the UART.

    this is my tera term settings and I connected the serial connector to the COM2: SoC UART Console on the board as you can see it on the quick start guide.

    I really don't know what am I doing wrong?! ;(

  • Majid,

    First of all, Congratulations. 

    You are able to load the UART image into the SPI -NOR successfully. ( From your output messages, it is evident. ).

    Your boot sequence is looking for IBL.   It is easy to do..... No worries...

    ---

    Please follow up the video given inside the FAQ --- in the step 4.f below

    ---

    In the EEPROM, load the IBL, ( Intermediate boot loader ) using EEprom_writer.out.

    Once you do a power on reset, IBL will come up first and then boot the app ( in your case it is UART) .

    ---

    4.e) How to build the IBL –

    Please note: The building steps are given for C665x. Please provide “C6678” as device parameter in place of C665x , while building


    4.f) How to flash the IBL (Intermediate Boot loader) into EEPROM and how to flash the application binary into NOR? How to boot the IBL + Application.

    https://e2e.ti.com/support/processors-group/processors/f/processors-forum/1073147/faq-tms320c6678-how-to-flash-the-ibl-intermediate-boot-loader-into-eeprom-and-how-to-flash-the-application-binary-into-nor-how-to-boot-the-ibl-application-binary

     ------

    For more/ complete user guide, Please refer to this https://e2e.ti.com/support/processors-group/processors/f/processors-forum/1082264/faq-tms320c6678-quick-set-up-guide-c6678-and-c6678-evm/4005920#4005920

    and scroll down slowly and read one by one...

    Regards

    Shankari G

  • Thanks for your attention and hints, but I must flash SPI NOR memory. This is what I must do as an example to write a sample application and make the image file flash on the SPI NOR memory.

  • Majid,

    The steps, I have given is for SPI-NOR only.

    Please try those. Along with that, flash IBL into EEPROM.

    It will work as expected.

    Let me know, how it goes for you.

    Regards

    Shankari G

  • Would you please tell me why I should use IBL in EEPROM? (Because I only need to flash the application into SPI NOR.)

    Also, I have a question:

     - How can I know that an application or source code is running on the DSP core or ARM core?

     - How can I prove that my code/example is running on the DSP core?

    Are these samples are running on the DSP cores?

     - UART_BasicExample_K2H_c66xTestProject

     - D:\ti\mcsdk\mcsdk_bios_3_00_03_15\examples\ndk\client\evmk2h

    -------------------------

    I couldn't get any result on the UART via flashing these applications to the SPI NOR like how we flash the keystone II SPI NOR example to the SPI NOR.

    I don't know what should I do.

  • Majid,

    IBL stands for Intermediate boot loader.

    When you do the DIP switch settings for SPI, and then, power-ON, IBL will come first, which in turn will boot the app.

    For more details on IBL, please visit https://www.ti.com/lit/an/spracn2/spracn2.pdf

    For DSP bootloader guide : https://www.ti.com/lit/ug/sprugy5c/sprugy5c.pdf

    [ The FPGA firmware on the EVM redirects the core to the IBL flashed on the EEPROM and then directs it to the desired boot mode. However, in custom designs, it has been observed that adding an additional EEPROM for implementing the IBL may not be practical due to cost and size reasons. The C667x PG 2.0 silicon has the PLL lock up issue fixed and no longer requires an implementation of an IBL on custom boards; the C665x PG 1.0 silicon does not have the PLL lock up issue, so it also does not require an implementation of an IBL on custom boards. ] 

    If you want to boot without IBL, directly as a ROM boot source from SPI, Please use this source code: 3124.C6657_directROM_Boot_example.zip

    ----

    Your are using the old software, i.e, MCSDK. I recommended you to use the latest Processor SDK 6.3 PROCESSOR-SDK-RTOS-K2HK  06_03_00_106
    https://software-dl.ti.com/processor-sdk-rtos/esd/K2HK/latest/index_FDS.html

    ----

    Also, I have a question:

     - How can I know that an application or source code is running on the DSP core or ARM core?

    Answer:  

    UART_BasicExample_k2h_armDMATestproject

    UART_BasicExample_K2H_armExampleProject

    UART_BasicExample_k2h_armTestproject

    These projects are for ARM core. Even names are generated in such a way that those are meant for ARM core. 


    UART_BasicExample_K2H_c66xDMATestProject

    UART_BasicExample_K2H_c66xExampleProject

    UART_BasicExample_K2H_c66xTestProject

    These projects are for DSP cores In K2H - C6678. The names with C66x are for DSP cores.

    Steps to generate the PDK examples --- for both DSp and ARM cores of K2H

    Once the PROCESSOR-SDK-RTOS-K2HK  06_03_00_106 is installed, observe the PDK package,  "pdk_k2hk_4_0_16" under C:\ti

    1. Launch command prompt
    2. Go to the directory C:\ti\pdk_k2hk_4_0_16\packages
    3. Run pdksetupenv.bat
      1. C:\ti\pdk_k2hk_4_0_16\packages>pdksetupenv.bat
    4. DSPCore examples:
      1. C:\ti\pdk_k2hk_4_0_16\packages>pdkProjectCreate.bat K2H all little all all dsp "C:\ti\pdk_k2hk_4_0_16\packages"
    5. ARMCore examples:
      1. C:\ti\pdk_k2hk_4_0_16\packages>pdkProjectCreate.bat K2H all little all all arm "C:\ti\pdk_k2hk_4_0_16\packages"
    6. It will create a folder by name "MyExampleProjects" under C:\ti\pdk_k2hk_4_0_16\packages.

    https://e2e.ti.com/support/processors-group/processors/f/processors-forum/1083353/faq-66ak2h14-how-to-generate-the-ccs-pdk-examples-for-66ak2h14---k2h-evm

    -------------------------------

     - How can I prove that my code/example is running on the DSP core?

    Answer : According to the DIP switch settings for 

      1)    - ARM - SPI

      2)    - DSP- SPI 

    You can differentiate. 

    ---

    Apart from this, when building the programs, the SOC definition will be for "ARM"  and "C66x" in the build configurations. 


    Regards

    Shankari G

  • Dear friend, what do you enter in the nor_writer_input.txt inside C:\ti\pdk_k2hk_4_0_16\packages\ti\boot\writer\nor\evmk2h\bin?

    Should I enter these values?

    file_name  = app.bin
    start_addr = 0x80000000

    or

    file_name  = app.bin
    start_addr = 0

    Also, 3124.C6657_directROM_Boot_example.zip is for C6657. Is it working for EVMK2h? I'm not sure it should be 6678 or 6657!

    (Is it working for DSP SPI 1010 ?)

    (Does it have any output? how can we know it is ran on the board?)

    Thanks

  • Majid,

    In the latest processor SDK 6.3, the conversion of ---- ".out " to .bin/dat is not required.

    We can boot the .out directly.

    I have tried only on the DSP side of the K2X boards and not on the ARM side.

    Let me try and get back...

    Meanwhile, the following are the steps followed.

    --------------------

    Step 4 - Flashing app

    1. The sample binary taken for this demonstration is UART_BasicExample_C6657_c66xTestProject.

    2. Located at C:\ti\pdk_c665x_2_0_16\packages\MyExampleProjects\UART_BasicExample_C6657_c66xTestProject

    3. Build and create the app binary using CCS 9.3

    4. App binary, UART_BasicExample_C6657_c66xTestProject.out will be located at  "C:\ti\pdk_c665x_2_0_16\packages\MyExampleProjects\UART_BasicExample_C6657_c66xTestProject\Debug\"

    5. Flashing app binary into NOR-memory using NOR-writer.

    1. Set your EVM to NO BOOT. Power on, launch target configuration in CCS, and connect to Core 0. Be sure the GEL file is used and DDR is initialized.
    2. Copy the UART-app binary you want to flash to "C:\ti\pdk_c665x_2_0_16\packages\ti\boot\writer\nor\evmc6657l\bin" directory.
    3. Rename the binary you copied in the previous step to “app.bin”.
    4. In CCS, select Core 0 and open the Memory Browser
    5. In the Memory Browser window, right click and select “Load Memory”
    6. Load your app.bin to 0x80000000. Do so by selecting app.bin for the file, click Next, and input 0x80000000 for Start Address (Type-size selected should be 32-bit)
    7. Load C:\ti\pdk_c665x_2_0_16\packages\ti\boot\writer\nor\evmc6657l\bin\norwriter_evm6657l.out
    8. Run Core 0. This will program the flash memory.

    If it succeeds, the console will print “NOR programming completed successfully”

    ---------------

    Regards

    Shankari G

    --------------------------------------------------

    Here, the instructions you mentioned was based on IBL or without IBL? (plus, is it working for DSP SPI NOR? because I didn't get any print on the UART console after flashing and setting the dip switch 1010 or even ARM SPI 0010 !!)

    Also, what configurations I should set on the Properties window of the UART_BasicExample_K2H_c66xTestProject before building that?

    What values I should set for the fields like Variant and the combo box in front of it, Linker command file, and Runtime support library? (I tried different values like TCI6614 and TMS320C6678 and TMS320C6657)

    My board is EVMK2H

    I'm not sure if it is c6678 or c6657 or something?

    Thanks.

  • 4.f) How to flash the IBL (Intermediate Boot loader) into EEPROM and how to flash the application binary into NOR? How to boot the IBL + Application.

    https://e2e.ti.com/support/processors-group/processors/f/processors-forum/1073147/faq-tms320c6678-how-to-flash-the-ibl-intermediate-boot-loader-into-eeprom-and-how-to-flash-the-application-binary-into-nor-how-to-boot-the-ibl-application-binary

    I followed all instructions you described in the above link, but I didn't get any result of booting IBL and IBL version on the uart after booting IBL and didn't get any result on the UART after booting the application.

    Also, I only have one SW on my EVMK2H board, but you mentioned 4 SW during the operations that we should set. like SW3 SW4 SW5 SW6. (I dont have them.)

    I did all operations with only one SW that I have on the board, but I didn't get such result.

  • Majid,

    In K2H, the DSP side core is C6678.

    Ok, Alright. I understand.

    Let us do one thing. 

    Let me take a remote control of your machine and try to instruct you to solve them.

    Please do install anydesk in your machine and reply to me with your anydesk number....

    Meanwhile, try out the available docs and pointers provided..

    Regards

    Shankari G

  • Hello dear friend,

    Thanks for your attention.

    I had some unclear things that I asked in the last three replies. Could you please help me and make them clear?

     1. Also, Could you please tell me whether the address 0x80000000 that we flash the image to, is for the case the code is running on the DSP cores or for the case the code is running on the ARM cores?

    1.1 the SPI example of package "Keystone II Boot Examples" is working on the ARM cores or DSP cores? with DIP SW 0010 is worked, but with DIP SW 1010 it doesn't work and print nothing on the UART.

     2. DIP SW 0010 means the bootloader is ARM and code is running on the DSP cores? or meaning the bootloader is ARM and code is running on the ARM cores?

    ----------------------------------------------

    3.

    Dear friend, what do you enter in the nor_writer_input.txt inside C:\ti\pdk_k2hk_4_0_16\packages\ti\boot\writer\nor\evmk2h\bin?

    Should I enter these values?

    file_name  = app.bin
    start_addr = 0x80000000

    or

    file_name  = app.bin
    start_addr = 0

    Also, 3124.C6657_directROM_Boot_example.zip is for C6657. Is it working for EVMK2h? I'm not sure it should be 6678 or 6657!

    (Is it working for DSP SPI 1010 ?)

    (Does it have any output? how can we know it is ran on the board?)

    Thanks

    ---------------------------------------------

    4.

    4.f) How to flash the IBL (Intermediate Boot loader) into EEPROM and how to flash the application binary into NOR? How to boot the IBL + Application.

    https://e2e.ti.com/support/processors-group/processors/f/processors-forum/1073147/faq-tms320c6678-how-to-flash-the-ibl-intermediate-boot-loader-into-eeprom-and-how-to-flash-the-application-binary-into-nor-how-to-boot-the-ibl-application-binary

    I followed all instructions you described in the above link, but I didn't get any result of booting IBL and IBL version on the UART after booting IBL and didn't get any result on the UART after booting the application.

    Also, I only have one SW on my EVMK2H board, but you mentioned 4 SW during the operations that we should set. like SW3 SW4 SW5 SW6. (I don't have them.)

    I did all operations with only one SW that I have on the board, but I didn't get such a result.

    --------------------------------------------

    Actually, would you please send me an email address to send you the Anydesk code and set a time to be online and available?

    I really appreciate you because this is the final due date I have.

  • Masjid,

    QUESTION 1 :

    ----------------------------

    1. Also, Could you please tell me whether the address 0x80000000 that we flash the image to, is for the case the code is running on the DSP cores or for the case the code is running on the ARM cores?

    Answer : It is neither of them. The address 0x80000000 is the MSMC RAM. This MSMC RAM memory  is common for both ARM and DSP core

    First, the code is loaded into MSMC RAM and then using the nor_writer program, it is copied from the MSMC RAM into the NOR flash memory.

    ----------------------------

    QUESTION 2: 

    1.1 the SPI example of package "Keystone II Boot Examples" is working on the ARM cores or DSP cores? with DIP SW 0010 is worked, but with DIP SW 1010 it doesn't work and print nothing on the UART.

    With DIP SW 0010 -- This is for ARM SPI. IF we load the uart code ( built for ARM arhitecture ) it will run on ARM core of K2H.

    The same UART example is exisiting to build for DSP architecture.  We can build for DSP and make it run on the DSP core of K2H. The DIP SW for DSP-SPI is 1010 

    ----------------------------

    QUESTION 3: 

    Dear friend, what do you enter in the nor_writer_input.txt inside C:\ti\pdk_k2hk_4_0_16\packages\ti\boot\writer\nor\evmk2h\bin?

    Should I enter these values?

    file_name  = app.bin
    start_addr = 0x80000000

    or

    file_name  = app.bin
    start_addr = 0

    ANSWER :

    nor_writer_input.txt -->

    file_name = app.bin ( app.bin for application code....uart )

    start_addr = 0

    ------

    eepromwriter_input.txt ---> 

    file_name = i2crom.bin
    bus_addr = 0x51
    start_addr = 0
    swap_data = 0

    .....................................................................

    Also, 3124.C6657_directROM_Boot_example.zip is for C6657. Is it working for EVMK2h? I'm not sure it should be 6678 or 6657!

    (Is it working for DSP SPI 1010 ?)

    (Does it have any output? how can we know it is ran on the board?)

    You are right.... Yes, it is for C6657. Will let you know the direct ROM BOOT examples for K2H, if existing....

    I hope my answers  helps ..............

    Regards

    Shankari G

  • The same UART example is exisiting to build for DSP architecture.  We can build for DSP and make it run on the DSP core of K2E. The DIP SW for DSP-SPI is 1010

    ---------------

    Thanks

    Would you please tel me how can I build that for the DSP architecture? Or where is the same example of keystone ii for DSP? If you mean UART_BasicExample_K2H_c66xTestProject, I built that, flashed it, but I didnt get anything on the UART after resetting the board.

    Also, you said K2E. Why k2e? My board is EVMK2H. Is there anything that I didnt pay attention?

    Thanks

    Actually, I need to know what the problem is for me.

  • Majid,

    That is the typo error from my side. It is K2H only. I have edited my post.

    ----

    UART_BasicExample_K2H_c66xTestProject 

    UART_BasicExample_K2H_c66xDMATestProject 

    UART_BasicExample_K2H_c66xExampleProject

    These three examples are for DSP core of K2H

    ------

    UART_BasicExample_k2h_armDMATestproject

    UART_BasicExample_K2H_armExampleProject

    UART_BasicExample_k2h_armTestproject

    These three examples are for ARM core of K2H

    ----

    For C6678- DSP arch of K2H, please follow this link for building and flashing the IBL.

    https://e2e.ti.com/support/processors-group/processors/f/processors-forum/1073147/faq-tms320c6678-how-to-flash-the-ibl-intermediate-boot-loader-into-eeprom-and-how-to-flash-the-application-binary-into-nor-how-to-boot-the-ibl-application-binary


    Regards

    Shankari.

  • I have tested the first one UART_BasicExample_K2H_c66xTestProject  and the last one UART_BasicExample_K2H_c66xExampleProject many times with IBL and without IBL based on the routine you mentioned before, but I didnt see anything on the UART after reset the board and putting the DIP SW on the both modes (1010 and 0010).

    Could you please help me or connect via Anydesk to see how I flash it? I can be available on the PC about 3 to 4 hours later.

    I really appreciate you.

  • Majid,

    On K2H EVM, I have tested the UART example on the DSP side and ARM side. On K2H EVM, It works perfectly with CCS and emulator in "NO-Boot" mode.

    I have created a video for you. Please followt the video given below.

    Let us go step by step.

    Just follow the instructions.

    1. First verify that the uart program works on the DSP side of K2H EVM..

    Let me know, how it goes for you.

    Regards

    Shankari G

  • Thanks for clarifying

    I did it the same as yours and ran it on the first DSP core.

    This is not my problem because I ran it on the first DSP core successfully.

    My problem is to flash it on the device permanently and each time I turn on the device, these messages print on the UART, and this test project run every time we start the board. this is what I cannot do. I need to flash/boot it on the device permanently not only run it as test execution.

    Best regards

    Majid A

  • OK,

    Let me do the flashing steps too on the K2H and get back to you.

    Regards

    Shankari G

  • Majid,

    I agree, the booting and flashing steps for Keystone II ( K2H/K2E ) devices doesnot match with keystone I ( C6657/C6678) devices.

    It is cumbersome,yes.... but will sort it out.

    Give me some more time.

    Thanks for your patience.

    Regards

    Shankari G

  • Thanks for attention

    I really like to find out what the problem is.

    Best regards

    Majid

  • Majid,

    Good news.....

    Able to flash the SBL ( secondary boot loader ) + the UART app on K2H board successfully using SPI-flash writer.

    I will share you the flashing steps + video, shortly.

    This time, you, would, be able to suceed.

    Regards

    Shankari G

  • Majid,

    This is what I did. Follow the steps slowly and sequentially. Maintain the same file names as I used... for a quick result....

    Step1:

    1. Using CCS, build the UART_BasicExample_K2H_c66xTestProject and create a  ".OUT" ---->  "UART_BasicExample_K2H_c66xTestProject.out"

    Step2:

    1. copy the .out file, UART_BasicExample_K2H_c66xTestProject.out, from the path -- C:\ti\pdk_k2hk_4_0_16\packages\MyExampleProjects_DSP\UART_BasicExample_K2H_c66xTestProject\Debug  into the path ----------------C:\ti\pdk_k2hk_4_0_16\packages\ti\boot\sbl\tools\out2rprc\bin

    Step 3:

    1. open command prompt

    2. Go to path -- C:\ti\pdk_k2hk_4_0_16\packages\ti\boot\sbl\tools\out2rprc\bin

           C:\Users\Admin>cd C:\ti\pdk_k2hk_4_0_16\packages\ti\boot\sbl\tools\out2rprc\bin

    3. In command line execute the out2rprc to convert the .out into the rprc format

          C:\ti\pdk_k2hk_4_0_16\packages\ti\boot\sbl\tools\out2rprc\bin>out2rprc.exe UART_BasicExample_K2H_c66xTestProject.out app.rprc

    4. Copy the app.rprc from path --- C:\ti\pdk_k2hk_4_0_16\packages\ti\boot\sbl\tools\out2rprc\bin --- into the path C:\ti\pdk_k2hk_4_0_16\packages\ti\boot\sbl\tools\multicoreImageGen\bin

    5.  In command line execute the MulticoreImageGen.exe to convert the app.rprc  into the bootable file format

          C:\Users\Admin>cd C:\ti\pdk_k2hk_4_0_16\packages\ti\boot\sbl\tools\multicoreImageGen\bin

          C:\ti\pdk_k2hk_4_0_16\packages\ti\boot\sbl\tools\multicoreImageGen\bin>MulticoreImageGen.exe LE 55 app 5 app.rprc

    This step will generate the bootable app

    6. copy the app from C:\ti\pdk_k2hk_4_0_16\packages\ti\boot\sbl\tools\multicoreImageGen\bin into the path C:\ti\pdk_k2hk_4_0_16\packages\ti\boot\sbl\tools\flashWriter\spi\bin\evmK2H

    7. copy the MLO file ( from the path,  "C:\ti\pdk_k2hk_4_0_16\packages\ti\boot\sbl\binary\evmK2H\spi\bin"  ----  into the path C:\ti\pdk_k2hk_4_0_16\packages\ti\boot\sbl\tools\flashWriter\spi\bin\evmK2H

    8. In k2H board, DIP Switch settings should be SW1 - 0001 - No boot mode. 

        ---> Connect the USB cable for emulator 

        ----> Connect the USB cable for COM port --- > open device manager in your PC --> open putty with the approriate port number. 

    9. Launch the K2H target configuration file, connect the ARM core first, wait until the gel completes. Connect the dsp core, wait until the gel completes.

    10. Load and run the "spi_flash_writer.out " located at C:\ti\pdk_k2hk_4_0_16\packages\ti\boot\sbl\tools\flashWriter\spi\bin\evmK2H.

    11. We are done !!

    ---

    12. Power off and put the DIP switch settings to SW1 -- 0010 -- ARM-SPI

          ----> MLO -- SBL will run on ARM, initialization will happen

          ----> It jumps to the uart app and runs on DSP.

    Video for steps 8 - 11

    Video for step 12

    Regards

    Shankari G

  • First of all, Thanks for your attention and everything you did.

    I'm sorry for the delay because I didn't have the board to test it again.

    I followed all steps you mentioned in the latest posts and videos.

    All versions, addresses, names, and directories seem the same.

    The only difference I see in my work is that when you load and run the spi_flash_writer.out, at first it flashes the MLO file automatically, and then it flashes the app file, but here it only flashes the app file and doesn't care about MLO file.

    Thanks

  • Reload your images. It was not seen.

    -Shankari G

  • I refreshed the page on two different devices, I see all images with different titles correctly!