

Hi
How to flash the IBL ( Intermediate Boot loader ) into EEPROM and how to flash the application binary into NOR?
How to boot the IBL + Application binary? on C6678 EVM using CCS 9.3

This thread has been locked.
If you have a related question, please click the "Ask a related question" button in the top right corner. The newly created question will be automatically linked to this question.
Hi
How to flash the IBL ( Intermediate Boot loader ) into EEPROM and how to flash the application binary into NOR?
How to boot the IBL + Application binary? on C6678 EVM using CCS 9.3
How to flash the IBL ( Intermediate Boot loader ) into EEPROM and how to flash the application binary into NOR?
How to boot the IBL + Application binary? on C6657 EVM using CCS 9.3
Pre-requisite
Step1: -- Building IBL ( If you are using TI-C6678 EVM, you can skip this step and use the pre-built binary which comes along with processor SDK 6.3)
Step2: -- Flashing IBL
SW3(off, on, on, on),
SW4(on, on, on, on),
SW5(on, on, on, on),
SW6(on, on, on, on)
file_name = i2crom.bin
bus_addr = 0x51
start_addr = 0
swap_data = 0
If it succeeds, the console will print “EEPROM programming completed successfully” like below.
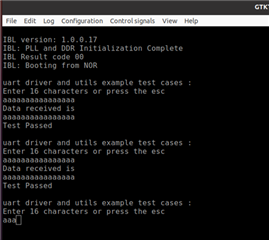
Step 3 - Booting IBL:
SW3(off, off, on, off),
SW4(on, on, on, on),
SW5(on, on, on, off),
SW6(on, on, on, on)

Step 4 - Flashing app
If it succeeds, the console will print “NOR programming completed successfully”
[C66xx_0] NOR Writer Utility Version 01.00.00.04

Flashing sector 0 (0 bytes of 3014656)
Flashing sector 1 (65536 bytes of 3014656)
Flashing sector 2 (131072 bytes of 3014656)
Flashing sector 3 (196608 bytes of 3014656)
Flashing sector 4 (262144 bytes of 3014656)
Flashing sector 5 (327680 bytes of 3014656)
Flashing sector 6 (393216 bytes of 3014656)
Flashing sector 7 (458752 bytes of 3014656)
Flashing sector 8 (524288 bytes of 3014656)
Flashing sector 9 (589824 bytes of 3014656)
Flashing sector 10 (655360 bytes of 3014656)
Flashing sector 11 (720896 bytes of 3014656)
Flashing sector 12 (786432 bytes of 3014656)
Flashing sector 13 (851968 bytes of 3014656)
Flashing sector 14 (917504 bytes of 3014656)
Flashing sector 15 (983040 bytes of 3014656)
Flashing sector 16 (1048576 bytes of 3014656)
Flashing sector 17 (1114112 bytes of 3014656)
Flashing sector 18 (1179648 bytes of 3014656)
Flashing sector 19 (1245184 bytes of 3014656)
Flashing sector 20 (1310720 bytes of 3014656)
Flashing sector 21 (1376256 bytes of 3014656)
Flashing sector 22 (1441792 bytes of 3014656)
Flashing sector 23 (1507328 bytes of 3014656)
Flashing sector 24 (1572864 bytes of 3014656)
Flashing sector 25 (1638400 bytes of 3014656)
Flashing sector 26 (1703936 bytes of 3014656)
Flashing sector 27 (1769472 bytes of 3014656)
Flashing sector 28 (1835008 bytes of 3014656)
Flashing sector 29 (1900544 bytes of 3014656)
Flashing sector 30 (1966080 bytes of 3014656)
Flashing sector 31 (2031616 bytes of 3014656)
Flashing sector 32 (2097152 bytes of 3014656)
Flashing sector 33 (2162688 bytes of 3014656)
Flashing sector 34 (2228224 bytes of 3014656)
Flashing sector 35 (2293760 bytes of 3014656)
Flashing sector 36 (2359296 bytes of 3014656)
Flashing sector 37 (2424832 bytes of 3014656)
Flashing sector 38 (2490368 bytes of 3014656)
Flashing sector 39 (2555904 bytes of 3014656)
Flashing sector 40 (2621440 bytes of 3014656)
Flashing sector 41 (2686976 bytes of 3014656)
Flashing sector 42 (2752512 bytes of 3014656)
Flashing sector 43 (2818048 bytes of 3014656)
Flashing sector 44 (2883584 bytes of 3014656)
Flashing sector 45 (2949120 bytes of 3014656)
Reading and verifying sector 0 (0 bytes of 3014656)
Reading and verifying sector 1 (65536 bytes of 3014656)
Reading and verifying sector 2 (131072 bytes of 3014656)
Reading and verifying sector 3 (196608 bytes of 3014656)
Reading and verifying sector 4 (262144 bytes of 3014656)
Reading and verifying sector 5 (327680 bytes of 3014656)
Reading and verifying sector 6 (393216 bytes of 3014656)
Reading and verifying sector 7 (458752 bytes of 3014656)
Reading and verifying sector 8 (524288 bytes of 3014656)
Reading and verifying sector 9 (589824 bytes of 3014656)
Reading and verifying sector 10 (655360 bytes of 3014656)
Reading and verifying sector 11 (720896 bytes of 3014656)
Reading and verifying sector 12 (786432 bytes of 3014656)
Reading and verifying sector 13 (851968 bytes of 3014656)
Reading and verifying sector 14 (917504 bytes of 3014656)
Reading and verifying sector 15 (983040 bytes of 3014656)
Reading and verifying sector 16 (1048576 bytes of 3014656)
Reading and verifying sector 17 (1114112 bytes of 3014656)
Reading and verifying sector 18 (1179648 bytes of 3014656)
Reading and verifying sector 19 (1245184 bytes of 3014656)
Reading and verifying sector 20 (1310720 bytes of 3014656)
Reading and verifying sector 21 (1376256 bytes of 3014656)
Reading and verifying sector 22 (1441792 bytes of 3014656)
Reading and verifying sector 23 (1507328 bytes of 3014656)
Reading and verifying sector 24 (1572864 bytes of 3014656)
Reading and verifying sector 25 (1638400 bytes of 3014656)
Reading and verifying sector 26 (1703936 bytes of 3014656)
Reading and verifying sector 27 (1769472 bytes of 3014656)
Reading and verifying sector 28 (1835008 bytes of 3014656)
Reading and verifying sector 29 (1900544 bytes of 3014656)
Reading and verifying sector 30 (1966080 bytes of 3014656)
Reading and verifying sector 31 (2031616 bytes of 3014656)
Reading and verifying sector 32 (2097152 bytes of 3014656)
Reading and verifying sector 33 (2162688 bytes of 3014656)
Reading and verifying sector 34 (2228224 bytes of 3014656)
Reading and verifying sector 35 (2293760 bytes of 3014656)
Reading and verifying sector 36 (2359296 bytes of 3014656)
Reading and verifying sector 37 (2424832 bytes of 3014656)
Reading and verifying sector 38 (2490368 bytes of 3014656)
Reading and verifying sector 39 (2555904 bytes of 3014656)
Reading and verifying sector 40 (2621440 bytes of 3014656)
Reading and verifying sector 41 (2686976 bytes of 3014656)
Reading and verifying sector 42 (2752512 bytes of 3014656)
Reading and verifying sector 43 (2818048 bytes of 3014656)
Reading and verifying sector 44 (2883584 bytes of 3014656)
Reading and verifying sector 45 (2949120 bytes of 3014656)
NOR programming completed successfully
The step4 is given in the video materials below. Follow the videos sequentially
Step 5 - Booting IBL + app binary
SW3(off, off, on, off),
SW4(on, on, on, on),
SW5(on, on, on, off),
SW6(on, on, on, on)
Regards
Shankari G
