This thread has been locked.

If you have a related question, please click the "Ask a related question" button in the top right corner. The newly created question will be automatically linked to this question.

FAO Paul Grohe RE building a Microgram scale

Other Parts Discussed in Thread: PGA112, PGA281, LMP2012

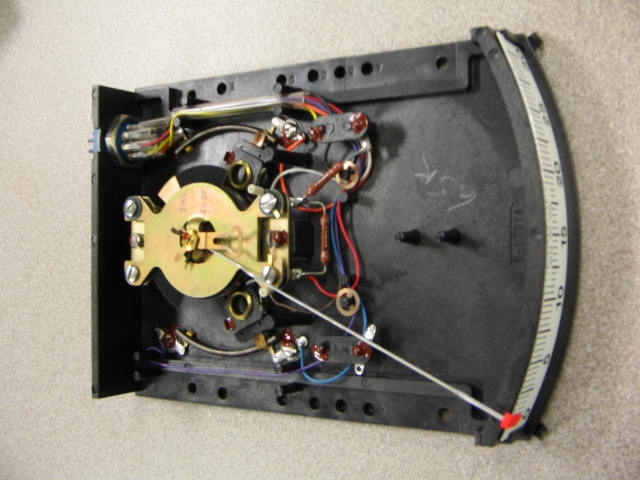
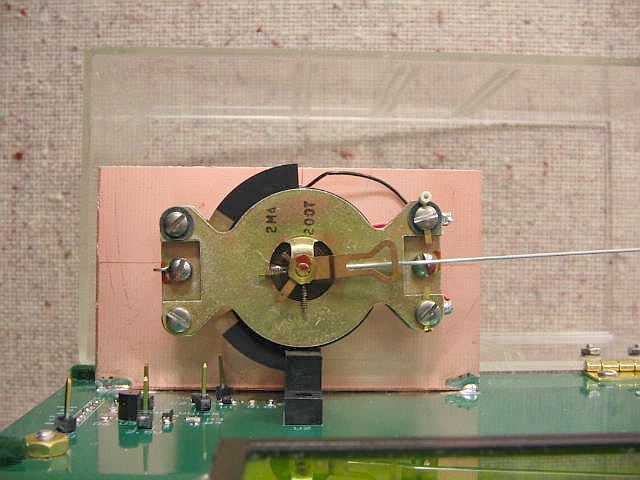
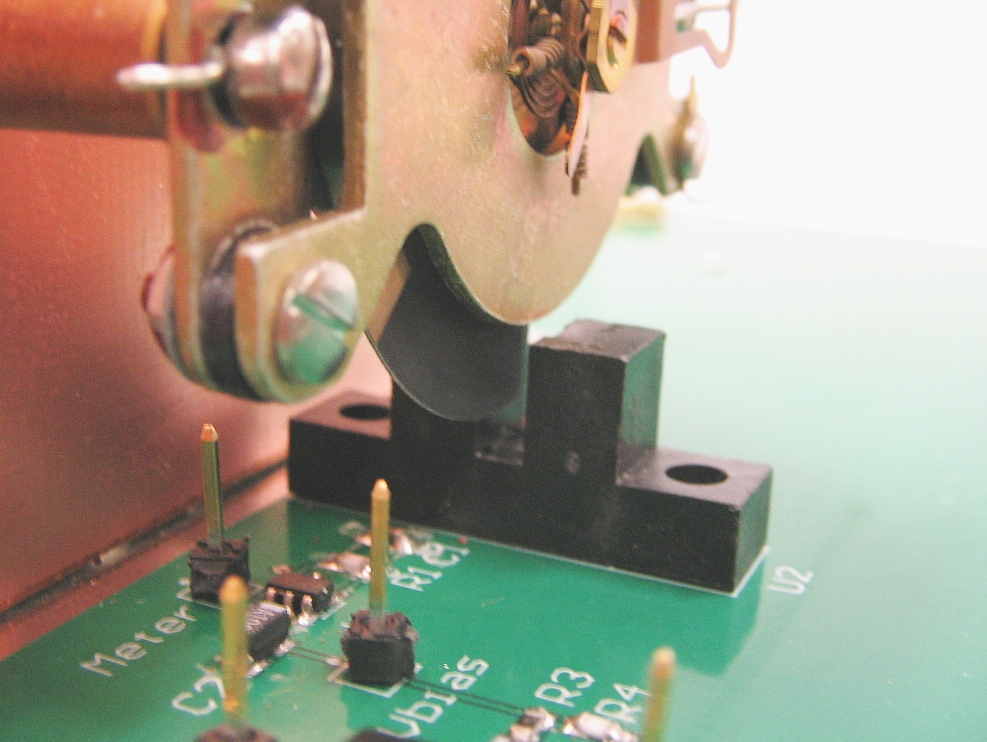
Hi Paul, I saw your amazing YouTube video: http://m.youtube.com/#/watch?v=n90whRO-ypE&desktop_uri=%2Fwatch%3Fv%3Dn90whRO-ypE

...showing you can accurately weigh an Eyelash hair. I am carrying out a study for an international Conference for Eyelash Extension professionals and have been searching everywhere on how to accurately weigh various combinations of individual Eyelash Extentions. Can you advise me on how I could access something like that? Even to hire or something? My partner is a Electrical engineer so he should be able to help but any advice would be grately appreciated.

The forum that I post on for Eyelash professionals were even considering pitching together to buy a suitable scale (to answer our many questions about this for Natural lash safety) but they're extremely expensive from what I've heard.

Any advice you ( or anyone else) has I would be most grateful.

  • Gee,

    Amazing? "Reality TV" and Infomercials has really shrunk our expectations of "Amazing"...

    Being so close to April Fools, I don't know if I should take this seriously! :)

    We do not get a lot of traffic from the Eyelash Extension Professionals crowd on our E2E community...I expected more questions from South America asking how to weigh "sugar"...

    I'm not that clever. The original idea of using a meter movement originally came from a pair of 1996 and 2001 articles in Scientific American by Shawn Carlson. George Schmermund came up with the original idea to use a surplus galvanometer movement as a microgram scale and Shawn Carlson wrote an article for Scientific American.

    The scale "breadboard":

     http://www.erowid.org/archive/rhodium/chemistry/equipment/scale.html

    and Mr. Carlson refined it with optical sensing in his second article:

     http://www.scientificamerican.com/article.cfm?id=down-among-the-micrograms

    My scale is just a refinement of the optical sensor principle, as well as adding the back-end analog VGA's, A/D's and processor. It was literally built with junk-box components.

    The meter movement is from a 5 inch 'edge-wise' industrial process meter. The "tray" is just the pointer turned sideways. These meters are still available through various electronics surplus houses. Most meter movements are only good for a few milligrams. The optical detector is a standard HP optical slot detector.

    Unfortunately, the main device I built the scale to demo is now obsolete (LMP8100), and time has not allowed me to update it with something more current.

    If your partner is a EE, he should easily be able to duplicate the articles.

    You can get milligram foil weight sets for calibration. They are just little pieces of thin stainless steel trimmed to the correct weight. Google "milligram calibration weights". You will need at least a 1mg weight.

    I hope this helps ease the burden of overweight eyelashes around the world...and will lead to lighter, trimmer lashes...Tammy Faye will rejoice.

    Regards,

  • Hi Paul

    Many thanks for the prompt response!

    I promise this is real  - I am an Eyelash extension professional carrying out research and I'm no fan of realty TV ;)

    Ok, so I have my shopping list and have been badgering my partner with questions, so I'll be buying:

    - HP optical slot detector - this I'm having great difficulty finding (I'm based in the UK), they only appear to be available in bulk fom the US

    - Millivoltmeter - still searching

    - 1 mg Calibration Weight - I've found THIS 1mg F1 Class Calibration Weight

    - Galvanometer - I've found THIS PHILIP HARRIS LTD VINTAGE GALVANOMETER

    Is there any chance I could purchase a HP optical slot detector from your company and have it sent to the UK? I've searched for this and its the one thing I think I'm going to have the greatest difficulty acquiring at a reasonable cost.

    Thanks again for your help and I look forward to hearing from you.

    Kind regards

  • Hi Teresa,

    "Galvanometer" = "Millivoltmeter"......same thing...you do not need to order both.

    The meter you found is a regular panel mount, and looks a bit small.

    What you want is a edge-wise meter - like this old Simpson classic:

     http://compare.ebay.com/like/330755888980?var=lv&ltyp=AllFixedPriceItemTypes&var=sbar

    Search UK Ebay for "edgewise meter" - Ebay forces me back to the US site...so I can't look for you...

    You do not have to use an edgewise meter - you can use a standard panel mount meter with a <1mA movement. A 60mm or larger (the better) meter. Larger meters have the longer needles (which becomes the balance arm) which give more leverage (sensitivity), and more room for the optical sensors...

    Ideally it should be a DC ammeter with a <1mA movement. DC voltmeters can also be used, but you will need to remove the scaling resistors (either external or internal).

    You want a "D'Arsonval" or "Moving Coil" meter movement (coil around a magnet, with a tension return spring, with a fixed pivot point). "Taut-band" meters may not be suitable because they cannot generally be operated at an angle (no bearings) and may not have enough strength.

    This Multicomp SD80/100 looks like a perfect candidate - and it is available new from Farnell for 15 pounds.

     http://uk.farnell.com/multicomp/sd80-0-100ua/meter-81x81mm-0-100ua/dp/4433932

    (I would recommend ordering two - just "in case"...as the movements are very delicate and easy to destroy once they are out of the case.

    The "slot" optical detector is just a LED and a photodiode in one package - nothing fancy or magical about it...you can replace it with separate LED and a photodiode.

    I did not find one at Farnell or Maplin, but Digikey has a similar one (they will ship to UK):

     http://www.digikey.com/product-detail/en/OPB621/365-1665-ND/1636993.

    Here is a nice milligram weight set for $12 - and they ship Int'l:

     http://www.ebay.com/itm/MILLIGRAM-CALIBRATION-WEIGHT-SET-1-TO-500-Mg-/330506905405

    These should get you started. No need to get too fancy. The rest of the parts can be scrounged up anywhere.

    It will take a little mechanical imagination to put it all together.

    Regards,

  • This is extremely helpful - thanks!

    I'm going to buy the Simpson edgewise meter like you suggested as it looks the most similar to what you used. I'm now on the hunt for the basic elements you mentioned on the YouTube video, namely the:

    - analog optical feedback circuit:
    my partner has tried to explain to this to me but I'm no engineer so don't understand, can you shed any light on what components would be suitable to work with the Simpson Edgewise Meter? He's telling me to source and buy everything then he will make it for me.

    - 12bit ADC:
    http://cpc.farnell.com/jsp/search/productdetail.jsp?sku=SC03531

    - programmable gain amplifier:
    http://cpc.farnell.com/jsp/search/productdetail.jsp?sku=SCTLC271CP

    - basic stamp controller:
    having trouble finding a suitable cost effective one - any suggestions?

    - display:
    does this come with the stamp controller or is it better to buy separately?

    This is really quite a challenge for a Lash Artist so my mechanical imagination if fairly limited but I'm determined to make one of these! :)

    Kind regards
    Teresa

  • Hi Teresa,

    Note that the Simpson meter is a 10V voltmeter - so there will be a resistor that will need to be removed or bypassed. This should not be a problem.

    The "Programmable" amplifier you selected is not quite correct. That one has an adjustable *speed*, not gain (amplification) - so it would not work.

    What I meant by "programmable" amp is something like the PGA112 or PGA281 - a "differential" input amplifier where you are able to select the amplification steps.

    In the circuit - you will need to be able to measure the *difference* between a "reference" voltage that establishes the "zero" position, and the voltage on the meter coil when the weight is applied. The difference in the reference voltage and the meter voltage is proportional to the weight applied.

    At low weights, this difference will be less than a 0.0001 volt. At full-scale weight - this could be a volt or more - so there is a wide range of gains required (think of a microscope, and how you have to change the lens "powers" as the things get smaller). To get more accuracy at the lower weights - the gain (amplification) must be increased so you can see it (fill the input range of the A/D).

    The amount of change is dependent on the physical/mechanical properties of the meter movement - so you will not know what gain ranges you will need until you test the movement and find out what it's limits are. At some point you can develop a "volts per milligram" number that will allow you to calculate the needed gain.

    I used a Parallax Basic Stamp 2 because I had used it previously in another project and was familiar with it, and I did not have time to learn "real" micro-controller programming and displays. You can use whatever platform your partner is comfortable with.

    The display is the Parallax 2x16 back-lit LCD display - also from Parallax (an "accessory").

    Disclaimer: I designed this when we were National Semi - and we did not have any "micro-controllers" to speak of at the time...So I used what I had in the time allotted... :)

    I would hold off on other purchases until you get the meter, sensor and the weights - as it will require some time to characterize the movement and get it working (the important part...). Once you have the scale movement constructed - everything else will just fall into place and become obvious. The circuitry is the easy part....

    Regards,

  • Hi Paul

    Ok thanks for the clarification. I'll get my partner to read this when he gets home as it'll make more sense to him.

    I'll also hold off on any more purchases like you said and get the basic basic mechanics working first.

    Thanks again for all your help, it would have been impossible for me without your guidance.

    I'll keep you posted on my progress, so you'll be hearing from me again in due course...:)

    Kind regards
    Teresa

  • Any chance there is a way to see the schematics as designed for reference?

    What did you use to calibrate the scale to below 100micrograms?

    Thanks,
    Matt 

  • Hmmm... Does not seem my reply made it... I'll try again...

    HI Matthew,

    (Hopefully) attached is the schematic for the movement part of the scale.

    0118.Scale_Schematic.pdf

    There were two pieces, the upper "movement" daughter-board and the "base" board that contained the second diff-amp stages and processor/display.

    The amplifiers I used on the "Base" part are now discontinued, so I do not want to pollute the universe with an obsolete schematic (and to prevent future "where can I find" posts). But that part was fairly straightforward (amps and ADC's)…the important part is the movement amplifier. The actual output would be the difference between the 1V reference voltage and the "Vmeas" output. For best results, connect your DMM between the "Vmeas" output (TP5) and the 1V reference input (TP3).

    Again…the ultimate sensitivity is determined by the meter movement, so you may have to tweak the values of R1 and R5. Basically you want to set the "zero" current to half the meter display rating (i.e.: the meter would be displaying mid-scale). Final 'zero" was set by adjusting the vane on the movement using the meters mechanical adjustment.

    The smallest calibrated weight I had was 1 milligram (basically a little sliver of thin sheet metal).  That set the upper limit.

    To measure below 1mg, you have to rely on physics…

    If you move the weight to half the distance of the fulcrum to the pan, then the resulting measured weight will be half.

    So I marked the shaft at 0.1, 0.25, 0.5 and 0.75 increments.

    I created "weights" out of a strand of hair and a piece of folded tape. The hair was formed into a loop (for hanging) then clamped between the folded tape. The 1mg weight was calibrated, then the "tape weight" was then placed in its place and the edges of the tape trimmed off until it measured what the 1mg weight measured. Get a sharp pair of small embroidery or dissection/surgery scissors…

    Then the "tape weight" was slid down the shaft to the marked 0.5 or 0.1 points, where it then should weigh  ½ or 1/10th what it did at the calibrated "pan" point. From there you can create a "calibration" curve.

    Have fun!

    Regards,

  • Thanks! This is just what I needed. I was unsure about how to bias the phototransistor. Perfect solution.

    Thanks for the info on calibration. Seems easier than the other technique I found which is measure the longest length of fine magnet wire that can be done in the calibrated range, measure and cut to get smaller values.

    Regards,

    Matt

  • Hi Matt,

    Glad to help.

    Here are some old pix of my movement....;^)..

    Here is the original meter, opened up. Notice the black half-moon "disk" vane with the copper area - this was part of the "alarm" setting function. That disk moves with the needle and makes contact with the sliding contacts.

    Here is a pic of the movement mounted - When set on it's side side, the edge of the vane sits in the beam of the sensor and "modulates" the light.

    The entire arm now "balances" on this beam of light.... The power is on, otherwise the needle (arm) would be lowered.

    And here is a close-up of the vane in the pickup "balancing" on the light beam:

    (BTW: The "beam" is infrared...so you cannot directly see it, but bright room light can still interfere with the photodiode)

    Hope this gives you some ideas...

    Regards,

  • Hi Paul,

       This is sooo cool! I totally want to try this out this summer. I'm doing undergrad chemistry research in polymer synthesis and the palladium catalysts we're using are needed in amounts like 0.2 mg, 0.5 mg etc and we have several analytical balances that have a display that goes to 000.0000 g so you'd think they would be able to measure out 0.5 mg with some kind of confidence but that doesn't seem to be the case. I can weigh a vial, take out what i think is about 0.5 mg then put the vial back on the scale and I never know what its going to tell me, sometimes it tells me the vial weights more than before i took some out! (other students and profs have the same problem so i don't think its just poor technique on my part). i think they sacrificed sensitivity for a wider range of measurement. I would be thrilled to have something that had a sensitivity of maybe +/- 0.1 mg, and you seem to have far exceeded that with your eyelash demonstration! I read the scientific american articles and they are very helpful. This project seems within the realm of possibility, i don't understand why there aren't affordable microgram scales on the market? Maybe you should start a new branch of TI called Affordable Microgram Scales! I'd buy one and i think other people would too! Thanks!

        -Nick

  • Hi Paul

    Despite all my efforts and your advice my partner never did make one of these for me :(

    But as it goes I'll be visiting Dallas beginning of September! Is there any chance at all that you would be so kind to let me buy/have this one from you? I know its a big ask but if you don't ask you don't get...

    I look forward to hearing back.

    Regards

    Teresa

  • hello i am oliver kershaw-dickson from sheffield hallam university in england.

    i am currently planning my final year project for my course and i am looking at producing your microgram spring balance device that you built on the youtube video.
    is there anyway i can have a list of parts used, electrical schematics, connection diagrams and a how to build guide so that i can learn from it and produce my own for uni. i would basically i need all the info you have please.

    i look forward to hearing back from you.

    my email is
    oliverkershawdickson@gmail.com
    thanks
  • Hi Oliver,Paul should be back after the holiday's to answer your questions.
    Regards,Karim
  • thanks karim. if Paul can respond either on here or to my email address then i will be happy to hear from him 

    oliverkershawdickson@gmail.com

  • Hi Paul do you have any pictures of the base part of the board. and do you have a link to the code you used on the parallax micro-controller. I know you have used a chip that is obsolete but i would like to see the base board if i can to try to find a replacement and get it working. thanks any response will be welcomed
  • Hello Oliver,

    The schematics are attached below.

    As I said above, the LMP8100's are no longer available. I would need to do some research into which PGA would be a suitable replacement.

    The design uses two LMP8100's for a total possible gain of 256 - but I only really used VGA1. VGA2 was never really used and was set to a gain of 1. 16x was more than enough gain. U3 is marked as a LMV822, but it is really a LMP2012.

    I was thinking of re-doing it using newer devices and a Launchpad for the "brains" and ADC's (like the MSP430FR8969, with the built-in LCD display).

    This is a 'Roud To-It project that I am probably not going to be able to get around to any time soon...Finding a duplicatable (and reasonable cost) movement would take a lot of research (and $$)...and I just don't have time for that.

    The code is a mess...probably would confuse more than help... I had to bit-bang the SPI since I had issues with the Stamp SPI library and the 8100's. Two ADC's were used - one monitored the rough output of the movement amplifier to determine the rough range (and offset voltage), and the second measuring the amplified and scaled output of the VGA.

    /cfs-file/__key/communityserver-discussions-components-files/14/Scale_5F00_Docs.pdf

    This is provided as-is as I cannot really support it anymore. The basic theory is there, but some artistic license is required to make it usable...

    Have fun!

    Regards,

  • thanks for that paul it will all be very helpful for me to get started with. if you could email me the code as is, i will be able to decipher it better from that as a start point. i am also working on this with a friend who is ok with programming but it would be really helpful to have that code as a starting point. i hope that will be ok. and i thankyou for the help and guidence

  • do you remember what the supply voltage and current was to the device to.

    thanks again
  • The supply voltage to the circuit is 5V, as supplied by the regulator. A wall-wort supply supplied 12V to the scale.

    Total supply current was around 50mA, mostly due to the LED back lighting on the LCD display.

    Supply current to the scale portion is dominated by the LED in the feedback circuit and the reference, then by the variable current required to drive the meter movement. Plus a few mA for the amplifiers. Supply current was not critical to the design...so I did not really measure it.

    Attached is the code...please do not laugh, I am not a programmer and did not have much time - so it is slapped together. The LCD display is a "smart" Parallax 27977 2x16 module with a 9600 baud ASCII serial input, so you talk to it like a line printer with ASCII text and control codes through a simple serial port. Much easier than futzing with mapped LCD controllers.

    I believe this was the latest version of the code...version control was minimal...

    /cfs-file/__key/communityserver-discussions-components-files/14/Scale6_5F00_n2.zip

    Regards,

  • i have found a usb version of the parrallax basic stamp 2 kit with the micro-controller will that be ok to program it.

    sorry for all the questions. you truly are a grate help

  • hi paul this is the last question.

    how is the LCD connected to the micro controller and do you know the pin out that are needed to connect. thanks

    oliver

  • Hi Oliver,

    P2 is the connector to the LCD display.

    "LCD" is the serial data line, which is connected to P15 (pin 20) on the BS2.

    Regards,

    www.parallax.com/.../27977

  • thanks for that paul and im assuming like the schematic shows they are connected to pins 1,2,3 on the lcd. 

    what is P3 used for also

    i have also managed to find some of the LMP8100 chips for sale so i have ordered the ones that say LMP8100AMA and lmp8100MA will these be ok

    thanks again really grateful

    oliver 

  • Hi Oliver,

    P3 is a 0.1" header for accessing the signal lines - it basically brings out the controller pins 5-12 for probing. Nothing is really connected to it normally..

    The LCD display is mounted on standoffs with a tall 0.1" 3-pin header. It looks like they have rev'ed the display since I built it and the input connector may be in a different spot...but that should not be an issue. There are only three pins - power, ground and data in.

    Regards,
  • i have found some LMP8100 chips but i have only got the LMP8100ama and the LMP8100ma will these be acceptable to use

    thanks

    oliver

  • Hi Oliver,

    Yes. The "AMA" is a more precise version (0.03% vs 0.075% gain accuracy). Same die, just tested and sorted.

    Regards,
  • yea thats cool i just wanted to check that they were ok to use. i found them in china but they are the national semi branded ones i guess from way back then. 

    im just starting the build process and i am very thankful for the assistance.

    thanks 

    Oliver

  • can you tell me what the difference is between the LMP8100MA and the LMP8100MAX as ive found a few with the X om the end

    thanks

    oliver

  • HI Oliver,

    The "X" is a shipping option. The device is the same...just how they are packaged for shipment.

    The "AMA" comes in a plastic rail of 55 units, and the "AMAX" is 2.5k units in tape and reel.

    Regards,

  • the way you programmed the LMp8100 was that set by how they were connected and also how they are connected to the smaller opamps or have you had to actually program them via a computer. 

    thanks and sorry for the 1000th question.

    oliver

  • paul in your microgram balance circuit i see there is an opto interuptor do you remember the specific type you used as im using this one

    its not making the meter work and is reducing the input voltage to the sensor to 1.6v

    http://uk.farnell.com/webapp/wcs/stores/servlet/ProductDisplay?catalogId=15001&langId=44&urlRequestType=Base&partNumber=1201179&storeId=10151

    again any help is welcome

  • Replied to the previous post.
  • hi paul do you know the make and model of your edgwise meter please as i have found some but they are 0-100 range ones and non of them have the vain that yours had could you please give me just one more bit of advice

    thanks

    oliver

  • Hello Oliver,

    This is why I never published an article - due to the difficulty and expense of sourcing the movement and the constant  "where can I find..." emails. It would have become too much of a support issue.

    The movement is a Parker Industrial model 66378 3.5” edgewise process control panel meters (circa 1970). 200 ohm, 2mA movement. Obtained at the local junk store (I bought all four - so they don't have any more). “Process” meters differ slightly from conventional meters in that they have adjustable trip points for activating alarms or other external circuitry. The movement is basically the same as standard panel meters, but there are special “vanes’ connected to the movement to trip optical and/or electrical contacts that are positioned by external setpoint levers. The "Vane" edge is what you see dangling into the optical detector.

    This was high-tech for the 60's - but now the trend is all digital meters and datalogging, so finding *good* analog meters is very difficult and expensive. I priced a new similar meter at over $800...that's a bit much for a hobbyist project.

    So you will have to get creative with the movement. The main advantage of the "edgewise" meters is the narrower needle swing range and long needle providing leverage.

    D’arsonval (jeweled) movements are recommended over taut band movements for this application. D’arsonval movements have a rigid mechanical pivot point whereas taut band movements have a floating coil suspended by a thin wire. The taut band movement does not have the mechanical stability of the jeweled movement and may “rock” in the X and Z-axis, causing optical alignment errors if the load is not centered. When selecting the meter, the physical differences between the movements are fairly obvious. The taut band meter has the meter coil suspended by a thin wire attached to spring arms on each end of the coil, and the coil can move freely in any direction. The D’Arsonval movement has a characteristic adjustment screw at the pivot point and a fairly rigid coil.

    You probably want a meter with a movement around 500uA-1mA. Less than 100uA may not be strong enough, and greater than 10mA may heat up and drift thermally.

    Note that most meters movements are in the 100uA-1mA range, and external shunts are used to "scale" the meters to the displayed currents.

    Regards,

  • Oliver,

    I found this on ebay. The arm is shorter so you will need to do something to extend it or get clever about how you mount the photointerupter and pan.  This kind of solution is giong to be needed  (and Paul won't be able to help) if you are going to get your project done in a reasonable time. 

    Is there a Maker's space near you?  I'd suggest wandering down there and seeing if you can find some help.

    Good luck,

    Matt

    www.ebay.com/.../151741633105

  • i have found a few of the meters you used paul. i would like to just say thanks for the help you are giving me and thanks to the others too. would it be ok paul to mention you in my final documentation under support references and technical guidance. 

  • Hello Teresa:

    Several years ago you posted a message asking for help with measuring eyelashes. I just came across it tonight, so I'm probably too late to help, but what the hell, I'll post a solution for you.

    When making light-weight measurements, like hairs, you want to keep things very simple. This solution involves a simple single-beam balance you can make at home and use grains of salt for counter balancing. Make the beam out of balsa wood, very thin, a few centimeters long, and center it on top of a fulcrum (that's an object in the shape of a triangle) where it is balanced and can pivot. Getting a suitable length will be a trial and error process.

    Place the eyelash on one end of the beam and a few grains of salt on the other end to make the balance equal to determine the weight of the eyelash.

    The average weight of a grain of salt is about 65 milligrams (I think). Have a local university chemistry laboratory measure a grain of salt for you as a reference, or ten grains of salt and divide by 10 to get an average weight per grain. Be aware that salt will become heavier on humid days as compared to dry days; how much? I don't know...have the lab make a measurement to see if it really makes a difference.

    If one eyelash is not enough to move the balance, add more lashes and divide by the number of lashes on the balance to get the average weight of a single eyelash.

    Sincerely,

    Thomas Foxcroft