This thread has been locked.

If you have a related question, please click the "Ask a related question" button in the top right corner. The newly created question will be automatically linked to this question.

PGA309 Unable to read EEPROM in extended address locations. 0 thru 122 is OK

Other Parts Discussed in Thread: PGA309

I have the need to be able to read the PGA309 serial number thru software. I have modified Multical for this and I am able to see the locations 0 thru 122.

After I have went thru the normal calibration and passed I had the understanding that the S/N (as assigned by Multical),  Date Code, and Model number are programmed in the companion EEPROM the PGA309 system board. My board is using 16K EEPROM the same as being used in the round PGA309 PCBA reference design.  Checking at address 140, 142, and 144 un get 

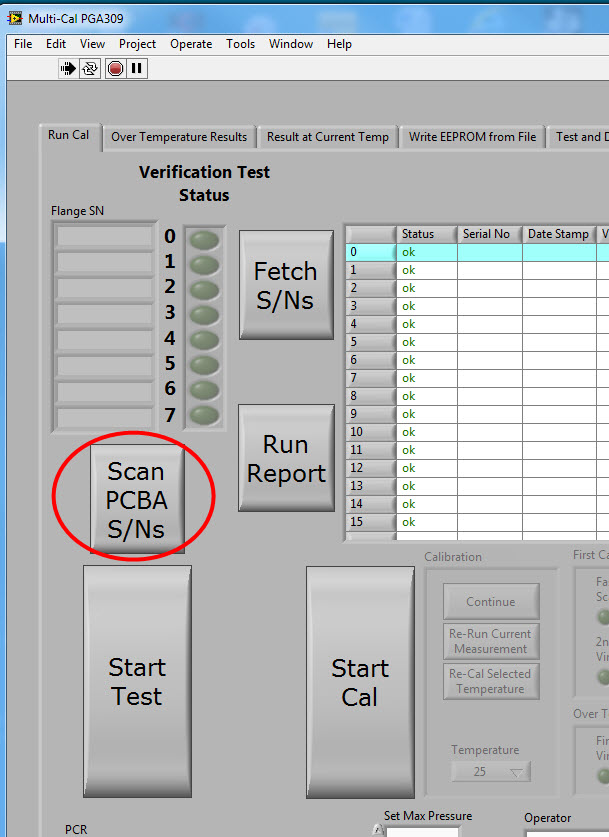
My s/n that is supposed to be written I can of course see in the Fast Scan section. But I'm not sure if it really is written in the first place or I just can't read it ... even though I can read other address 122 and below.

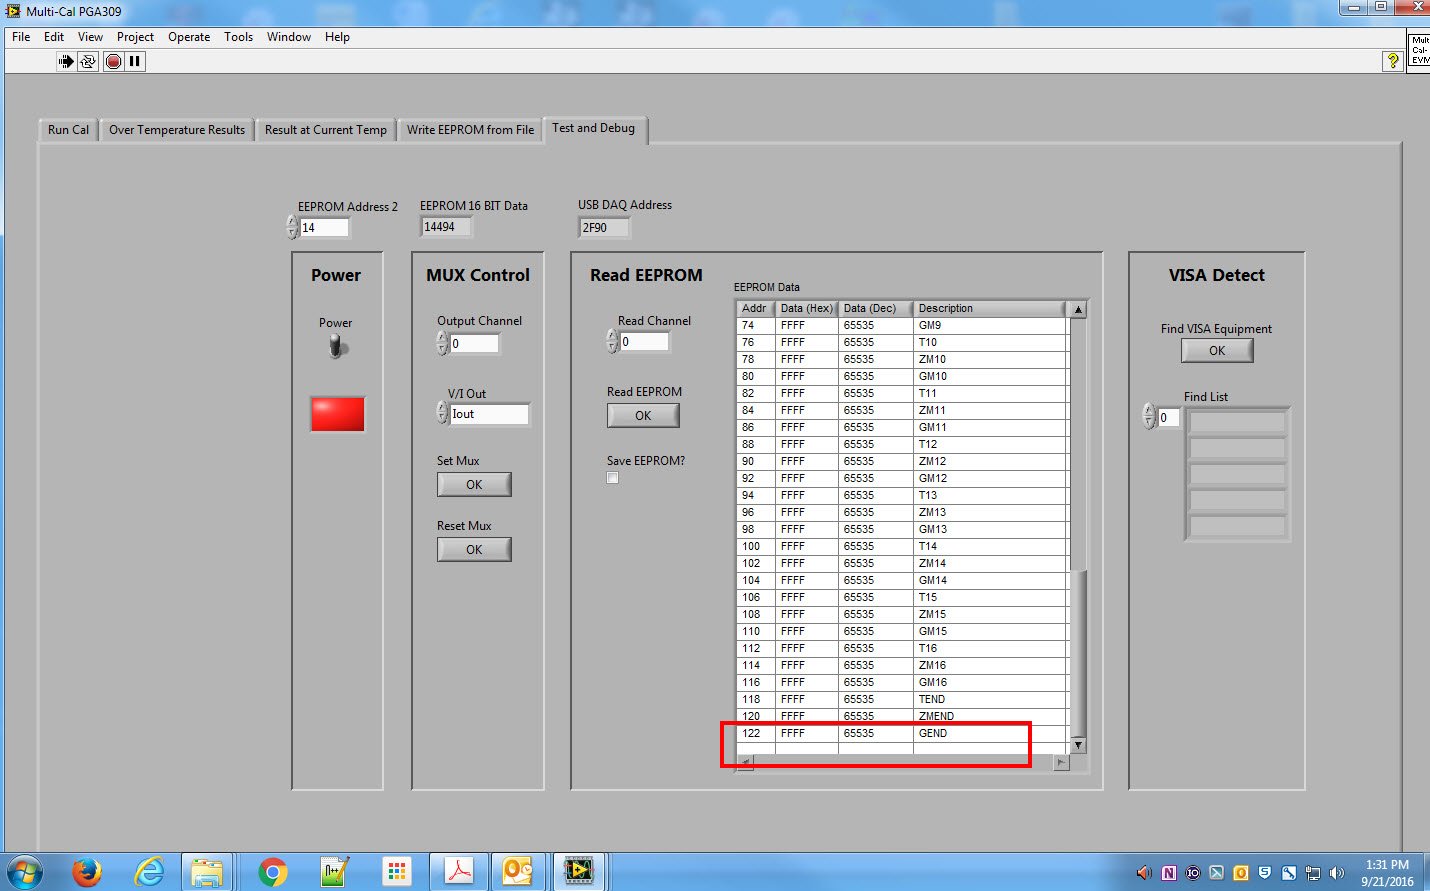
Here is what I added, I just set the EEPROM address and click a button on the front panel.


This starts the EEPROM read.

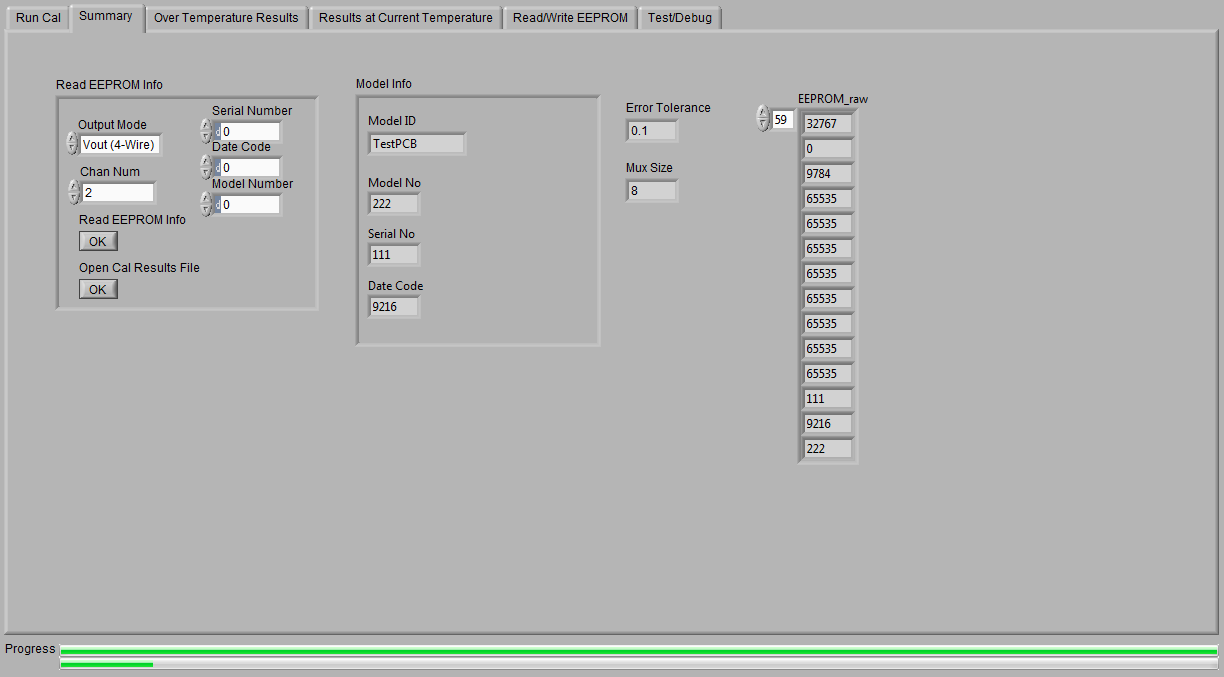
The results are displayed here. And any address in the range of 0 - 122 I can read OK.

If I have the EEPROM data output to file I also only see from 0 - 122. What ever is in the "Read EEPROM" Data table is sent to the ascii file, nothing else. Anything past 122 is blank.

Here is my model file setup.

Any read of 140, 142, or 144 results in a 65535 value.

Any suggestions? THX

  • Hello Michael,

    I can verify that the Multi-Cal software does write the serial number, date code, and model number to the EEPROM addresses 140, 142, and 144. In the latest revision of the Multi-Cal software, this occurs towards the end of the "Write to EEPROM" state as shown below.

    I modified my most recent version of the software to read the full EEPROM and display it in an array, and saw that the values in these EEPROM addresses matched my settings. 

    There were issues with EEPROM read/write in older revisions of the software. I'm working on a new build which will get pushed to the web soon, but it is tested and verified to be working well. You can try it here: https://txn.box.com/s/y1txqkamb4uxng4gk7i9bam0gwazl49e

    Best regards,

    Ian Williams
    Linear Applications Engineer
    Precision Analog - Op Amps

  • I checked and I have the version 2.1 dated August 2014.  My version has the S/N, Date Code, Model number starting at  iteration 5 in the Write EEPROM function as I show below. 

    I suspect the function is executing but not able to write to those spaces on my version.  Unless a different method is used to read those addresses 140, 142, and 144 than 0 122, then if my PCBA's EEPROM had data in those locations I should be able to read to read those spaces as I am successful reading individual address I select from 0 - 122.

    My version's screen for writing to 140 ...

    I'm using LV 2012 and I had made extensive additions to the original program.  I didn't change or add anything to the Write EEPROM section and other than not being able to read above 122 the units are programming OK otherwise.

    Your newest installer throws an error  "This installer cannot upgrade the installed feature set of NI-488.2 prior to 14.0" . I would upgrade to the latest however, I'm a bit paranoid as there are other things on this computer using it, and because I have a lot of additions to Multical the only thing an executable version of Multical would offer me is a means to see if 140, 142, and 144 are actually programmed in the EEPROM or not.  In other words using my version of Multical to program then read back the EEPROM using the newer version in your download link.

    But I'm fairly confident those locations are not being programmed from my version even though the methods exist to do so.

    I think to be able to move forward with this if you have updated source code available I could just patch in the changes. First to use your read EEPROM method in your "Summary" tab. It that doesn't show any data in 140 thru 144 then I would need to patch in the updated Write EEPROM. Of course i have an older LV (2012) so I'm not sure if your VI's are more modern that 2012.  But I'm sure at least I can look at individual VIs without loading the entire project and get a clue on the changes.

    So please advise if you have source code for that new version you have in the link you provided.

    THX

  • Hello Michael,

    I agree that starting from this new version of the Multi Cal software is the best approach, as the improvements and bug fixes are numerous (as you can see when you view the patch notes). This is developed in LabVIEW 2014, so I'm not sure if there are any compatibility issues.

    To verify the correct writing of the model/date/serial information, create a model file as per usual with the desired settings. Perform a calibration and write the EEPROM when complete. 

    Next, navigate to the "Read/Write EEPROM" tab. The model file information will already be correct, so in the "Read EEPROM" section select the desired channel and click the Read EEPROM button. The EEPROM of that channel will be read and the standard addresses displayed in the read table on the right side.

    Finally, click on the "Summary" tab and check the data at the end of the "Raw EEPROM" array. This array is populated based on the EEPROM read from the previous step. The model number, serial number, and date code should match what's listed in the "Model Info" cluster. Keep in mind that the serial number will be incremented based on the channel number. Since this is channel 2, the serial number is 102 instead of 100.

    You can download this source code here: https://txn.box.com/s/7v3sqn2drc17ltexa1wxv9j1utfk1rze

    Best regards,

    Ian Williams