This thread has been locked.

If you have a related question, please click the "Ask a related question" button in the top right corner. The newly created question will be automatically linked to this question.

LMX2492EVM: Spur on ramp reset

Part Number: LMX2492EVM
Other Parts Discussed in Thread: LMX2492,

Hi fellow EEs,

I have been using the LMX2492 in its ramping (FMCW) mode, and programming it with TICS Pro(which proved to be an effective approach with relatively few problems apart from occasional crashes).

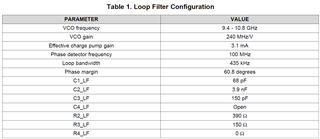
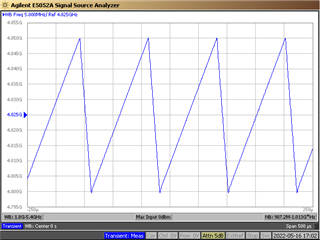
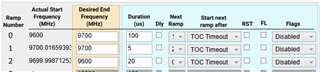
I used the ramping function with the following settings, and measured everything on the RFout output of my Rev.C LMX2492EVM :

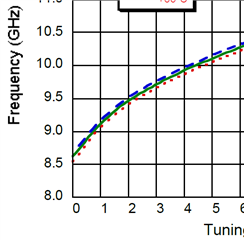
  • 9600 MHz --> 9800 MHz frequency sweep range ;
  • 100 µs ramp duration.

The ramp loops on itself (previous settings are for ramp 0, thus RAMP0_NEXT is set to 0).
The end frequency of the generated pattern being different from the beginning frequency, RAMP0_RST is activated.

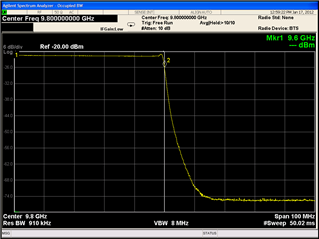
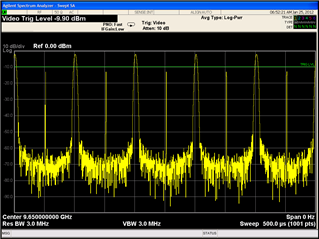
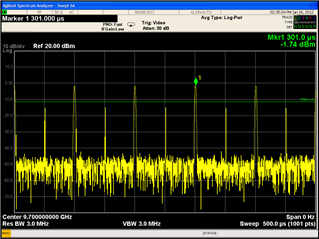
I successfully generate a ramp, however when measuring the power levels at a given frequency inside the sweep range (zero span view on SA), I also measured a spur on ramp reset.

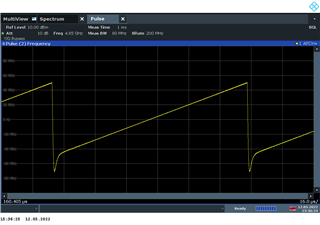
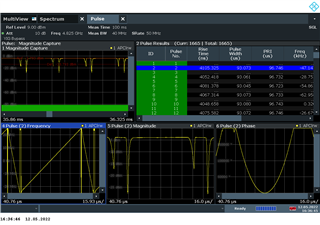
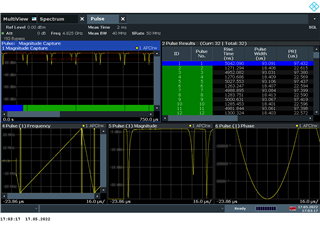
When using a more performant SA with Pulse measurement features, I was able to get a time domain view of the ramp itself (not just its spectrum) :

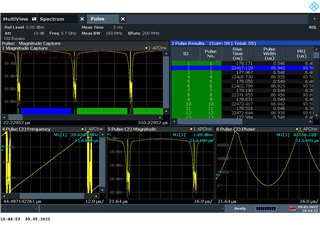
As you can tell, on ramp reset, there is a significant parasitic pulse (see top left/bottom left-most).

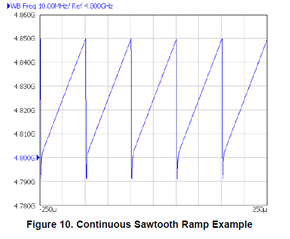
However, this event and behavior between ramps is not seen in the LMX2492EVM's User's Guide (3.2.2, Fig.10).

Is there way to reduce or completely eliminate it? I have tried using a negative ramp segment to avoid using the RST function, to no avail.

Thanks in advance for your insight,

Regards,

Nicolas

  • Hi Nicolas,

    I think the problem is with the Vtune voltage being not enough to drive the VCO to 9800MHz. In the EVM, passive loop filter is used, as a result, the max. Vtune voltage from the PLL is around 3V. To get 9800MHz from the VCO, we need close to 4V Vtune voltage. We can modify the EVM to use active filter so that we can support higher Vtune voltage. 

  • Hi Noel,

    Thanks for the quick answer. I will try to stay in the PLL's charge pump output voltage range.

    However, in the EVM User's Guide (3.1.1, Table 1), there is a VCO frequency range specified, which I assumed the EVM was able to cover :

    What part of this range is the EVM effectively able to cover with a passive loop filter configuration ?

    Regards,

    Nicolas

  • I also want to add that experimentally, I was able to generate ramps with frequencies of up to 9.8 GHz, using the EVM with its factory passive filter configuration, without any problems.

  • Hi Nicolas,

    9.4 to 10.8GHz is the frequency range of the VCO, I should have make this clear in the user's guide, my bad.

    I reviewed the EVM schematic again, although the PLL is 3.3V operated but the charge pump supply is actually tied to 5V, That means, the output Vtune can be up to 4.5V. From the VCO datasheet, the EVM should be able to support up to 10GHz.

    in your last plot, were you also doing a sawtooth ramp?

    In your first post, if you sweep the frequency between 9600 and 9700MHz, will you see the same issue?

    Badly I don't have the EVM in the lab, otherwise, I could do a crosscheck.

  • Hi Noel,

    Thanks for clearing up the EVM's frequency range.

    In the last plot, I was indeed generating a sawtooth ramp.

    I changed the ramp frequency to operate between 9600 and 9700 MHz, as per your request. I got the following plot :

    I also experimented with the RFout/2 output, and got a nominal looking ramp (while still ramping from 9600 to 9800 MHz) :

    Having measured good looking ramps on the RFout/2 output, I decided to measure further ramps on this output.

    In my experiments, I used a ramp going from 9600 to 9700 MHz in 100 µs, and used another one to ramp back to 9600 MHz in 20 µs. The pattern's ending frequency being equal to the starting frequency, RST parameter was turned off.

    The spurs appeared again, both at the end of the pattern and between both ramps. Note that the power supply was set to a current limit of 400 mA during all measurements.

  • Hi Nicolas,

    My colleague has this board, I will check this out on Monday.

  • Hi Nicolas,

    Here is my test result, 9600 --> 9700MHz in 100us; 9700 --> 9600 in 20us. current consumption is 276mA including the on-board XO. 

    register file here. OSCin = 100MHz.

    R141	0x008D00
    R140	0x008C27
    R139	0x008B10
    R138	0x008A00
    R137	0x008900
    R136	0x008800
    R135	0x008700
    R134	0x008600
    R133	0x008527
    R132	0x008410
    R131	0x008300
    R130	0x008200
    R129	0x008100
    R128	0x008000
    R127	0x007F00
    R126	0x007E27
    R125	0x007D10
    R124	0x007C00
    R123	0x007B00
    R122	0x007A00
    R121	0x007900
    R120	0x007800
    R119	0x007727
    R118	0x007610
    R117	0x007500
    R116	0x007400
    R115	0x007300
    R114	0x007200
    R113	0x007100
    R112	0x007027
    R111	0x006F10
    R110	0x006E3F
    R109	0x006DFF
    R108	0x006CFF
    R107	0x006BF5
    R106	0x006A00
    R105	0x006927
    R104	0x006810
    R103	0x006700
    R102	0x006600
    R101	0x00650D
    R100	0x00641B
    R99	0x006300
    R98	0x006207
    R97	0x0061D0
    R96	0x00603F
    R95	0x005FFF
    R94	0x005EDF
    R93	0x005D3A
    R92	0x005C20
    R91	0x005B27
    R90	0x005A10
    R89	0x005900
    R88	0x005800
    R87	0x005706
    R86	0x00568E
    R85	0x005500
    R84	0x005400
    R83	0x005300
    R82	0x005218
    R81	0x005100
    R80	0x005000
    R79	0x004F00
    R78	0x004EFA
    R77	0x004D00
    R76	0x004C00
    R75	0x004B00
    R74	0x004A00
    R73	0x004900
    R72	0x004800
    R71	0x004700
    R70	0x00460A
    R69	0x004500
    R68	0x0044FE
    R67	0x004300
    R66	0x004200
    R65	0x004100
    R64	0x004000
    R63	0x003F02
    R62	0x003E00
    R61	0x003D00
    R60	0x003C00
    R59	0x003B00
    R58	0x003A01
    R57	0x003900
    R45	0x002D00
    R44	0x002C00
    R43	0x002B00
    R42	0x002A00
    R41	0x002900
    R40	0x002800
    R39	0x00275A
    R38	0x002618
    R37	0x002510
    R36	0x002408
    R35	0x002341
    R34	0x002204
    R33	0x002120
    R32	0x002000
    R31	0x001F32
    R30	0x001E0A
    R29	0x001D00
    R28	0x001C1F
    R27	0x001B08
    R26	0x001A00
    R25	0x001901
    R24	0x001800
    R23	0x001703
    R22	0x0016E8
    R21	0x001500
    R20	0x001400
    R19	0x001300
    R18	0x00122C
    R17	0x001100
    R16	0x001060
    R15	0x000F00
    R14	0x000E00
    R13	0x000D00
    R12	0x000C00
    R11	0x000B00
    R10	0x000A00
    R9	0x000900
    R8	0x000800
    R7	0x000700
    R6	0x000600
    R5	0x000500
    R4	0x000400
    R3	0x000300
    R2	0x000201
    R1	0x000100
    R0	0x000018
    

  • Hi Noel,

    I've loaded your exact config on the EVM, tried using another power supply (with a current limit of 1 A in order to give the component even more room), verified the 50 ohm terminator... I tried removing most variables out of the problem and got the following output :

    And even with all of this, I still see the spurs on the output, whenever the ramp changes direction. I'll experiment more with the component, and I'll update this post if I find a way to get rid of them. Thanks for your time and effort.

  • Hi Nicolas,

    Could you try this? 

    I added a 5us no-frequency-change ramp before ramping down.

    R141	0x008D00
    R140	0x008C27
    R139	0x008B10
    R138	0x008A00
    R137	0x008900
    R136	0x008800
    R135	0x008700
    R134	0x008600
    R133	0x008527
    R132	0x008410
    R131	0x008300
    R130	0x008200
    R129	0x008100
    R128	0x008000
    R127	0x007F00
    R126	0x007E27
    R125	0x007D10
    R124	0x007C00
    R123	0x007B00
    R122	0x007A00
    R121	0x007900
    R120	0x007800
    R119	0x007727
    R118	0x007610
    R117	0x007500
    R116	0x007400
    R115	0x007300
    R114	0x007200
    R113	0x007100
    R112	0x007027
    R111	0x006F10
    R110	0x006E3F
    R109	0x006DFF
    R108	0x006CFF
    R107	0x006BF5
    R106	0x006A00
    R105	0x006907
    R104	0x0068D0
    R103	0x00673F
    R102	0x0066FF
    R101	0x0065DF
    R100	0x00643B
    R99	0x006340
    R98	0x006201
    R97	0x0061F4
    R96	0x00603F
    R95	0x005FFF
    R94	0x005EFF
    R93	0x005DFA
    R92	0x005C20
    R91	0x005B27
    R90	0x005A10
    R89	0x005900
    R88	0x005800
    R87	0x005706
    R86	0x00568E
    R85	0x005500
    R84	0x005400
    R83	0x005300
    R82	0x005218
    R81	0x005100
    R80	0x005000
    R79	0x004F00
    R78	0x004EFA
    R77	0x004D00
    R76	0x004C00
    R75	0x004B00
    R74	0x004A00
    R73	0x004900
    R72	0x004800
    R71	0x004700
    R70	0x00460A
    R69	0x004500
    R68	0x0044FE
    R67	0x004300
    R66	0x004200
    R65	0x004100
    R64	0x004000
    R63	0x003F02
    R62	0x003E00
    R61	0x003D00
    R60	0x003C00
    R59	0x003B00
    R58	0x003A01
    R57	0x003900
    R45	0x002D00
    R44	0x002C00
    R43	0x002B00
    R42	0x002A00
    R41	0x002900
    R40	0x002800
    R39	0x00275A
    R38	0x002618
    R37	0x002510
    R36	0x002408
    R35	0x002341
    R34	0x002204
    R33	0x002120
    R32	0x002000
    R31	0x001F32
    R30	0x001E0A
    R29	0x001D00
    R28	0x001C1F
    R27	0x001B08
    R26	0x001A00
    R25	0x001901
    R24	0x001800
    R23	0x001703
    R22	0x0016E8
    R21	0x001500
    R20	0x001400
    R19	0x001300
    R18	0x00122C
    R17	0x001100
    R16	0x001060
    R15	0x000F00
    R14	0x000E00
    R13	0x000D00
    R12	0x000C00
    R11	0x000B00
    R10	0x000A00
    R9	0x000900
    R8	0x000800
    R7	0x000700
    R6	0x000600
    R5	0x000500
    R4	0x000400
    R3	0x000300
    R2	0x000201
    R1	0x000100
    R0	0x000018