This thread has been locked.

If you have a related question, please click the "Ask a related question" button in the top right corner. The newly created question will be automatically linked to this question.

LMX2594: Power on and configuration issues

Part Number: LMX2594


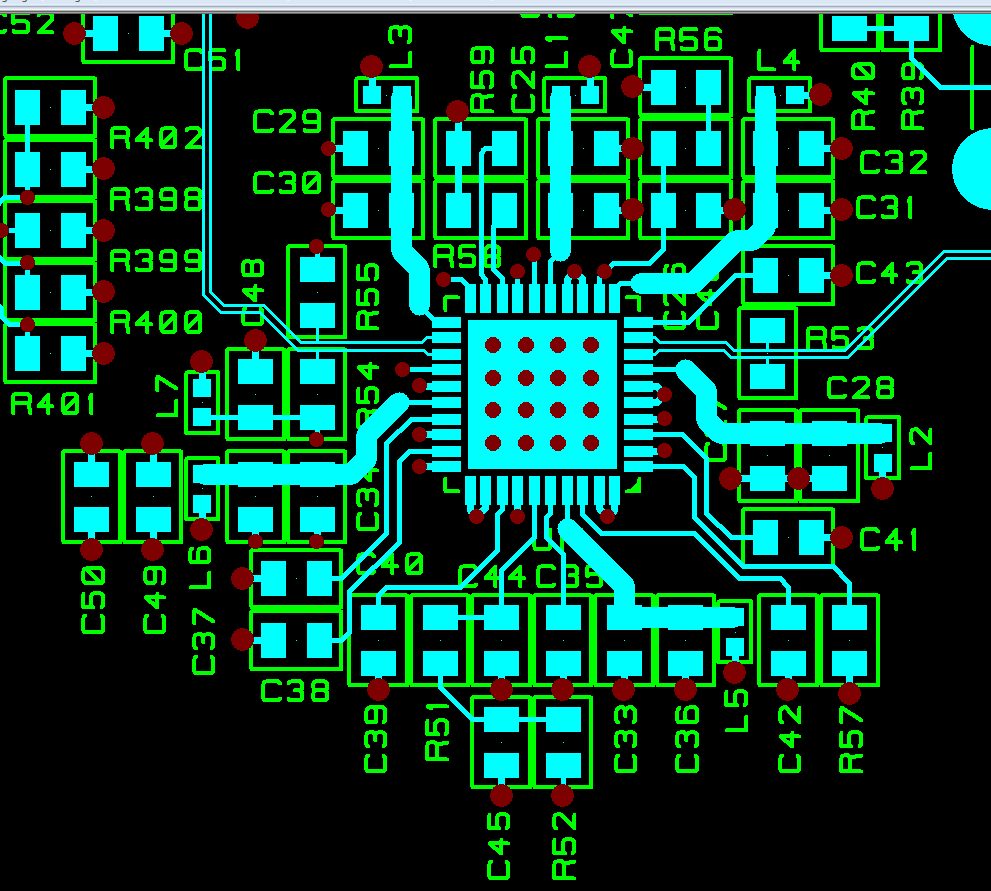
We have designed a custom PCB that uses an LMX2594 to generate some higher speed clocks from a 10 MHz reference and are having problems.  We built two of the PCB's, on one of the PCB's the LMX behaves as expected.  Powers on correctly, can be configured as expected, locks and generates the clocks we expect.

The other PCB we are having nothing but issues.  When we first received it, the LMX seemed to function correctly, it would configure and lock from a first power on, however if you powered it off, then powered it back on, it would immediately attempt to draw in excess of 2 Amps (hard to tell exactly but it was multiple Amps) and get red hot, the only way to mitigate this seemed to be to leave it off for a significant amount of time before trying to power it on, although we didn't try enough times to confirm this was consistently right.  We did try discharging all of the capacitors around it (including its internal LDO ones) before attempting the power on, that made no difference.

The only difference we noted was when it worked, the OSCin inputs DC level was approximately 1.5 V, when it was in its super heated state this was ~ 3.3 V (pretty much oscillating at the supply rail).

Assuming the chip was faulty we had it replaced.  The second chip was worse, we couldn't get it to power on without immediately going into pulling huge current, super heating mode.  We finally managed to achieve a workaround to get a consistent start, whereby instead of switching the power to this device off and on using a FET switch (which is a relatively fast turn on), we just hooked it straight to the 3.3V regulator, which has an incredibly slow start up, this then seemed to let us get the chip powered without cooking itself, however we couldn't get the chip to respond to anything on the SPI bus, so assuming we'd cooked it we replaced it yet again.

The third chip is somewhere between the two, using the same workaround (powering directly from the 3.3V regulator) we can get it powered and on consistently not melting.  However when we attempt to configure it using the SPI commands we get very mixed behaviour:

  • 1 time in about 20 it powers up correctly and locks.
  • Normally it does nothing, the current draw doesn't really change, the OscIn DC jumps up to ~3V and when I probe the caps on the internal LDO's they are all at 0V as if its shutdown. No matter what we then set we can't get it back to life.
  • Every few times, at some point during the command set the device goes into meltdown mode, pulls vast amounts of current and cooks.

From power on we can't get anything back from the SPI registers, we either get all 1's or all 0's depending on the state of the Muxout pin, if we then configure it to make that serial data out we get the behaviour as above, occasionally it works and we can read from it, mostly nothing, close second, error condition.

So my list of questions:

  • Is there some power on criteria that is needed to ensure the device powers up successfully without attempting to self destruct, if so what is this.
  • Is there a min / max ramp criteria for the bring up of the main 3.3V rail to avoid the above.
  • Why would the OSC in DC bias jump from normal ~1.5V to ~3.3V?
  • Why does there appear to be an SPI command that can cause it to self destruct.
  • What could be causing the huge current draw and temperature rise, is there a clamp diode somewhere activated and locked on, and how / why is it doing this?

Thanks for any help you can offer,

Bryn

  • As an extra update, I just found this forum post:

    Which details the voltages of the various internal LDO's, so I checked my two boards immediately after a power on.  My two boards match the voltages mentioned in the forum post, for all values except VBIASVCO.

    On my working board VBIASVCO is 1.105V which is pretty close to the 1.3V mentioned in the post, on my non working board this is always 0.295 V, I tried this on multiple power cycles and it keeps coming back to the same value.  Any ideas why this would be so low?

    And could this be causing my issues?

  • Hi Bryn,

    Have you tried swapping the part on the "bad" board onto the "good" board? I realize this risks rendering both boards useless, but without this test it is difficult to rule out the possibility that one of your boards is damaged in some hard-to-spot way.

    I don't think you would experience any trouble from the power sequencing on the device. I don't know of any maximum ramp rate on the power supply that must be observed. You continue to observe faults even when the ramp rate is limited, so I suspect we've already ruled out that potential cause. There are no self-destruct registers, but some register writes can provoke large changes in supply current, which could be destructive to a damaged, overvolted, or marginal LDO.

    Normally when a part starts drawing large currents, that implies one of the rails is overvolted, shorted to ground, or else there is some damage to the device's internal LDOs. Can you upload a schematic that shows the LMX2594 connections? It would be prudent to double-check that all of the VCC pins and bypass pins are connected correctly.

    Regards,

  • Hi Derek,

    Thanks for the reply.  Yeh that's not going to happen, we're already up against it on time having been battling this issue for weeks, I'm not about to risk rendering my only good board unusable.  As I mentioned in my first post the bad board is on its 3rd LMX chip so I'm fairly certain what we are seeing is a damaged board or component on the 'bad' board, I'm after some guidance on where we need to look based on what your chip is doing.

    You say you don't think there is any issues with power sequencing, and I am inclined to believe you, but on iteration 'chip 2', slowing the ramp rate down was the only way we could get it to power on not in current limit mode, so it may not be a root cause but I'm certain it is related somehow.

    So as I said in my second reply, I can power it on (this is before doing anything to it) and its not drawing huge amounts of current, the main input rails are at 3.3V yet VBIASVCO is at 0.295V, then if we attempt to reconfigure (or just take it back out of software reset) it most times ends up in huge current draw mode.

    I can list all the internal LDO voltages generated by the device (that we have decoupling caps on) if that helps, they don't seem to be listed anywhere in the datasheet so I can't check them.

    I've checked the resistance to ground on the main input rail, and all the internal voltage rails the LMX generates, and compared them between the 'good' board and the 'bad' board and I can't find any differences.

    Our board level 3.3V is generated by a LTM4676AIY#PBF regulator with 10 x 100uF decoupling caps on its output, this is the fed to the power switch below:

    As I said earlier while debugging chip 2, we permanently enabled this so its on from start up as the only way to make it start up with out melting.

    The LMX circuitry is then:

    The input clock is sourced from a 10 MHz clock splitter, AC coupled with 100nF caps.

    The SPI buffer is to allow us to disable the 3V3_CLK rail and it ensures the SPI signals to high impedance.

    This circuitry works perfectly on our 'good' board.

    Can you explain what could be causing VBIASVCO to be so low, and if this could be the root of our problems.  I'm inclined to think if we can get that voltage right maybe it will all start working.  Is that LDO sourced from the pin labelled VccVCO, should I be checking voltages on all the Vcc pins.  I've confirmed they are all soldered to the board, but I've not been round and voltage checked each pin.  I only discovered this voltage issue late on Friday so not had time to investigate round it further, I wanted to confirm if it was likely to be an issue first.

    Regards,

    Bryn

  • Bryn,

    I don't see anything immediately wrong with the schematic, but I would recommend C40 be 1µF instead of 10µF (per the datasheet recommendations). C40 is derived from the VccVCO2 rail, so it shouldn't be a contributing factor.

    For testing purposes, you could also short L5 with 0Ω. As you suggest, the VCO bias outputs are derived from the VccVCO rail, so if outputs on this rail are being pulled low, that suggests something derived from the VCO rail is damaged or shorted to ground.

    VccVCO, VregVCO, and VrefVCO are right next to each other. Is there any chance these pins have some kind of solder bridge or other short?

    Regards,

  • Hi Derek,

    Thanks for the reply.  Yes I'd seen the datasheet recommended 1uF, but we went with 10uF as per the example design and some other reference designs we referred to, as you say, I can't imagine it would be a contributing factor.

    What else is derived from the VccVCO rail or it it just VbiasVCO?

    I measured the voltages from the various references as follows:

    • VbiasVCO (@ C41) = 0.294V
    • VregIN (@C43) = 1.228V
    • VbiasVCO2 (@C40) = 0.641V
    • VrefVCO2 (@C38) = 2.84V
    • VbiasVRAC (@C39) = 1.536V
    • VrefVCO (@C35) = 2.84V
    • VregVCO (@C42) = 2.004

    So from this I would say I doubt VregVCO is shorted to VccVco, I guess its possible VrefVCO is, but if it was I would have thought it would be nearer 3.3V.

    I'm not back in the office till after New Year so I can't probe that input pin and check the ones adjacent.

    I did get someone to check and retouch the pins with an iron under a microscope so I'm certain none of the pins are visibly shorted.

    I also previous to measuring the voltages went around checking the resistances on all the caps, resistors and inductors around the part to ground, then comparing against our working board so I don't think there is anything obviously shorted to each other or ground.  But that was on the discretes rather than on the device pins so its possible there is something not connected to a pin.  If VccVCO was not connected or had a very poor connection through the inductor L5, could that result in the behaviour we are seeing?

    Regards,

    Bryn

  • Bryn,

    VccVCO supplies VrefVCO, VregVCO, and VbiasVCO. I would expect VrefVCO to be lower voltage if L5 wasn't well-connected. So I don't think that's the issue.

    I might've missed it, but I don't think I saw you ever say that you replaced the VbiasVCO capacitor? Can you get someone to swap out C41 if you haven't already? In the thread you linked, a similar issue appears to have been resolved this way. Perhaps there's something wrong with the capacitor that is otherwise difficult to detect? If the capacitor was burned out, or an open circuit failure, or 10nF instead of 10µF, that wouldn't necessarily be apparent from a resistance probe.

    Regards,

  • Hi Derek,

    I may not have mentioned it, but that was the last thing I tried.  I couldn't get my hands on a 10uF capacitor at short notice so I tried a brand new 4.7uF, it made absolutely no difference.

    I have got some 10uF's on order so will try those in the new year, but if it was a duff capacitor I would have expected it to have made some difference even if its not the exact right value.

    Regards,

    Bryn

  • Bryn,

    Thanks for the update. I'm not sure what else could be responsible, and which could damage multiple devices on the same board. I'll bring this question up internally with a few people who know more about the internal functions of the bias rails, and get back to you when I have more suggestions.

    Regards,

  • Hi Derek,

    Have you found anyone who's been able to offer any suggestions?

    Thanks,

    Bryn

  • Hi Bryn,

    Two thoughts came up internally:

    1. Do you have AC-coupling on OSCin somewhere off the visible schematic? This could potentially be a problem, for instance if the signal on OSCin pins was centered around GND.
    2. Are any of the SPI lines being brought high before VCC is present on the device? We've seen a few strange issues occasionally as a result of the SPI lines being held high before bringing the device VCC on.

    Otherwise, we couldn't identify any obvious failure mechanisms that would result in the issues you're describing.

    If neither of the above are applicable, could you share some images of the PCB layout around the LMX2594? Since it seems there is some board dependence related to this issue, perhaps the layout could provide a clue.

    Regards,

  • Hi Derek,

    I did mention it previously in passing, but yes to clarify LMX_OSCIN_P/N on our schematic are sourced from a clock splitter (ADCLK944BCPZ) via 100nF AC coupling caps.

    On the occasional times the 'bad' board was seen to be working and immediately after power on before we attempt to configure it, the OSCIN pins can be seen to be toggling around ~1.5V, this is also true for our working board.  Once we've attempted to configure the bad board and it's in its fault state, either doing nothing or attempting to cook itself, the OSCIN pins can be seen to be toggling around ~3.3v, pretty well around the supply rail.  Is this a clue as to what could be going on internally as these are meant to be self biasing pins aren't they?

    None of the SPI lines should be able to go high before the supply rail as the 'SPI BUFFER' component in the bottom left of my schematic page is put in specifically to stop that.  It is a tri state buffer that's outputs are powered from the 3V3_CLK rail, so if that's not up they should be tri-stated, its pull ups are attached to that rail, and unless the CS input to that peripheral is driven the outputs are also held in tri state.  See attached schematic page:

    Below is the top layer of the layout around the LMX2594:

    And below is the bottom layer of the same area:

    Please let me know if you need anymore images.

    Thanks,

    Bryn

  • One of my colleagues has just pointed out theoretically we could get Vcc up on the device marginally after the SPI line as the Vcc's are fed through some inductive filters while the pull ups are direct on the rail.  Is this small time likely to cause us an issue?

    Regards,

    Bryn

  • Hi Bryn,

    We are not sure if that would damage the part. When we are working with the EVM, very often, we have the SPI ready before power up the EVM but we never see failure. However, we have series resistors between SPI interface and the part, so the resistors might be safeguarding the part.

    I reviewed your schematic, there is an error on the OSCin pins. We have internal bias voltage on these pins, so AC-couple is required, see below diagram. I cannot tell whether the 100Ω resistor is causing the issue, but it is good to try.

    in addition, your VbiasVCO voltage is not correct. After Vcc power up (without programming), the voltage should be around 1.1V. After programming all registers, the voltage should go up to 1.27V. I don't know what may be causing this low voltage as everything seems good except for the 100Ω resistor at OSCin.

  • Hi,

    I checked on an oscilloscope and the SPI lines go up at the same time (or marginally after) as the Vcc lines, so I think we can safely say they are not up before the Vcc.

    I'm confident the 100 ohms isn't causing the issue as I've already removed it (just in case) and it made no difference, plus our working board still has that fitted.

    I know the VbiasVCO is low, so far that is the only thing I can find that is wrong.  I was hoping for some insight into how that's generated or what could be causing that LDO to not work correctly, as I'm hopeful if we can sort that, everything else will spring into action.

    Are their clamp diodes between your internal rails as could that explain why when we attempt to configure it, it tries to melt itself, could some rail be being clamped to another, possibly this one that is too low?

    Can I get any information on the internal architecture relating to that LDO output, or some guidance on how it is generated?

    Regards,

    Bryn

  • Hi Bryn,

    Nothing in the layout stands out to me.

    There are ESD diodes present on most of the I/O pins connecting to VCC/GND, as well as some clamps on the supply pins to prevent excessive voltage. But aside from the SPI lines and OSCin, most of your I/O is tied to GND, so there really isn't much that could be clamping rails in the way you're describing. I also don't think this is a function of rail power sequencing, because you've stated that your ramp rate is set by the 3.3V LDO startup time, which is likely to be much slower than any rail sequencing effects (even with the potential added inductance of the ferrite beads). That said, if for some reason one of the rails is temporarily faulting during operation, due to LDO instability, brownout, or some other unknown cause, that might create a mechanism for one rail interacting with another.

    Is it possible to replace the ferrite beads on the supply rails with maybe 1Ω resistors and identify which rail or rails are pulling the extra current when the part becomes unresponsive and enters the high current state? While we suspect the VccVCO and that's what I would check first, we haven't demonstrated that this is the rail that's failing. A high-current fault like this sounds like either latchup or short to ground, and there's only so many places in the device that can fail; but there may be rail interactions as described above, so it is vital to know which rail is specifically causing problems.

    I don't expect this to achieve much, but can you try shorting CE pin to GND before startup (short it with tweezers) and then release the short? CE shouldn't be related to power sequencing at POR, but it's easy to test.

    Regards,

  • Hi Derek,

    I could attempt to try and discover which rail is pulling the extra current, however the part pulls probably in excess of 3A's at that point (we see a > 1A jump at our 12V input) so understandably heats up incredibly fast, in less than a second its hotter than you can touch so I am very reluctant to keep it running for long enough to probe round some rails in case it destroys itself and takes a chunk of the PCB with it.  I will see if I can make some measurements.

    Regarding the CE pin, I did exactly that (with tweezers).  I tried shorting it and releasing while it was on, made no difference and I tried shorting it before start up, powering it on the releasing, again made no difference.

    I've had all the decoupling capacitors around the device replaced and that has also made no difference.

    While doing some probing around and comparing with our working board, I have discovered the working board also generates VbiasVCO at ~0.29 V until its configured then this jumped up to the ~1.1V, is this normal behaviour?  In which case maybe the low VbiasVco is red herring and the actual problem is we can't configure the part (for a different reason) and get it up and running.

    Something else I have discovered just attempting to read and write over the SPI bus immediately after power on:

    • If I read all the registers I get all 0's (the mux out pin seems to held low)
    • If I set the powerdown bit by writing either 0x0001 or 0x2411, the current drops slightly and I can now read all the registers and get values back on them (i'll cut and paste the values below)
    • If I clear the power down bit, either 0x0000 or 0x2410, the current jumps slightly and I can do nothing with it, reads all return as 0xF's and I can't reset the power down bit, the only way to do anything is power cycle.  In this state shorting the CE pin also does nothing, it is completely locked up.
    • Shorting the CE pin after start up doesn't have the same effect, I need to set the power down bit, however if after setting the power down bit, I ground CE to hold it in power down, I can clear the bit and it still keeps responding, until I release CE, then it goes into its completely locked up state.
    • If I do a write to any other bit than the power down bit first it just jumps to its locked up state, and I think this is the state that every now and then is melt down mode.

    The behaviour I am seeing seems to be after power on its in some sort of idle or semi power down state.  If you power it down using the power down bit, it all works correctly, SPI interface works, but the moment you clear that power down bit, you are into unknown behaviour.

    Any thoughts on this?

    Register reads when power down bit set:

    R112 0x0000
    R111 0x00B7
    R110 0x0100
    R109 0x9800
    R108 0x00F2
    R107 0x0000
    R106 0x0007
    R105 0x4440
    R104 0x0000
    R103 0x0000
    R102 0x0000
    R101 0x0000
    R100 0x0000
    R99 0x0000
    R98 0x0000
    R97 0x0000
    R96 0x0000
    R95 0x0000
    R94 0x0000
    R93 0x0000
    R92 0x0000
    R91 0x0000
    R90 0x0000
    R89 0x0000
    R88 0x0000
    R87 0x0000
    R86 0x0000
    R85 0x0000
    R84 0x0000
    R83 0x0000
    R82 0x0000
    R81 0x0000
    R80 0x0000
    R79 0x0000
    R78 0x0064
    R77 0x0000
    R76 0x000C
    R75 0x0800
    R74 0x0000
    R73 0x003F
    R72 0x0001
    R71 0x0080
    R70 0xC350
    R69 0x0000
    R68 0x03E8
    R67 0x0000
    R66 0x01F4
    R65 0x0000
    R64 0x1388
    R63 0x0000
    R62 0x00AF
    R61 0x00A8
    R60 0x03E8
    R59 0x0001
    R58 0x8001
    R57 0x0000
    R56 0x0000
    R55 0x0000
    R54 0x0000
    R53 0x0000
    R52 0x0820
    R51 0x0080
    R50 0x0000
    R49 0x4180
    R48 0x0300
    R47 0x0300
    R46 0x07FD
    R45 0xCEDF
    R44 0x1FA2
    R43 0x0000
    R42 0x0000
    R41 0x0000
    R40 0x0000
    R39 0xFFFF
    R38 0xFFFF
    R37 0x0204
    R36 0x0032
    R35 0x0004
    R34 0x0000
    R33 0x1E21
    R32 0x0393
    R31 0x43E8
    R30 0x2108
    R29 0x2108
    R28 0x0488
    R27 0x0002
    R26 0x0DB0
    R25 0x0624
    R24 0x071A
    R23 0x007C
    R22 0x0001
    R21 0x0401
    R20 0xB848
    R19 0x27B7
    R18 0x0064
    R17 0x00FA
    R16 0x0080
    R15 0x064F
    R14 0x1E70
    R13 0x4000
    R12 0x5001
    R11 0x0018
    R10 0x10D8
    R9 0x0604
    R8 0x2000
    R7 0x00B2
    R6 0xC802
    R5 0x00C8
    R4 0x0A43
    R3 0x0642
    R2 0x0500
    R1 0x080B
    R0 0x0001

    I also tried R0 as 0x2411, and got the same set of reads just with R0 as 0x2411.  Does this shed any light?

    Regards,

    Bryn

  • As some extra information, I did some more debugging.

    Immediately after power on I seem to be able to toggle between reset and power down modes, while in reset mode I can't do any reads, but I can return to power down and do reads.  If I keep one of those bits set I seem to be able to keep the SPI bus operational.  If I clear the power down bit (without reset set) it enters its locked up state.  If instead I clear the reset bit (without power down set) it enters self destruct mode and draws loads of current, this happened pretty consistently the 10 or so times I tried it.

    While repeatedly in this fault state I worked my way around the inductors, assuming their internal resistance would probably let us see something, I only kept it powered for a few seconds as generally after that time you could smell very hot chips and the PSU browned out causing a reboot of the software, so the numbers may not be the most exact, the DVM was still attempting to settle.

    I measures the following, first value normal operation, second value high current fault condition:

    • 3v3 rail - 3.27 - 2.9 (this is probably due the internal resistance of our 3 A power switch)
    • L1 - 3.27 - 2.87
    • L2 - 3.27 - 2.87
    • L3 - 3.27 - 2.87
    • L4 - 3.27 - 2.89
    • L5 - 3.27 - 2.87
    • L6 - 3.27 - 2.83
    • L7 - 3.27 - 2.894

    As L7 is only driving the output pull ups I would expect this to pretty well track the rail, no more.

    The other all seem pretty consistently slightly lower, apart from L6 (VccVCO2) which I would say is pulling more current than the others.  Does this help?

    Bryn

  • Hi,

    Anymore thoughts on this issue?  Did anything spring out from my debugging above?

    Regards,

    Bryn

  • Hello Bryn,

    Our devices shouldn’t spontaneously fail, and the fact that after replacing three of them so far suggests something is causing these devices to blow up that isn’t changing between tests or reworks.

    After looking over your debug we are pretty sure there’s damage in your PCB somewhere that’s causing something to short, or else you could have a bad capacitor that’s failing under load, or something along those lines.

  • Hi Aaron,

    If you read back through my posts, I agree with you, I find it hard to believe we've had 3 bad chips in a row, so I'm assuming it must be something about the board or surrounding components, but that is why I've posted all my findings so hopefully you could point me in a particular area to look, as I can't find any issues with our board.  I've done the following:

    • Replaced every decoupling capacitor around the device.
    • Probed every pin on the device with the chip attached, all resistances pretty well match our working board.  Input Vcc rails are of order 9k ohms, all rails generated by your device are of order Meg ohms.
    • Probed every pin on the footprint with the device removed, all resistances as before, nothing low or a short.
    • We've now wired a 2594eval board into the board, so using our input voltage supply, clock input and output circuits and SPI buffers and it all works perfectly, so I don't think its anything outside the immediate area of the part.

    I was hoping you could narrow it down a bit to, its this voltage rail or this oscillator turning on, or when it starts tuning, or something to give me a clue.

    Regards,

    Bryn

  • Bryn,

    Given the steps that you've taken above, it seems like there could be two different issues combining to make debug difficult:

    1. Some kind of damage caused by a defect in the PCB. Perhaps this is a cracked power delivery via, an improperly milled inner layer route that causes a short from some pin to GND under strain/thermal expansion/other mechanical stresses, etc. Insidiously, the fault condition could show up only intermittently when the right thermal or mechanical stress is applied. If it's temperature-related, you may be able to locate it by heating the board up or flexing it and looking for shorts or opens between the device pads and the traces leading to them. It sounds like you already looked for damage before, but perhaps not with thermal or mechanical stresses applied? An alternate test could try to power up the board with no LMX2594 populated, then apply a heat gun to the device area or flex the PCB while looking for shorts or opens.
    2. Whatever happens on the PCB cooks the LMX2594, and the device permanently becomes significantly more susceptible to failure. Perhaps re-apply one of the bad parts into the LMX2594 EVM and check if it works as expected to confirm whether or not there's device damage after whatever event occurs on your own PCB. If there is some permanent damage to the device after use on the faulty board, I'm not sure how we can reliably separate the board defect from the device damage. On the other hand, if the device works on the EVM, it must be a board defect alone that causes the problem since you've already replaced every component around the device.

    Based on the results of your current measurements, I suspect that you should be paying close attention to the traces on VccVCO2-related pins (25-30). I do see that there's a via on pin 25 to GND that is partially off the bottom-layer ground, and I'm not sure if there are additional layers within the board; I wonder if there is some uneven mechanical stress on this via due to placement? Note that damage to the VCO-related circuitry is consistent with your report that the device behaves well when in powerdown or reset state, as both states should temporarily disable the VCO.

    If you really need this board to work at all costs, you could try removing the pads and traces, and manually wiring pins 25-30 to their destinations. An alternative for the grounded pins is cutting the traces to the vias and shorting the pins to the central pad beneath the die. 

    I'm not sure how else we can help you. All signs point to this being an issue with the PCB, and not the LMX2594. Beyond what I've suggested, I'm not sure there's any remaining device-specific knowledge that we could impart which would shed light on the situation.

    Regards,