This thread has been locked.

If you have a related question, please click the "Ask a related question" button in the top right corner. The newly created question will be automatically linked to this question.

Setting DLP Lightcrafter video timings in the EDID to support 120 Hz

Problem: Getting the LightCrafter to display at 120Hz from a graphics card

https://e2e.ti.com/support/dlp-products-group/dlp/f/dlp-products-forum/614841/dlp4500-need-help-getting-120hz-refresh-rate-with-dlp4500-evm

https://e2e.ti.com/support/dlp-products-group/dlp/f/dlp-products-forum/711671/faq-dlp-lightcrafter-4500-evm-faqs

https://e2e.ti.com/support/dlp-products-group/dlp/f/dlp-products-forum/312672/structured-light-patterns-over-hdmi-on-4500-at-120hz

The DLP is expecting specific video timings to work properly at 120Hz
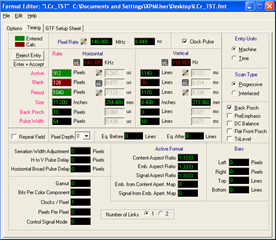
These can be set in the video card settings (custom resolution), but this is not easy as there is no one-to-one mapping

between the recommended settings and NVIDIA proposed timings. Also it needs to be done on every computer

you plug the DLP in.

A second issue is that using Video Mode on the DLP results in choppy video output at ~15Hz.

Solutions:

  • Don't use Video Mode, it simply does not work as advertised in the documentation at 120 Hz, instead use Pattern Mode and select HDMI as the input
  • Flash the EDID on the DLP

Flashing the EDID:

This was done on Ubuntu, but is probably possible on Windows with dedicated programs

# Enable EEPROM flashing

Install jumper on J8 to allow writing to the EDID EEPROM

# dependencies
sudo apt install ghex
sudo apt install read-edid
sudo apt install i2c-tools

# IMPORTANT: Identify on which I2C bus is the DLP

Try for different values of X:

sudo get-edid -b X | parse-edid

# make a copy of the EDID
sudo get-edid -b 2 > original.bin

# check EDID v1.3 spec
glenwing.github.io/.../VESA-EEDID-A1.pdf

to flash the EEPROM: Be extremely careful to select the right device (in my case it was on i2c bus 2)

sudo i2cset 2 0x50 0x5A 0x08 b # Pixel Clock first 8 bits | 146MHz -> 14600 -> 0x39 0x08
sudo i2cset 2 0x50 0x5B 0x39 b # Pixel Clock last 8 bits
sudo i2cset 2 0x50 0x5C 0x90 b # Horizontal active lower 8 bits | 912
sudo i2cset 2 0x50 0x5D 0x80 b # Horizontal blanking lower 8 bits | 128
sudo i2cset 2 0x50 0x5E 0x30 b # Horizontal active upper 4 bits, Horizontal blanking upper 4 bits
sudo i2cset 2 0x50 0x5F 0x74 b # Vertical active lower 8 bits | 1140
sudo i2cset 2 0x50 0x60 0x1E b # Vertical blanking lower 8 bits | 30
sudo i2cset 2 0x50 0x61 0x40 b # Vertical active upper 4 bits, Vertical blanking upper 4 bits
sudo i2cset 2 0x50 0x62 0x0A b # Horizontal Sync Offset (Back porch), lower 8 bits | 10
sudo i2cset 2 0x50 0x63 0x40 b # Horizontal Sync pulse width, lower 8 bits | 64
sudo i2cset 2 0x50 0x64 0x3A b # Vertical Sync Offset (Back porch) lower 4 bits, Vertical Sync pulse width lower 4 bits | 3, 10
sudo i2cset 2 0x50 0x65 0x00 b # bit 7,6: Horizontal Sync Offset upper 2 bits, bit 5,4: Horizontal Sync pulse width upper 2 bits, bits 3,2: Vertical Sync Offset upper 2 bits, bits 1,0: Vertical Sync pulse width upper 2 bits
sudo i2cset 2 0x50 0x66 0x1C b # Horizontal Image Size (mm), lower 8 bits | 284
sudo i2cset 2 0x50 0x67 0xD5 b # Vertical Image Size (mm), lower 8 bits | 213
sudo i2cset 2 0x50 0x68 0x10 b # Horizontal Image Size upper 4 bits, Vertical Image Size upper 4 bits
sudo i2cset 2 0x50 0x69 0x00 b # Horizontal border | 0
sudo i2cset 2 0x50 0x6A 0x00 b # Vertical border | 0
sudo i2cset 2 0x50 0x6B 0x1E b # Flags
sudo i2cset 2 0x50 0x7F 0x55 b # Checksum

sudo get-edid -b 2 | parse-edid

You should see this appear
Modeline     "Mode 2" 146.00 912 922 986 1040 1140 1143 1153 1170 +hsync +vsync

# Appendix (compute the checksum)

set the correct checksum , use:
github.com/.../EDID_checksum

```
from struct import *
import sys
import os

argvs = sys.argv
argc = len(argvs)

if (argc != 2):
    print("please input edid binary file path for argument")
    quit()

size = os.path.getsize(argvs[1])
if size >= 127:
    f = open(argvs[1],'rb')
    sum = 0
    for i in range(127):
        tmp = unpack('B',f.read(1))[0]
    #    print('read:%d' % tmp)
        sum = sum + tmp

    m = 256 - (sum % 256)
    print('Calced: %x' % m)
    if size >= 128:
        csum = unpack('B',f.read(1))[0]
        print('Actual: %x' % csum)
        if (csum == m):
            print('Match!')
        else:
            print('Un-match...')
else:
    print("Please input binary size > 127 Bytes")
```    

  • Hello Martin,

    Welcome to TI E2E forums and thanks for showing interest in DLP technology. Our team will look into the issue and get back with an update by mid of this week.

    Regards,

    Mayank

  • Hi Martin,

    This seems to solution on how to set it up in linux for LCR4500EVM to dispaly a 120Hz source with a graphics card.

    Could you please confirm if my understanding mentioned above is correct or not.

    Regards,

    Akhil

  • That is correct, provided the graphics card supports 120Hz output (which most modern graphics card do). Please note that after following those steps on a linux machine, the LCR4500EVM should also be recognized by a widows machine as a 120Hz capable display since the EDID is stored on the LCR4500EVM itself. Also I haven't been able to project full color RGB, but only 8 bits pattern (red only in my case, which is fine for my application) 

  • Hello Martin,

    Thank you for the information!

    Our team is looking into this behavior and will get back to you soon.

    Regards,

    Lori 

  • Hello Martin.

    Can you please confirm few questions:

    1. Are you using an EVM or a custom board?

    2. In pattern sequence mode, you will only be able to display a 8-bit depth image at 120Hz. Can you check the bit depth?

    3. You mentioned that the graphics card supports 120Hz, it would be good if you can confirm.

    Regards,

    Lori 

  • Hello Lori,

    1. Are you using an EVM or a custom board?

    I'm using a straight up EVM from Wintech

    2. In pattern sequence mode, you will only be able to display a 8-bit depth image at 120Hz. Can you check the bit depth?

    That's what I gathered from online info too. This is because you cannot set the exposure time low enough for 24-bits, would that be correct ? 8-bit is fine for me though, but I thought that info may be useful for others.

    3. You mentioned that the graphics card supports 120Hz, it would be good if you can confirm.

    I'm running a NVIDIA 1050 Ti, which I believe to be 120Hz capable. If you need a stronger level of evidence, what would you consider convincing ? Should I probe VSYNC on the board or measure the output with a photodiode ? I could probably have this set up in a few days 

    Thanks for your interest,

    Best,

    Martin

  • To be fair, I think flashing the EDID solved the issue for me, maybe setting a custom resolution in NVIDIA's control pannel works too, but I find this solution less satisfying as one would have to repeat the operation on each and every computer one would use the Lightcrafter with. I haven't done any measurement to make sure that it was indeed running at 120Hz besides eyeballing it as "yeah that looks smoother". 
    Could you maybe confirm that Video Mode doesn't work at 120Hz just to be sure ?

  • Hello Martin,

    The team will have to look into this request and get back to you. Thank you for your patience.

    Regards,

    John

  • Martin,

    Thanks a lot for contributing and sharing your solution. 
    I am closing this ticket now. Since this is an solution rather than an query. 

    Regards,
    Akhil