This thread has been locked.

If you have a related question, please click the "Ask a related question" button in the top right corner. The newly created question will be automatically linked to this question.

TUSB1064: Controlling with dip switches

Part Number: TUSB1064
Other Parts Discussed in Thread: TPS65987D, TPS65987

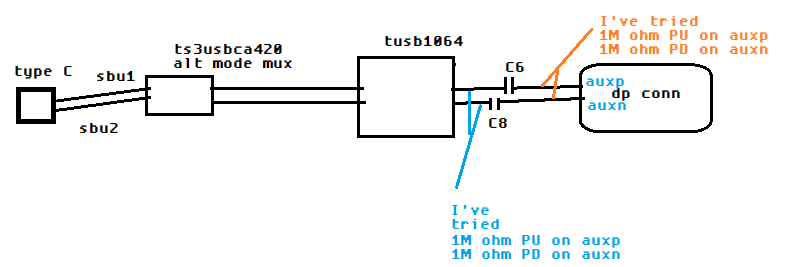
In GPIO mode I want to make sure I have the switches set correctly to allow the super speed mux to pass through, but no combinations of switches allow me to see conduction between the input and output of the tusb1064s SS mux.

I saw in the datasheet there might be a sequence require for the config1 gpio.  Of controller needs to provide a LHL transition to the TUSB1064

Is there a way to test that I can just control the mux independent of the parts state machine?

Thanks

  • *"Of controller" was meant to read PD controller

  • Hi,

    Are you in the USB or DisplayPort (DP) mode? 

    The TUSB1064 will power up in USB mode. For switching to the DisplayPort mode, the TUSB1064 must be taken out of USB mode and into four Lane DisplayPort mode. The CTL0 pin must transition high and then back low. If you don't have a PD controller, you can implement a pullup (3.3V) 1uF capacitor and a pulldown 100k resistor on the CTL0 pin to achieve this transition. The CTL1 pin must be pulled high through a 10k resistor.  

    Thanks

    David

  • I would like to have USB supported on power up, but then allow USB + DP in the future.

    Lets just focus on getting super speed communication between my two connectors right now

    On my board I have the following:

    TPS65987D

    TUSB1064

    I have a USB Type C connector connected to my 'device' over a C-C cable and a micro USB 3 connector connected to my 'host' windows computer.

  • Hi,

    For USB, you should use the TUSB1046 instead the TUSB1064. 

    For DP, if the SS USB Device supports DP Alt Mode, then the TUSB1064 will be the choice. 

    Since you already have a PD controller, you should let the PD controller controls the TUS1046/64 based on the Type-C CC1/2 connection status. 

    Thanks

    David 

  • Hey David, why should I use the TUSB1046? 

    I was told in this forum that the TUSB1064 has just a simple super speed mux and that it would be fine in my application. 

    Furthermore I need the board I'm making to source display port to an external monitor...so wouldn't TUSB1064 the correct part?

  • Hey David,

    I have already built the board I mentioned above in this thread so I'm trying to debug now.

    I was able to get 5V, 9V, 15V, and 20V to work as well as USB2.0 enumeration.

    Now I'm trying to get USB3 enumeration to work, but I'm running into issues.  I'm going to just try soldering wires to the SS input / output of the TUSB1064 and flip the DIP switches I have connected to the TUSB1064 I/Os to see if I can  get the part to conduct input to output.

    I will also try to control via I2C from the PD controller, but I don't know how to control this via the PD controller.  Is there a way to program the pd controller to do this through the GUI application?

    Please see the previous forum post here:

    https://e2e.ti.com/support/interface/f/138/t/900112?tisearch=e2e-sitesearch&keymatch=TUSB1064

  • Hi,

    Can I please take a look at your schematic?

    From a USB3 perspective, we don’t care which side Host or Device is on since USB3 is a bi-directional bus. But from a Type-C perspective, the TUSB1046 will be the right device since the Type-C connector is facing the device. 

    For I2C control via the PD controller, please work with the PD team.

    Thanks

    David

  • I can e-mail snippits it to you, but cannot post on forum

  • Right now I have CTL1, CTL0, FLIP = LHL and I cannot see pin12 (RX1p) shorted to pin5 (SSRXp) which is what I expect from the datasheet

  • Hi,

    Please accept my friendship request and then you can send me the schematic using the private message.

    With TUSB1064 being a linear redriver, you will not see RX1 directly shorted to SSRX. What you could do is to use a scope and measure the USB signal lines when first connected, you should see LPFS (~20MHz) signal sent from the host and the device.

    Are you doing 5G or 10G USB?

    Thanks

    David 

  • Hi,

    David sent me your schematic. Looking at the schematic, 

    1. On the Micro-B connector, you need to AC couple the DEVICE_TXP/N_RDRV_SSRXP/N.

    2. The DEVICE_RXP/N_RDRV_SSTXP/N AC coupling capacitor can be removed or replaced with 0.33uF.

    3. On the Type-C connector, TX1/2 capacitors need to be replaced with 0.22uF and RX1/2 capacitors need to be replaced with 0.33uF.

    4. The pullup resistor on AUX should be placed between the capacitor and the TUSB1064 and should be 1M.

    Thanks

    David

  • Thanks David,  I got USB 3.0 working with suggestions 1 and 2

    I tried #4 to enable DP functionality, but that alone didn't work

    I will try #3 now as well, I wouldn't think this would prevent functionality, but maybe it does

  • Hi,

    What common mode voltage are you seeing if you measure the TUSB1064 AUXP and AUXN using a multi-meter? The common mode voltage on AUXP and SBU2 should be around 0.3V and the common mode voltage on AUXN and SBU1 should be around 3V. 

    Once the common mode voltage checks out, make sure the HPD is high. 

    You can then configure the TUSB1064 to be in DP 4 lane mode by driving CTL0 = 0 and CTL1 = 1. 

    What do you have connected on the Type-C connector and the DP connector? 

    Thanks

    David

  • I have a mac laptop with thunderbol 3 connected on the USB Type C side
    I have a Display port monitor on the DP Conn side

    common mode voltages:

    AUXP

    before DP Connected = ~0.3V
    after DP connected = 2.5V

    AUXN
    before DP connected = 3.3V
    after DP connected = 3.3V

    HPD is 3.3V after DP is connected.

    I haven't changed the values of the caps on the DP lines yet, is this critical to functionality?

    If I leave the way the schematic is will it still work or should I change these caps as  you suggested previously?

    Thanks

  • Hi,

    How does the SBU/AUX being connected between the Type-C connector, the TUSB1064, and the DP connector? If you are using the TUSB1064 to control the SBU/AUX switch, please remove the AC coupling caps (C6 and C8) and not populating the 100k and the 1M pullup/pulldown as the caps and resistors should be populated on the source and sink side. 

    With 100k pulldown on AUXP at the source side and 1M pullup on the sink side, you should see ~0.3V on AUXP. With 100k pullup on AUXN at the source side and 1M pulldown on AUX at the sink side, you should see ~3V on AUXN. Please make sure the TUSB1064 AUXP and SBU2 are seeing ~0.3V common mode voltage and AUXN and SBU1 are seeing ~3V common mode voltage. If the common mode voltage is not correct, data will not go through the TUSB1064 SBU/AUX switch.

    I would recommend changing the caps on the main link so the total capacitance is within the USB Type-C spec and minimize the DC wander from going through the caps.

    Thanks

    David

  • I've tried these two reworks as well as the default 100kohm PD on auxp and 100kohm PU on auxn

    I can try removing all passives and shorting caps C6 and C8 as well

  • HI,

    Since you are using the TS3USBCA420 as the Alt Mode Mux, I would bypass the TUSB1064 AUX/SBU switching by having the TUSB1064 SBU floating, and have the TUSB1064 AUXP/N connected directly to the AUX bus between the TS3USBCA420 and the DP connector.

    You then need to make sure the TS3USB420 is switching the AUX/SBU correctly depending on the Type-C orientation.

    Thanks
    David

  • Hey David,

    Okay I will try this.

    Can you clarify if you mean for me to try option 1 or option 2 in my image below

  • Hi,

    Since you are using the TUSB1064 in the GPIO mode, AUX snoop is disabled and all 4 lanes are always enabled. So both options would work. For option 1, I would tie unused AUXP to 1M to GND, and unused AUXN to 1M to 3.3V.

    Thanks

    David 

  • trying to post new comments, but it won't let me?

  • Hi,

    Can you please try to post your comment again?

    Thanks

    David

  • I tried your suggestion and I don't see enumeration of the display over the DP connection through the board.

    I have the equalization all set to a small positive setting

    I have been trying CTL1, CTL0 = H, L

    I have toggling the 'flip' via a dip switch

    I have tried flipping the USBC cable as well as swapping AUXP/AUXN with SBU1/SBU2

    I'm not sure what else to try at this point.

    I guess I can try swapping the caps as you suggested earlier

    Here are my GPIO mode settings for TUSB1064

    L=DPEQ1

    H=DPEQ0

    L=SSEQ1

    H=SSSEQ0

    L=EQ1

    H=EQ0

    L=I2C_EN

    H=EN

    H=CTL1

    L=CLT0

    H and L=FLIP

    I've also tried with CTL1, CTL0 as H, H and I saw USB3 working 

  • Hi,

    Do you have a way to capture both the CC and the AUX log file for me to review?

    Thanks

    David

  • Hey David, thanks I don't think I have that capability, but I just talk to our PD SW guy and he said the PD controller's default programming as a PD source will actually not do alt mode negotiation, so until I get a PD config that basically tells the device at the other end of the type C cable to get into DP alt mode this interface will not work.

    In the mean time, you are confident that bypassing TUSB1064 will be acceptable?  

    Should there be any series capacitance or pull up / pull down on SBU1/SBU2 on my board to just let the DP display provide the pulls?

  • Hi,

    Below is the DP Alt Mode negotiation flow diagram.

    You could let the TS3USBCA420 or the TUSB1064 handle the AUX/SBU switching, but not both. As long as the SBU/AUX switching correctly followed the DP Alt Mode spec and the SBU/AUX switch electrical characteristics in the datasheet are met, then I don't see an issue.

    Per the DP spec, the AC coupling caps and 100k pullup/pulldown should be inside the SOURCE. The AC coupling caps and 1M pullup/pulldown should be inside the SINK. The only thing you would need is 2M pulldown on SBU1 and SBU2.

    Thanks

    David

  • Okay thanks,  I made a new configuration for our TPS65987 device and it successfully negotiated alt mode with the type C laptop it was connected to.  Now I can charge the laptop and have the laptop spit out USB3 AND DP.  and I can see the laptops extended screen on a DP monitor connected through my board with TUSB1064 on it (SBU1/SBU2 bypassing TUSB1064).

    Do you know how I should expect the TUSB1064 device to work when testing USB3 compliance?

    I see LFPS when I connect a USB SS type C device to my board

    I get CP0 after LFPS happens (which is USB standard)

    My question is how to get CP1.  I need to inject a signal from a function generator, which I confirmed I can do when testing a USB SS device by itself, but I want to test with my board (with the TUSB1064) in the middle, change the redriver settings, and test again to make sure we are using the correct redriver settings.

    Thanks,

    Adam

  • Adam

    Please download the XHSETT tool (32-bit or 64-bit) from the USB.org, https://usb.org/document-library/xhsett-x64 and install the tool onto and run it from the laptop. You will then put the particular port under the test into the compliance mode and use the LFPS from the functional generator to trigger the host sending out the different compliance patterns.

    Thanks

    David