This thread has been locked.
If you have a related question, please click the "Ask a related question" button in the top right corner. The newly created question will be automatically linked to this question.
Tool/software: Code Composer Studio
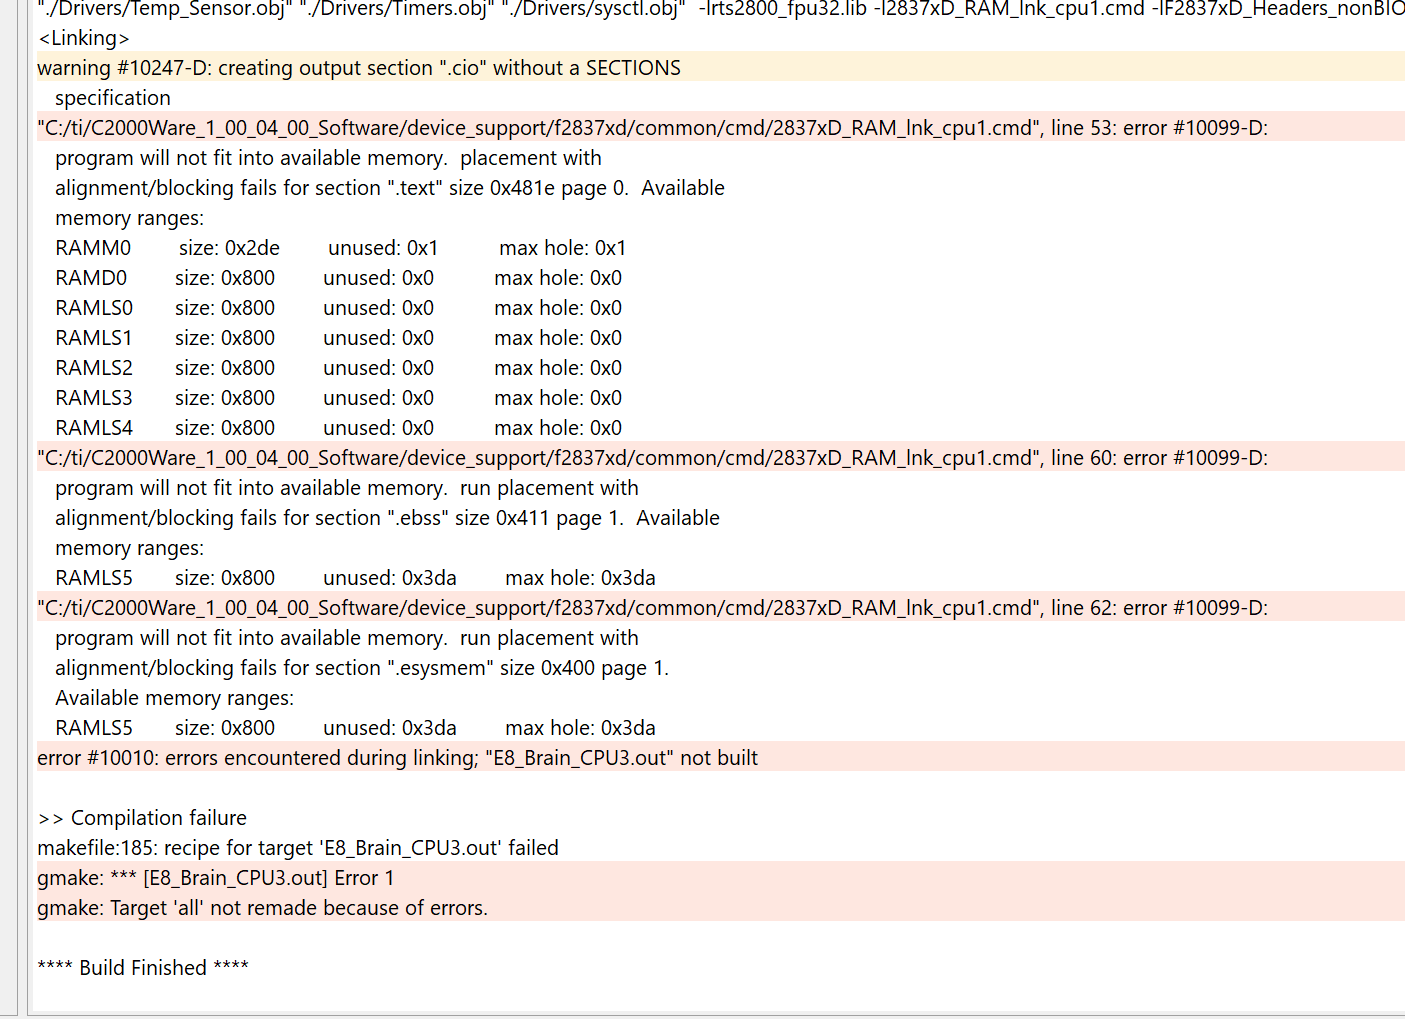
I am getting the following error when trying to get a dual core application into the MCU.
Can anybody help me understand how to get this working. I did the blinky dual core example project and that went fine but I am unable to get my project to do the same thing.
The error indicates "No core matches the pattern 'CPU1'. Is there something that CPU1 must be running before CPU2 can be downloaded? I found another
post that asked the same question and I tried the suggested solution which worked for the original poster but it does not work in my case.
C28xx_CPU2: GEL Output:
Memory Map Initialization Complete
C28xx_CPU2: If erase/program (E/P) operation is being done on one core, the other core should not execute from shared-RAM (SR) as they are used for the E/P code. Also, CPU1 will be halted to determine SR ownership for the CPU which will run the Flash Plugin code, after which CPU1 will be set to run its application. User code execution from SR could commence after both flash banks are programmed.
C28xx_CPU2: Error occurred during flash operation: No core matches the pattern 'CPU1'
C28xx_CPU2: Error setting the GSxMSEL register for Flash operations
C28xx_CPU2: Error occurred during flash operation: Timed out waiting for target to halt while executing wr_pll.alg
C28xx_CPU2: Error writing the PLL values (Flash algorithm timed out). Operation cancelled.
C28xx_CPU2: Perform a debugger reset and execute the Boot-ROM code (click on the RESUME button in CCS debug window) before erasing/loading the Flash. If that does not help to perform a successful Flash erase/load, check the Reset cause (RESC) register, NMI shadow flag (NMISHDFLG) register and the Boot-ROM status register for further debug.
C28xx_CPU2: Error occurred during flash operation: No core matches the pattern 'CPU1'
C28xx_CPU2: File Loader: Memory write failed: Unknown error
C28xx_CPU2: GEL: File: C:\Users\Dave\workspace_v8\E8_Brain_CPU3\CPU2_FLASH_DEBUG\E8_Brain_CPU3.out: Load failed.
C28xx_CPU2: Error occurred during flash operation: No core matches the pattern 'CPU1'
C28xx_CPU2: Error setting the GSxMSEL register for Flash operations
C28xx_CPU2: Error occurred during flash operation: Timed out waiting for target to halt while executing pwrite_en.alg
C28xx_CPU2: Flash operation timed out waiting for the algorithm to complete. Operation cancelled.
C28xx_CPU2: Perform a debugger reset and execute the Boot-ROM code (click on the RESUME button in CCS debug window) before erasing/loading the Flash. If that does not help to perform a successful Flash erase/load, check the Reset cause (RESC) register, NMI shadow flag (NMISHDFLG) register and the Boot-ROM status register for further debug.
C28xx_CPU2: Error occurred during flash operation: No core matches the pattern 'CPU1'
C28xx_CPU2: Error setting the GSxMSEL register for Flash operations
David,
Please confirm that you have CPU1 connected to CCS and halted while trying to program CPU2.
Also please check that you have installed latest CCS update. You can check for the same under "Help".
Regards,
Vivek Singh
OK so I tried to upload the offending project into my cloud space CCS. I received the following error.
Just to be sure I am using the compiler version 18.9.0...
I dont understand why I would get this error.
Hopefully if I can load this into the cloud you will be able to get access to it ans help me solve some of the problems.
So here is a contradiction (at least for me it is). This debug configuration for the dual core blinky application for "core selection" field shows that the load should be placed into CPU1. But in fact it loads into CPU2. So what is this setting actually doing? Its obvious to me that it is not doing the obvious.
David,
Sorry to know that you are facing multiple issue on this. This started as code not loading on CPU2 but look like you are facing some basic issue with compile/linking itself. Linker cmd file is very unique to each project. Sample linker cmd file provided with example code may not work for every project and user need to update it as per their project requirement. You can find more detail on linker cmd file here.
The core selection in flash plug-in is done by tool itself based on which core you select. You don't have to change that. Also CPU1/CPU2 pre-defined in CCS properties is only for code compilation because there some resources on this device which are only accessible by CPU1 and not CPU2 but that should not prevent you from loading the code on CPU2. In the snapshot above, you have imported same project multiple time. You may want to clean that.
Along with example code in C2000Ware, you can refer this workshop which is specifically created for this device. Hope this helps.
Regards,
Vivek Singh
Hi Ricky,
Yes that is exactly the error I was getting. So I followed the exact procedure I used for the blinky DC project. I first connected to CPU1 and successfully downloaded CPU1 code. The debugger was stopped at main ready to go. Then I tried to load CPU2 code and ran into that error.
The ccxml file seems to be automatically created or possibly added to the project I'm not sure which.
I am unable to attach the file to this post cuz the system does not allow that extension od here is the file copied & pasted as text.
//=======================================================================
<?xml version="1.0" encoding="UTF-8" standalone="no"?>
<configurations XML_version="1.2" id="configurations_0">
<configuration XML_version="1.2" id="configuration_0">
<instance XML_version="1.2" desc="Texas Instruments XDS100v2 USB Debug Probe" href="connections/TIXDS100v2_Connection.xml" id="Texas Instruments XDS100v2 USB Debug Probe" xml="TIXDS100v2_Connection.xml" xmlpath="connections"/>
<connection XML_version="1.2" id="Texas Instruments XDS100v2 USB Debug Probe">
<instance XML_version="1.2" href="drivers/tixds100v2icepick_c.xml" id="drivers" xml="tixds100v2icepick_c.xml" xmlpath="drivers"/>
<instance XML_version="1.2" href="drivers/tixds100v2c28x.xml" id="drivers" xml="tixds100v2c28x.xml" xmlpath="drivers"/>
<instance XML_version="1.2" href="drivers/tixds100v2cla1.xml" id="drivers" xml="tixds100v2cla1.xml" xmlpath="drivers"/>
<instance XML_version="1.2" href="drivers/tixds100v2cs_child.xml" id="drivers" xml="tixds100v2cs_child.xml" xmlpath="drivers"/>
<platform XML_version="1.2" id="platform_0">
<instance XML_version="1.2" desc="TMS320F28379D" href="devices/f28379d.xml" id="TMS320F28379D" xml="f28379d.xml" xmlpath="devices"/>
<device HW_revision="1" XML_version="1.2" description="" id="TMS320F28379D" partnum="TMS320F28379D" simulation="no">
<router HW_revision="1.0" XML_version="1.2" description="ICEPick_C router" id="IcePick_C_0" isa="ICEPICK_C">
<subpath id="Subpath_1">
<property Type="numericfield" Value="0x11" desc="Port Number_0" id="Port Number"/>
</subpath>
</router>
</device>
</platform>
</connection>
</configuration>
</configurations>
Thanks, Dave
Ricky,
I am not sure whats going on but I responded to this thread the other day.
But when I looked I was missing my previous post. Then after posting my response again
I then saw the missing post. Now this time all of that is missing.
I am not sure if you are receiving my responses.
If you are please advise me that you are receiving them.
Thanks, Dave.
David,
Yes, I was able to see your previous posts.
It's a little difficult to see what is happening just based on the text you provided. So, can you run a few more tests for me?
1. Find the ccxml you are using and double click to open the Target Configuration view, and then go to the "Advanced" tab. I want to make sure you have the "C28xx_CPU1" core in your configuration. This is the string that the code is trying to match when looking for CPU1.
It should look something like this:
2. Right click on that ccxml and select "Launch Selected Configuration".
- After that, connect to both CPU1 and CPU2.
- When connected, go to 'Tools -> On-Chip Flash'. This should open the flash settings for your C28 cores.
- make sure CPU1 is selected, find the Erase button in the On-Chip Flash and click on it. See if this works.
- select CPU2, find the Erase button in the On-Chip Flash and click on it. See if this works.
Please let me know the test results for this.
Thanks,
Ricky