This thread has been locked.

If you have a related question, please click the "Ask a related question" button in the top right corner. The newly created question will be automatically linked to this question.

EVM430-CAPMINI: Modifying UART communication

Part Number: EVM430-CAPMINI
Other Parts Discussed in Thread: MSP430FR2512, MSP430FR2422, CAPTIVATE-FR2633

Tool/software:

I'm trying to communicate via UART to an external module. I have a EVM430-CAPMINI and I'm trying to start from EVM430-CAPMINI_Demo example because I want to use the CapTIvate part of the evaluation board. Using an Analog Discovery 3 (AD3), I've seen that from pin 2 of J3, corresponding to FR2512_TXD, there's a lot of data being sent already (my guess is that it is being sent to CapTIvate Design Center for live updates there), which I do not need for my purpose.

Looking briefly over the example I couldn't find where the UART data communication was being sent from. To attempt to find it out I've started from a smaller example, an UART echo found at MSP430FR2512 > Peripheral Examples > Register Level > msp430fr2422_euscia0_uart_01.c. I realized It wasn't the proper MCU so after some initial troubleshooting, I've followed the modifications needed as mentioned by Bruce McKenney47378 here: https://e2e.ti.com/support/microcontrollers/msp-low-power-microcontrollers-group/msp430/f/msp-low-power-microcontroller-forum/872676/ccs-msp430fr2512-msp430-uart-sample-code and It has worked properly, using the AD3 I can see the echo functioning properly.

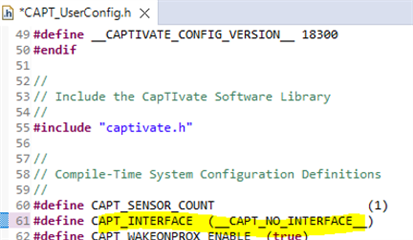
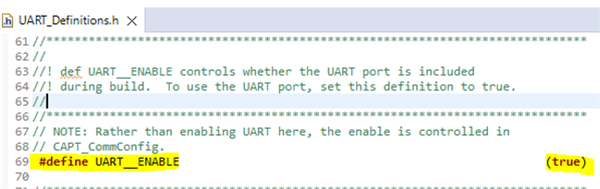
Back to EVM430-CAPMINI_Demo, I can see that some of the communication is being handled by CAPT_appHandler, but It is still confusing on what could I even modify. Am I supposed to be able to remove this communication and place my own UART on the MSP430FR2512 using the EV430-CAPMINI, or is it only expected to be used by Captivate Design Center?

If I am able to modify the UART communication, what should I modify or what example/tutorial should I start from If I want to keep the CapTivate functionality?

Thanks in advance

  • Hi Albert,

    I believe all you need to do is modify CAPT_UserConfig.h as shown here:

    Next uncomment line 69 in UART_Definitions.h and set  =  e(true)

    Then somewhere in your code copy this code and populate it by selecting a baud rate from the table shown here in code.

    /*
     * The host_interface_uart module re-uses the driverlib code and structures used
     * for Captivate to GUI interface.
     */
    //*****************************************************************************
    //! def UART_SAMPLING_MODE defines the eUSCI_A LF or HF mode.
    //! def UART_PRESCALER defines the eUSCI_A pre-scaler.
    //! def UART_FIRST_STAGE_MOD defines the eUSCI_A first stage modulation.
    //! def UART_SECOND_STAGE_MOD defines the eUSCI_A second stage modulation.
    //*****************************************************************************
    // Assumes SMCLK = 2MHZ
    #define BAUD_19200
    
    #ifdef BAUD_9600
    // EUSCI runs @ 9600
    #define UART_SAMPLING_MODE    (EUSCI_A_UART_OVERSAMPLING_BAUDRATE_GENERATION)
    #define UART_PRESCALER                                              (13)
    #define UART_FIRST_STAGE_MOD                                        (0)
    #define UART_SECOND_STAGE_MOD                                       (69)
    
    #elif defined BAUD_19200
    // EUSCI runs @ 19.2K
    #define UART_SAMPLING_MODE      (EUSCI_A_UART_OVERSAMPLING_BAUDRATE_GENERATION)
    #define UART_PRESCALER                                                (6)
    #define UART_FIRST_STAGE_MOD                                          (8)
    #define UART_SECOND_STAGE_MOD                                         (17)
    
    #elif defined BAUD_38400
    // EUSCI runs @ 38.4K
    #define UART_SAMPLING_MODE      (EUSCI_A_UART_OVERSAMPLING_BAUDRATE_GENERATION)
    #define UART_PRESCALER                                                (3)
    #define UART_FIRST_STAGE_MOD                                          (4)
    #define UART_SECOND_STAGE_MOD                                         (4)
    
    #elif defined BAUD_57600
    // EUSCI runs @ 57.6K
    #define UART_SAMPLING_MODE      (EUSCI_A_UART_OVERSAMPLING_BAUDRATE_GENERATION)
    #define UART_PRESCALER                                                (2)
    #define UART_FIRST_STAGE_MOD                                          (2)
    #define UART_SECOND_STAGE_MOD                                         (187)
    
    #elif defined BAUD_115200
    // EUSCI runs @ 115.2K
    #define UART_SAMPLING_MODE      (EUSCI_A_UART_LOW_FREQUENCY_BAUDRATE_GENERATION)
    #define UART_PRESCALER                                                (17)
    #define UART_FIRST_STAGE_MOD                                          (0)
    #define UART_SECOND_STAGE_MOD                                         (74)
    
    #elif defined BAUD_230400
    // EUSCI runs @ 230.4K
    #define UART_SAMPLING_MODE      (EUSCI_A_UART_LOW_FREQUENCY_BAUDRATE_GENERATION)
    #define UART_PRESCALER                                                (8)
    #define UART_FIRST_STAGE_MOD                                          (0)
    #define UART_SECOND_STAGE_MOD                                         (214)
    
    #elif defined BAUD_250000
    // EUSCI runs @ 250K
    #define UART_SAMPLING_MODE      (EUSCI_A_UART_LOW_FREQUENCY_BAUDRATE_GENERATION)
    #define UART_PRESCALER                                                (8)
    #define UART_FIRST_STAGE_MOD                                          (0)
    #define UART_SECOND_STAGE_MOD                                         (0)
    
    #else
    #warning "NO BAUD RATE SELECTED"
    #endif
    
    /*
     * CREATE A LOCAL INSTANCE OF UART PARAMETERS
     * REFER TO TRACKPAD_DEMO.H FOR DEFINITIONS
     */
    static const tUARTPort appUARTPort =
    {
        .pbReceiveCallback = NULL,
        .pbErrorCallback = 0,
        .peripheralParameters.selectClockSource = EUSCI_A_UART_CLOCKSOURCE_SMCLK,
        .peripheralParameters.clockPrescalar = UART_PRESCALER,
        .peripheralParameters.firstModReg = UART_FIRST_STAGE_MOD,
        .peripheralParameters.secondModReg = UART_SECOND_STAGE_MOD,
        .peripheralParameters.parity = EUSCI_A_UART_NO_PARITY,
        .peripheralParameters.msborLsbFirst = EUSCI_A_UART_LSB_FIRST,
        .peripheralParameters.numberofStopBits = EUSCI_A_UART_ONE_STOP_BIT,
        .peripheralParameters.uartMode = EUSCI_A_UART_MODE,
        .peripheralParameters.overSampling = UART_SAMPLING_MODE
    };
    #endif


    UART_openPort(&appUARTPort);

    Last, make the call to enable the UART -> UART_openPort(&appUARTPort);

  • Wonderful, I didn't think It was that simple on the part of CapTIvate. I was able to work with the UART part on the FR2633-Backchannel_UART-Demo as we also got a Captivate-FR2633, so I got into trying out that part. If anything, the "#endif" on your line 85 wasn't needed, or the starter #ifdef was removed, if it's needed.

    Are there any tutorials explaining CapTIvate's code structure or how to perform these kind of modifications? As a first time user, It may help to find out faster what I can or can't do.

    Edit: I've taken a look at this guide: https://software-dl.ti.com/msp430/msp430_public_sw/mcu/msp430/CapTIvate_Design_Center/latest/exports/docs/users_guide/html/CapTIvate_Technology_Guide_html/markdown/ch_workshop.html , specially the one after "Part 1 - CapTIvate Touch Library Overview".

    Following the previous guide, I've been leaded to https://software-dl.ti.com/msp430/msp430_public_sw/mcu/msp430/CapTIvate_Design_Center/latest/exports/docs/users_guide/html/CapTIvate_Technology_Guide_html/markdown/ch_library.html

    I believe I'm on the right tutorials, but if I'm missing any, they would be greatly appreciated.


    Thank you,

    Albert

**Attention** This is a public forum