This thread has been locked.

If you have a related question, please click the "Ask a related question" button in the top right corner. The newly created question will be automatically linked to this question.

Reading DFI file using EV2300 & BqEASY

Other Parts Discussed in Thread: BQMTESTER

I have given learning cycle to a 4S_1P pack so that its max error changes to 1% & update status to 6. I think pack is ready to read golden image? Am I right?

1. Now to read dfi file from it, via Ev2300 I directly connect it to EV2300 & went to BQEASY ->1. Setup -> 1B. LOAD/READ .dfi file.

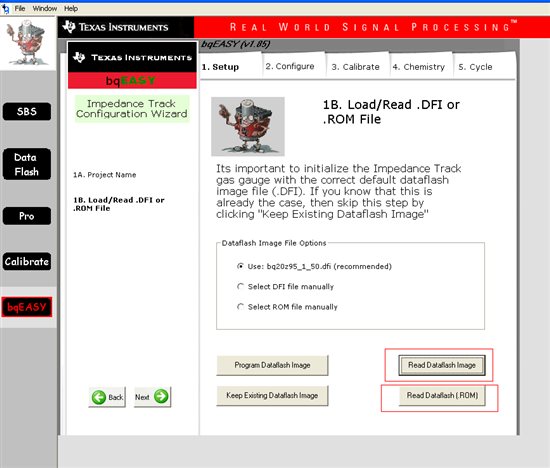
First I clicked on Read dataflash image to read .dfi file & then I read dataflash by clicking Read Dataflash btton. I have attached both file .dfi & .rom file. Are they correct or I have done some mistake in giving learning cycle and/or in reading dataflash image?

2. Now I have many other 4S_1P pack to program with same golden file. It is mentioned that change update status in dfi file from 06 to 02. How to do it? How to edit .dfi file?

2727.golden_pack_setting.rar

  • Update Status IT Enable 02 To 06
    NO IT Enable Update Status =02

  • First of all, did you use bqEASY to run the golden learning cycle (i.e. step 5 "Learning" tab in bqEASY). If so, bqEASY should have generated a golden dfi file under the project directory. You can use this golden dfi file and program to other pcb.

    If you run the learning cycle without using bqEASY, then you will need to follow a few steps to generate the golden image instead of simply reading out the dfi from the IC that just finished the golden learning cycle. This is because the gauge that just completed the golden learning cycle has IT enabled and some internal parameters are also updated (due to IT enabled). We don't want that for the golden image.

    Here is the step to follow:

    1. With the gauge that just completed the golden learning cycle, export the gg file using EVSW "Data Flash" screen

    2. Open the gg file via a txt editor, update "Update Status" from 6 to 2. Update "Cycle Count" to 0.

    3. Reprogram the default senc to the gauge

    4. Configure DF parameters to the gauge

    5. Update chemistry (using bqEASY step 4 "Chemistry" tab) to the gauge

    6. Import the gg file (from step 2) to the gauge

    7. Use bqEASY to read out the dfi (if you plan to use bqEASY to program the golden image to other pcb)  or rom file (if you plan to use bqMTester to program golden image to other pcb). This is your golden image.

    If you have been using bqEASY for the evaluation and have been gone through bqEASY step1 to step4, then upon completion of step 4 of bqEASY, the tool actually has created a xxxxxxx_CONFIGURATED.dfi file under the projects directory. You can replace step 3-step5 above by simply program that xxxxxxx_CONFIGURATED.dfi file (this dfi file contains the configured DF parameters and updated chemistry info).