This thread has been locked.

If you have a related question, please click the "Ask a related question" button in the top right corner. The newly created question will be automatically linked to this question.

AM69A: Accuracy metrics for yolov5

Part Number: AM69A
Other Parts Discussed in Thread: AM68A,

Tool/software:

Hi,

I am using edge-ai-benchmark tool to benchmark the accuracy metric for Yolov5 model

Tool - https://github.com/TexasInstruments/edgeai-tensorlab

Yolov5 - https://github.com/TexasInstruments/edgeai-yolov5/tree/main

I see there is not edgeai-yolov5 inside model zoo of edgeai-tensorlab. So I move the above yolov5 and it's compiled artifact to edgeai-modelzoo and tried to benchmark the accuracy. 

I am getting AP = 0 for all the ranges. 

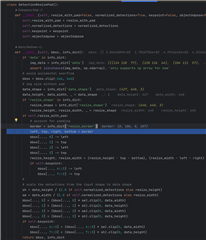
Here is my configuration - 

        'yolov5_s':utils.dict_update(common_cfg,
            preprocess=preproc_transforms.get_transform_onnx(640, 640, reverse_channels=True, resize_with_pad=[True, "corner"], backend='cv2', pad_color=[114, 114, 114]),
            session=onnx_session_type(**sessions.get_common_session_cfg(settings, work_dir=work_dir),
                runtime_options=settings.runtime_options_onnx_np2(
                   det_options=True, ext_options={'object_detection:meta_arch_type': 6,
                    'object_detection:meta_layers_names_list': f'{settings.models_path}/vision/detection/coco/yolov5/yolov5s6_640_ti_lite_metaarch.prototxt',
                    #'advanced_options:output_feature_16bit_names_list': '1033, 711, 712, 713, 727, 728, 728, 743, 744, 745'
                    },
                    fast_calibration=True),
                model_path=f'{settings.models_path}/vision/detection/coco/yolov5/yolov5s6_640_ti_lite_37p4_56p0.onnx'),
            postprocess=postproc_transforms.get_transform_detection_yolov5_onnx(squeeze_axis=None, normalized_detections=False, resize_with_pad=True, formatter=postprocess.DetectionBoxSL2BoxLS()),
            
            metric=dict(label_offset_pred=datasets.coco_det_label_offset_80to90(label_offset=1)),
            model_info=dict(metric_reference={'accuracy_ap[.5:.95]%': 38.3}, model_shortlist=70)
        ),

And this is what I am getting - 

 Average Precision  (AP) @[ IoU=0.50:0.95 | area=   all | maxDets=100 ] = 0.000
 Average Precision  (AP) @[ IoU=0.50      | area=   all | maxDets=100 ] = 0.000
 Average Precision  (AP) @[ IoU=0.75      | area=   all | maxDets=100 ] = 0.000
 Average Precision  (AP) @[ IoU=0.50:0.95 | area= small | maxDets=100 ] = 0.000
 Average Precision  (AP) @[ IoU=0.50:0.95 | area=medium | maxDets=100 ] = 0.000
 Average Precision  (AP) @[ IoU=0.50:0.95 | area= large | maxDets=100 ] = 0.000
 Average Recall     (AR) @[ IoU=0.50:0.95 | area=   all | maxDets=  1 ] = 0.000
 Average Recall     (AR) @[ IoU=0.50:0.95 | area=   all | maxDets= 10 ] = 0.000
 Average Recall     (AR) @[ IoU=0.50:0.95 | area=   all | maxDets=100 ] = 0.000
 Average Recall     (AR) @[ IoU=0.50:0.95 | area= small | maxDets=100 ] = 0.000
 Average Recall     (AR) @[ IoU=0.50:0.95 | area=medium | maxDets=100 ] = 0.000
 Average Recall     (AR) @[ IoU=0.50:0.95 | area= large | maxDets=100 ] = 0.000

I tried similar things with edgeai-yolox models as well and I can see the accuracy for those models. Not sure what's wrong with yolov5.

Also, just to be on clear side, if yolov5 is giving output in xyxy format, how this edgeai-benchmark tool is converting it to xywh format (if using pycocotools)?

Thanks

Akhilesh

  • Hi Akhilesh,

    Thanks for bringing this up. Unfortunately do to lack of bandwidth on my end, I won't be able to get a chance to investigate this issue this week. I will leave this open on my end, and get back to you next week.

    Best,

    Asha

  • Thanks Asha.

    I have the question.

    How can I calculate the accuracy using pycocotools? I am trying but the AP I am getting is 10-15% lower. 

    How are you converting yolov5s output to pycocotools supported output?

    Example - yolox-s or yolov5s gives output in format xyxy. How this xyxy is being converted into xywh inside edgeai-benchmark tool in order to calculate AP using pycocotools?

    Please explain.

    Thanks

  • Can you take a look at edgeai-benchmark at https://github.com/TexasInstruments/edgeai-tensorlab to see how accuracy is calculated using pycocotools.

    Accuracy measurement (to the accuracy that is matching with that in the training framework) may require slightly differnt parameters during model compilation. For example:

    detection_threshold : 0.01
    detection_top_k : 1000

    Instead of the default parameters here:

    https://github.com/TexasInstruments/edgeai-tensorlab/blob/main/edgeai-benchmark/settings_base.yaml#L92

  • We recommend yolov5 from https://github.com/open-mmlab/mmyolo (converted to lite model by replacing unsupported layers). 

    You can see the config added here: https://github.com/TexasInstruments/edgeai-tensorlab/blob/main/edgeai-benchmark/configs/detection_v2.py#L96

  • Can you take a look at edgeai-benchmark at https://github.com/TexasInstruments/edgeai-tensorlab to see how accuracy is calculated using pycocotools.

    I tried to look and understand. One thing I am not sure how you have calculated the yolov5 output x1y1x2y2 in some other x1y1x2y2 format.

    ex - My raw yolov5s output is -  [ 3.82799530e+02  1.74598602e+02  5.00566162e+02  4.52767090e+02 9.30112600e-01  0.00000000e+00]

    My prediction output is [3.82799530e+02, 6.85986023e+01, 5.00566162e+02, 3.46767090e+02, 0.00000000e+00, 9.30112600e-01]

    So from above conversion - x1 and x2 is same for both. How did you convert these y values? I understand last 2 values are switched that's fine. 

    I need to know how these y values are converted. (May be you are converting x too but this is for 1 images only I printed).

    After prediction output is - [3.82799530e+02, 6.85986023e+01, 5.00566162e+02, 3.46767090e+02, 0.00000000e+00, 9.30112600e-01]. I can easily convert this xyxy to xywh using standard method. 

    Help me to understand this y conversion.

    Thanks

  • We recommend  mmyolo. Can you see this thread and see if it helps with your issue: github.com/.../7

  • Even in mmyolo, it used some postprocessing. I am asking what postprocessing is being used in edgeai-benchmark. Can you please provide minimum reproducible code for mmyolo postprocessing? I could not find inside edgeai-benchmark that's why asking.

    That link did not help.

    Thanks

    Akhilesh

  • The yolov5-small config for that model is here: github.com/.../detection_v2.py

  • I already checked that. 

    What I am more interesting is into this -

    postprocess=postproc_transforms.get_transform_detection_yolov5_onnx(squeeze_axis=None, normalized_detections=False, resize_with_pad=True, formatter=postprocess.DetectionBoxSL2BoxLS()), #TODO: check this

    Even this DetectionBoxSL2BoxLS I got. But what other postprocessing you are doing, that is hard to understand. Could you help in that?

    Thanks

  • Once that post processing is done, the output is ready. Such outputs are collected for all the frames in the validation set, it is given for accuracy evaluation - the evaluation function that is part of the dataset class that is being used. For example, for coco it is here: github.com/.../coco_det.py

  • Once that post processing is done,

    Can you explain what postprocessing is being done? That's the main thing I want to know.

    Thanks

  • Can you see the list of postprocess transforms:

    https://github.com/TexasInstruments/edgeai-benchmark/blob/main/edgeai_benchmark/postprocess/__init__.py#L122

    https://github.com/TexasInstruments/edgeai-benchmark/blob/main/edgeai_benchmark/postprocess/__init__.py#L63

    Formatting of the detctections is done in this line: https://github.com/TexasInstruments/edgeai-benchmark/blob/main/edgeai_benchmark/postprocess/__init__.py#L86

    Depending on the formatter being used for this model: https://github.com/TexasInstruments/edgeai-benchmark/blob/main/configs/detection_v2.py#L105

    Copying only relevant lines here - you can see the relevant operations here in the postprocess. After this, the output goes for accuracy valuation.

    def get_transform_detection_base(self, formatter=None, resize_with_pad=False, keypoint=False, object6dpose=False, normalized_detections=True,
      shuffle_indices=None, squeeze_axis=0, reshape_list=None, ignore_index=None, logits_bbox_to_bbox_ls=False):

      postprocess_detection = []

      postprocess_detection += [ReshapeList(reshape_list=reshape_list),
        ShuffleList(indices=shuffle_indices),
        Concat(axis=-1, end_index=3)]
      if squeeze_axis is not None:
      # TODO make this more generic to squeeze any axis
      postprocess_detection += [SqueezeAxis()]
      #
      if ignore_index is not None:
        postprocess_detection += [IgnoreIndex(ignore_index)]
      #
      if formatter is not None:
        if isinstance(formatter, str):
          formatter_name = formatter
          formatter = getattr(postprocess_transform_types, formatter_name)()
        elif isinstance(formatter, dict) and 'type' in formatter:
          formatter_name = formatter.pop('type')
          formatter = getattr(postprocess_transform_types, formatter_name)(**formatter)
         #
        postprocess_detection += [formatter]
      #
      postprocess_detection += [DetectionResizePad(resize_with_pad=resize_with_pad, keypoint=keypoint, object6dpose=object6dpose,
      normalized_detections=normalized_detections)]
      if self.settings.detection_threshold is not None:
        postprocess_detection += [DetectionFilter(detection_threshold=self.settings.detection_threshold,
        detection_keep_top_k=self.settings.detection_keep_top_k)]

      #


  • Let me look into this. I checked this earlier too.

  • Hi,

    My simple question is why this is not working. If we have the yolov5 output as x1y1x2y2 and I am converting it to xywh using below method, why it is not working?

    x = (x1 + x2)/2

    y = (y1 + y2)/2

    w = x2-x1
    h = y2-y1

    Are you people doing anything else other than above method?

    Thanks

  • If you see the detection formatter that you have used in the first post, it is: formatter=postprocess.DetectionBoxSL2BoxLS()

    It is only changing the order - i.e. Box, Score, Label to Box, Label, Score. 

    -----------------------------------------

    The conversion that you are doing in the above post is like in a different formatter, called DetectionXYXY2XYWH():

    https://github.com/TexasInstruments/edgeai-benchmark/blob/main/edgeai_benchmark/postprocess/transforms.py#L541

    And that is not what we have used for this model.

  • Can you clarify the terminology used to help understand this better:

    ------

    My raw yolov5s output is -  [ 3.82799530e+02  1.74598602e+02  5.00566162e+02  4.52767090e+02 9.30112600e-01  0.00000000e+00]

    It it using yolov5 without TIDL?

    -------

    My prediction output is [3.82799530e+02, 6.85986023e+01, 5.00566162e+02, 3.46767090e+02, 0.00000000e+00, 9.30112600e-01]

    Is it using yolov5 with TIDL?

  • Hi

    Both are using edgeai-benchmark tool. 1st one is before postprocessing and later one is after some postprocessing. I ran the edgeai-benchmark for 1 image and found this difference. That's the reason I asked what postprocessing you people are doing. It is using tidl in both

  • In edgeai-benckmark/settings_base.yaml

    Can you set

    model_selection: od-8100

    experimental_models : True

    And then run 

    ./run_benchmarks_pc.sh AM68A

    ======================================

    You can also do this for a quick compilation:
    num_frames : 10
    calibration_frames : 5
    calibration_iterations : 5

    =====================================

    This is what I got in PC:

    infer : od-8100_onnxrt_coco_edgeai-yolov5-gplv3_yolov5s6_640| 100%|##########|| 10/10 [01:29<00:00, 8.93s/it]
    INFO:20240724-174520: infer completed - od-8100_onnxrt_coco_edgeai-yolov5-gplv3_yolov5s6_640_ti_lite_37p4_56p0_onnx - 91 secLoading and preparing results...
    DONE (t=0.00s)
    creating index...
    index created!
    Running per image evaluation...
    Evaluate annotation type *bbox*
    DONE (t=0.02s).
    Accumulating evaluation results...
    DONE (t=0.11s).
    Average Precision (AP) @[ IoU=0.50:0.95 | area= all | maxDets=100 ] = 0.331
    Average Precision (AP) @[ IoU=0.50 | area= all | maxDets=100 ] = 0.445
    Average Precision (AP) @[ IoU=0.75 | area= all | maxDets=100 ] = 0.389
    Average Precision (AP) @[ IoU=0.50:0.95 | area= small | maxDets=100 ] = 0.121
    Average Precision (AP) @[ IoU=0.50:0.95 | area=medium | maxDets=100 ] = 0.581
    Average Precision (AP) @[ IoU=0.50:0.95 | area= large | maxDets=100 ] = 0.572
    Average Recall (AR) @[ IoU=0.50:0.95 | area= all | maxDets= 1 ] = 0.261
    Average Recall (AR) @[ IoU=0.50:0.95 | area= all | maxDets= 10 ] = 0.342
    Average Recall (AR) @[ IoU=0.50:0.95 | area= all | maxDets=100 ] = 0.342
    Average Recall (AR) @[ IoU=0.50:0.95 | area= small | maxDets=100 ] = 0.123
    Average Recall (AR) @[ IoU=0.50:0.95 | area=medium | maxDets=100 ] = 0.590
    Average Recall (AR) @[ IoU=0.50:0.95 | area= large | maxDets=100 ] = 0.641


    SUCCESS:20240724-174520: benchmark results - {'infer_path': 'od-8100_onnxrt_coco_edgeai-yolov5-gplv3_yolov5s6_640_ti_lite_37p4_56p0_onnx', 'accuracy_ap[.5:.95]%': 33.081814, 'accuracy_ap50%': 44.452167, 'num_subgraphs': 1, 'infer_time_core_ms': 8914.585376, 'infer_time_subgraph_ms': 8914.475408, 'ddr_transfer_mb': 0.0, 'perfsim_time_ms': 6.6796, 'perfsim_ddr_transfer_mb': 33.15, 'perfsim_gmacs': 8.7152}

  • This needs edgeai-yolov5 to be cloned inside edgeai-tensorlab so that the model path used in edgeai-benchmark is valid 

  • I think the config snippet that you posted above is different from what is here github.com/.../detection_experimental.py

    (which is what I would my run used when I specified model_selection: od-8100)

    I can see difference in input_mean, input_scale

  • Hi Manu,

    Thanks for that. But I have already tried this and could see the results you mentioned above. My requirement is different. I think there is some miscommunication happened. Let me put it in clearer way-

    1. Above results are correct and I had also reproduced them using edgeai-benchmark tool with 9.2 version.

    2. I wanted to calculate accuracy metric inside am69a board for which I had installed pycocotools inside the am69a board.

    3. Now using output from yolov5 and mscoco dataset, I tried to calculate the metric and found the accuracy mismatch.

    4. Then I wanted to know what postprocessing, after getting the yolov5 output, you people are doing in edgeai-benchmark.

    So, main issue is I want to calculate accuracy inside am69a board using pycocotools.

    We have common_utils.py inside  tidl_09_02_07_00/edgeai-tidl-tools/examples/osrt_python/

    I can see this code of line for yolov5 in common_utils.py


        elif(od_type == "YoloV5"):
            outputs = [np.squeeze(output_i) for output_i in outputs]
            num_boxes = int(outputs[0].shape[0])
            for i in range(num_boxes):
                if(outputs[0][i][4] > 0.3) :
                    xmin = outputs[0][i][0]
                    ymin = outputs[0][i][1]
                    xmax = outputs[0][i][2]
                    ymax = outputs[0][i][3]
                    draw.rectangle(((int(xmin), int(ymin)), (int(xmax), int(ymax))), outline = colors_list[int(outputs[0][i][5])%len(colors_list)], width=2)
        

    If you see, these are x1 y1 x2 y2. I am running this osrt_python/ort example inside am69a board. 

    Now my question is how are you people converting this x1 y1 x2 y2 to x y w h format inside edgeai-benchmark tool and using pycocotools to calculate the accuracy.

    This x1 y1 x2 y2 has to be converted into z y w h because pycocotools take the xywh format to calculate the accuracy. 

    I wanted to know this conversion. I hope it is clear now. 

    Thanks

  • Okay. I shall try to answer your question. But before answering your specific question, I would like to point out that it is possible to run edgeai-benchmark in EVM as well. You just need to mount the datasets in the EVM from your PC. It can be used to measure accuracy and inference time on EVM.

  • These are the operations that are done to the detetion output

    1. Swap the class lablel and score - The box cordinates are not modified in this step: formatter=postprocess.DetectionBoxSL2BoxLS()

    2. DetectionResizePad - removes the padding that was done. The input image is padded hence the detection boxes that comes out also has a padding. This padding has to be removed.

  • you can get more insights if you put a breakpoint here and step into postprocess:

    github.com/.../accuracy_pipeline.py

  • Thanks Manu. 

    Here are the steps I am going to do next-

    1. Run edgeai-benchmark inside am69a board and check accuracy and FPS

    2. Try checking DetectionResizePad and get details.

    I'll update you once I try these.

    Thanks
    AKhilesh

  • Hi Manu,

    I tried to install edgeai-benchmark tool on am69a and followed this link- github.com/.../usage_evm.md

    While doing pip3 install -r requirements_evm.txt, I got the following error-

    Building wheels for collected packages: h5py
      Building wheel for h5py (pyproject.toml) ... error
      error: subprocess-exited-with-error
    
      × Building wheel for h5py (pyproject.toml) did not run successfully.
      │ exit code: 1
      ╰─> [75 lines of output]
          running bdist_wheel
          running build
          running build_py
          creating build
          creating build/lib.linux-aarch64-cpython-310
          creating build/lib.linux-aarch64-cpython-310/h5py
          copying h5py/version.py -> build/lib.linux-aarch64-cpython-310/h5py
          copying h5py/ipy_completer.py -> build/lib.linux-aarch64-cpython-310/h5py
          copying h5py/h5py_warnings.py -> build/lib.linux-aarch64-cpython-310/h5py
          copying h5py/__init__.py -> build/lib.linux-aarch64-cpython-310/h5py
          creating build/lib.linux-aarch64-cpython-310/h5py/_hl
          copying h5py/_hl/vds.py -> build/lib.linux-aarch64-cpython-310/h5py/_hl
          copying h5py/_hl/selections2.py -> build/lib.linux-aarch64-cpython-310/h5py/_hl
          copying h5py/_hl/selections.py -> build/lib.linux-aarch64-cpython-310/h5py/_hl
          copying h5py/_hl/group.py -> build/lib.linux-aarch64-cpython-310/h5py/_hl
          copying h5py/_hl/filters.py -> build/lib.linux-aarch64-cpython-310/h5py/_hl
          copying h5py/_hl/files.py -> build/lib.linux-aarch64-cpython-310/h5py/_hl
          copying h5py/_hl/dims.py -> build/lib.linux-aarch64-cpython-310/h5py/_hl
          copying h5py/_hl/datatype.py -> build/lib.linux-aarch64-cpython-310/h5py/_hl
          copying h5py/_hl/dataset.py -> build/lib.linux-aarch64-cpython-310/h5py/_hl
          copying h5py/_hl/compat.py -> build/lib.linux-aarch64-cpython-310/h5py/_hl
          copying h5py/_hl/base.py -> build/lib.linux-aarch64-cpython-310/h5py/_hl
          copying h5py/_hl/attrs.py -> build/lib.linux-aarch64-cpython-310/h5py/_hl
          copying h5py/_hl/__init__.py -> build/lib.linux-aarch64-cpython-310/h5py/_hl
          creating build/lib.linux-aarch64-cpython-310/h5py/tests
          copying h5py/tests/test_slicing.py -> build/lib.linux-aarch64-cpython-310/h5py/tests
          copying h5py/tests/test_selections.py -> build/lib.linux-aarch64-cpython-310/h5py/tests
          copying h5py/tests/test_ros3.py -> build/lib.linux-aarch64-cpython-310/h5py/tests
          copying h5py/tests/test_objects.py -> build/lib.linux-aarch64-cpython-310/h5py/tests
          copying h5py/tests/test_h5z.py -> build/lib.linux-aarch64-cpython-310/h5py/tests
          copying h5py/tests/test_h5t.py -> build/lib.linux-aarch64-cpython-310/h5py/tests
          copying h5py/tests/test_h5pl.py -> build/lib.linux-aarch64-cpython-310/h5py/tests
          copying h5py/tests/test_h5p.py -> build/lib.linux-aarch64-cpython-310/h5py/tests
          copying h5py/tests/test_h5o.py -> build/lib.linux-aarch64-cpython-310/h5py/tests
          copying h5py/tests/test_h5f.py -> build/lib.linux-aarch64-cpython-310/h5py/tests
          copying h5py/tests/test_h5d_direct_chunk.py -> build/lib.linux-aarch64-cpython-310/h5py/tests
          copying h5py/tests/test_h5.py -> build/lib.linux-aarch64-cpython-310/h5py/tests
          copying h5py/tests/test_group.py -> build/lib.linux-aarch64-cpython-310/h5py/tests
          copying h5py/tests/test_filters.py -> build/lib.linux-aarch64-cpython-310/h5py/tests
          copying h5py/tests/test_file_image.py -> build/lib.linux-aarch64-cpython-310/h5py/tests
          copying h5py/tests/test_file_alignment.py -> build/lib.linux-aarch64-cpython-310/h5py/tests
          copying h5py/tests/test_file2.py -> build/lib.linux-aarch64-cpython-310/h5py/tests
          copying h5py/tests/test_file.py -> build/lib.linux-aarch64-cpython-310/h5py/tests
          copying h5py/tests/test_errors.py -> build/lib.linux-aarch64-cpython-310/h5py/tests
          copying h5py/tests/test_dtype.py -> build/lib.linux-aarch64-cpython-310/h5py/tests
          copying h5py/tests/test_dims_dimensionproxy.py -> build/lib.linux-aarch64-cpython-310/h5py/tests
          copying h5py/tests/test_dimension_scales.py -> build/lib.linux-aarch64-cpython-310/h5py/tests
          copying h5py/tests/test_datatype.py -> build/lib.linux-aarch64-cpython-310/h5py/tests
          copying h5py/tests/test_dataset_swmr.py -> build/lib.linux-aarch64-cpython-310/h5py/tests
          copying h5py/tests/test_dataset_getitem.py -> build/lib.linux-aarch64-cpython-310/h5py/tests
          copying h5py/tests/test_dataset.py -> build/lib.linux-aarch64-cpython-310/h5py/tests
          copying h5py/tests/test_completions.py -> build/lib.linux-aarch64-cpython-310/h5py/tests
          copying h5py/tests/test_big_endian_file.py -> build/lib.linux-aarch64-cpython-310/h5py/tests
          copying h5py/tests/test_base.py -> build/lib.linux-aarch64-cpython-310/h5py/tests
          copying h5py/tests/test_attrs_data.py -> build/lib.linux-aarch64-cpython-310/h5py/tests
          copying h5py/tests/test_attrs.py -> build/lib.linux-aarch64-cpython-310/h5py/tests
          copying h5py/tests/test_attribute_create.py -> build/lib.linux-aarch64-cpython-310/h5py/tests
          copying h5py/tests/conftest.py -> build/lib.linux-aarch64-cpython-310/h5py/tests
          copying h5py/tests/common.py -> build/lib.linux-aarch64-cpython-310/h5py/tests
          copying h5py/tests/__init__.py -> build/lib.linux-aarch64-cpython-310/h5py/tests
          creating build/lib.linux-aarch64-cpython-310/h5py/tests/data_files
          copying h5py/tests/data_files/__init__.py -> build/lib.linux-aarch64-cpython-310/h5py/tests/data_files
          creating build/lib.linux-aarch64-cpython-310/h5py/tests/test_vds
          copying h5py/tests/test_vds/test_virtual_source.py -> build/lib.linux-aarch64-cpython-310/h5py/tests/test_vds
          copying h5py/tests/test_vds/test_lowlevel_vds.py -> build/lib.linux-aarch64-cpython-310/h5py/tests/test_vds
          copying h5py/tests/test_vds/test_highlevel_vds.py -> build/lib.linux-aarch64-cpython-310/h5py/tests/test_vds
          copying h5py/tests/test_vds/__init__.py -> build/lib.linux-aarch64-cpython-310/h5py/tests/test_vds
          copying h5py/tests/data_files/vlen_string_s390x.h5 -> build/lib.linux-aarch64-cpython-310/h5py/tests/data_files
          copying h5py/tests/data_files/vlen_string_dset_utc.h5 -> build/lib.linux-aarch64-cpython-310/h5py/tests/data_files
          copying h5py/tests/data_files/vlen_string_dset.h5 -> build/lib.linux-aarch64-cpython-310/h5py/tests/data_files
          running build_ext
          Loading library to get build settings and version: libhdf5.so
          error: Unable to load dependency HDF5, make sure HDF5 is installed properly
          Library dirs checked: []
          error: libhdf5.so: cannot open shared object file: No such file or directory
          [end of output]
    
      note: This error originates from a subprocess, and is likely not a problem with pip.
      ERROR: Failed building wheel for h5py
    Failed to build h5py
    ERROR: Could not build wheels for h5py, which is required to install pyproject.toml-based projects
    

    This is specific while installing h5py. Please help resolving this issue.

    Thanks

    AKhilesh

  • You can comment out that line in requirements_evm.txt and continue installation. The functionality in one particular dataset may not work, but that is fine.

    Also comment out or replace this line:

    https://github.com/TexasInstruments/edgeai-tensorlab/blob/main/edgeai-benchmark/edgeai_benchmark/datasets/nyudepthv2.py#L30

    try:

      import h5py

    expect:

      print('h5py import failed. functionality in this file may not work')

  • Hi,

    I did that and it installed with some numpy error. But I resolved it. It is installing numpy 2.0.1 which is incompatible. So I installed numpy 1.23 .

    But one more issue-

    I am seeing inside requirements_evm.txt-

    -r requirements.txt
    #opencv-python-headless<4.3
    #onnxsim
    #git+github.com/.../edgeai-tidl-tools.git
    #numpy==1.23.0
    #tflite
    #flatbuffers==1.12.0
    #requests
    #pytest
    #graphviz
    #protobuf==3.20.2
    #onnx==1.13.0
    ~

    This is all commented. Do I need to uncomment it? Because with this, I am seeing error 

    ModuleNotFoundError: No module named 'onnx'

    I am running everything on am69a.

  • That particular version of onnx seems to be not available on EVM. You can install the latest onnx on evm to get around it. onnx is anyway used during model compilation only and we should see if that module import can be avoided on evm. 

  • . DetectionResizePad - removes the padding that was done. The input image is padded hence the detection boxes that comes out also has a padding. This padding has to be removed.

    Hi Manu,

    I had tried this and able to get 30% only. I integrated padding and postprocessing by looking at edgeai-benchmark tool.

    Here is the code-

    ################ code for postprocessing
    
    det = populate_detections(image_id,raw_bbox,padding, original_img_shape)


    def populate_detections(image_id, out, padding, original_img_shape):
        bbox = [float(out[0]), float(out[1]), float(out[2]), float(out[3])]
        bbox = DetectionResizePad(bbox, padding, original_img_shape)
        det = {}
        det["image_id"] = image_id
        x1 = bbox[0]
        y1 = bbox[1]
        x2 = bbox[2]
        y2 = bbox[3]
        w = x2-x1
        h = y2-y1
        #print("x1 type : ", type(x1))
        score = float(out[4])
        #print("out[5]: ", out[5])
        category = classList[int(out[5])+1]
        #print("category : ", category)
        for i in coco_class:
            if category in i["name"]:
                id = i["id"]
                break
        #print(x1, y1, w, h, score, id)
        det["bbox"] = [x1, y1, w, h]
        print("final bbox: ", bbox)
        det["category_id"] =  id
        #det["category"] =  category
        det["score"] = score
    
        return det
    
    def DetectionResizePad(bbox, padding, original_img_shape, resize_shape=(640, 640)):
        
        #bbox = bbox.clip(-1e6, 1e6)
        data_shape = original_img_shape
        print("img : ", data_shape) # (230, 352, 3)
        print("bbox 1st : ", bbox)
        data_height, data_width, _ = data_shape
        print("img h and w : ",data_height, data_width )
    
        #resize_shape = info_dict['resize_shape']
        resize_height, resize_width = resize_shape
        print("1 resize_height, resize_width : ", resize_height, resize_width)
    
        # account for padding
        border = padding
        left, top, right, bottom = border
        print("border : ", border)
        bbox[0] -= left
        bbox[1] -= top
        bbox[2] -= left
        bbox[3] -= top
        print("bbox after removing padding : ", bbox)
        resize_height, resize_width = (resize_height - top - bottom), (resize_width - left - right)
        print("2 resize_height, resize_width : ", resize_height, resize_width)
    
        # scale the detections from the input shape to data shape
        sh = data_height / (resize_height)
        sw = data_width / (resize_width)
        print("sh, sw : ", sh, sw)
        bbox[0] = (bbox[0] * sw)#.clip(0, data_width)
        bbox[1] = (bbox[1] * sh)#.clip(0, data_height)
        bbox[2] = (bbox[2] * sw)#.clip(0, data_width)
        bbox[3] = (bbox[3] * sh)#.clip(0, data_height)
    
        print("bbox after scaling : ", bbox)
    
        print("DetectionResizePad ends!!!!!!!!!!!")
        return bbox


    ############# Code for preprocessing
    
    
    def preprocesss(img):
        size = 640
        interpolation= 1
        pad_color = [114, 114, 114]
        w, h = img.shape[1], img.shape[0] # # 352, 230
        #print("w, h : ", w, h)
        if (w >= h and w == size) or (h >= w and h == size):
            ow = w
            oh = h
        elif w > h:
            ow = size
            oh = int(size * h / w)
            print("resize shape : ", ow, oh)
            img = cv2.resize(img, (ow, oh), interpolation=interpolation)
            print("img after resize shape : ", img.shape)   
        else:
            oh = size # 640
            ow = int(size * w / h) # 640*352/230 = 418
            print("resize shape : ", ow, oh)
            img = cv2.resize(img, (ow, oh), interpolation=interpolation) # (ow, oh) (640, 418)
            print("img after resize shape : ", img.shape)
        #
        # pad if necessary
        wpad = (size - ow) # 640-418 = 222
        hpad = (size - oh) # 640-640 = 0
    
        top = hpad // 2 # 0
        bottom = hpad - top # 0
        left = wpad // 2 # 222//2 = 111
        right = wpad - left # 111
    
        img = cv2.copyMakeBorder(img, top, bottom, left, right, cv2.BORDER_CONSTANT, value=pad_color)
        border=(left,top,right,bottom)
        print("border : ", left,top,right,bottom)
        print("image : ", img)
        return img, border

    Am I missing something? My accuracy has increased from 20% to 30% on mscoco dataset and threshold 0.001 .But still it is not coming 37%. 

    Can you look and check if I missed something from edgeai-benchmark tool during preprocessing or postprocessing?

    Thanks

    AKhilesh

  • Are you using mixed precision by specifying 'advanced_options:output_feature_16bit_names_list' as in this example: https://github.com/TexasInstruments/edgeai-benchmark/blob/main/configs/detection_v2.py#L102

    It is hard to say what is the difference by casual looking. You can run edgeai-benchmark and your script in PC and step through the code and compare the outputs. The outputs will exactly match if you are doing the same thing. You don't need to do this comparison on EVM. You can do this on PC and once it is matching, you can do it on EVM.

  • I am not using mixed precision. Let me compare output again.

    Thanks

  • There was a change in output directly from the model when I am using edgeai-tidl tools and edgeai-benchmark tool. Let me see those things again.

  • calibration_iterations calibration_frames etc are also import parameters when it comes to quantized accuracy. 

  • But those will affect while compiling the model right? I am using the same compiled model on both places. Still accuracy difference.

    The raw output is in itself is not matching for same image. I am using 000000037777.jpg image from coco dataset and found the output without postprocessing is also not same.

    Ex-

    Using edgeai-tidl, raw output is -           [248.8, 343.80, 355.5, 463.43]

    Using edgeai-benchmark, raw output-  [227.7,  276.88,  346.2, 460.28]

    Above both on am69a

    Categories are same but probability scores varies little a bit.

    I am suspecting something on preprocessing side on edgea-tidl tools.

    These are my settings-

    tensor_bits = 8
    debug_level = 1
    max_num_subgraphs = 16
    accuracy_level = 1
    calibration_frames = 2
    calibration_iterations = 5
    output_feature_16bit_names_list = ""#"conv1_2, fire9/concat_1"
    params_16bit_names_list = "" #"fire3/squeeze1x1_2"
    mixed_precision_factor = -1
    quantization_scale_type = 0
    high_resolution_optimization = 0
    pre_batchnorm_fold = 1
    inference_mode = 0
    num_cores = 1
    ti_internal_nc_flag = 1601
    
    data_convert = 3
    SOC = os.environ["SOC"]
    if (quantization_scale_type == 3):
        data_convert = 0
    
    #set to default accuracy_level 1
    activation_clipping = 1
    weight_clipping = 1
    bias_calibration = 1
    channel_wise_quantization = 0
    
    tidl_tools_path = os.environ["TIDL_TOOLS_PATH"]
    
    optional_options = {
    # "priority":0,
    #delay in ms
    # "max_pre_empt_delay":10
    "platform":"J7",
    "version":"7.2",
    "tensor_bits":tensor_bits,
    "debug_level":debug_level,
    "max_num_subgraphs":max_num_subgraphs,
    "deny_list":"", #"MaxPool"
    "deny_list:layer_type":"", 
    "deny_list:layer_name":"",
    "model_type":"",#OD
    "accuracy_level":accuracy_level,
    "advanced_options:calibration_frames": calibration_frames,
    "advanced_options:calibration_iterations": calibration_iterations,
    "advanced_options:output_feature_16bit_names_list" : output_feature_16bit_names_list,
    "advanced_options:params_16bit_names_list" : params_16bit_names_list,
    "advanced_options:mixed_precision_factor" :  mixed_precision_factor,
    "advanced_options:quantization_scale_type": quantization_scale_type,
    #"object_detection:meta_layers_names_list" : meta_layers_names_list,  -- read from models_configs dictionary below
    #"object_detection:meta_arch_type" : meta_arch_type,                  -- read from models_configs dictionary below
    "advanced_options:high_resolution_optimization": high_resolution_optimization,
    "advanced_options:pre_batchnorm_fold" : pre_batchnorm_fold,
    "ti_internal_nc_flag" : ti_internal_nc_flag,
    # below options will be read only if accuracy_level = 9, else will be discarded.... for accuracy_level = 0/1, these are preset internally
    "advanced_options:activation_clipping" : activation_clipping,
    "advanced_options:weight_clipping" : weight_clipping,
    "advanced_options:bias_calibration" : bias_calibration,
    "advanced_options:add_data_convert_ops" : data_convert,
    "advanced_options:channel_wise_quantization" : channel_wise_quantization,
    # Advanced options for SOC 'am69a' 
    "advanced_options:inference_mode" : inference_mode,
    "advanced_options:num_cores" : num_cores
    }

    Do you find anything odd here? 

    Thanks

  • >>>I am suspecting something on preprocessing side on edgea-tidl tools.

    Yes - most probably. Make sure that the input going to onnxruntime/TIDL is the exactly the same.

  • Hi Manu,

    I just checked and found in edgeai-benchmark, I was using this-

    'advanced_options:output_feature_16bit_names_list':'370, 680, 990, 1300'
    but in edgeai-tidl, I did not specify any such 16bit names. So I went and specified this-
    params_16bit_names_list = '370, 680, 990, 1300 in common_utils.py
    Is there any flag do we need to set inorder to utilize this 16bit layers? Because I see no difference in output again after this.
    Thanks
  • 'advanced_options:output_feature_16bit_names_list' is the option to specify which layers should go in 16 bit. It is to be specified during model compilation. If you are using an already compiled artifact, it has no effect.

  • Hi Manu, I was actually able to get the same accuracy. 

    I saw I had set top_k: 200 but in the actual model prototxt file, it was set to 30000. When I set it to 30000, it gave me the same accuracy. Not sure if this is the right way. 

    Regards

    Akhilesh

  • Hi Akhilesh, 

    top_k and confidence threshold affect accuracy. They need to be appropriately set for accuracy measurement. 

  • Yeah. For yolov models, now the accuracies are good. I am checking yolox too.