This thread has been locked.

If you have a related question, please click the "Ask a related question" button in the top right corner. The newly created question will be automatically linked to this question.

CCS/EVMK2H: Fail to burn U-boot to EVMK2H with CCS

Part Number: EVMK2H

Tool/software: Code Composer Studio

HI,

I  try to burn the U-boot to EVMK2H with CCS on win10,but when I verify on UART, U-Boot  show up nothing on the UART.

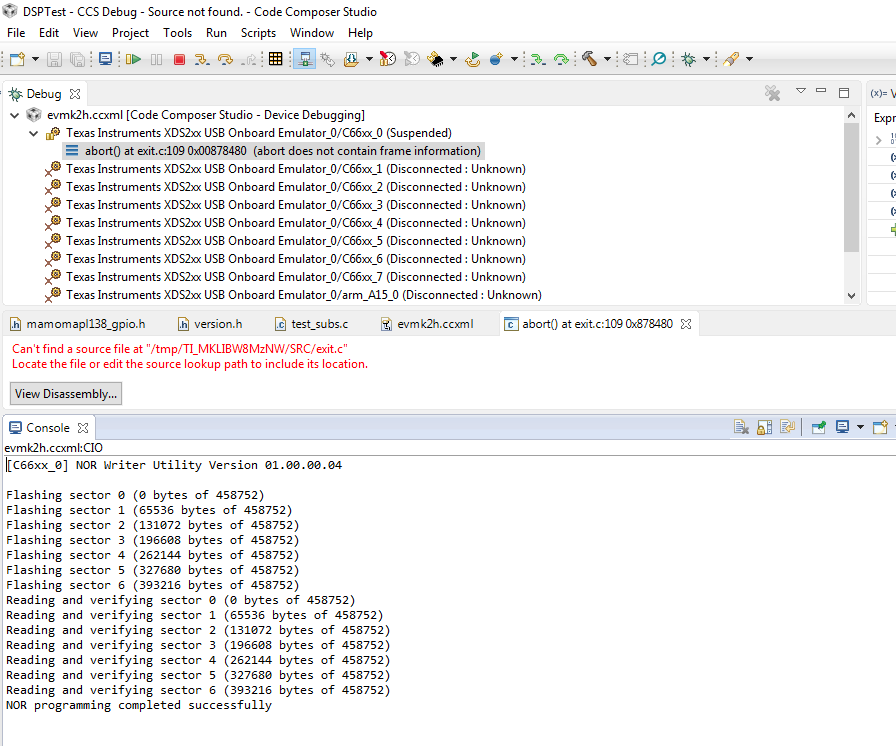
Here is my CCS version 7.3

U-boot file supply by processor sdk  06.01.00.08:

ti-processor-sdk-k2hk-evm-06.01.00.08/board-support/prebuilt-images/u-boot-spi-k2hk-evm.gph

I use execute file which supply by processor sdk  06.01.00.08:

ti-processor-sdk-k2hk-evm-06.01.00.08/bin/program_evm/binaries/evmk2h/norwriter_evmk2h.out

CCXML file by processor sdk  06.01.00.08:

ti-processor-sdk-k2hk-evm-06.01.00.08/bin/program_evm/configs/evmk2h/evmk2h.ccxml

I was successful to program the nor flash with CCS.

But when switch to SPI  boot mode ,restart  EVMK2H power  , UART has nothing show up .This is the first time I use CCS to burn U-boot. Do I miss anything?

Or anybody has any advise?

Or anyone who know how to restore ?Seem the EVMK2H  only can run in no-boot mode. 

  • Here is when I connect to core 0 ,GEL will output  below:

    IcePick_D_0: Warning: A firmware update is recommended for the XDS200 debug probe. Click the "Update" button to update the firmware. Click the "Continue" button to continue without updating. (Emulation package 7.0.48.0)
    C66xx_0: GEL Output:
    Connecting Target...
    C66xx_0: GEL Output: TCI6638K2K GEL file Ver is 1.60000002
    C66xx_0: GEL Output: Detected PLL bypass enabled: SECCTL[BYPASS] = 0x00800000
    C66xx_0: GEL Output: (2a) MAINPLLCTL1 = 0x00000040
    C66xx_0: GEL Output: (2b) PLLCTL = 0x00000048
    C66xx_0: GEL Output: (2c) PLLCTL = 0x00000048
    C66xx_0: GEL Output: (2d) Delay...
    C66xx_0: GEL Output: (2e) SECCTL = 0x00810000
    C66xx_0: GEL Output: (2f) PLLCTL = 0x0000004A
    C66xx_0: GEL Output: (2g) Delay...
    C66xx_0: GEL Output: (2h) PLLCTL = 0x00000048
    C66xx_0: GEL Output: (4)PLLM[PLLM] = 0x0000000F
    C66xx_0: GEL Output: MAINPLLCTL0 = 0x05000000
    C66xx_0: GEL Output: (5) MAINPLLCTL0 = 0x07000000
    C66xx_0: GEL Output: (5) MAINPLLCTL1 = 0x00000040
    C66xx_0: GEL Output: (6) MAINPLLCTL0 = 0x07000000
    C66xx_0: GEL Output: (7) SECCTL = 0x00890000
    C66xx_0: GEL Output: (8a) Delay...
    C66xx_0: GEL Output: PLL1_DIV3 = 0x00008002
    C66xx_0: GEL Output: PLL1_DIV4 = 0x00008004
    C66xx_0: GEL Output: PLL1_DIV7 = 0x00000000
    C66xx_0: GEL Output: (8d/e) Delay...
    C66xx_0: GEL Output: (10) Delay...
    C66xx_0: GEL Output: (12) Delay...
    C66xx_0: GEL Output: (13) SECCTL = 0x00090000
    C66xx_0: GEL Output: (Delay...
    C66xx_0: GEL Output: (Delay...
    C66xx_0: GEL Output: (14) PLLCTL = 0x00000041
    C66xx_0: GEL Output: PLL has been configured (CLKIN * PLLM / PLLD / PLLOD = PLLOUT):
    C66xx_0: GEL Output: PLL has been configured (122.879997 MHz * 16 / 1 / 2 = 983.039978 MHz)
    C66xx_0: GEL Output: Power on all PSC modules and DSP domains...
    C66xx_0: GEL Output: Set_PSC_State... Timeout Error #03 pd=2, md=9!
    C66xx_0: GEL Output: Set_PSC_State... Timeout Error #03 pd=17, md=25!
    C66xx_0: GEL Output: Set_PSC_State... Timeout Error #03 pd=17, md=26!
    C66xx_0: GEL Output: Set_PSC_State... Timeout Error #03 pd=18, md=27!
    C66xx_0: GEL Output: Set_PSC_State... Timeout Error #03 pd=19, md=28!
    C66xx_0: GEL Output: Set_PSC_State... Timeout Error #03 pd=19, md=29!
    C66xx_0: GEL Output: Set_PSC_State... Timeout Error #03 pd=20, md=30!
    C66xx_0: GEL Output: Set_PSC_State... Timeout Error #03 pd=20, md=31!
    C66xx_0: GEL Output: Set_PSC_State... Timeout Error #03 pd=20, md=32!
    C66xx_0: GEL Output: Set_PSC_State... Timeout Error #03 pd=20, md=33!
    C66xx_0: GEL Output: Set_PSC_State... Timeout Error #03 pd=21, md=34!
    C66xx_0: GEL Output: Set_PSC_State... Timeout Error #03 pd=22, md=35!
    C66xx_0: GEL Output: Set_PSC_State... Timeout Error #03 pd=22, md=36!
    C66xx_0: GEL Output: Set_PSC_State... Timeout Error #03 pd=23, md=37!
    C66xx_0: GEL Output: Set_PSC_State... Timeout Error #03 pd=23, md=38!
    C66xx_0: GEL Output: Set_PSC_State... Timeout Error #03 pd=24, md=39!
    C66xx_0: GEL Output: Set_PSC_State... Timeout Error #03 pd=24, md=40!
    C66xx_0: GEL Output: Set_PSC_State... Timeout Error #03 pd=24, md=41!
    C66xx_0: GEL Output: Set_PSC_State... Timeout Error #03 pd=24, md=42!
    C66xx_0: GEL Output: Set_PSC_State... Timeout Error #03 pd=25, md=43!
    C66xx_0: GEL Output: Set_PSC_State... Timeout Error #03 pd=25, md=44!
    C66xx_0: GEL Output: Set_PSC_State... Timeout Error #03 pd=25, md=45!
    C66xx_0: GEL Output: Set_PSC_State... Timeout Error #03 pd=25, md=46!
    C66xx_0: GEL Output: Set_PSC_State... Timeout Error #03 pd=26, md=47!
    C66xx_0: GEL Output: Set_PSC_State... Timeout Error #03 pd=27, md=48!
    C66xx_0: GEL Output: Power on all PSC modules and DSP domains... Done.
    C66xx_0: GEL Output: WARNING: SYSCLK is the input to the PA PLL.
    C66xx_0: GEL Output: Completed PA PLL Setup
    C66xx_0: GEL Output: PAPLLCTL0 - before: 0x0x098804C0  after: 0x0x09080500
    C66xx_0: GEL Output: PAPLLCTL1 - before: 0x0x00000040  after: 0x0x00002040
    C66xx_0: GEL Output: DDR begin
    C66xx_0: GEL Output: XMC setup complete.
    C66xx_0: GEL Output: DDR3 PLL (PLL2) Setup ...
    C66xx_0: GEL Output: DDR3 PLL Setup complete, DDR3A clock now running at 666 MHz.
    C66xx_0: GEL Output: DDR3A initialization complete
    C66xx_0: GEL Output: DDR3 PLL Setup ...
    C66xx_0: GEL Output: DDR3 PLL Setup complete, DDR3B clock now running at 800MHz.
    C66xx_0: GEL Output: DDR3B initialization complete
    C66xx_0: GEL Output: DDR done

  • Hi, Jacky,

    Please refer to u-boot/board/ti/ks2_evm/README on the section of "Load and Run U-Boot on keystone EVMs using CCS".

    Rex

  • Hi, Rex

    Thanks for your reference. I follow this section to load and run U-Boot, It did run U-boot. UART  did print the U-Boot message.

    U-Boot 2019.01-gc1c5535ff1-dirty (Mar 03 2020 - 17:53:24 +0800)
    CPU: 66AK2Hx SR2.0
    Model: Texas Instruments Keystone 2 Kepler/Hawking EVM
    DRAM:  DDR3A Speed will be configured for 1333 Operation.
    Detected SO-DIMM [SQR-SD3T-2G1333SED]
    DDR3 speed 1333
    DRAM: 2 GiB (includes reported below)
    Clear entire DDR3 memory to enable ECC
    2 GiB
    NAND:  512 MiB
    Loading Environment from NAND... ## Error: flags type check failure for "eth1addr" <= "192.168.1.20" (type: m)
    himport_r: can't insert "eth1addr=192.168.1.20" into hash table
    OK
    Net:  
    Warning: netcp@2000000 using MAC address from ROM
    eth0: netcp@2000000
    Warning: netcp@slave-1 (eth1) using random MAC address - e6:23:d1:9f:e4:ad
    , eth1: netcp@slave-1
    Warning: netcp@slave-2 (eth2) using random MAC address - ba:4a:19:67:2b:f6
    , eth2: netcp@slave-2
    Warning: netcp@slave-3 (eth3) using random MAC address - 9e:f5:2e:58:85:50
    , eth3: netcp@slave-3
    Hit any key to stop autoboot:  0
    =>
    And I follow the section "SPI NOR Flash programming instructions" to program the u-boot to nor flash.
    It seems not work successfully. Here is what UART print
     
    Warning: netcp@2000000 using MAC address from ROM
    eth0: netcp@2000000
    Warning: netcp@slave-1 (eth1) using random MAC address - e6:23:d1:9f:e4:ad
    , eth1: netcp@slave-1
    Warning: netcp@slave-2 (eth2) using random MAC address - ba:4a:19:67:2b:f6
    , eth2: netcp@slave-2
    Warning: netcp@slave-3 (eth3) using random MAC address - 9e:f5:2e:58:85:50
    , eth3: netcp@slave-3
    Hit any key to stop autoboot:  0
    => env default -f -a
    ## Resetting to default environment
    => setenv addr_uboot 0x87000000
    => setenv filesize <size in hex of u-boot-spi.gph round to hex 0x10000>
    => run burn_uboot_spi
    SF: Detected n25q128a11 with page size 256 Bytes, erase size 4 KiB, total 16 MiB
    SF: 1048576 bytes @ 0x0 Erased: OK
    sf - SPI flash sub-system
    Usage:
    sf probe [[bus:]cs] [hz] [mode] - init flash device on given SPI bus
                                      and chip select
    sf read addr offset|partition len       - read `len' bytes starting at
                                              `offset' or from start of mtd
                                              `partition'to memory at `addr'
    sf write addr offset|partition len      - write `len' bytes from memory
                                              at `addr' to flash at `offset'
                                              or to start of mtd `partition'
    sf erase offset|partition [+]len        - erase `len' bytes from `offset'
                                              or from start of mtd `partition'
                                             `+len' round up `len' to block size
    sf update addr offset|partition len     - erase and write `len' bytes from memory
                                              at `addr' to flash at `offset'
                                              or to start of mtd `partition'
    sf protect lock/unlock sector len       - protect/unprotect 'len' bytes starting
                                              at address 'sector'
    =>
    When I restart the power of EVMK2H .Set the SW1 dip switch to "SPI Little Endian Boot mode" .But still have nothing  show up on UART.
    I don't know what  "Once U-Boot prompt is available" means ?What message will print on UART ?
    Do  you have more detail document about how to burn u-boot to nor flash?
    Best Regards
    Jacky
  • Hi, Jacky,

    When you followed the steps in "SPI NOR Flash Programming", did you do step 3 to load .gph to address 0x87000000? If you did, the other thing you did differently is you issued "env default -f -a" which doesn't exist in the instruction. I suspect either you didn't do step 3 or "dev default' cleared the download area.

    If you have TFTP server setup and .gph file in tftp download directory, you can use CCS to bring up to U-boot prompt, then in the UART console type the following commands:

    > env default –f –a

    > setenv serverip <tftp_server_ip>

    > setenv tftp_root <tftp_directory>

    > run get_uboot_net

    > run burn_uboot_spi

    The "run get_uboot_net" is equivalent to step 3 in the instruction. The above commands are documented in U-boot User's Guide (Note for KS2 platforms),

    http://software-dl.ti.com/processor-sdk-linux/esd/docs/latest/linux/Foundational_Components_U-Boot.html#spi

    The "Once u-boot prompt is available" is when you hit any key to stop u-boot booting and get a u-boot prompt.

    Rex

  • Hi Rex

    1,Yes, I  do step 3 to load .gph to address 0x87000000 .

    2,Why has "env default -f -a" instruction?

    Because if I don't enter this instruction, it will come to error message. And I don't know why. 

    => run burn_uboot_spi
    ## Error: "burn_uboot_spi" not defined

    3,I confuse this "setenv filesize <size in hex of u-boot-spi.gph rounded to hex 0x10000>" on the document

       I guess this is not instruction,and it tell should enter size of u-boot-spi.gph,such as "setenv 0x80000". Am I right?

    4.Thanks for your document for tftp u-boot. I will try it when I solve this issue

    Best Regards

    Jacky

  • Hi, Jacky,

    The "env default -f -a" is to reset the u-boot env variables. It didn't find burn_uboot_spi is because the command is new in Processor SDK. In the old MCSDk, the command is burn_uboot (no _spi). It apparently that the EVM was running old MCSDK u-boot before. I didn't mention in my previous post that I don't thihk env default command would wipe out the memory at address 0x87000000, and don't thnk that is the cause of your failure. In your case, you should issue "env default" to reset the u-boot env to those of new ProcSDK settings. Once programming .gph is successful, issue "env default" aftter u-boot comes back after reboot, and saveenv afterward.

    "setenv filesize <size in hex of u-boot-spi.gph rounded to hex 0x10000>"  means to set the filesize of .gph to the next 0x10000 (64KB) page. That is, if size is 0xa3604, then "setenv filesize 0xb0000" . Setting filesize is needed if you program the NOR using step 3. If you get the file using "run get_uboot_net", then you don't need to do step 3 and the filesize will be set automatically by tftp download.

    Rex

  • Hi,Rex

    I try to program .gph , but u-boot is not working successfully.

    My  filesize  of .gph is 0x a360c ,so I setenv filesize 0xb0000. And the UART show written OK

    But After  Power off the EVM, Set the SW1 dip switch to SPI mode,Power up the EVM .UART still don't have anything show up !!!!

    May I ask how to confirm u-boot really burn to NOR flash?

    Best Regards

    Jacky

  • Hi, Jacky,

    I just checked the u-boot script. For 2019.01 u-boot, the u-boot relevant env variables are set as following:

    => pri burn_uboot_spi
    burn_uboot_spi=sf probe; sf erase 0 0x100000; sf write ${loadaddr} 0 ${filesize}

    loadaddr=0x82000000

    In ccs, the .gph is loaded to 0x87000000, but when programming, it uses 0x82000000 as in ${loadaddr}. You can either load the .gph file to 0x82000000 memory address in ccs, or "setenv loadadddr 0x87000000", and repeat your process. It should work for you.

    Rex

  • Hi, Rex ,

    It did work ,When I switch to SPI mode . UART show up  u-boot message.

    Thanks very much 

    Best Regards

    Jacky