


Other Parts Discussed in Thread: SYSCONFIG
CC23XX Debug Logging Feature
We have recently released a new debug logging feature on the SimpleLink Low Power F3 SDK for the CC23xx devices. The logging feature allows users to output a debug message into a log within your IDE, similar to UART messages in a serial terminal. This allows for easier debugging capabilities without needing to use a UART peripheral. This post will provide some examples to help with the implementation of this feature.
Log Driver Example
The Log example is included in the SimpleLink Low Power F3 SDK for the CC23xx. The log example showcases how the log driver works and is a helpful reference for adding the logging functionality to your custom project. This driver implements the functionality necessary to output custom debug messages that can be viewed through Runtime Object Viewer (ROV). The example log project includes a counter that outputs the updated number every five seconds, and two initial "Hello World!" outputs within the main loop to confirm the log is working.
Adding the Log Feature to Other Programs
The log feature can be added to any other project in the SDK. To do this, add the log module via SysConfig. These SysConfig log modules can be customized for different purposes, in this example, the default name and settings from the log driver example are used. Within the log SysConfig module, you can customize where the log is sent to, and filter the debug messages that are sent by the log driver.
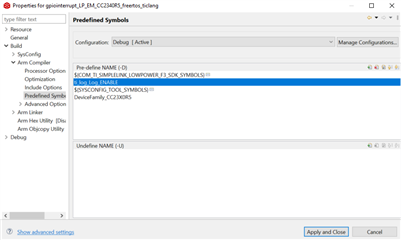
To implement the log feature in any program, start by adding the predefined symbols (ti_log_Log_ENABLE) to enable the logging functionality. The predefined symbols section can be found by right clicking the project, going to Properties->Build->Arm compiler->Predefined Symbols. The image below shows what is to be added.
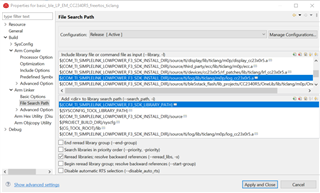
Additionally, an include file needs to be added within the File Search Path.
Default path: ${COM_TI_SIMPLELINK_LOWPOWER_F3_SDK_INSTALL_DIR}/source/ti/log/lib/ticlang/m0p/log_cc23x0r5.a
The File Search Path is accessible by right clicking on the project, going to Properties -> Build -> Arm Linker -> File Search Path. The second image below this will show what needs to be added into the Include library file or command file as input (--library, -l).
Next, the modules within SysConfig need to be setup. Depending on the application, the modules may be setup differently, but for this example, the default module from the log driver example can be used. The picture shows an example setup, including the global parameters section.
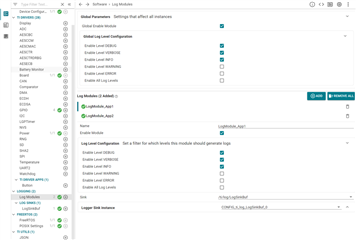
In this image, two modules were created.
The include statements for the log need to be added in the include section of the primary program and the main program for a BLE example. Along with this, the two lines of code below should be added to the main function of the program.

The following two lines of code is how you would send a debug message to LogModule_App1 and LogModule_App2, with a log level of DEBUG.

After this, the program needs to be ran in debug mode. To open the log menu, go to Tools -> Runtime Object View. Within ROV, open the LogSinkBuf. Within here two "Hello World!" outputs should be seen.
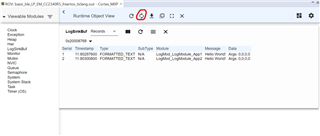
The constant refresh button is circled in the picture above. This feature is useful when receiving messages at a constant rate.
Additional print statements can be added to different functions and interrupts. This allows for easier debugging and output of information. For more information about this feature, please read the log API description found in the TI drivers API guide contained within the BLE5 Stack User's Guide.

