This thread has been locked.

If you have a related question, please click the "Ask a related question" button in the top right corner. The newly created question will be automatically linked to this question.

LMK04906BEVAL: LMK04906

Part Number: LMK04906BEVAL
Other Parts Discussed in Thread: LMK04906, USB2ANY

Tool/software:

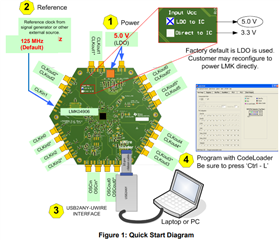
I've recently purchased a LMK04906 Evaluation Board, i can not seem to get the board to function at all. i have followed the instructions but default set up  but nothing happens ie D5 does not light up and i have no control 

I am using the USB2ANY (HPA665) control .. do i have to reconfigure the ports? when i identify the USB2ANY the light does blink


Regards

Simon

  • Hi Simon,

    Thank you for your question. I have a few things that I would like to ask so that I can help identify the issue. 

    1) What voltage level are you inputting to your EVM?

    2) Which pin are you using as your clock input?

    3) Are you using one of the default configurations provided by TICSPro? If not, can you share your configuration file?

    Thanks,

    Michael

  • Hi Micheal

    1. 5v Supply drawing about 290mA ( i have probed output of regulator this reads 3.3v)

    2. Using 125Mhz input  as this drawing below ( the Demo board came with a serial port connector)

    3. Yes i have tried using the Tics-pro and code loader default configurations

    The D4 light only comes on when i reboot the USB2ANY then once i do anything it goes OFF, D5 LED has never come on.

    Simon

  • Hi Simon, 

    Thank you for sharing that information with me. I will be able to take it into lab on Monday, and I will see if I can uncover anything to help you with your issue. 

    Thanks,

    Michael

  • Hi Simon,

    The reason why your LMK04906EVM is not responding is because the board is a relatively old part - so old that it does not use SPI. Instead, it uses the Microwire protocol. I do not believe Texas Instruments sells the Microwire-SPI adapter board anymore, but I can share with you a pinout configuration that you can implement through a breadboard that will allow you to successfully interface with the device. 

    Pin 1 of the USB2Any connects to Pin 1 of the EVM.

    Pin 2 of the USB2Any connects to Pin 6 of the EVM.

    Pin 3 of the USB2Any connects to Pin 5 of the EVM.

    Pin 4 of the USB2Any connects to Pin 2 of the EVM. 

    Pin 7 of the USB2Any connects to Pin 7 of the EVM. 

    Pin 8 of the USB2Any connects to Pin 4 of the EVM. 

    The remaining pins on each connector do not have to be connected. 

    Thanks,

    Michael

  • Perfect.. Thought it must be something like that

    I will make up a breadboard

    Thanks