This thread has been locked.

If you have a related question, please click the "Ask a related question" button in the top right corner. The newly created question will be automatically linked to this question.

DLPDLCR230NPEVM: DLPDLCR230NPEVM

Part Number: DLPDLCR230NPEVM
Other Parts Discussed in Thread: DLPC3436

Hello,

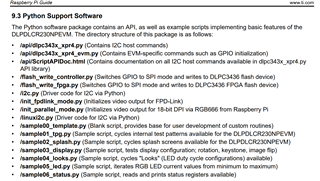
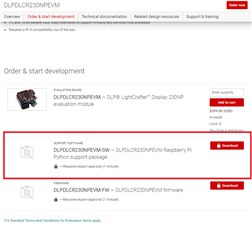
we have purchase DLPDLCR230NPEVM kit and would like to connect to Rpi4,

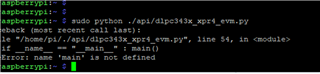
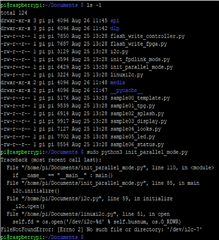
I copied config.txt file per Section 9 of the user guide but when SD card is installed on RPi 4 

it does not bootup.

Can you help

Regards,

Nayan

  • Hello Nayan,

    Welcome to the E2E forum and thank you for your interest in DLP® technology.

    You will have to give us more information to help you with this boot. Have you followed the example applications in Section 9.5 of the EVM User's Guide? Have you been able to SSH into your Pi?

    Regards,

    Austin

  • Austin,

    We following sample from EVM user's guide see below

    When we run ./api/dlpc343x_xpr4_evm.py we get error 'main' is not defned

    Can you help so we finish installation.

    Regards,

    Nayan 

  • Nayan,

    Can you say why you are calling executing dlpc343x_xpr4_evm.py? This module is not intended to be run by itself. Rather it is meant to be referenced by other scripts.

    Please try executing the instructions in Section 9.5.1 of the EVM User's Guide and let us know if this corrects the issue.

    Kind regards,

    Austin

  • Austin,

    Thanks for getting back see below error when follow instruction from 9.5.1

  • Nayan,

    The I2C bus is likely set to another address on your Raspberry Pi. We have had another client with this issue in this E2E thread:

    https://e2e.ti.com/support/dlp-products-group/dlp/f/dlp-products-forum/1033104/dlpdlcr230npevm-how-to-check-if-the-evm-is-connected-correctly-to-a-raspberry-pi-4b

    Please try performing an i2cdetect command and adjust your i2c.py file as is shown in the thread.

    Please post here if the issue is resolved.

    Regards,

    Austin

  • Austin,

    Thanks for getting back see below for i2cdetect

    Let us know if we need change i2c address

    Regards,

    Nayan

  • Austin,

    Per link you provided, we change i2c address as following:

    DEFAULT_I2C_BUS = 22

    but we are still see no detection - what else we missing?

    Regards,

    Nayan

  • Nayan,

    It appears that you have sent "i2cdetect -y -l" with the last digit being a lower-case "L." This should be a numerical value. Please try sending:

    i2cdetect -y 1

    and

    i2cdetect -y 22

    Also, please be sure that your EVM is powered when issuing these commands so that the Raspberry Pi is able to make a connection with the DLPC.

    Regards,

    Austin

  • Austin,

    see below for results of 

    i2cdetect -y 1

    Note: i2cdetect 22 command does not work.

    Also we have apply power to EVM board (5V@ 5Amps)

    pi@raspberrypi:~ $ sudo i2cdetect -l
    i2c-20 i2c Broadcom STB : I2C adapter
    i2c-1 i2c bcm2835 (i2c@7e804000) I2C adapter
    i2c-21 i2c Broadcom STB : I2C adapter
    i2c-7 i2c 700000002.i2c I2C adapter
    pi@raspberrypi:~ $ sudo i2cdetect 1
    WARNING! This program can confuse your I2C bus, cause data loss and worse!
    I will probe file /dev/i2c-1.
    I will probe address range 0x08-0x77.
    Continue? [Y/n] y
    0 1 2 3 4 5 6 7 8 9 a b c d e f
    00: -- -- -- -- -- -- -- --
    10: -- -- -- -- -- -- -- -- -- -- -- -- -- -- -- --
    20: -- -- -- -- -- -- -- -- -- -- -- -- -- -- -- --
    30: -- -- -- -- -- -- -- -- -- -- -- -- -- -- -- --
    40: -- -- -- -- -- -- -- -- -- -- -- -- -- -- -- --
    50: -- -- -- -- -- -- -- -- -- -- -- -- -- -- -- --
    60: -- -- -- -- -- -- -- -- -- -- -- -- -- -- -- --
    70: -- -- -- -- -- -- -- --
    pi@raspberrypi:~ $ sudo i2cdetect 22
    Error: Could not open file `/dev/i2c-22' or `/dev/i2c/22': No such file or directory
    pi@raspberrypi:~ $

    Regards,

    Nayan

  • Austin,

    If i run 12cdetect -y 7 I get following information:

    Regards,

    Nayan

  • Austin,

    I able to run the sample scripts on the projector but I need to run video using  omxplayer but I am not able to install  omxplayer on RPi 4 (64Bit)

    can you help.

    Regards,

    Nayan

  • Hi Nayan,

    We will will look into this matter. Thank you for your patience.

    Regards,

    John

  • John,

    Any update on Omxplayer for RPi 4? Does Ti recommends any other player?

    let us know 

    Regards,

    Nayan

  • Hi Nayan, 

    We will need more time to answer your questions. Please expect a response by mid of this week.

    Regards,

    Mayank

  • Nayan,

    Raspberry Pi appears to be phasing out Omxplayer. However, the Raspberry Pi OS image should come standard with VLC player. This player should work well for your use.

    Kind regards,

    Austin

  • Austin,

    I can play video using VLC but it play the video on Monitor that is connected to HDMI NOT on the projector.

    Can you help us redirect the video to projector?

    Regards,

    Nayan

  • Nayan,

    Have you executed the init_parallel.py script to output video to the 230NPEVM? This script should cause the EVM to be projecting exactly what is seen on the monitor. Is this not the case?

    Regards,

    Austin

  • Austin,

    Sorry to get back to you sooner.

    Yes I have executed init_paraller.py see below for error we get when we use VLC command:

    pi@raspberrypi:~ $ sudo python3 init_parallel_mode.py
    set slave address: 27
    Initializing Raspberry Pi Default Settings for DLPC3436...
    sh: 1: gpio: not found
    Setting DLPC3436 Input Source to Raspberry Pi...
    Configuring DLPC3436 Source Settings for Raspberry Pi...
    pi@raspberrypi:~ $ cd Videos
    pi@raspberrypi:~/Videos $ ls
    20220805_143145.mp4
    pi@raspberrypi:~/Videos $ vlc 20220805_143145.mp4
    VLC media player 3.0.17.4 Vetinari (revision 3.0.13-8-g41878ff4f2)
    [00000055936f0e00] main interface error: no suitable interface module
    [000000559360a5c0] main libvlc error: interface "globalhotkeys,none" initialization failed
    [000000559360a5c0] main libvlc: Running vlc with the default interface. Use 'cvlc' to use vlc without interface.
    [00000055936f0e00] skins2 interface error: cannot initialize OSFactory
    [00000055936f0e00] [cli] lua interface: Listening on host "*console".
    VLC media player 3.0.17.4 Vetinari
    Command Line Interface initialized. Type `help' for help.
    > [0000007f70001fc0] gles2 generic error: parent window not available
    [0000007f700013e0] mmal_xsplitter vout display error: Failed to open Xsplitter:opengles2 module
    [0000007f70001fc0] xcb generic error: window not available
    [0000007f700013e0] mmal_xsplitter vout display error: Failed to open Xsplitter:xcb_x11 module
    [0000007f700013e0] mmal_xsplitter vout display error: Failed to open Xsplitter:mmal_vout module
    [0000007f700013e0] mmal_xsplitter vout display: Try drm
    [0000007f70001fc0] drm_vout generic: <<< OpenDrmVout: Fmt=DPV0
    [0000007f70001fc0] drm_vout generic error: Failed to get xlease
    [0000007f78c12820] avcodec decoder: Using DRM Video Accel for hardware decoding
    [0000007f70001fc0] drm_vout generic error: atomic_q_attempt_commit_next: Atomic commit failed: Permission denied
    [0000007f70001fc0] drm_vout generic error: atomic_q_attempt_commit_next: Atomic commit failed: Permission denied

    Can you help.

    Regards,

    Nayan


  • Nayan,

    To confirm, you are able to see you desktop or the command line interface after executing the init_parallel_mode.py script?

    Regards,

    Austin

  • Austin,

    Yes, I am able to see desktop after executing the init_parallel_mode,py

    Also I am able to run all the sample scripts (sample01 to sample05_led.py) 

    Only issue we are having is not able to run any video.

    Regards,

    Nayan

  • Hello Nayan,

    The team will have to find a workaround for this. Please allow us some time to find an alternative if possible.

    Thank you for your patience,

    Regards,

    John

  • Nayan,

    Please try changing your video output to 'OpenGL video output' within VLC and let us know if this corrects your issue.

    Kind regards,

    Austin

  • Austin,

    Sorry I was out to town and did not get back to you.

    Any I change the video output under simple preferences to OpenGL Video Output but I am getting same error as before.

    Question  Do we need to change rom x64bit to x32bit operation?

    let me know

  • Hello Nayan,

    It should not be necessary to change the boot rom operation. I have been able to get the video to output after following steps similar to those laid out in Section 9 of the DLPDLCR230NPEVM User's Guide, but using OpenGL video output in VLC in place of omxplayer.

    Given that I am not seeing this issue on my system this issue is falling more into the realm of Raspberry Pi support than DLP support. I recommend that consulting the Pi forums online, but I can try to support as much as I am able.

    How does this error appear? Are you using the command line interface or are you interfacing through the desktop? I recommend using the desktop GUI in order to get this set up initially and to ensure that the video streaming is functional.

    Regards,

    Austin 

  • Austin,

    Please see below for error we see when we run VLC player:

    Note:

    VLC plays the media but it play on the desktop it does not direct to DLP projector.

    I am using desktop and running VLC with command line

    Regards,

    Nayan

    pi@raspberrypi:~/DLP/ti/media $ vlc xyz.mp4
    VLC media player 3.0.17.4 Vetinari (revision 3.0.13-8-g41878ff4f2)
    [00b4fb98] main libvlc: Running vlc with the default interface. Use 'cvlc' to use vlc without interface.
    [e270b650] gl gl: Initialized libplacebo v2.72.0 (API v72)
    [e270b650] gl gl error: shader 0: 0:1(12): warning: extension `GL_OES_EGL_image_external' unsupported in fragment shader
    0:2(1): error: syntax error, unexpected NEW_IDENTIFIER

    [e270b650] gl gl error: shader program: error: linking with uncompiled/unspecialized shader
    [e270b650] gl gl error: Unable to use program
    [f442e768] main video output error: video output creation failed
    [f4412918] main decoder error: failed to create video output
    [e33032a0] gl gl: Initialized libplacebo v2.72.0 (API v72)
    QObject::~QObject: Timers cannot be stopped from another thread

  • Nayan,

    You have previously said that the desktop is being projected. How are you seeing the video on your desktop and not through the DLP platform is the platform is projecting the desktop?

    I recommend the following:

    1. Open the Raspberry Pi VLC app through the desktop GUI.
      1. This can either be done by controlling the Pi through VNC or by attaching peripherals directly to the Pi
    2. Update the VLC app
    3. Reset VLC settings to default
    4. Set video output to OpenGL Video output
    5. Close VLC
    6. Reopen VLC
    7. Open your mp4 file within VLC

    Regards,

    Austin

  • Austin,

    Thanks for getting back.

    It seem we have miscommunication, On DLP project we can run sample files that get display via the projects, this works every time.

    The desktop i was referencing to is via HDMI on the LCD Monitor.

    Note:

    VLC is running at version 3.0.17.4-0+deb11u1+rpi1+rpt3 and VLC output video is set to OpenGL

    I follow your STEP 1 thru 7 and video is still outputting via HDMI, not on the DLP projector.

    Is there any other step we missed or change config.txt file? let us know.

    PI os info:

    pi@raspberrypi:~ $ pi@raspberrypi:~ $ cat /etc/os-release
    PRETTY_NAME="Raspbian GNU/Linux 11 (bullseye)"
    NAME="Raspbian GNU/Linux"
    VERSION_ID="11"
    VERSION="11 (bullseye)"
    VERSION_CODENAME=bullseye
    ID=raspbian
    ID_LIKE=debian
    HOME_URL="">http://www.raspbian.org/"
    SUPPORT_URL="
    ">www.raspbian.org/RaspbianForums"
    BUG_REPORT_URL="">www.raspbian.org/RaspbianBugs"

    BTW when I run init_paraller_mode file, I do get one error "sh: 1: gpio: not found 

    Do I need to worry about this error?

    pi@raspberrypi:~/DLP/ti $ python3 init_parallel_mode.py
    set slave address: 27
    Initializing Raspberry Pi Default Settings for DLPC3436...
    sh: 1: gpio: not found
    Setting DLPC3436 Input Source to Raspberry Pi...
    Configuring DLPC3436 Source Settings for Raspberry Pi...

    Config.txt info:

    # For more options and information see
    # http://rpf.io/configtxt
    # Some settings may impact device functionality. See link above for details

    # uncomment if you get no picture on HDMI for a default "safe" mode
    #hdmi_safe=1

    # uncomment the following to adjust overscan. Use positive numbers if console
    # goes off screen, and negative if there is too much border
    #overscan_left=16
    #overscan_right=16
    #overscan_top=16
    #overscan_bottom=16

    # uncomment to force a console size. By default it will be display's size minus
    # overscan.
    #framebuffer_width=1280
    #framebuffer_height=720

    # uncomment if hdmi display is not detected and composite is being output
    hdmi_force_hotplug=1

    # uncomment to force a specific HDMI mode (this will force VGA)
    #hdmi_group=1
    #hdmi_mode=1

    # uncomment to force a HDMI mode rather than DVI. This can make audio work in
    # DMT (computer monitor) modes
    #hdmi_drive=2

    # uncomment to increase signal to HDMI, if you have interference, blanking, or
    # no display
    config_hdmi_boost=5

    # uncomment for composite PAL
    #sdtv_mode=2

    #uncomment to overclock the arm. 700 MHz is the default.
    #arm_freq=800

    # Uncomment some or all of these to enable the optional hardware interfaces
    dtparam=i2c_arm=on
    #dtparam=i2s=on
    #dtparam=spi=on

    #config Raspberry PI for SSH over USB
    dtoverlay=dwc2

    #config i2c on GPI Pins #22 and #23
    dtoverlay=i2c-gpio,i2c-gpio_sda=23,i2c_gpio_sci=22,i2c_gpio_delay_us=2
    # Uncomment this to enable infrared communication.
    #dtoverlay=gpio-ir,gpio_pin=17
    #dtoverlay=gpio-ir-tx,gpio_pin=18

    # Enable audio (loads snd_bcm2835)
    dtparam=audio=on

    # Automatically load overlays for detected cameras
    camera_auto_detect=1

    # Automatically load overlays for detected DSI displays
    display_auto_detect=1

    # Enable DRM VC4 V3D driver
    dtoverlay=vc4-kms-v3d
    max_framebuffers=2

    # Run in 64-bit mode
    arm_64bit=1

    # Disable compensation for displays with overscan
    disable_overscan=1

    # Configure I2C on GPIO Pins #22 and #23
    dtoverlay=i2c-gpio,bus=7,i2c-gpio_sda=23,i2c_gpio_scl=22,i2c_gpio_delay_us=2

    ####################################################################
    # Initialization of Raspberry Pi 4B GPIO pins (BCM 0-27).
    # Configure DPI on GPIO Pins #0 through #21
    gpio=0=op
    gpio=0=pn
    gpio=1-27=ip
    gpio=1-27=pn
    # Enable DPI18 Overlay
    enable_dpi_lcd=1
    display_default_lcd=1
    dpi_group=2
    dpi_mode=87
    ####################################################################
    # Configuration of 1920 x 1080, 58-60 Hz video output via 18-bit DPI lines (RGB666).
    # RGB 666 CFG 1 (MODE 5)
    dpi_output_format=458773
    # 58 Hz Timings, Works at GPIO Drive Strength 5 to 7
    hdmi_timings=1920 0 20 10 10 1080 0 10 10 10 0 0 0 58 0 125000000 3
    ####################################################################

    [cm4]
    # Enable host mode on the 2711 built-in XHCI USB controller.
    # This line should be removed if the legacy DWC2 controller is required
    # (e.g. for USB device mode) or if USB support is not required.
    otg_mode=1

    [all]

    [pi4]
    # Run as fast as firmware / board allows
    arm_boost=1

    [all]


  • Hello Nayan,

    Thank you for this clarification.

    What you have posted does not appear to be the correct config file for the DLPDLCR230NPEVM. The Pi config file should be replaced with what is available on the DLPDLCR230NPEVM Product page under the DLPDLCR230NPEVM Raspberry Pi Python Support package link.

    Please closely go through the steps outlines in Section 9.1 of the DLPDLCR230NPEVM User's Guide, and let us know if this resolves your issue.

    Regards,

    Austin

  • Austin,

    Per you comments, we follow Section 9.1 of the DLPDLCR230NPEVM User's Guide, By the way Ti Sample config.txt file does NOT work with RPI 4

    We had take existing RPI config.txt and modify see below for config.txt:

    Also Ti does NOT help how to resolve I/O error :"sh: 1: gpio: not found " Per other user recommend we install WiringPi SOFTWARE that works.

    Now we DO NOT have any error when we run sample images via projector. We modify VLC per you feedback and procedure but when we run the VLC the output is on the HDMI NOT on the projector.

    We need know if TI has solution for issue. We are working with major retailer customer if TI projector is NOT working we need info our customer.

    Please let me know If TI has working solution with VLC (Video) output on projector (DLPLC230NPEVM) with RPI 4.

    Thanks for all your help and support

    Regards,

    Nayan

    # For more options and information see
    # http://rpf.io/configtxt
    # Some settings may impact device functionality. See link above for details

    # uncomment if you get no picture on HDMI for a default "safe" mode
    #hdmi_safe=1

    # uncomment the following to adjust overscan. Use positive numbers if console
    # goes off screen, and negative if there is too much border
    #overscan_left=16
    #overscan_right=16
    #overscan_top=16
    #overscan_bottom=16

    # uncomment to force a console size. By default it will be display's size minus
    # overscan.
    #framebuffer_width=1280
    #framebuffer_height=720

    # uncomment if hdmi display is not detected and composite is being output
    hdmi_force_hotplug=1

    # uncomment to force a specific HDMI mode (this will force VGA)
    hdmi_group=2
    hdmi_mode=82

    # uncomment to force a HDMI mode rather than DVI. This can make audio work in
    # DMT (computer monitor) modes
    #hdmi_drive=2

    # uncomment to increase signal to HDMI, if you have interference, blanking, or
    # no display
    config_hdmi_boost=4

    # uncomment for composite PAL
    #sdtv_mode=2

    #uncomment to overclock the arm. 700 MHz is the default.
    #arm_freq=800

    # Uncomment some or all of these to enable the optional hardware interfaces
    dtparam=i2c_arm=on
    #dtparam=i2s=on
    dtparam=spi=on

    # Uncomment this to enable infrared communication.
    #dtoverlay=gpio-ir,gpio_pin=17
    #dtoverlay=gpio-ir-tx,gpio_pin=18

    # Additional overlays and parameters are documented /boot/overlays/README

    # Enable audio (loads snd_bcm2835)
    dtparam=audio=on

    # Configure Raspberry PI for SSH over USB
    dtoverlay=dwc2

    # Configure I2C on GPIO Pins #22 and #23
    dtoverlay=i2c-gpio,i2c-gpio_sda=23,i2c_gpio_scl=22,i2c_gpio_delay_us=2

    # Configure DPI on GPIO Pins #0 through #21
    gpio=0=op
    gpio=0=pn
    gpio=1-27=ip
    gpio=1-27=pn

    # Enable DPI18 Overlay
    enable_dpi_lcd=1
    display_default_lcd=1
    dpi_group=2
    dpi_mode=87

    # Configure DPI Video Timings
    # RGB 666 CFG 1 (MODE 5)
    dpi_output_format=458773

    # 58 Hz Timings (Low-End Spec)
    # Works at GPIO DRIVE 5-7
    hdmi_timings=1920 0 20 10 10 1080 0 10 10 10 0 0 0 58 0 125000000 3

    # NOTE: GPIO PINS #24 - #27 ARE DRIVEN SEPARATELY BY WiringPi SOFTWARE

    # Automatically load overlays for detected cameras
    camera_auto_detect=1

    # Automatically load overlays for detected DSI displays
    display_auto_detect=1

    # Enable DRM VC4 V3D driver
    dtoverlay=vc4-kms-v3d
    max_framebuffers=2

    # Disable compensation for displays with overscan
    disable_overscan=1

    [cm4]
    # Enable host mode on the 2711 built-in XHCI USB controller.
    # This line should be removed if the legacy DWC2 controller is required
    # (e.g. for USB device mode) or if USB support is not required.
    otg_mode=1

    [all]

    [pi4]
    # Run as fast as firmware / board allows
    arm_boost=1

    [all]

  • Helllo Nayan,

    We will get back soon on this.

    Regards,

    Akhil

  • Nayan,

    There seems to be some confusion here.

    The config file that we provide in the DLPDLCR230NPEVM Software package does, in fact, work for connecting a Raspberry Pi 4B to the 230NPEVM. I and many others have seen this work. However, this config file will not work when connecting to an monitor through HDMI. The video timings between the monitor connected through HDMI and the EVM are not compatible. If you alter the config file and attempt to connect to a monitor you will likely see a rainbow square pattern. Is your ultimate goal to have this Pi connected to a monitor or to the 230NPEVM?

    My recommendation is to put the config file that TI has provided in place. Once this has been done, power the Raspberry Pi and EVM. Connect to the Pi remotely through SSH or VNC on a laptop or PC sharing the same network as the Pi. Connecting through VNC will allow you to use the desktop GUI as you have been while connecting to a monitor through an HDMI cable. Once the desktop is visible, run the init_parallel_mode.py Python script, and the desktop will be projected through the EVM. At this point you will have the desktop visible both on your controlling PC and your projection surface. This process is documented in Section 9 of the DLPDLCR230NPEVM User's Guide.

    Also Ti does NOT help how to resolve I/O error :"sh: 1: gpio: not found " Per other user recommend we install WiringPi SOFTWARE that works.

    This error is likely a symptom of using an incorrect config file.

    Now we DO NOT have any error when we run sample images via projector. We modify VLC per you feedback and procedure but when we run the VLC the output is on the HDMI NOT on the projector.

    This makes sense as the sample images do not require the correct video timings on the Pi/EVM video interface. The PI is sending simple I2C commands to the EVM so that the EVM generates the images itself.

    Please try using the provided config file without connecting to a monitor through HDMI.

    Regards,

    Austin

  • Austin,

    Sorry to bug you but after reset we got the DLP projector working as you describe.

    One one issue when we play video via VLC (video out set to OpenGL) the video out is choppy 

    can we improve the output video?

    Thanks for all our help and support.

    Regards,

    Nayan

  • Nayan,

    You are quite welcome. I am glad to hear that it is working for you.

    Is the video output choppy on the projection or on your remote (VNC) display? I find that the video does not appear smoothly on a remote access desktop while it usually appears well on the projection itself. This is likely due to a limitation in the VNC data bandwidth.

    Regards,

    Austin

  • Austin,

    The Video output is choppy on the projector. 

    Note:

    Once we get desktop display via projector we run the VLC from the desktop. 

    Regards,

    Nayan

  • Nayan,

    I understand. I will have to see if I can recreate this on my system and observe the choppy output. It may take me a few days before I am able to do so.

    In the meantime please try the other video formats within VLC to see if this improves performance. You might also consider disconnecting from VNC while the video is running to see if performance improves then as well. It may be that remoting in through VNC is taking a significant amount of resources from the video streaming. If that is the case you may have to use the CLI to begin the video.

    Regards,

    Austin

  • Hello Nayan,

    I have been investigating this, but my schedule will not allow me to put more into this issue. Additionally, the choppiness of the video output appears to be more related to the Raspberry Pi as opposed to the 230NPEVM. You may want to consider trying other media players on the Pi or searching the Pi forums. However, I will have to complete the support for this ticket here.

    Kind regards,

    Austin