This thread has been locked.

If you have a related question, please click the "Ask a related question" button in the top right corner. The newly created question will be automatically linked to this question.

DS90UH941AS-Q1EVM: Connect to DS90UB948 and Set Up Registers

Part Number: DS90UH941AS-Q1EVM
Other Parts Discussed in Thread: DS90UB948-Q1, ALP, OPT3001

Hi ,

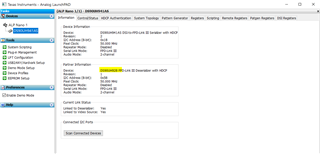
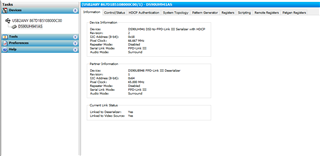
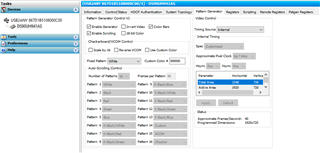
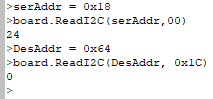
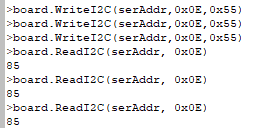
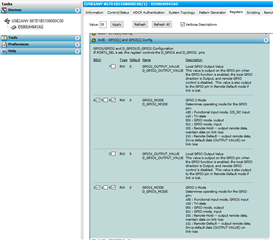
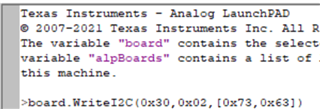
I am trying to connect the DS90UH941AS-Q1EVM to a complete LCD module with DS90UB948-Q1 deserializer; any way I can configure the DeSeralizer register to bring up the LCD? I can't seem to configure the DES registers... Thanks!

  • Hi Nick,

    Are you trying to access remote registers from the 948 ALP side? If yes , this message is expected you can access the 941AS registers locally through the 941AS ALP profile and also can access the 948 registers remotely through the 941AS profile as well since the 948 is the downstream device connected to 941AS remote I2C. 

    Accessing 948 remote register through 941AS ALP profile

    if you want to access 941AS from 948 side you can use the scripting tab.

    use devAddr for 941AS -- in my case it's 0x18. Reading device ID it gave me 24 or 0x18 in hex which is the expected value for 941AS ID. 

    Regards,
    Fadi A.

  • Hi Fadi - thanks for the response!

    The error message popped up when I tried to access the 948 registers remotely (Remote Registers). Is there a good way I can modify the 948 registers remotely from the scripting? I am trying to set up the registers for 941 (evokit) and the downstream 948 (LCD module).

  • Hi Nick,

    Can you give me more details on how you have the 941 and 948 configured ? Do you have them connected in single or dual FPD-Link mode? What PCLK are you using? What are the IDx addresses for the Ser/Des , and where are you trying to access I2C from? 

    Can you send me a block diagram of your application including Ser/Des and point to me where you are trying to talk to the 948 from?
    For now, let's establish the I2C communication to the 941AS locally. Open ALP and have it set to 941AS profile. In my case the EVM IDx is set to 0x18 - See table below.

    This means that if I want to read the 941AS ID register 0x00 locally 

    I would use the following python command in ALP scripting tab.
    serAddr = 0x18
    board.ReadI2C(serAddr,00)  #This will read out the value for register 0x00 for 941AS locally which in this case is 0x18.

    The 948 IDx in my case is set to 0x58
    So if I want to talk to it, I can use the same ALP scripting tab for the 941AS as well, but use the 948 IDx address instead of the 941AS IDx address to communicate with the Des side. 

    For example: If I want to read out the general status of 948 from the 941AS scripting tab 

    I would write the following code:
    DesAddr = 0x58
    board.ReadI2C(DesAddr, 0x1C)

    If I want to write the value 0x01 to the 948 register 0x24 remotely through the 941AS scripting tab I would do the following:
    board.WriteI2C(DesAddr, 0x24, 0x01)  

    If I want to write 0xFA to the 941AS register 0x03 I would do the following:
    serAddr = 0x18 # Device ID is set by IDX external strap voltage divider network. 
    board.WriteI2C(serAddr,0x03,0xFA)

    If you try above and still doesn't work.

    Connect 941AS to 948 through the FPD-link channel and connect I2C to 941AS locally and send me a screenshot of your information tab of the 941AS. 

    It should look something like this, only you should see DS90UB948 as the partner information vs. DS90Uh928 in below picture. 

    Regards,
    Fadi A.

  • Hi Fadi,

    I was able to set up the pattern generator to set the pixel clock, but still could not use the remote register tab on the navigation bar.

    If it is only the "Remote Register" tab not working...

    Maybe I can use scripting to edit some of the registers?

    board.ReadI2C(DesAddr, 0x??)
    board.WriteI2C(DesAddr, 0x??)

  • When I tried to I2C read/ write using the scripting, I could not seem to get the right value read back correctly sometimes.

    But when I went to the Registers tab to check, it actually was written correctly...

    Do we know why sometimes there is this inconsistency? Thanks.

  • I figured out the issue here and used hex() to convert the I2C read values.

    One more question - how do I I2C write 2-byte data?

    For another remote I2C devices (OPT3001 - ambient light sensor), I was trying to access to I2C 2 byte-data to a register, but seemed like unsuccessful.

    board.ReadI2C(0x88,0x7F,2)
    [48, 1]

    board.ReadI2C(0x88,0x7F,2)
    [48, 1]

    hex(board.ReadI2C(0x88,0x7F))
    '0x30'

    hex(board.ReadI2C(0x88,0x7F))
    '0x30'

    board.ReadI2C(0x88,0x02,2)
    [0, 0]

    board.ReadI2C(0x88,0x02,2)
    [0, 0]

    board.WriteI2C(0x88,0x02,0xBBFF)

    board.ReadI2C(0x88,0x02,2)
    [0, 0]

  • Hi Nick,

    Just to confirm, it looks like you are able to get the 2-byte read to work correctly but the write is not working ?

    Regards,
    Fadi A.

  • Correct - is there a specific format to I2C write 2-byte data

  • Hi Nick,

    I see, in this case you need to use the correct syntax to write to a 2-byte address as follows:

    Regards,
    Fadi A.