

Other Parts Discussed in Thread: SYSCONFIG, AM2634
How to work with MCU-PLUS-SDK-AM263x on MacOS?

This thread has been locked.
If you have a related question, please click the "Ask a related question" button in the top right corner. The newly created question will be automatically linked to this question.
How to work with MCU-PLUS-SDK-AM263x on MacOS?
Repo Tool Setup
MCU+ SDK has multiple components (in multiple repositories) and dependencies (like compiler, CCS and other tools). We use repo tool from Google to manage these multiple repositories.
Follow the below mentioned steps to setup repo tool:
Make sure python3 is installed and is in your OS path.
Make sure homebrew is installed
To install the repo client,
Do the following in the terminal:
brew install repo && brew install gpg
Cloning The Repositories
Note that depending on the SoC you're working with, the components you clone might be slightly different. So please choose the manifest folder according to the SoC of your interest. For example, we are showing for am263x below.
repo init -u github.com/.../mcupsdk-manifests.git -m am263x/dev.xml -b main
After the repo is initialized, do a
repo sync
This should clone all the repositories required for MCU+ SDK development. Now download and install the dependencies.
Downloading And Installing Dependencies
In MacOS the dependencies have to be manually installed. Given below are the steps:
brew install nvm
nvm install 12.18.4
$ cd mcu_plus_sdk/
$ npm ci
$ cd ../brew install doxygen
brew install openssl@1.1
Now that the dependencies are installed, you can start the repositories with a default branch dev by doing below:
repo start dev --all
Changes to be done in SDK
Make the following changes in the code base:
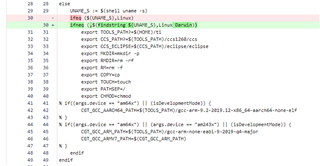
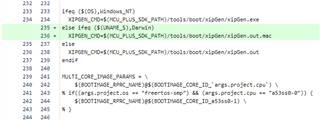
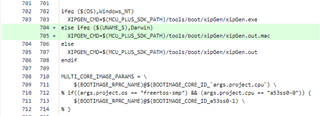
Note: The above changes in the makefiles are applicable regardless of whether you use an installer from https://ti.com/ or clone from git.
The template files are not delivered as part of the installer nor is there an option to recreate all the makefiles for the same.
Building the SDK
NOTE
"DEVICE="release or debug profiles. To do this pass one of these values to "PROFILE="Run the following command to create makefiles.
make gen-buildfiles DEVICE=am263x
To see all granular build options, run
make -s help DEVICE=am263x
This should show you commands to build specific libraries, examples or tests.
Make sure to build the libraries before attempting to build an example. For example, to build a Hello World example for AM263x, run the following:
make -s -j4 libs DEVICE=am263x PROFILE=debug
Once the library build is complete, to build the example run:
make -s -C examples/hello_world/am263x-cc/r5fss0-0_nortos/ti-arm-clang all PROFILE=debug

Note: Importing a project directly in CCS is not supported for AM26x devices on MacOS.
Following are the commands to build all libraries and all examples. Valid PROFILE's are "release" or "debug"
make -s -j4 clean DEVICE=am263x PROFILE=debug
make -s -j4 all   DEVICE=am263x PROFILE=debug
Running the examples
CCS support is not officially available for AM26x devices as of now.
Workaround:
Copy the following files from a linux installation
|
Linux
|
MacOS
|
|---|---|
| .../ti/ccs1260/ccs/ccs_base/emulation/gel/AM263x/ | .../ti/ccs1260/ccs/ccs_base/emulation/gel/AM263x/ |
| .../ti/ccs1260/ccs/ccs_base/common/targetdb/devices/AM2634.xml | .../ti/ccs1260/ccs/ccs_base/common/targetdb/devices/ |
| .../ti/ccs1260/ccs/ccs_base/common/targetdb/Modules/AM263/ | .../ti/ccs1260/ccs/ccs_base/common/targetdb/Modules/AM263/ |
After copying these files, follow the Target Configuration setup to get CCS Load, Launch and Run Example working.
Note: Only script based Flashing of an example is supported on MacOS
Hello World example running on AM263x-CC on MacOS(CCS 12.6)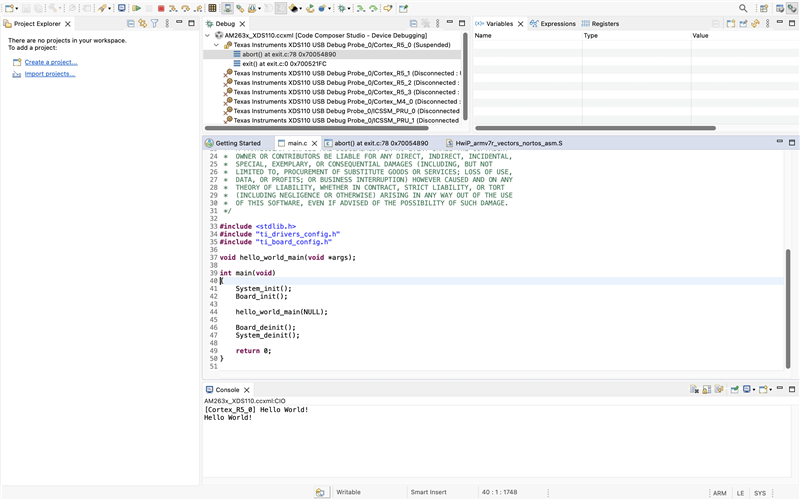
More information on SDK usage
For more details on SDK usage, please refer to the SDK user guide. User guides contain information on
Note that user guides are specific to a particular device. The links for all the supported devices are given below.
